✨ Introduction
Ever wanted to test your local web app on your phone? Share a work-in-progress with a client? Or receive webhooks from services like Stripe or GitHub?
This blog post is your complete guide to securely exposing local development servers to the internet — whether it's a React.js frontend or a Node.js REST API backend.
We’ll explore two popular tools:
- 🔗 LocalTunnel – simple and open-source
- 🚀 ngrok – powerful with an interactive dashboard and HTTPS support
🔍 What You’ll Learn
In this guide, you’ll:
- Understand the concept and use cases of local tunneling
- Set up a basic Node.js REST API and React.js app
- Expose both apps securely using LocalTunnel and ngrok
- Learn the pros/cons of each tool
🛠️ Project Setup (React + Node)
1️⃣ Node.js REST API
Steps to create a basic Express API:
mkdir backend-app
cd backend-app
npm init -y
npm install express
Create server.js:
const express = require('express');
const app = express();
const PORT = 8000;

app.get('/api/greet', (req, res) => {
  res.json({ message: 'Hello from Backend-App' });
});

app.listen(PORT, () => {
  console.log(`API running at http://localhost:${PORT}`);
});
Run it:
node server.js2️⃣ React.js Frontend App
Using Create React App:
npx create-react-app frontend-app
cd frontend
npm start
Or, Using Vite (faster):
npm create vite@latest frontend-app -- --template react
cd frontend
npm install
npm run dev
Update App.js as:
import React from 'react';

function App() {

  return Hello from Frontend-App;
}

export default App;
🌐 What is a Tunneling System?
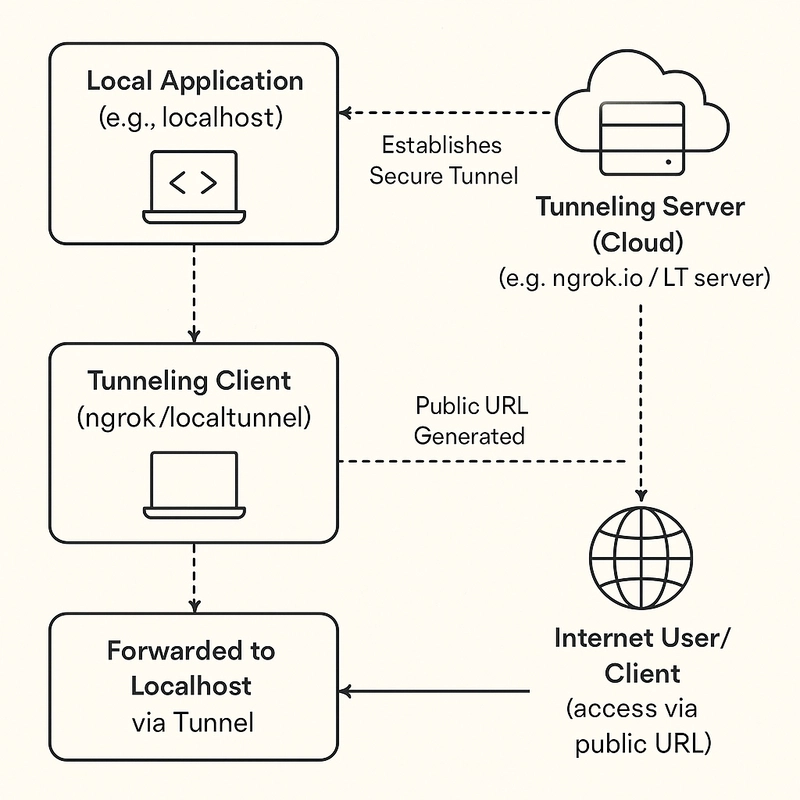
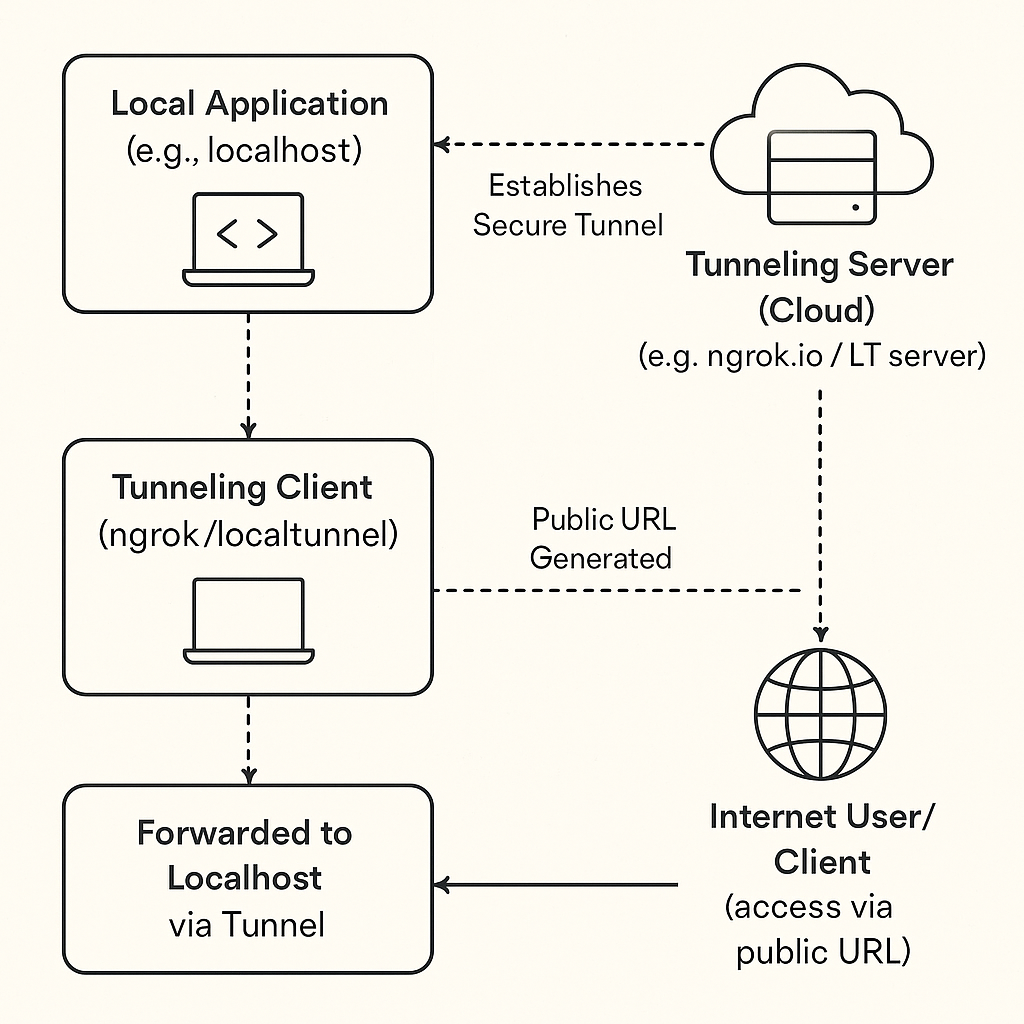
When you're developing locally (e.g., http://localhost:3000 or http://127.0.0.1:8000), your apps are only accessible on your machine. If you want someone else — a client, teammate, or even a third-party API like Stripe — to access your local project, you need to expose it to the internet.
That’s where tunneling tools come in.
A tunneling system creates a secure "bridge" between your local server and a public URL that anyone can access — even from outside your network.
Imagine it like building a secure pipe from your computer to the outside world. You don't have to deploy to a remote server or set up complex networking — just run a single command and you're live!
🚀 Setting Up ngrok to Tunnel Your Local React and Node.js Apps
Let’s now walk through how to use ngrok to expose both your local backend and frontend to the internet.
🔧 Step 1: Install ngrok
You can install ngrok globally via npm or download it from the official website.
Option 1 – Install via npm:
npm install -g ngrokOption 2 – Download from website:
- Go to https://ngrok.com/download
- Download and unzip the binary
- Move it to a directory in your system’s PATH
🔐 Step 2: Sign up and authenticate ngrok (Optional but recommended)
If you're using a free ngrok account, you should sign up and connect your account to unlock features like custom subdomains and higher session limits.
- Sign up at https://dashboard.ngrok.com
- Copy your authtoken from the dashboard
- Run the command:
ngrok config add-authtokenMake sure your node and react servers are running locally.
🌍 Step 3: Expose your servers with ngrok
⚠️ Note: ngrok Free Plan supports only one active tunnel at a time. If you want to expose both the React app and Node API simultaneously, you’ll need a Pro plan or use a different tunneling tool for one of them (e.g., LocalTunnel).
Tunnel the Node.js API (port 8000):
ngrok http 8000You’ll get an output like:
Forwarding https://1e3f-106-219-85-57.ngrok-free.app -> http://localhost:8000You can now access your API from this public URL.
Tunnel the React frontend (port 3000):
If you want to expose the React app instead:
ngrok http 3000And again, ngrok will provide a public HTTPS URL like:
Forwarding https://6g4f-105-221-92-12.ngrok-free.app -> http://localhost:3000🚀 Setting Up LocalTunnel for your React and Node.js Application
After covering ngrok, let’s explore another tunneling tool: LocalTunnel — a free and open-source option that lets you share your local development environment via a public URL.
Unlike ngrok, LocalTunnel does not require an account and allows multiple tunnels simultaneously (each on different ports and subdomains).
🔧 Step 1: Install LocalTunnel
Install it globally via npm:
npm install -g localtunnelMake sure your node and react servers are running locally.
🌍 Step 2: Expose your servers with LocalTunnel
You can create tunnels for both apps using unique ports and optional subdomains.
Tunnel the Node.js API:
lt --port 8000 --subdomain my-node-apiThis creates a URL like:
https://my-node-api.loca.ltTunnel the React frontend:
lt --port 3000 --subdomain my-react-appThis creates a URL like:
https://my-react-app.loca.lt⚠️ Subdomains are first-come-first-served, and not guaranteed. If someone else is already using the same subdomain, you’ll get an error. If you omit --subdomain, a random one is generated.
🔁 Realtime Code Changes
LocalTunnel reflects real-time changes, just like ngrok, since it directly proxies your local server. You can continue editing your React or Node app, and the changes are reflected via the public tunnel.
🎉 That’s It!
You’ve now exposed your local apps to the world using ngrok or LocalTunnel. You can share those URLs with clients, test on your phone, or integrate with third-party services that need a public endpoint.
🆚 Comparison: ngrok vs. LocalTunnel
| Feature | ngrok (Free Tier) | LocalTunnel |
|---|---|---|
| 🧰 Installation |
npm install -g ngrok or native binary |
npm install -g localtunnel |
| 🔐 Account Required | ✅ Yes (for custom subdomains, dashboard access) | ❌ No |
| 🔄 Supports Multiple Tunnels | ❌ No (only 1 active tunnel at a time) | ✅ Yes (multiple tunnels allowed) |
| 🌐 Custom Subdomain | ✅ Yes (only with account) | ✅ Yes (but not always guaranteed) |
| 🔐 HTTPS Support | ✅ Yes (by default) | ✅ Yes (by default) |
| 🌍 URL Format | https:// |
https:// |
| 🧑💻 Dashboard & Inspect Traffic | ✅ Yes (Web dashboard & HTTP request inspector) | ❌ No built-in dashboard |
| 💻 Real-time Code Updates | ✅ Yes (reflects local changes) | ✅ Yes (reflects local changes) |
| 🕐 Session Duration | ~8 hours (free account), reconnect needed | Until you manually close the tunnel |
| 📦 Open Source | ❌ Proprietary | ✅ Yes |
| 💰 Pricing | Free & paid tiers | Fully free |
| 🌐 Use Case Fit | Best for professional demos, webhooks, integrations | Best for quick testing, sharing with teammates |
🎯 Conclusion
In this post, we explored how tunneling tools like ngrok and LocalTunnel help developers expose their local applications to the internet. ngrok offers advanced features like custom subdomains and request inspection, making it ideal for professional use, while LocalTunnel is a simpler, free alternative perfect for quick sharing and testing. Both tools provide a secure and real-time connection to your local environment, so you can choose the one that best fits your needs.
Happy coding! 🚀