Introduction
Hi, I’m Haruka — a UI designer with 4 years of experience!
I’m currently studying Web Development at a community college in Vancouver, working as a co-op student.
In this article, I’ll talk about a web app I made as my final school project. I’ll share how we built it and what I learned from working in a team.
I hope this helps anyone who wants to try making their own web service or join a hackathon!
Project Overview
Team Members
We had 4 people:
- 2 backend developers (1 was also the project manager)
- 2 frontend/designers
Our PM had experience in web backend. One backend and one frontend had embedded systems experience. I had some HTML/CSS experience.
Project Length
4 weeks of coding(2 weeks to prepare for the final demo presentation)
My Role
- UI/UX planning
- Wireframes, prototypes, and design
- Design reviews
- Frontend development
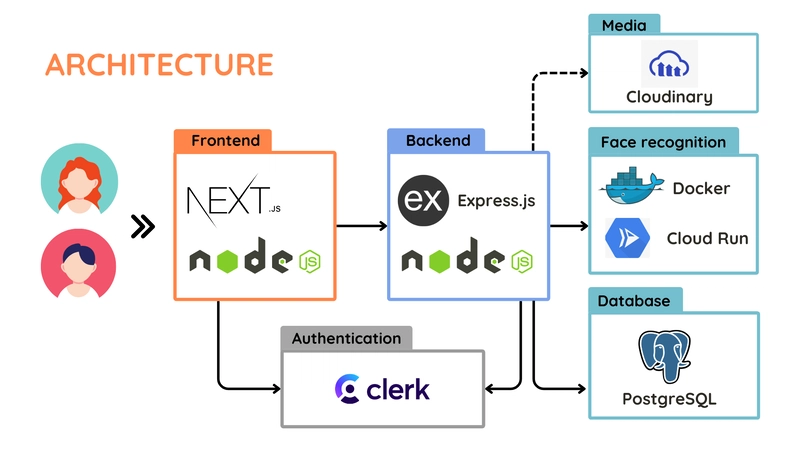
Tech Stack
Frontend:
- Next.js
- TypeScript
- TailwindCSS
- Shadcn/ui
Backend:
- Node.js
- Express.js
Database:
- PostgreSQL
- Prisma
Other Tools:
- Clerk (auth)
- Cloudinary (images)
- Resend (email)
- Motion (animation)
- Axios (API)
- react-slick (slider)
- react-medium-image-zoom (image zoom)
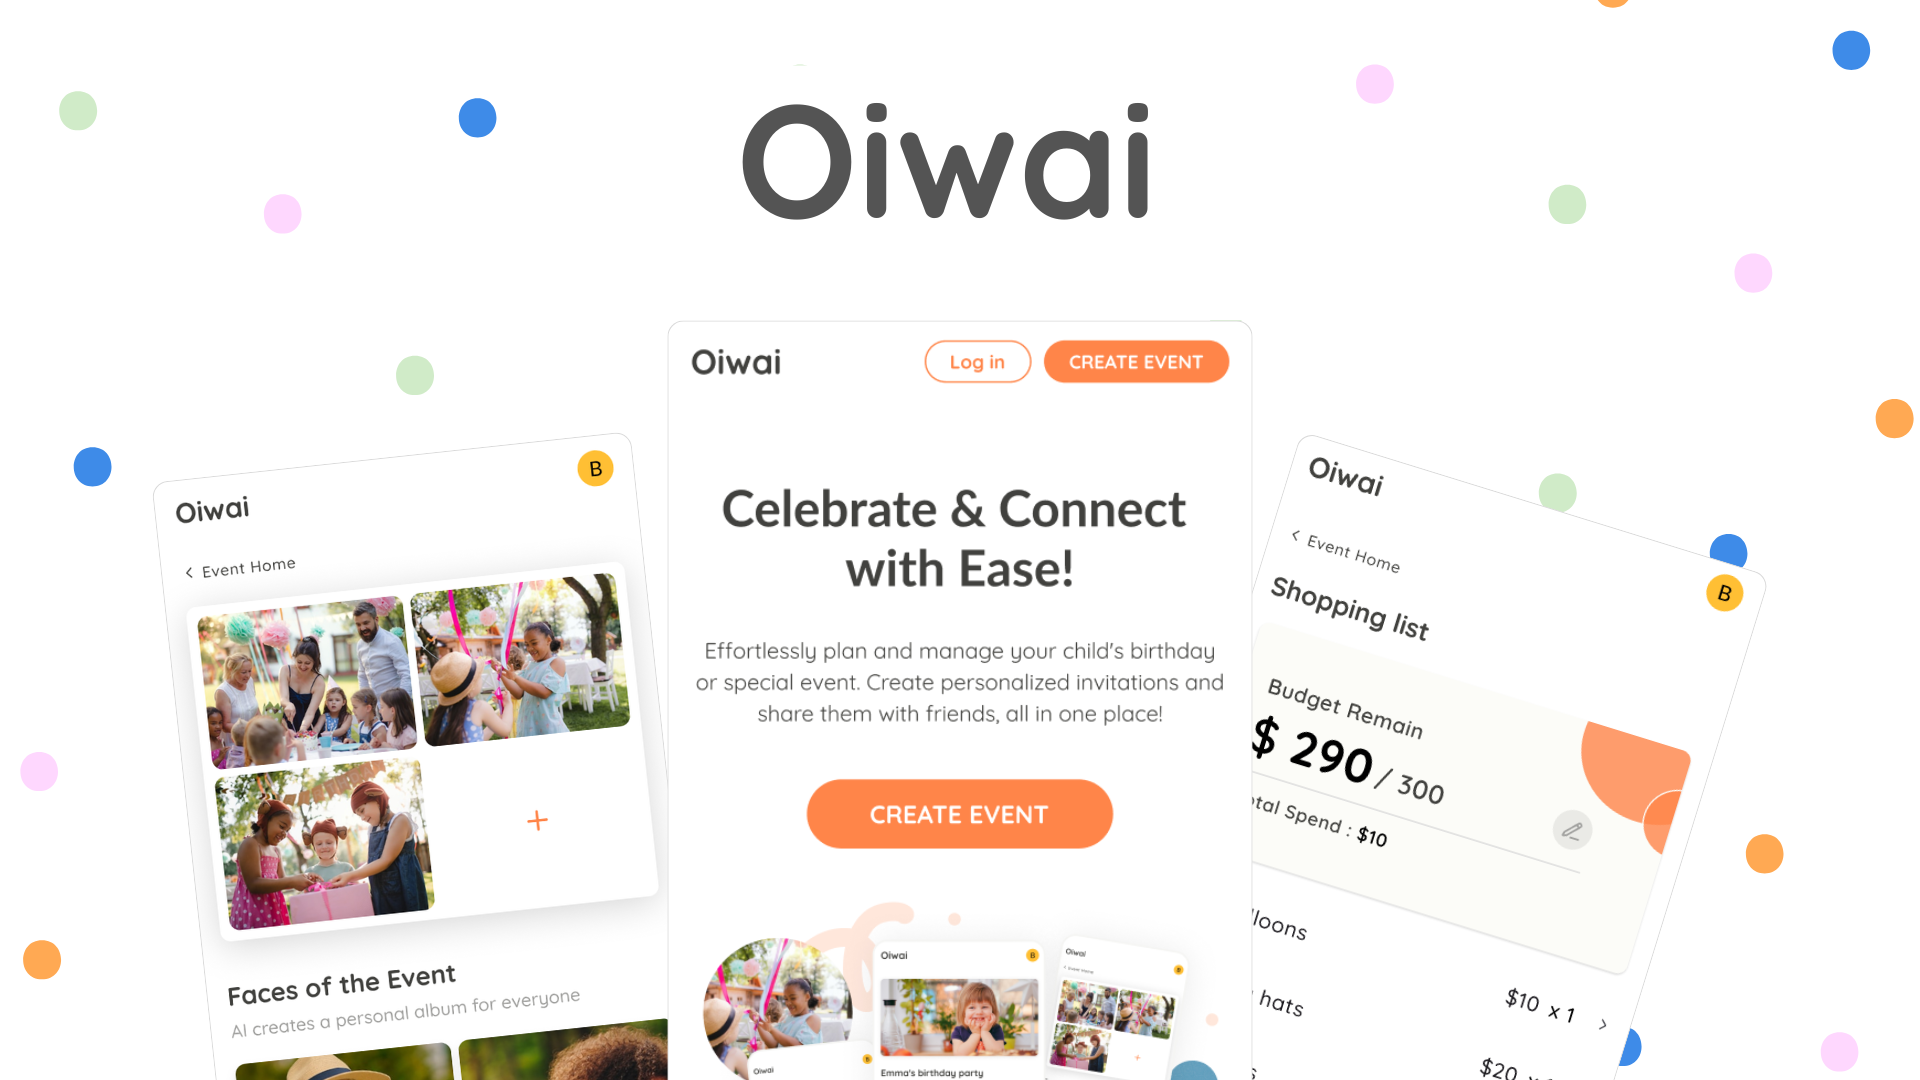
About the App: Oiwai
Oiwai is a simple app to manage kids’ birthday parties.
- Hosts can manage the budget and guest list
- Guests can check all the party info in one place
The app name 'Oiwai' comes from the Japanese word meaning 'to celebrate'.
Process
1. Idea and Planning
Brainstorming
One team member has a 2-year-old child, so we decided to build a kids-related service. We wanted to make something useful for us too.
Defining the Problem
We started by writing a simple problem statement:
“What problem are we trying to solve?”
This article was really helpful to us:Problem Statements in UX Discovery

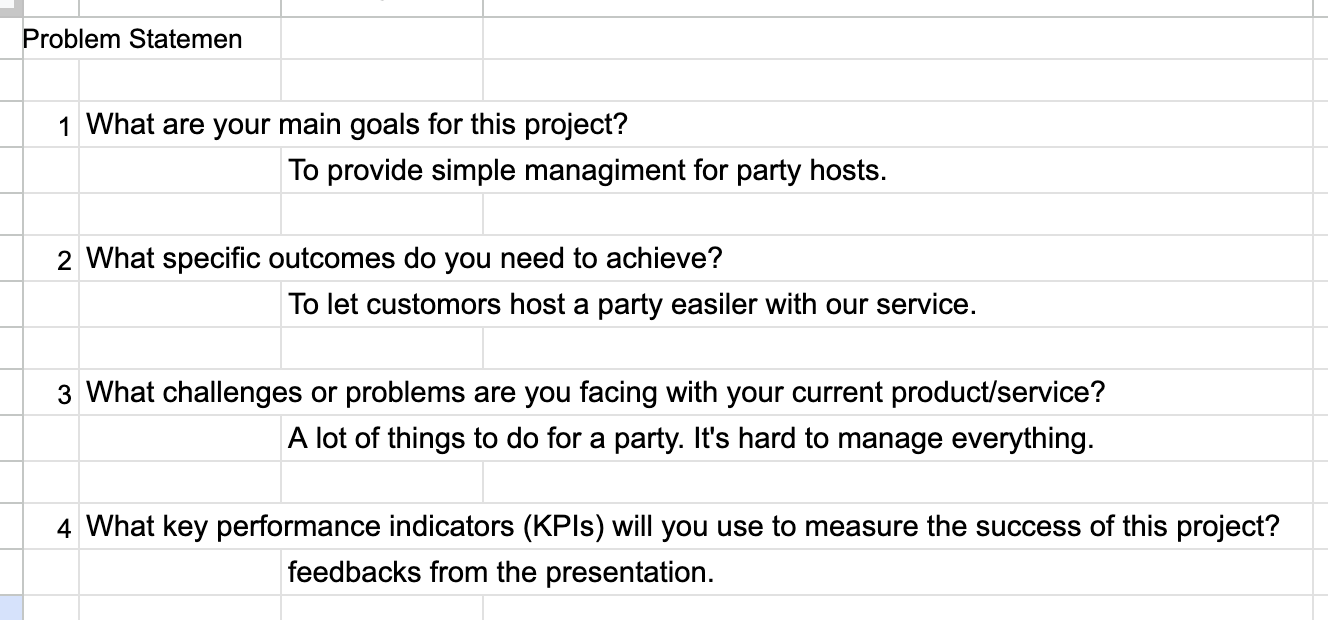
We used the statement to decide on features for our MVP and create user stories.
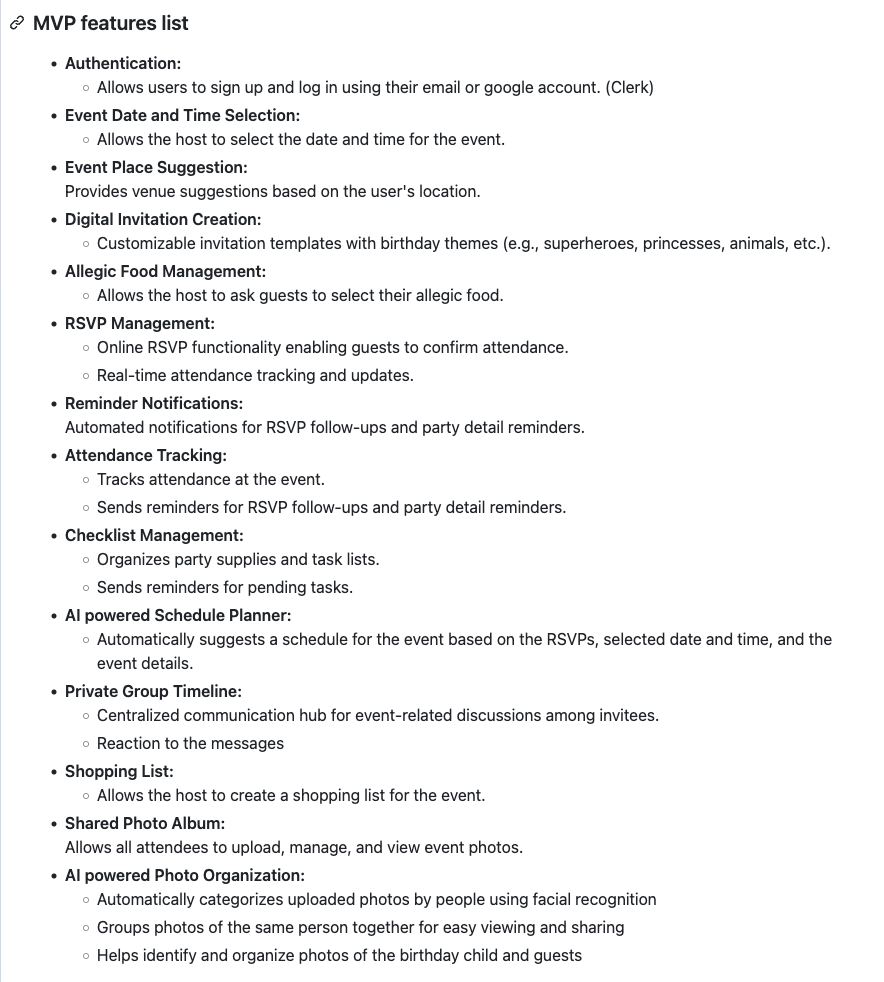
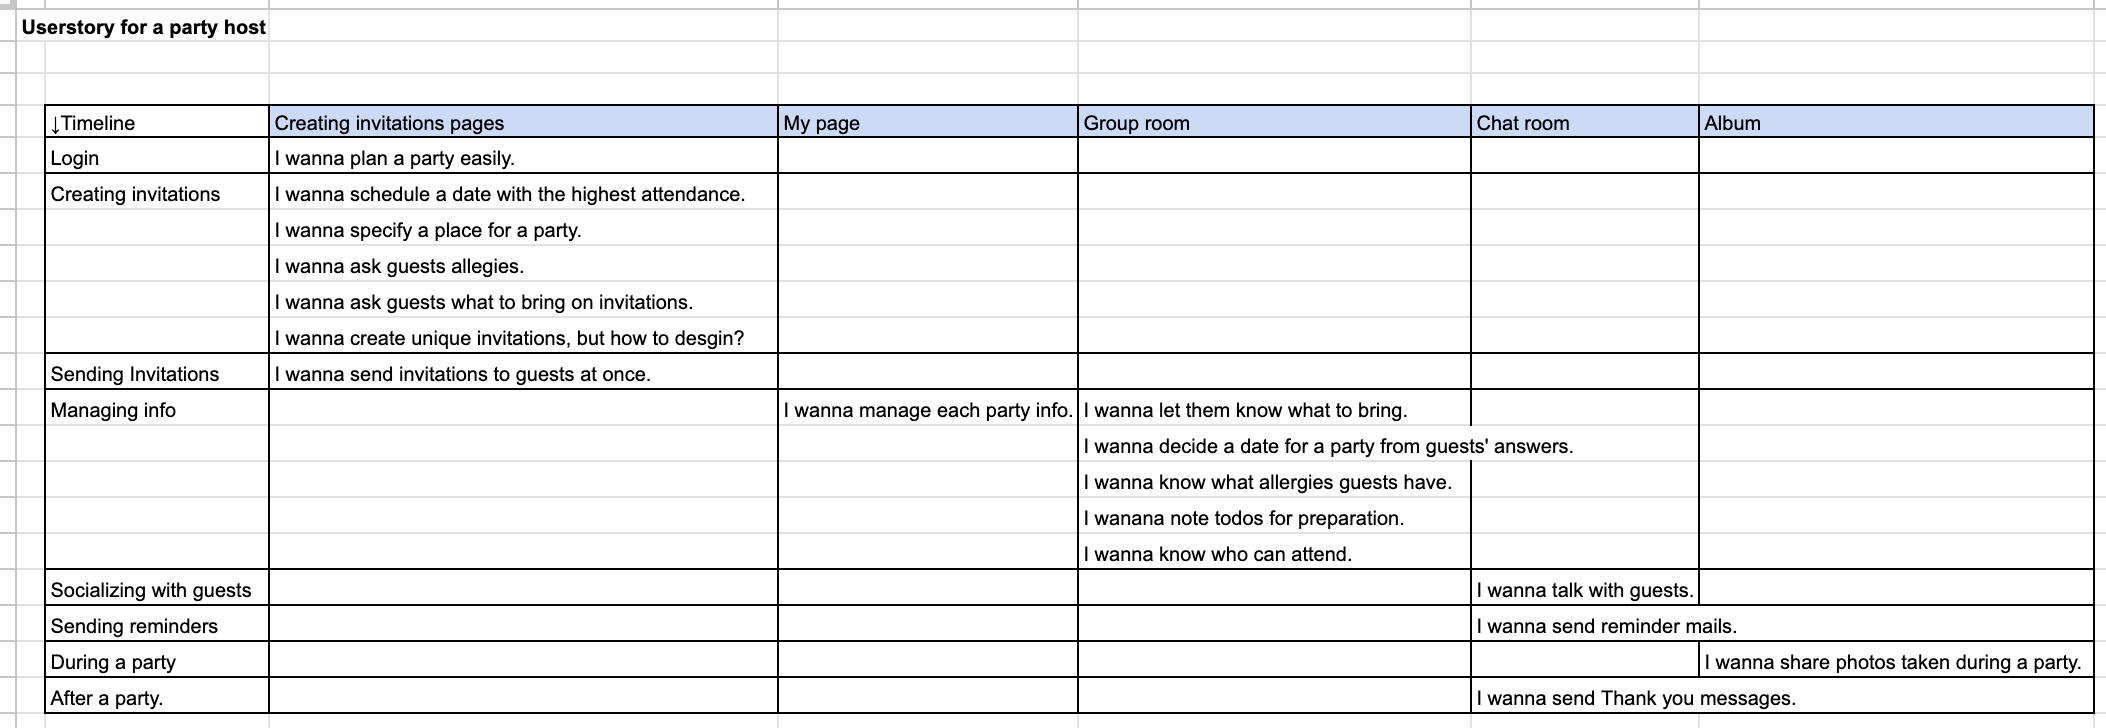
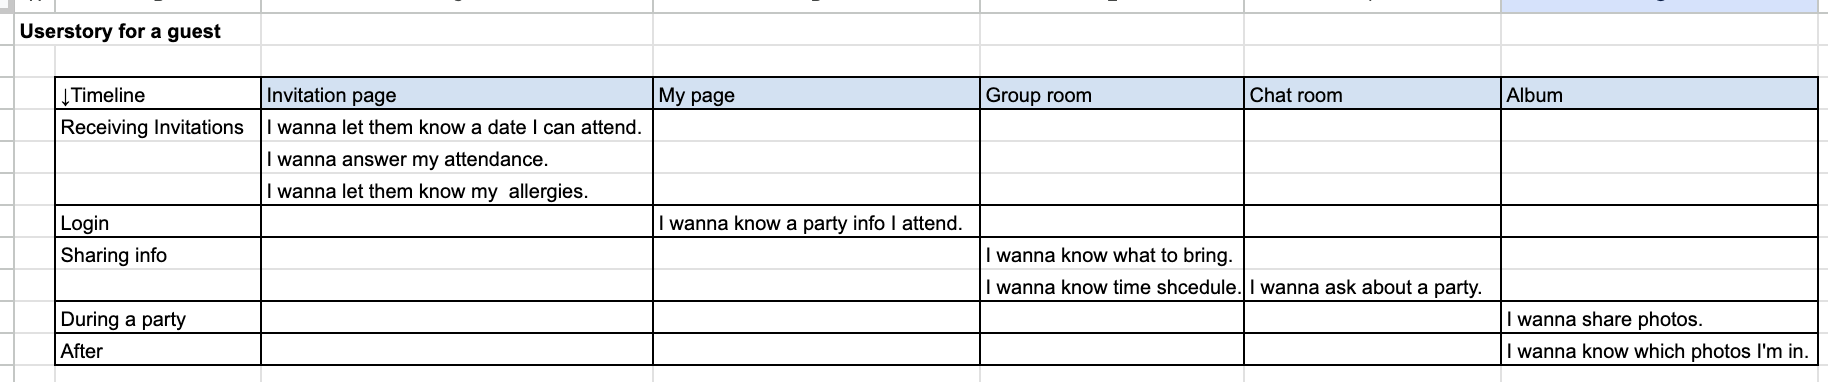
User Stories
We made two types of user stories:
- For the host
- For the guest
One person wrote the base, and we all reviewed it together.
2. Wireframes & Design
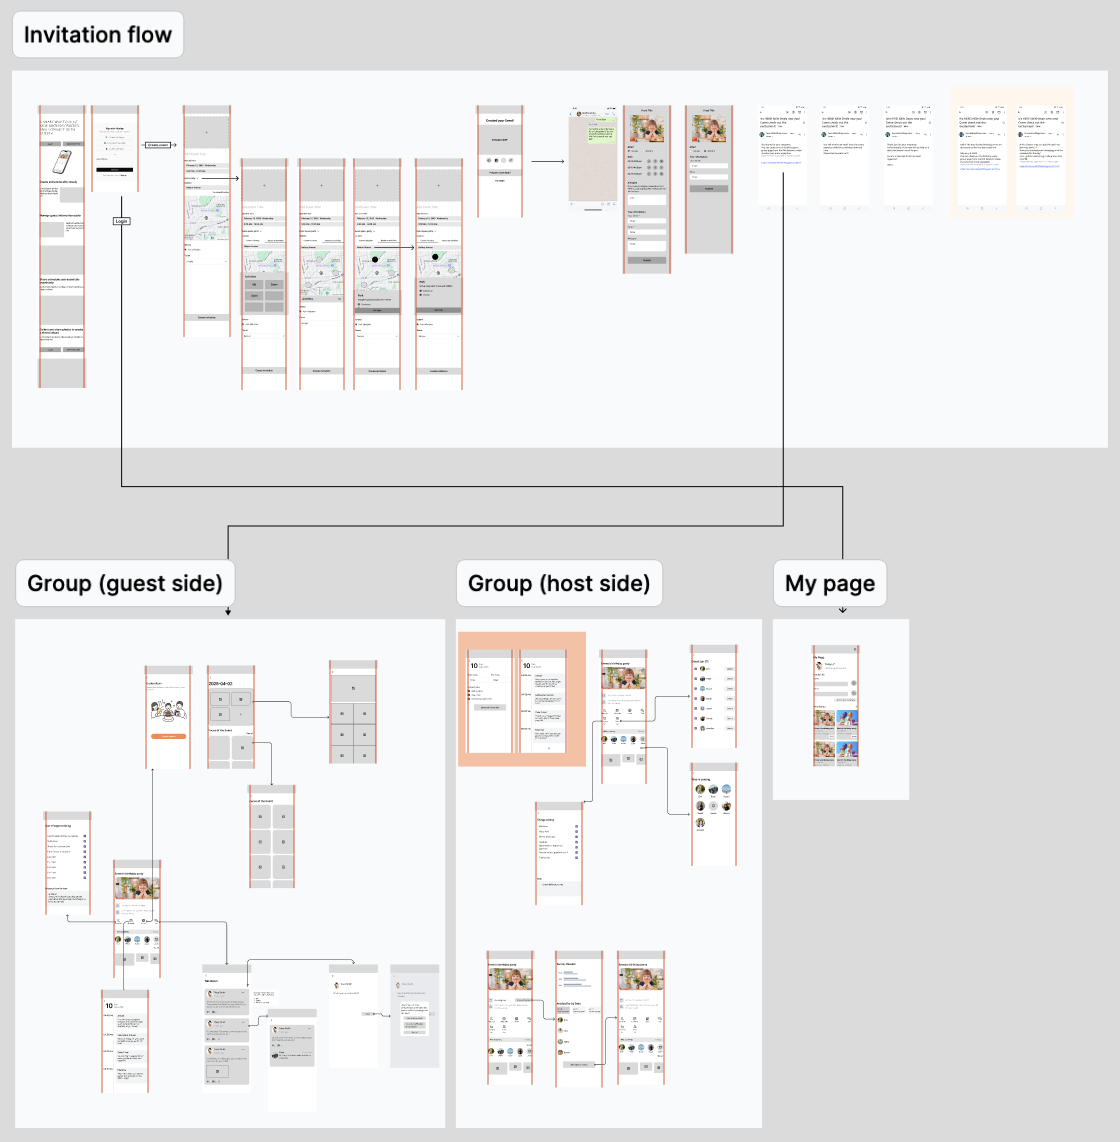
Wireframes (Low-fidelity)
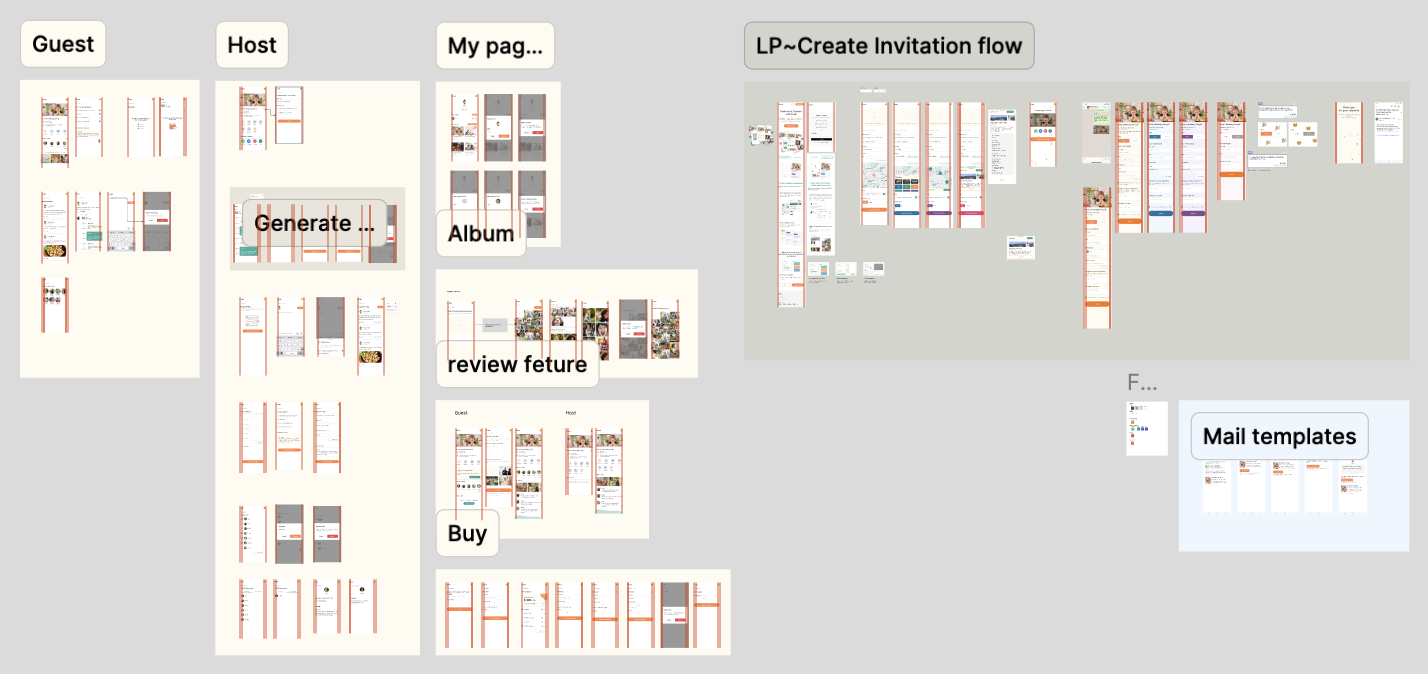
We listed all necessary screens and actions. I was in charge of the invitation flow.
Design (High-fidelity)
After the wireframes, we made the UI design.
Another frontend member liked design too, so they took the lead. I helped with design reviews and taught how to use Figma.
Our steps:
- Make an image board
- Choose a main color
- Collect reference designs
- Both of us designed 1 screen each to check direction
- Finalize and review each other’s work
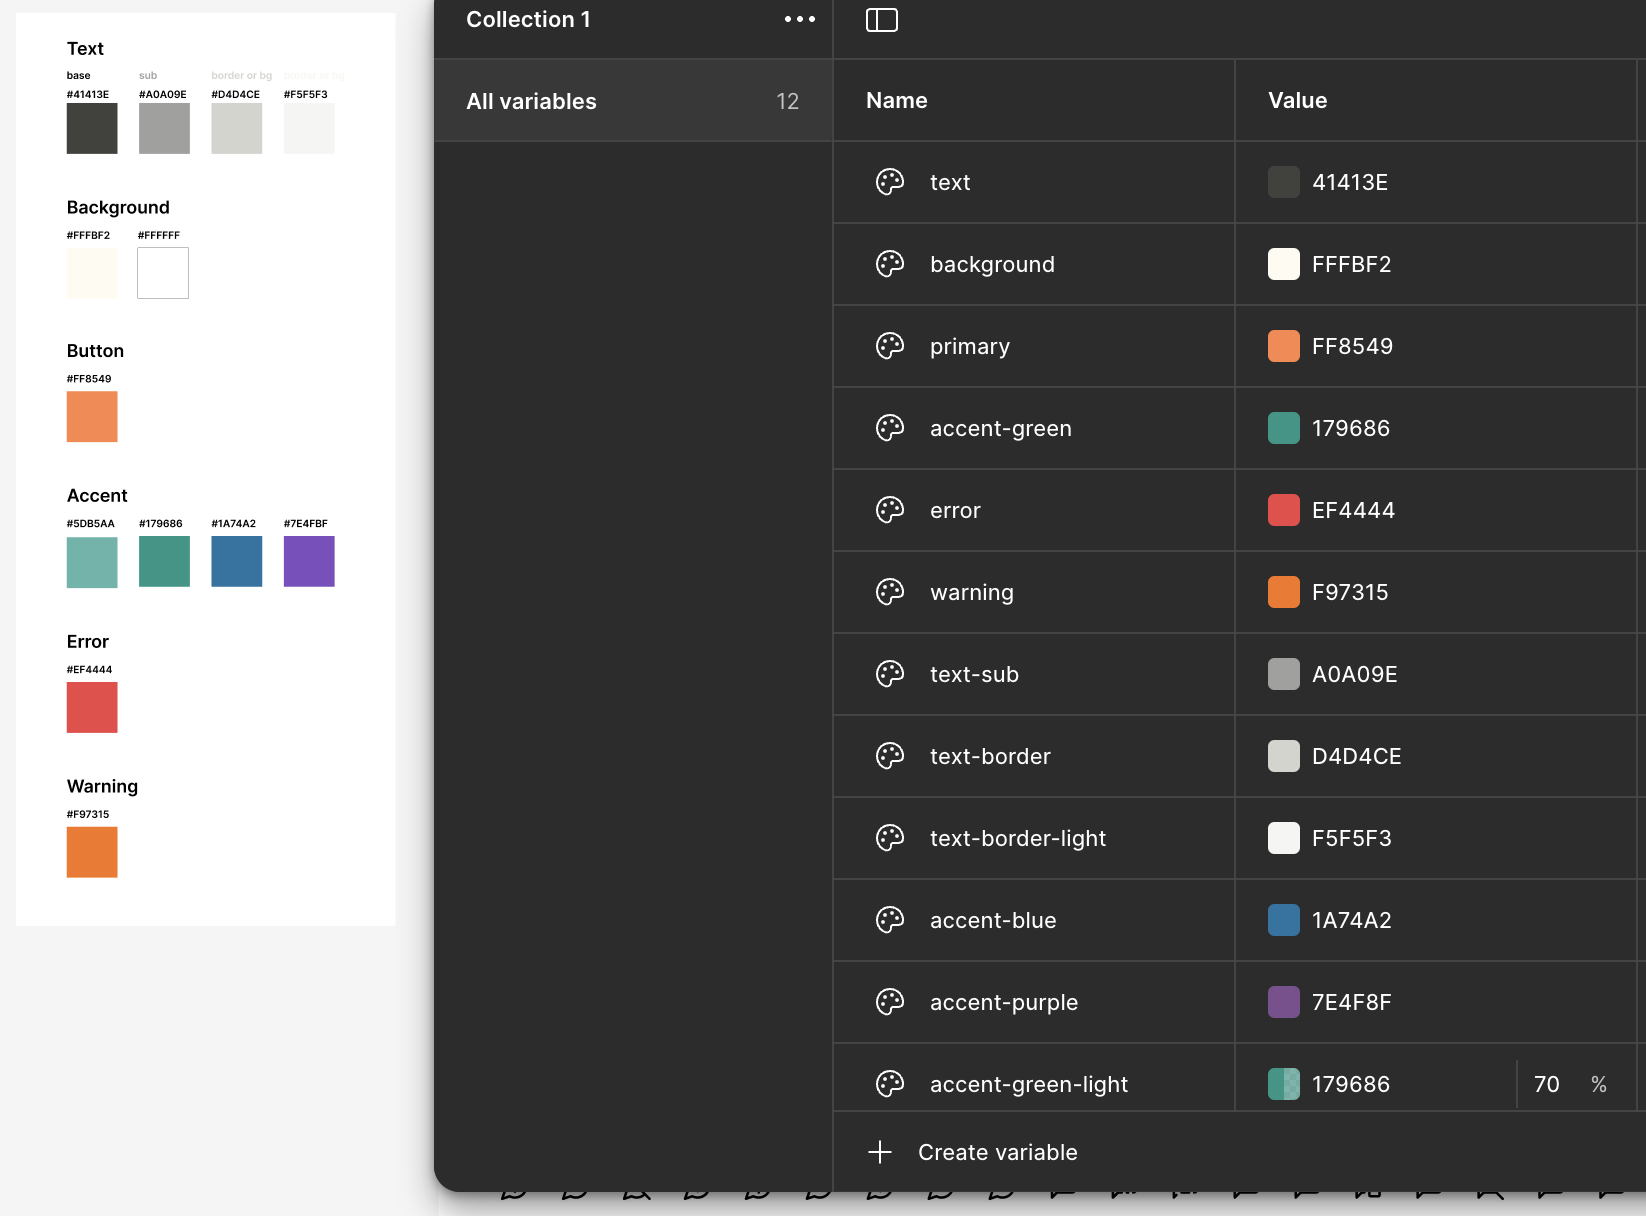
To save time, we used an 8px spacing system and design tokens for colors and fonts.
I created 4 user flows:
- Landing page → Host
- Invitation for guest
- Guest event page
- After-party review
3. ER Diagram & Roadmap
ER Diagram
The backend team made the ERD. We used draw.io.

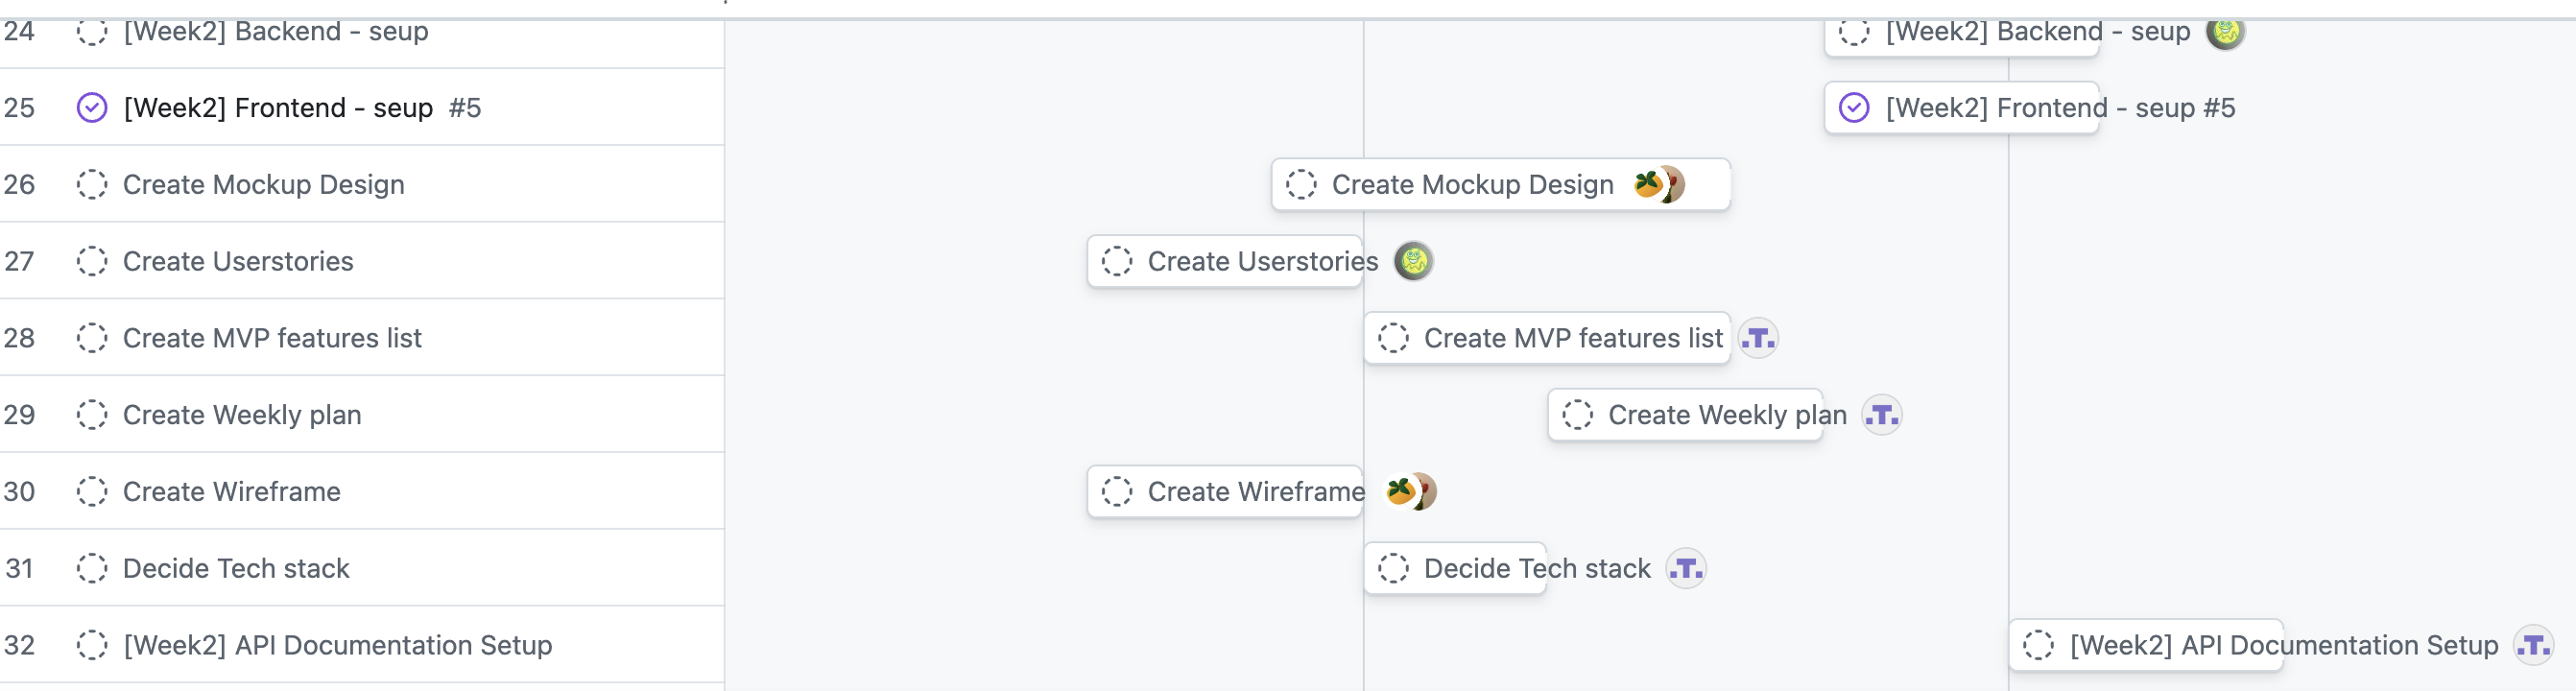
Roadmap
Our PM made a roadmap based on screens. We estimated hours and managed tasks using GitHub Projects.
4. Development
General Process
While frontend worked on markup, backend created API docs. Once backend was ready, we connected the frontend.
PRs were reviewed by the same-role member, and we had short daily stand-ups (30 min) to share updates.
Frontend Development
Before jumping into development, we aligned on a few key things:
- Folder structure
- Component rules
- Naming conventions
We used Tailwind CSS along with shadcn/ui, and added prettier-plugin-tailwindcss to keep our styles clean and consistent.
This really helped us reduce miscommunication and keep our code easy to read.
My Work
Challenges
Reusable Modal Components
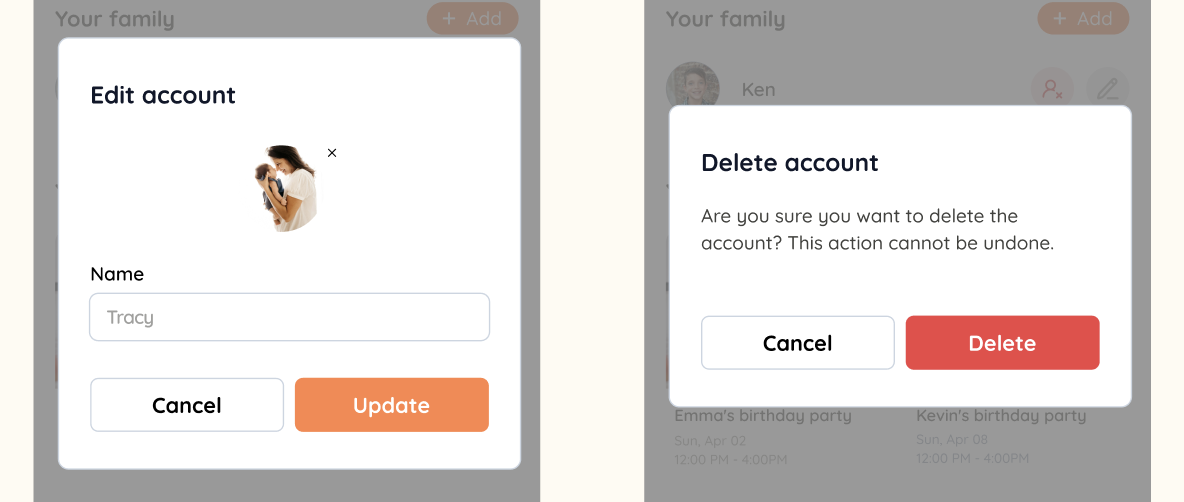
I had a hard time implementing reusable modals.
The modal looked something like the one in the attachment, and at first, I tried to handle all patterns within a single component.
After discussing with a teammate, I got some helpful advice:
There are mainly two types of modals - ones that just have buttons, and ones that include input elements - so it might be faster and cleaner to split them into two separate modal components.
Even managing just those two types was still a bit confusing, so I think it was a good call in the end.
For the ones with input fields, I wanted to change the function that gets executed depending on the props, but it ended up having too many conditional branches... so I’m still not sure if that was the best approach 😅
Here's the final code👇
"use client";

type ModalProps = {
  trigger: ReactNode;
  title: string;
  description?: string;
  button?: ReactNode;
  deleteAction: (id?: string) => Promise<{ success: boolean; message: string }>;
  id?: string;
  deleteErrorMessage: string;
  onSuccess?: () => void;
};

export default function Modal({
  trigger,
  title,
  description,
  button,
  deleteAction,
  id,
  deleteErrorMessage,
  onSuccess,
}: ModalProps) {
  const [isLoading, setIsLoading] = useState(false);
  const [isOpen, setIsOpen] = useState(false);

  const { toast } = useToast();

  const handleDelete = async (e: FormEvent) => {
    e.preventDefault();
    setIsLoading(true);

    try {
      if (id) {
        const response = await deleteAction(id);
        if (response.success) {
          setIsOpen(false);
          if (onSuccess) {
            onSuccess();
          }
        }
        return;
      }

      if (!id && deleteAction) {
        const response = await deleteAction();
        if (response.success) {
          setIsOpen(false);
          return;
        }
      }

      throw new Error("Invalid ID and no delete action available.");
    } catch (error) {
      if (error instanceof Error) {
        showErrorToast(toast, error.message, deleteErrorMessage);
      } else {
        showErrorToast(toast, "Failed to delete user", deleteErrorMessage);
      }
    } finally {
      setIsLoading(false);
    }
  };

  return (

      {trigger}


          {title}
          {description && {description}}


              Cancel


            {isLoading ?  : button}


  );
}"use client";
type PersonModalProps = {
trigger?: ReactNode;
title: string;
defaultName?: string;
defaultImage?: string;
type: "user" | "family" | "guest";
mode?: "new" | "edit";
familyId?: string;
eventId?: string;
errorMessage: string;
onSuccess?: () => void;
};
export default function PersonModal({
trigger,
title,
defaultName,
defaultImage = "/images/profile_default.png",
type,
mode,
familyId,
eventId,
errorMessage,
onSuccess,
}: PersonModalProps) {
const [isLoading, setIsLoading] = useState(false);
const [imageUrl, setImageUrl] = useState(defaultImage);
const [imageUrlData, setImageUrlData] = useState(null);
const [name, setName] = useState(defaultName || "");
const [isOpen, setIsOpen] = useState(false);
const inputImageRef = useRef(null!);
const { toast } = useToast();
const defaultImagePath = "/images/profile_default.png";
useEffect(() => {
if (isOpen) {
setName(defaultName || "");
setImageUrl(defaultImage);
}
}, [isOpen, defaultName, defaultImage]);
// image functions
const handleImageClick = (e: React.MouseEvent) => {
e.preventDefault();
e.stopPropagation();
inputImageRef.current.click();
};
const revokeObjectURL = useCallback(() => {
if (imageUrl.startsWith("blob:")) {
URL.revokeObjectURL(imageUrl);
}
}, [imageUrl]);
const handleImageDelete = (e: React.MouseEvent) => {
e.preventDefault();
e.stopPropagation();
revokeObjectURL();
setImageUrl(defaultImagePath);
setImageUrlData(null);
};
const handleImageChange = async (e: React.ChangeEvent) => {
const file = e.target.files?.[0];
if (file) {
const imageUrl = URL.createObjectURL(file);
setImageUrlData(file);
setImageUrl(imageUrl);
revokeObjectURL();
}
};
const handleNameChange = (e: React.ChangeEvent) => {
setName(e.target.value);
};
const resetForm = () => {
setName(defaultName || "");
revokeObjectURL();
setImageUrl(defaultImage);
};
const handleSubmit = async (e: FormEvent) => {
e.preventDefault();
setIsLoading(true);
try {
let response;
const updateData: { name: string; profileImageUrl?: File | null } = {
name,
};
if (imageUrlData) {
updateData.profileImageUrl = imageUrlData;
} else if (imageUrlData === defaultImagePath) {
updateData.profileImageUrl = null;
}
if (type === "user") {
response = await updateUserInfo(updateData);
} else if (familyId && type === "family") {
response = await updateFamilyInfo({
familyId,
...updateData,
});
} else if (eventId && type === "guest") {
response = await addTemporaryParticipant(eventId, name);
}
if (mode === "new") {
response = await addFamilyMember(updateData);
}
if (!response?.success) {
notFound();
}
setIsOpen(false);
resetForm();
if (onSuccess) {
onSuccess();
}
} catch (err: unknown) {
if (err instanceof Error) {
showErrorToast(toast, err.message, errorMessage);
} else {
showErrorToast(toast, "Unknown error occurred", errorMessage);
}
} finally {
setIsLoading(false);
}
};
useEffect(() => {
return () => {
revokeObjectURL();
};
}, [revokeObjectURL, imageUrl]);
return (
{trigger ? (
trigger
) : (
)}
e.stopPropagation()}
>
{title}
{type !== "guest" && (
<>
>
)}
Name
Cancel
{isLoading
? "Updating..."
: mode === "new"
? "Add"
: mode === "edit"
? "Update"
: "Submit"}
);
}Checking the API Documentation
Although I got used to it later on, in the beginning I only checked the response and didn’t properly read through the documentation.
For example, I once missed the note saying that the request body should be of type Content-Type: multipart/form-data (as shown in the attached image), and ended up wasting quite a bit of time.
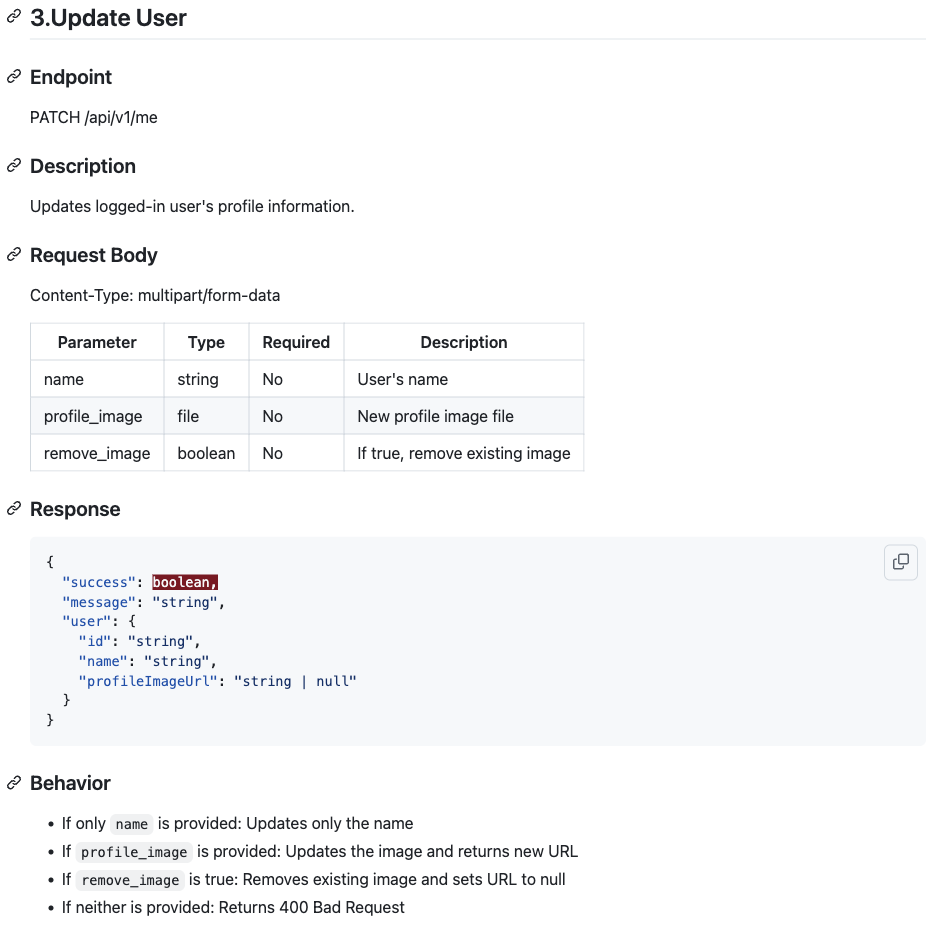
Still, I’m glad I got to learn how handling image data is different from sending text or numbers, and also how to immediately display inputted image data on screen after uploading.
Naming Conventions
In my previous job, I used class names like Container or Wrap for wrapper elements when writing markup. So, I kept using names like 〇〇Container for components as well.
However, during a review, I was told that Container is a bit too abstract and that my naming pattern was a bit limited. I also got feedback that similar names like ParticipantListItem and ParticipantItem can be confusing, and I should be more mindful of that.
I realized I still lack the perspective of someone completely new to the codebase, and I’d like to improve this moving forward!
Scroll Position & shadcn Form Components
I struggled through lots of small roadblocks but managed to push forward with trial and error.
One of the hardest parts was using shadcn/ui's form component. Writing validations with zod was tricky, and dealing with type errors took more time than expected.
I also wasn’t sure whether to use that form component or go with a Next.js server action for submitting forms.
It made me wonder how experienced engineers decide what to use when dealing with more complex forms.
Another challenge was handling the scroll position.
When going back to a previous page via breadcrumb or link, the scroll position was preserved, which sometimes caused elements to be partially hidden.
I tried setting scroll={true} as suggested in some articles, but it didn’t work well. In the end, I wrote a custom function to reset the scroll position on the relevant pages.
"use client";

import { useEffect } from "react";

export default function ScrollToTop() {
  useEffect(() => {
    window.scrollTo(0, 0);
  }, []);
  return null;
}
That said, I’m not confident that this is the best approach—I'd love to learn what the recommended solution would be! 👀
What I Learned
I learned the whole process of building a project using Next.js and Node.js.
Although I had some backend classes, I didn’t write much backend code this time—just skimmed through what others wrote. So, I want to practice building small backend apps myself!
I also realized (as obvious as it may sound) how different the thought process is between designing and implementing a UI.
When designing, I focused on organizing UI elements while imagining user flows. But when coding, I had to think about what kind of data comes from the API and how it’s fetched, which required much more concrete thinking.
This is something I lacked before, and also a big reason why I wanted to learn more frontend skills.
By the way, the other frontend teammate who’s also into design had previous engineering experience, so they were already thinking about the API while designing. I thought that was really cool.
When you have to design fast, it would be ideal to not only focus on usability, layout, and visual design—but also keep data flow in mind. That’s what I want to aim for.
I’m always learning a lot from the designers I work with.
They propose ideal UI designs while also keeping implementation in mind, and I really admire that balance. I want to be able to do the same!
This time, we only used color tokens, but I’m also interested in learning more about design/frontend crossover areas like:
- UI management using Storybook
- MCP (which I’ve heard about a lot recently)
- Building components with Figma → Cursor
🙌 Hoping to grow in those areas too!
Links
Github: https://github.com/kakimaru/oiwai
Figma: https://www.figma.com/design/1l3niGh4ZAzR5rDv2SCi8X/Oiwai?node-id=70-5925&t=MN61YXeTtCPcNe7W-1
LinkedIn: https://www.linkedin.com/in/haruka-kakiuchi-profile/
Final Thoughts
Through this project, I feel like I’ve significantly expanded my toolkit as a designer.
My goal is to grow into a design engineer who contributes to the whole product—not just visuals—and I’ll keep challenging myself with more team-based development!
If you’re planning to build a project from scratch, like for a hackathon, I hope this post gave you some helpful insights. Let’s do our best!
