
Ever felt like screaming at your CSS because it won’t apply your styles? You tweak a color, refresh… nothing. Or worse, some rule overrides it. The culprits? CSS Cascading and Specificity—the forces deciding which styles win.
Specificity isn’t just a beginner’s hurdle—I’ve seen it frustrate seasoned developers as well. I’ve been there myself.
This is part one of our “Why Isn’t Your CSS Working?” series. Before tackling cascading, you must master specificity, the ranking system that decides which styles apply over others.
Many tutorials teach cascading first, but without understanding specificity, it feels unpredictable. Mastering it now makes cascading much clearer in the next part.
While writing this article, I considered all the real-world problems I’ve faced—many of which both beginners and advanced devs deal with daily. At the end of this article, you’ll get a case study to cement your understanding and a quiz to test it.
This is theory-heavy, but trust me, it’ll make CSS far less frustrating in the future. Let’s dive in!
Table of Contents
- What is Specificity?
- Specificity Calculation (The Simple Formula) In Depth
- How Combined Selectors Affect Specificity Ranking
- Specificity of Inline CSS, Internal CSS, External CSS
- An Exception in CSS Specificity – !important
- Specificity in Action (A Case Study)
- Bottom Line
- Quick Quiz: Strengthen Your Understanding of the Specificity
- Wrapping Up
- SOLUTION OF THE QUIZ
What is Specificity?
Specificity determines which CSS rule takes precedence when multiple rules apply to the same element. The general rule is: more specific rules override less specific ones.
Think of specificity as a ranking system. For example, in the military, a lieutenant can give orders in the absence of a general. However, if the general is present, their orders take priority over the lieutenant’s because they hold a higher rank. Similarly, in CSS, a more specific rule will always override a less specific one.
Specificity Calculation (The Simple Formula) in depth
Now that you understand what specificity is, let’s break down how it’s calculated. The easiest way to think about specificity is to assign a score to each type of selector.
We’ll use a ranking system to make specificity easier to understand. If we assign ranks to a a selector:
A→ High RankB→ Medium RankC→ Low Rank-
If combined, the ranking increases →
ABis stronger thanAorAC, just asBCis stronger thanBorC. -
If the same rank appears multiple times, the last one takes priority → For example, if
ABappears first and anotherABappears later, the second one will override the first. (Which is known as cascading, which will be discussed in the next part of this series.)
The Specificity Formula
(ID count, Class/Attribute/Pseudo-class count, Element/Pseudo-element count)Feeling overwhelmed? No worries! Let’s break it down step by step.
1. Understanding Specificity of an ID Selector
Suppose we write CSS for an element using an ID selector:
#myElement {
    color: blue;
}
Let’s apply the specificity formula by replacing the values:
- ID count = 1 (since we are using a single ID selector)
- Class/Attribute/Pseudo-class count = 0 (since no classes, attributes, or pseudo-classes are used)
- Element/Pseudo-element count = 0 (since no element names or pseudo-elements are used)
Thus, the specificity value is:
(1, 0, 0)
Why does 1 in place of The ID count appear in the first position?
CSS specificity prioritizes ID selectors, giving them the highest weight. That’s why they always take the first position in the specificity tuple.
Since ID selectors uniquely identify elements, they have high specificity, so we assign them Rank A.
This is the specificity of an ID selector. This is easier than it looks, isn't it?
2. Understanding Specificity of Class/Attribute/Pseudo-class Selector
Now that we’ve assigned values for an ID selector, understanding Class, Attribute, and Pseudo-class selectors becomes easier. Let’s start with the Class Selector.
1. Class Selector
Here’s our specificity formula again:
(ID count, Class/Attribute/Pseudo-class count, Element/Pseudo-element count)For class selectors, we replace the Class/Attribute/Pseudo-class count portion with 1, just like we did for ID selectors, but in its respective position.
Let’s see it in action:
/* Class Selector Example */
.button {
    color: blue;
}
Since we are selecting an element by its class name, we assign:
- ID count = 0 (No ID selector used)
- Class/Attribute/Pseudo-class count = 1 (One class selector used)
- Element/Pseudo-element count = 0 (No element or pseudo-element used)
Thus, the specificity value is:
(0, 1, 0)Since class selectors have a lower specificity than ID selectors, we assign them Rank B.
2. Attribute Selector
/* Attribute Selector Example */
input[type="text"] {
    border: 1px solid red;
}
For an attribute selector like [type="text"], the specificity is:
(0, 1, 0)Because:
- ID count = 0 (No ID selector used)
- Class/Attribute/Pseudo-class count = 1 (One attribute selector used)
- Element/Pseudo-element count = 0 (No element or pseudo-element used)
Since it has the same specificity as a class selector, we also assign it Rank B.
3. Pseudo-class Selector
/* Pseudo-class Selector Example */
a:hover {
    text-decoration: underline;
}
A pseudo-class like :hover follows the same rule:
(0, 1, 0)- ID count = 0 (No ID selector used)
- Class/Attribute/Pseudo-class count = 1 (One pseudo-class used)
- Element/Pseudo-element count = 0 (No element or pseudo-element used)
Just like class and attribute selectors, pseudo-classes hold Rank B.
Why does 1 in place of Class/Attribute/Pseudo-class count appear in the second position?
CSS specificity prioritizes Class, Attribute, and Pseudo-class selectors after ID selectors, giving them the second highest weight. That’s why they always take the second position in the specificity tuple.
This covers the Class, Attribute, and Pseudo-class selectors. Their specificity is equal, making them more powerful than element selectors but weaker than ID selectors.
3. Understanding Specificity of Element/Pseudo-element Selector
Now that we’ve covered Class, Attribute, and Pseudo-class selectors, understanding Element and Pseudo-element selectors is straightforward. These selectors have the lowest specificity in CSS.
1. Element Selector
Here’s our specificity formula again:
(ID count, Class/Attribute/Pseudo-class count, Element/Pseudo-element count)For element selectors, we replace the Element/Pseudo-element count portion with 1, while keeping the other values as 0.
Let’s see it in action:
/* Element Selector Example */
p {
    font-size: 16px;
}
Since we are selecting an element by its tag name, we assign:
- ID count = 0 (No ID selector used)
- Class/Attribute/Pseudo-class count = 0 (No class, attribute, or pseudo-class used)
- Element/Pseudo-element count = 1 (One element selector used)
Thus, the specificity value is:
(0, 0, 1)Since element selectors have the lowest specificity, we assign them Rank C.
2. Pseudo-element Selector
/* Pseudo-element Selector Example */
p::before {
    content: "Note: ";
    font-weight: bold;
}
A pseudo-element like ::before or ::after follows the same rule:
(0, 0, 1)- ID count = 0 (No ID selector used)
- Class/Attribute/Pseudo-class count = 0 (No class, attribute, or pseudo-class used)
- Element/Pseudo-element count = 1 (One pseudo-element used)
Since pseudo-elements behave like elements in specificity calculations, they share Rank C with element selectors.
Why does 1 in place of Element/Pseudo-element count appear in the third position?
CSS specificity does not prioritize Element/Pseudo-element selectors as highly as Class, Attribute, Pseudo-class, or ID selectors, giving them the lowest weight. That’s why they always take the third position in the specificity tuple.
Still, there is a lower level of specificity available—the most lowest—and we are going to explore it in this next section.
4. Understanding Specificity of the Universal Selector
Now that we've explored ID selectors, class/attribute/pseudo-class selectors, and element/pseudo-element selectors, let's look at the universal selector *.
The universal selector applies to all elements, but it holds the lowest possible specificity in CSS.
Let’s revisit our specificity formula:
(ID count, Class/Attribute/Pseudo-class count, Element/Pseudo-element count)Universal Selector Example
/* Universal Selector Example */
* {
    margin: 0;
    padding: 0;
}
Let’s break this down using the specificity formula:
- ID count = 0 (No ID selector used)
- Class/Attribute/Pseudo-class count = 0 (No class, attribute, or pseudo-class used)
- Element/Pseudo-element count = 0 (No element or pseudo-element used)
So the specificity of the universal selector is:
(0, 0, 0)Why is the universal selector the weakest?
The universal selector * is designed to target everything, but with no priority. It acts like a default fallback. That’s why it holds zero specificity — it’s not targeting any specific type, class, or ID.
You can think of it as a private in the military ranking analogy — it follows all orders but can't override anyone.
Finalizing CSS Ranking System:
-
Rank
A→ ID selectors(1, 0, 0) -
Rank
B→ Class, Attribute, Pseudo-class selectors(0, 1, 0) -
Rank
C→ Element, Pseudo-element selectors(0, 0, 1)
We now understand that Rank A (ID selectors) overrides Rank B (Class, Attribute, Pseudo-class selectors), which in turn overrides Rank C (Element, Pseudo-element selectors) — and all universal selectors get overridden by all of them.
But what happens when we combine multiple selectors? Can a compound selector (a combination of classes, attributes, or pseudo-classes) override an ID selector?
How Combined Selectors Affect Specificity Ranking
We have seen how different ranks (A, B, and C) influence which styles take precedence. But what happens when we combine or repeat them?
1. Combination of A and B (AB)
When A (high rank) and B (medium rank) are combined, the result is stronger than A or B alone. This makes AB more dominant than a standalone A or B.
#id.class {
  color: blue;
}
Or Descendant Selector (A B)
.container p {
  color: blue;
}
or Child Selector (A > B)
.container > p {
  color: red;
}
Or Adjacent Sibling Selector (A + B)
h2 + p {
  margin-top: 0;
}
Or General Sibling Selector (A ~ B)
h2 ~ p {
  color: gray;
}- Rank: (1, 1, 0)
- Since it contains both
AandB, it is stronger than a singleAorB.
2. Combination of B and C (BC)
When B (medium rank) and C (low rank) are combined, the result becomes stronger than B or C alone, but still weaker than any selector containing A.
.class div {
  font-size: 16px;
}
Or Descendant Selector (B C)
.container span {
  color: blue;
}
Or Child Selector (B > C)
.box > h2 {
  color: red;
}
Or Adjacent Sibling Selector (B + C)
.note + h4 {
  margin: 10px 0;
}
Or General Sibling Selector (B ~ C)
.alert ~ h2 {
  font-weight: bold;
}- Rank: (0, 1, 1)
- Since it contains both a class and an element selector, it’s stronger than either alone, but cannot beat a selector with an ID.
3. Repeating A (AA)
If A (ID selectors) appears more than once in a selector chain, the specificity doubles, making it stronger than any combination of B and C, but with one catch: you cannot apply more than one ID to a single element in valid HTML.
Invalid example (for concept only):
#id1#id2 {
  background: red;
}
Valid and practical form:
id="container">
   id="item">Hello
Is Descendant Selector (A A)
#container #item {
  color: green;
}
Or Child Selector (A > A)
#parent > #child {
  font-size: 18px;
}
Or Adjacent Sibling Selector (A + A)
#heading + #subheading {
  margin-top: 0;
}
Or General Sibling Selector (A ~ A)
#main ~ #footer {
  color: gray;
}- Rank: (2, 0, 0)
- Contains two
Aselectors — very high specificity, but only valid if used on different elements in hierarchy.
4. Repeating B (BB)
If B (class selectors) are repeated within a selector, the specificity gains weight, becoming stronger than a single B, and even combinations like BC, but it’s still weaker than A-based selectors.
.class1.class2 {
  border: 1px solid black;
}
Or Descendant Selector (B B)
.card .highlight {
  background: yellow;
}
Or Child Selector (B > B)
.wrapper > .info {
  color: red;
}
Or Adjacent Sibling Selector (B + B)
.title + .subtitle {
  margin-left: 10px;
}
Or General Sibling Selector (B ~ B)
.alert ~ .message {
  padding: 10px;
}- Rank: (0, 2, 0)
- Combining multiple class selectors gives a stronger edge than a single class or element — but not strong enough to beat an ID selector.
5. Repeating C (CC)
When C (element selectors) are repeated or chained, they gain a little specificity boost — but even multiple elements remain the weakest in the specificity hierarchy.
You cannot combine it like:
sectionarticle {
  font-size: 18px;
}
Beacause sectionarticle is an invalid HTML tag.
Only Descendant Selector (C C)
section article {
  font-size: 18px;
}
Or Child Selector (C > C)
ul > li {
  list-style: none;
}
Or Adjacent Sibling Selector (C + C)
h1 + h2 {
  color: red;
}
Or General Sibling Selector (C ~ C)
p ~ span {
  font-weight: bold;
}- Rank: (0, 0, 2)
- Repeating element selectors increases weight slightly, but they are still easily overridden by any class or ID selector.
Specificity of Inline CSS, Internal CSS, External CSS
You can add CSS to an HTML document in three ways:
1. External CSS – written in a separate .css file and linked using the
rel="stylesheet" href="styles.css">-
Specificity: External CSS has the lowest specificity if it uses general selectors.
However, its rules can still override others depending on how specific the selectors are — which we have already seen above, and through the use of the
!importantkeyword — which we will see shortly.
2. Internal CSS – written inside
div {
      width: 400px;
      background-color: green;
}- Specificity: Internal CSS has medium specificity. It overrides external if the selector is the same. Otherwise, higher specificity of external CSS can override internal CSS styles. It also gets overridden by inline styles for the same element.
3. Inline CSS – written directly in an HTML element’s style attribute.
style="color: red;">This is Inline CSS.- Specificity: Inline CSS has the highest specificity. It overrides both internal and external styles applied to the same element — even if the element is targeted using an ID selector or a combination of ID or class selectors.
However, there is one exception — the !important keyword, which can override inline styles if applied properly.
An Exception in CSS Specificity – !important
Normally, inline CSS has the highest specificity compared to internal and external styles.
However, there's an important exception — the !important declaration.
When you add !important to a CSS rule, it tells the browser:
"No matter what the specificity is, apply this rule."
Even inline styles will be overridden by a rule marked !important.
Example:
#text_id {
    color: blue !important;
  }


 id="text_id" style="color: red;">
  This will appear in blue, not red.
How !important Works
- It boosts the priority of a CSS declaration above others — including inline styles, ID selectors, class selectors, and element selectors.
- It does not change the specificity value of a rule — it simply forces the rule to win in the cascade.
-
If multiple
!importantrules apply to the same property, then specificity comes back into play — the more specific selector wins.
(Don’t worry about Cascading as it’s the subject of our next part of this series, where we’ll understand it in depth through an investigative case study.)
Now that you understand specificity in depth, let’s do a case study to explore its practical implementation.
Specificity in Action (A Case Study)
Let’s write a basic element with some lorem text. We’ll use this element across all the cases below:

Case I – Apply color green using an element selector:
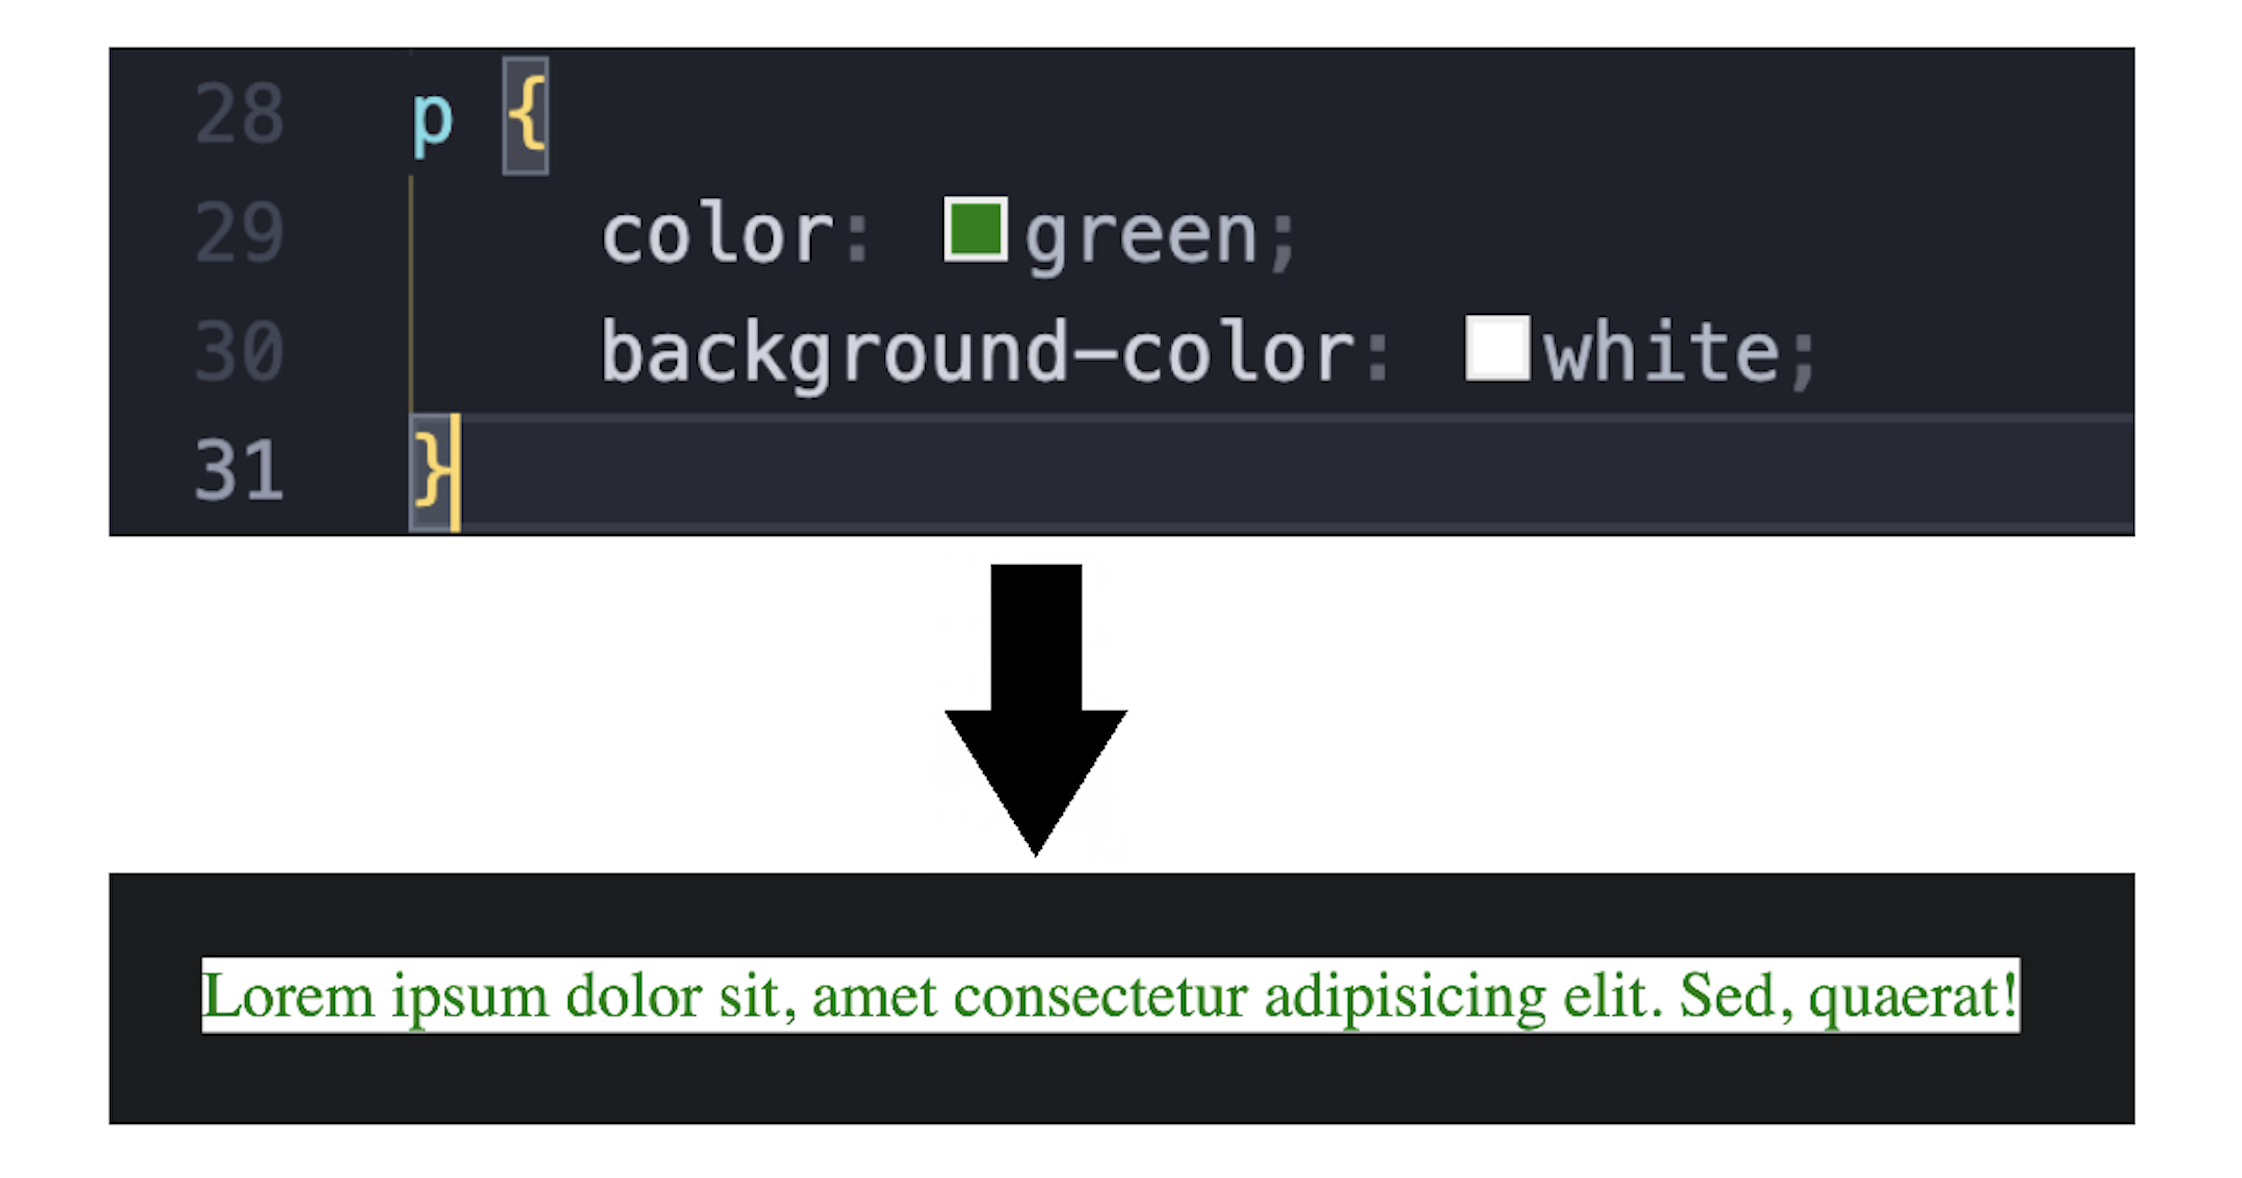
Specificity is : (0, 0, 1)It worked — as expected. If you’ve correctly linked your .css file, this should always work.
But what happens if we apply a class selector to this same element while keeping the element selector as well?
Let’s find out.
Case II – Give the same element color blue using a class selector, while the element selector is still win
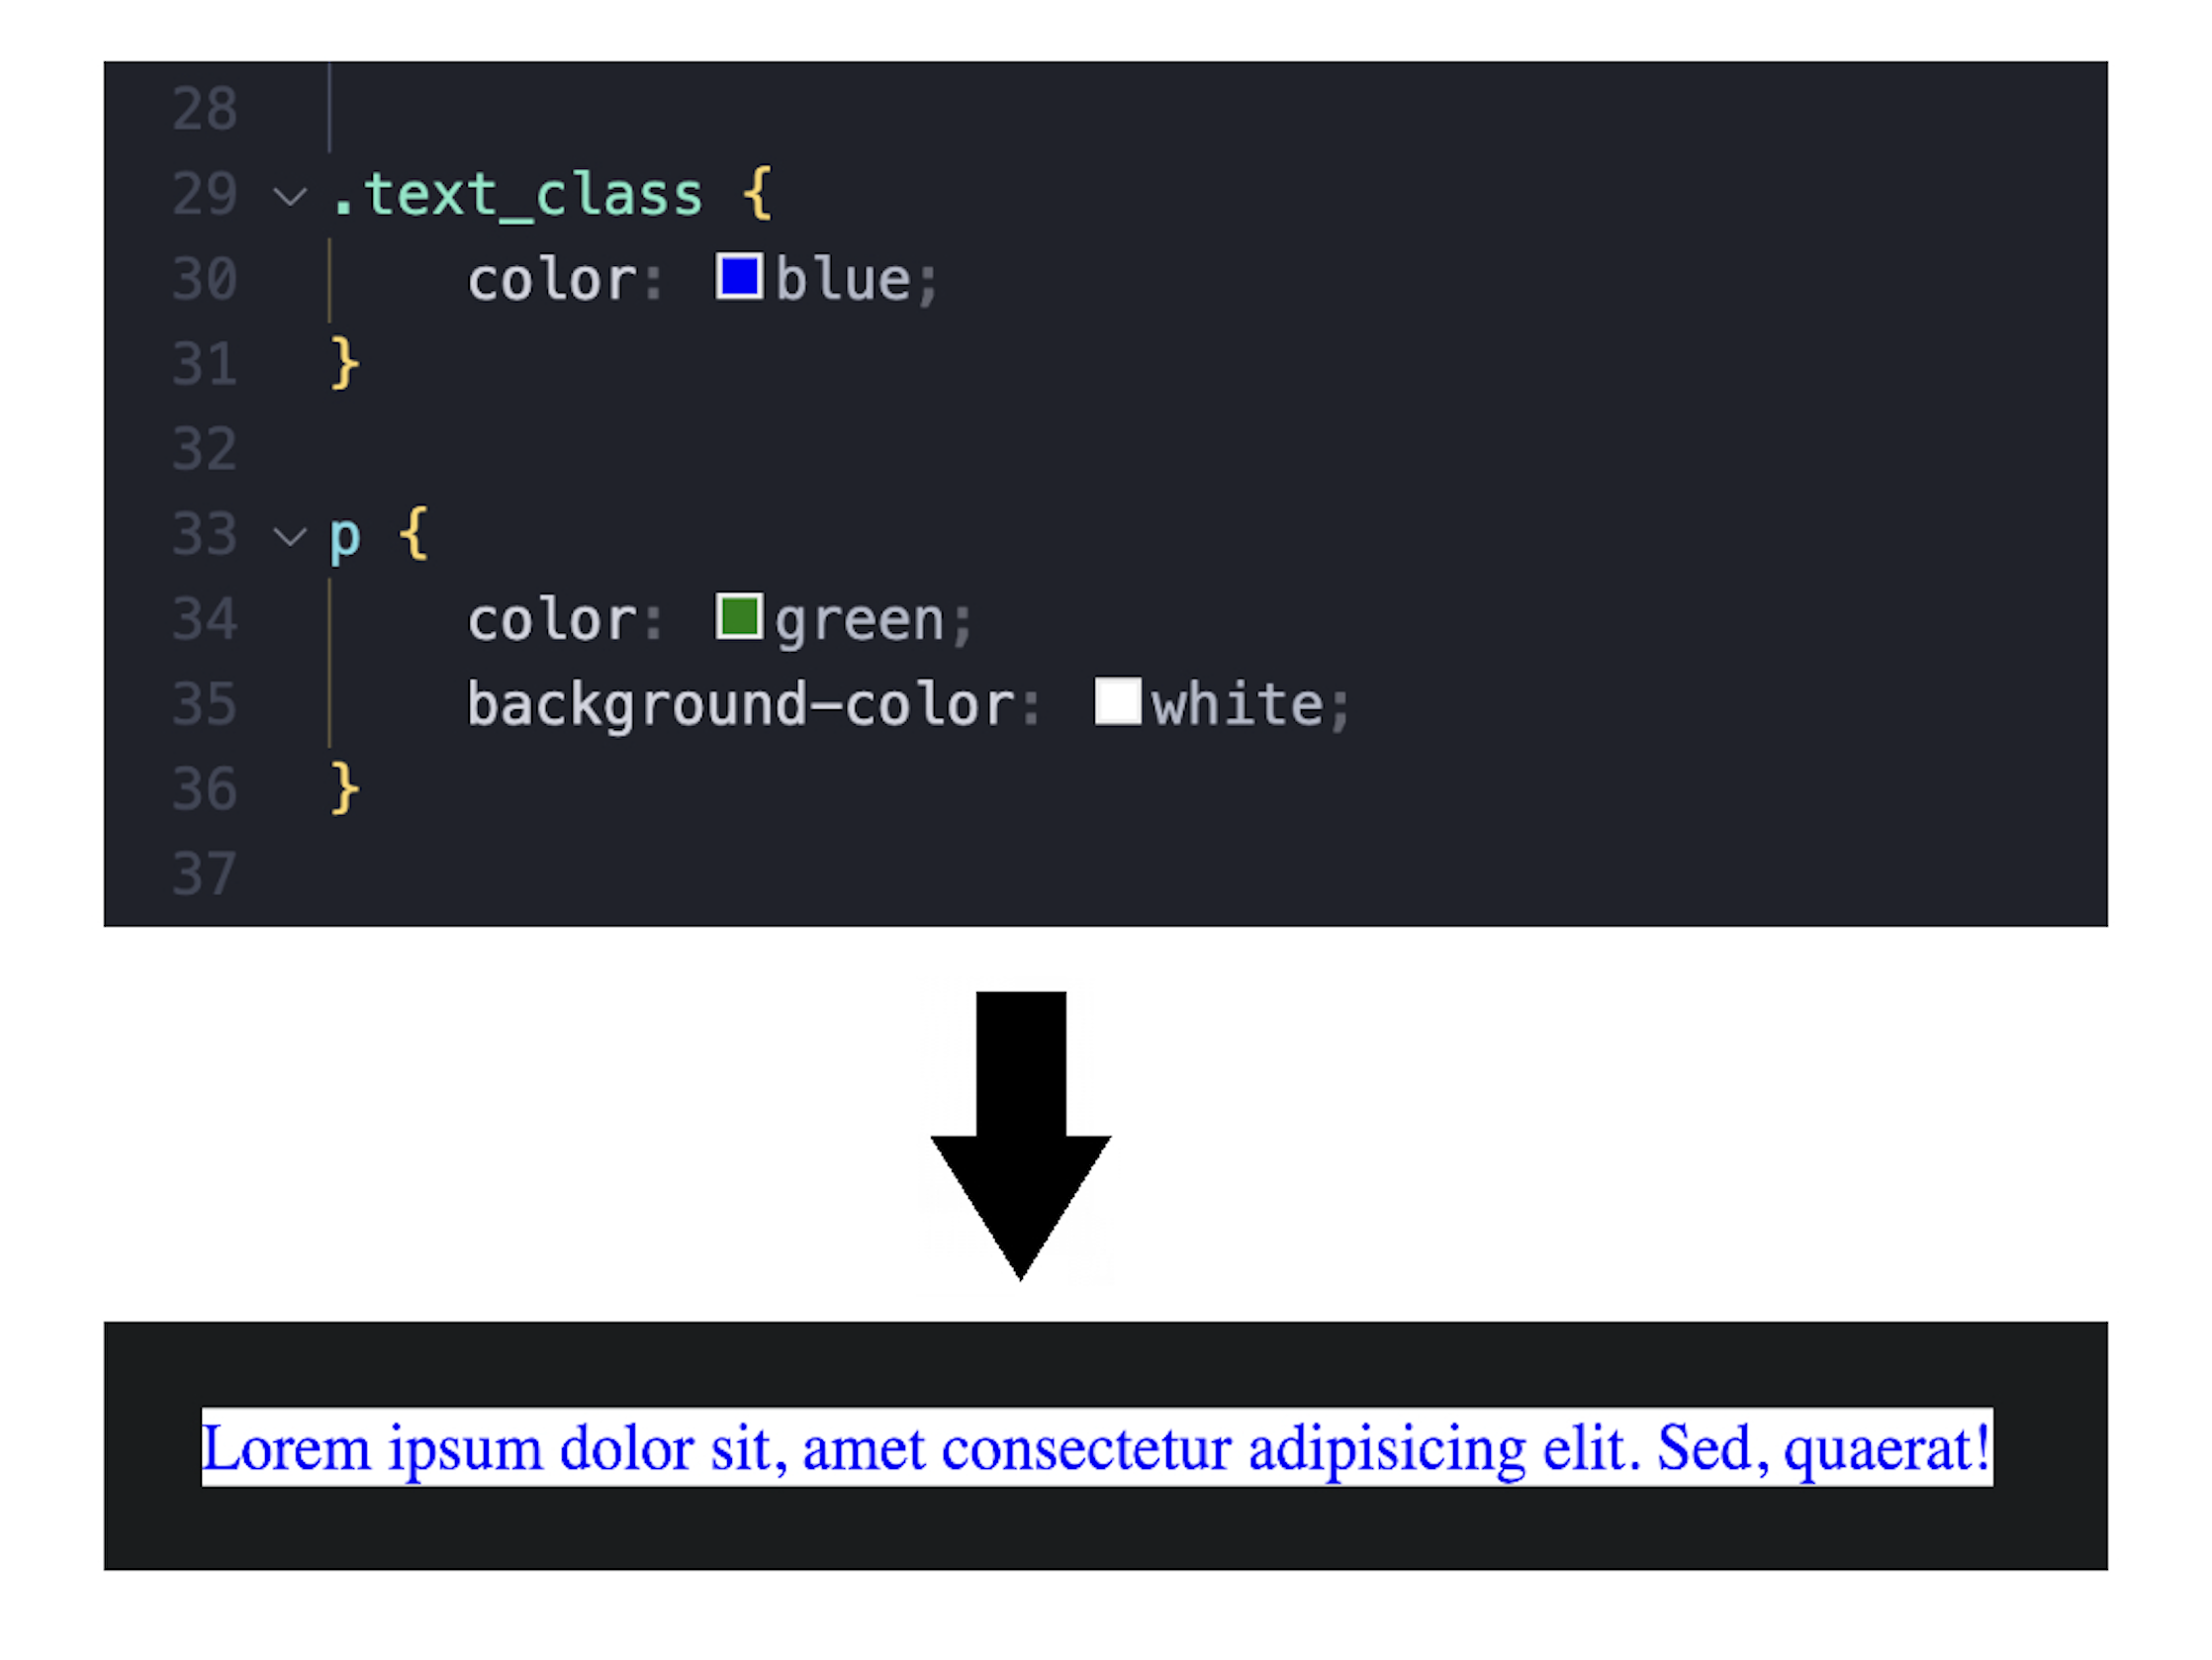
Specificity is : (0, 1, 0)Before it comes to your mind why I used the class selector above the element selector in the stylesheet — even though we applied the element selector first — let me clarify:
This is due to cascading, which we’ll fully cover in the next part of this series.
But to give you a quick preview — cascading is a rule that applies CSS based on the order of appearance when two selectors have equal specificity. For example:
p {
  color: red;
}
p {
  color: yellow;
}
The
yellowcolor will be applied because it comes last.
However, in this case, the class selector has higher specificity than the element selector, so the text color in the element is changed to blue.
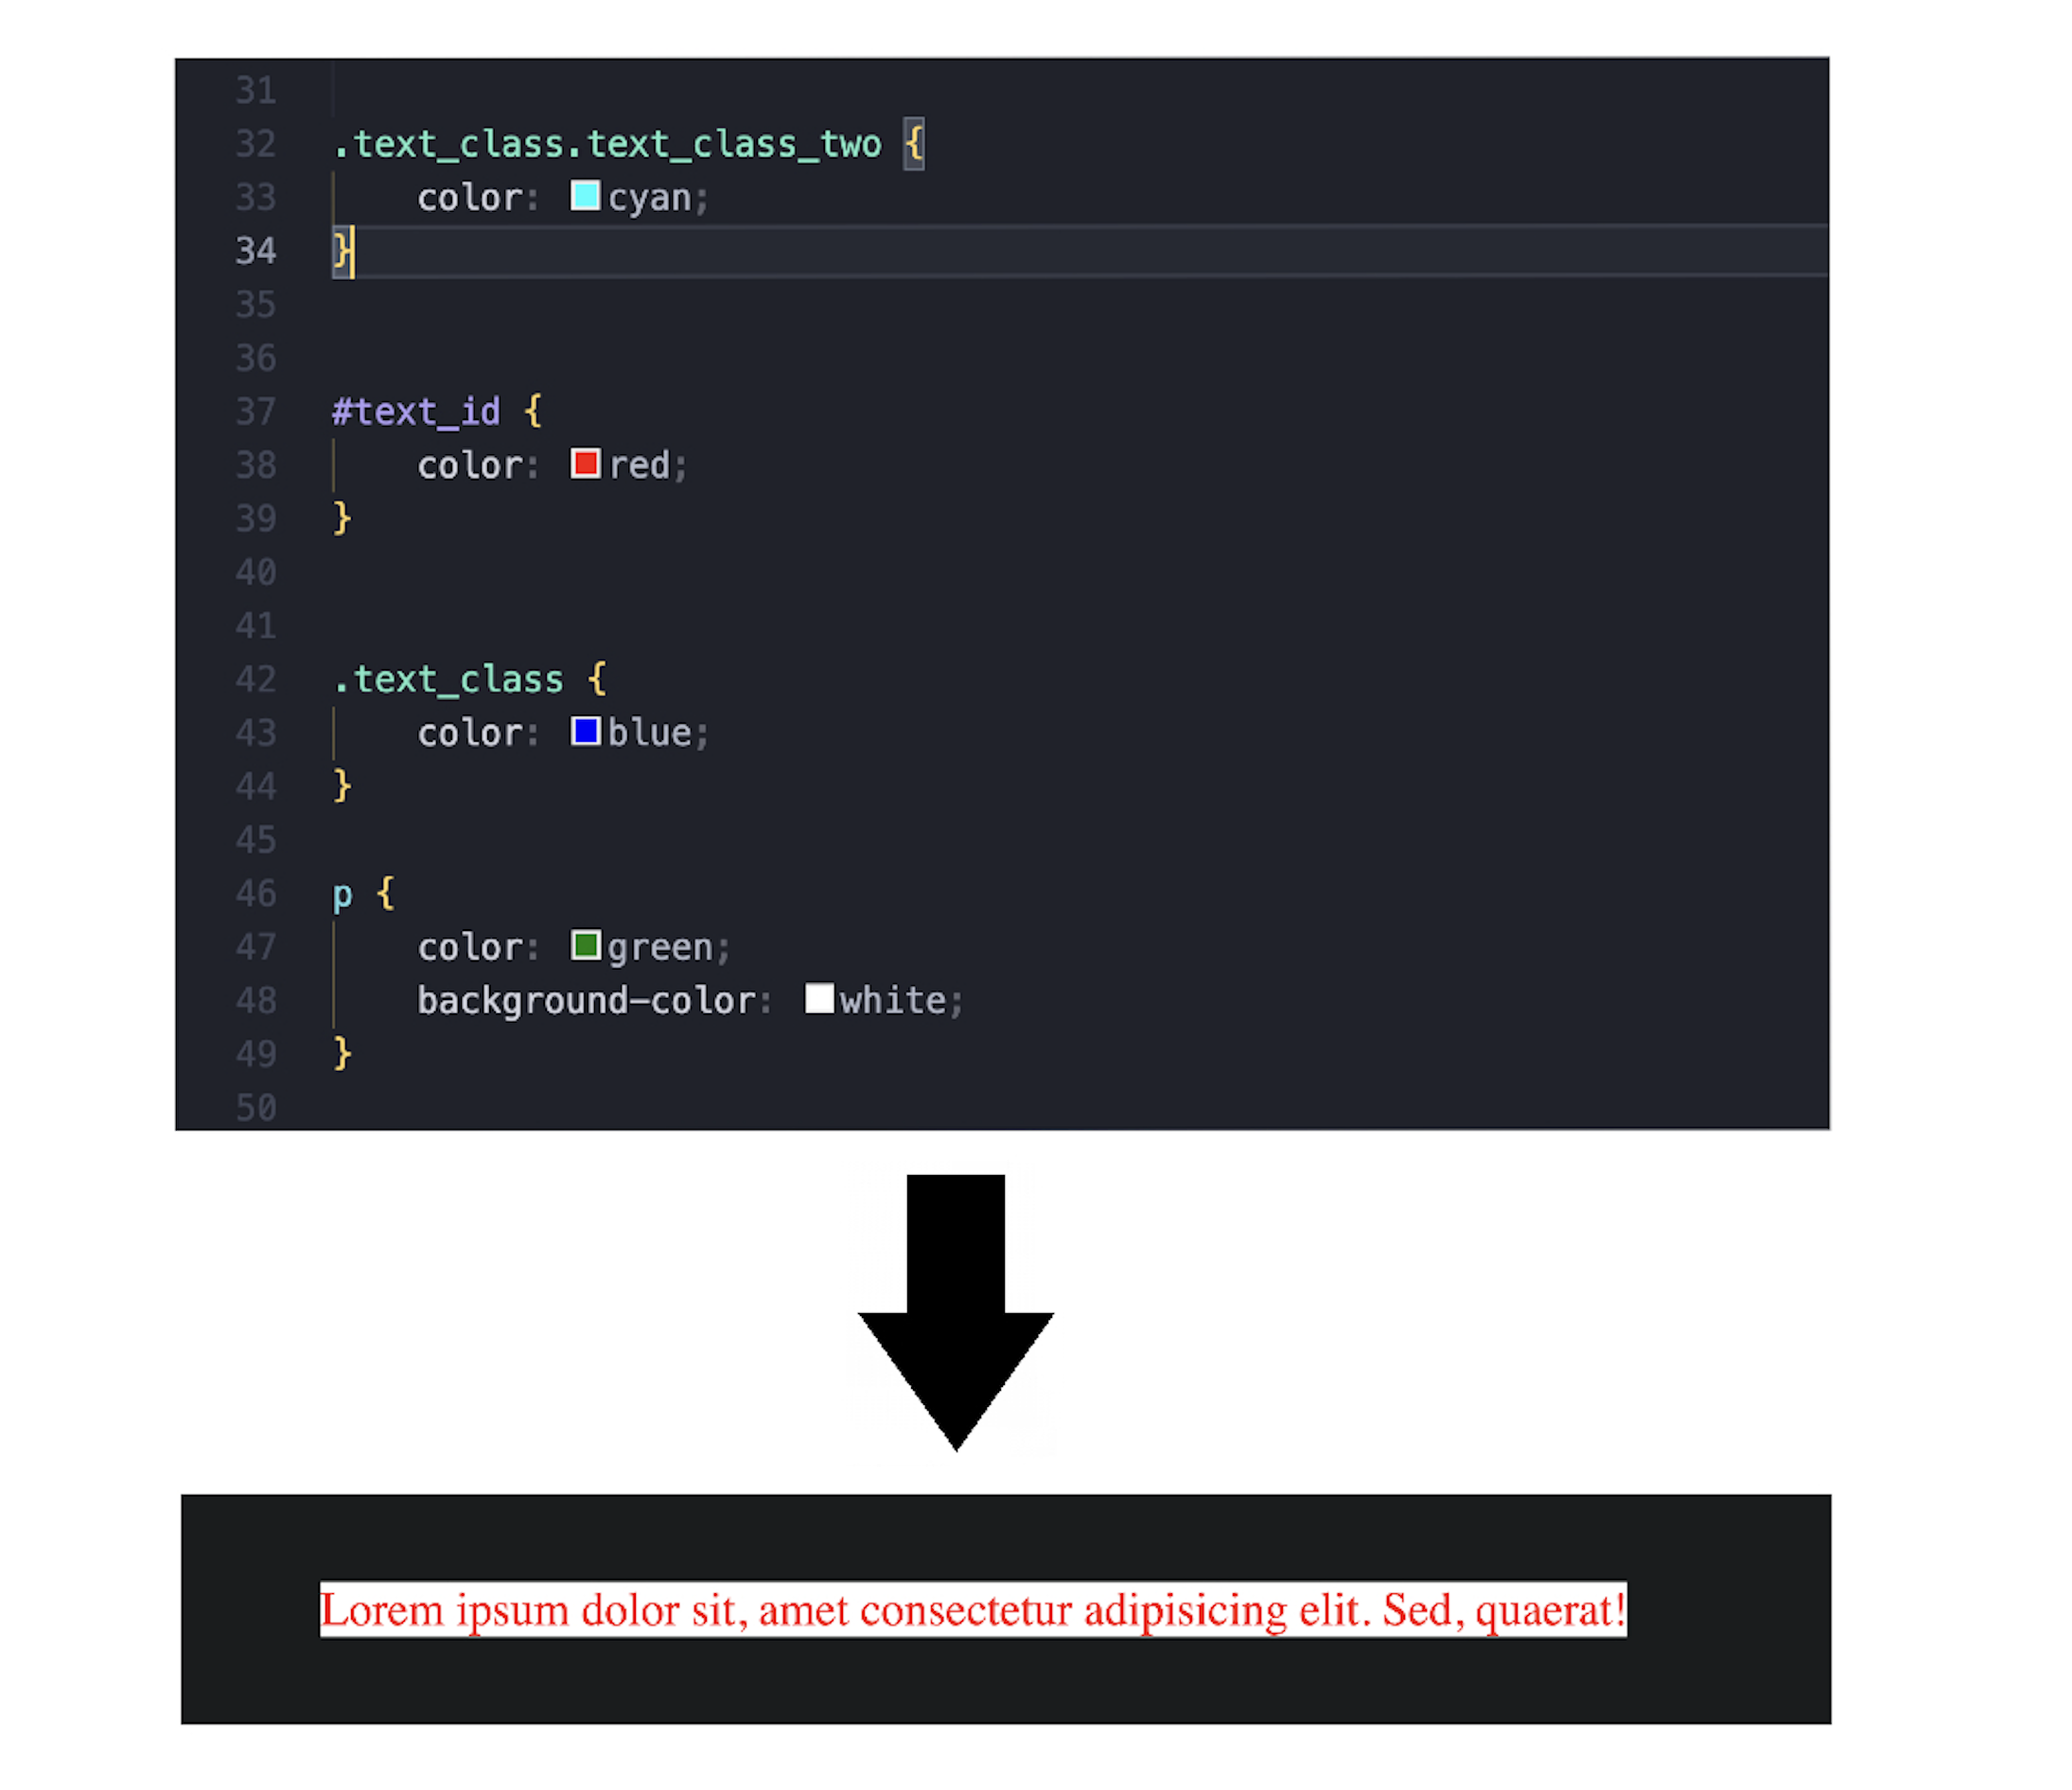
Case III – Give the same element color red using an ID selector, while the class and the element selector are still win

Specificity is : (1, 0, 0)As you can see, the ID selector overrides all the selectors even though they appear later in the stylesheet.
But what if we use a combined class selector? Will it win over the ID selector?
Case IV – Give the same element color cyan using a combined class selector, while the ID, the class, and the element selector are still win. Then remove the ID selector to see what happens.
Specificity is: (1, 2, 0)The class selector gets a score of 2 because we used a combined class selector (.class1.class2), and the ID selector gets a score of 1 — however, the ID selector still wins.
Why? Because ID specificity (1, 0, 0) is always higher than any number of class selectors.
But what if we comment out the ID selector?
Let's see:
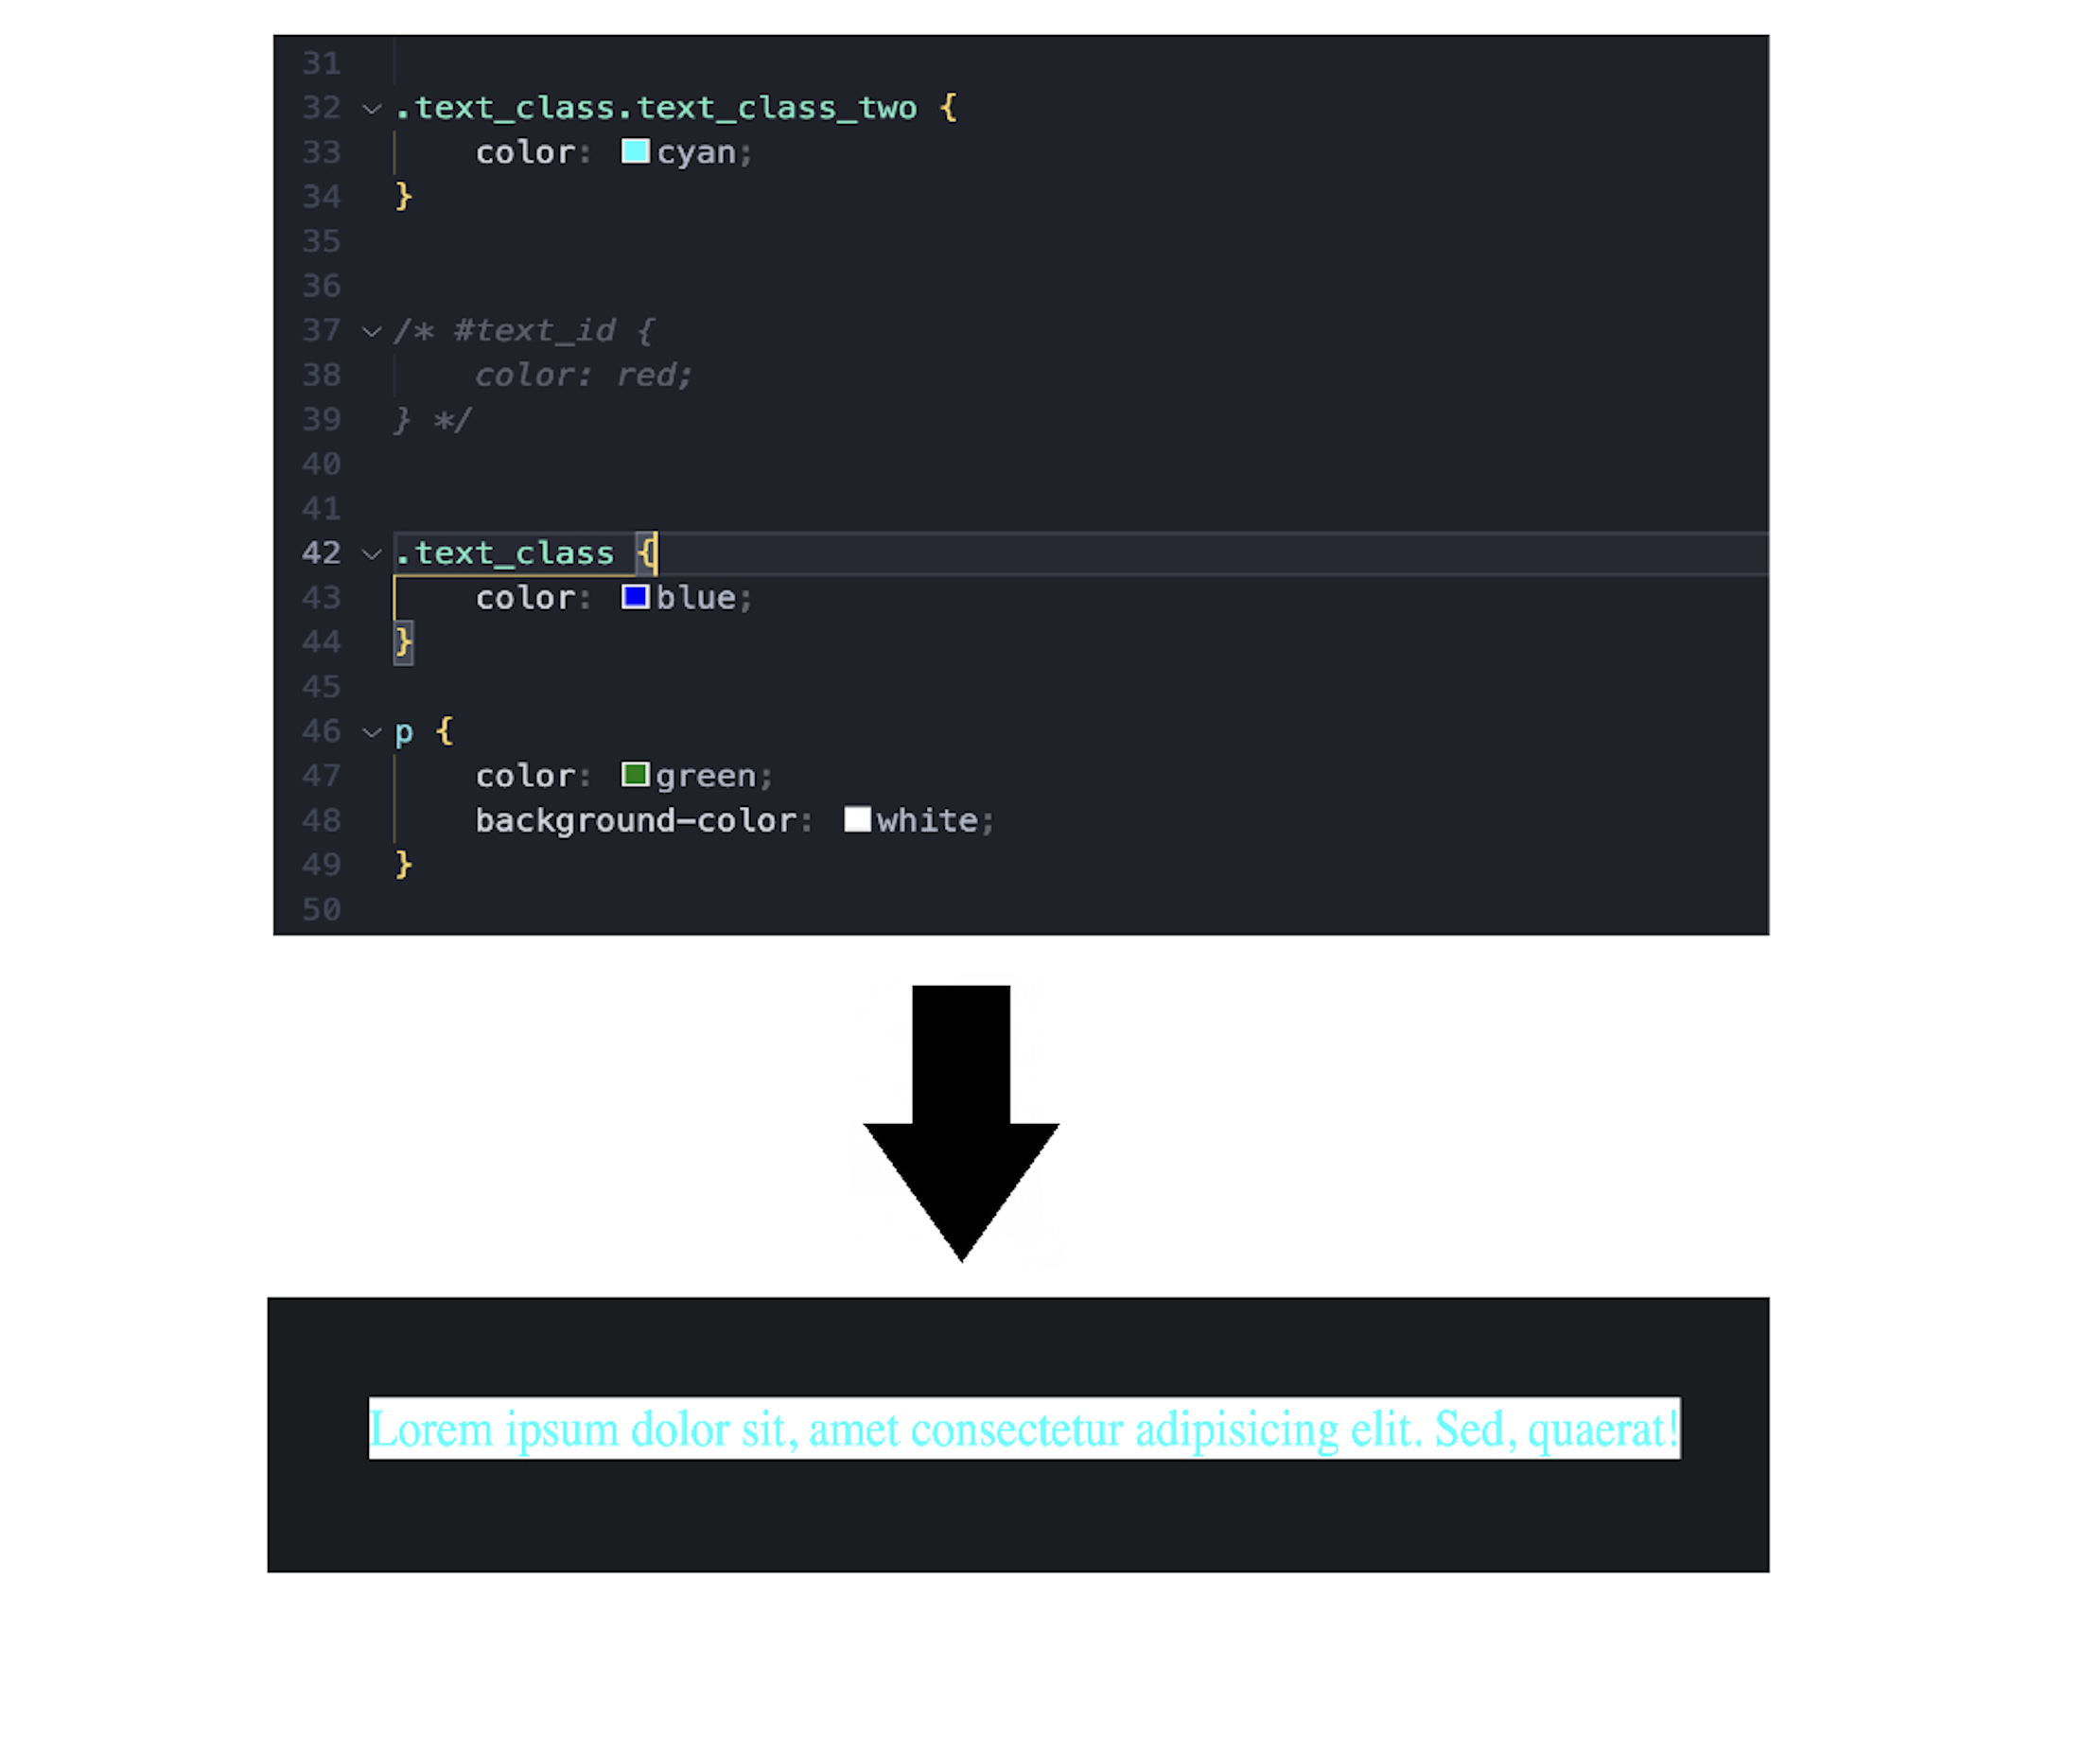
Specificity is: (0, 2, 0)So now that the ID selector is removed, the combined class selector wins — and the color changes to cyan.
No matter how many classes, attributes, or elements you combine — an ID selector will always win if it’s present.
Case V – Apply the color goldenrod using a combined selector of ID and class, while the ID, class, and element selectors are still applied.
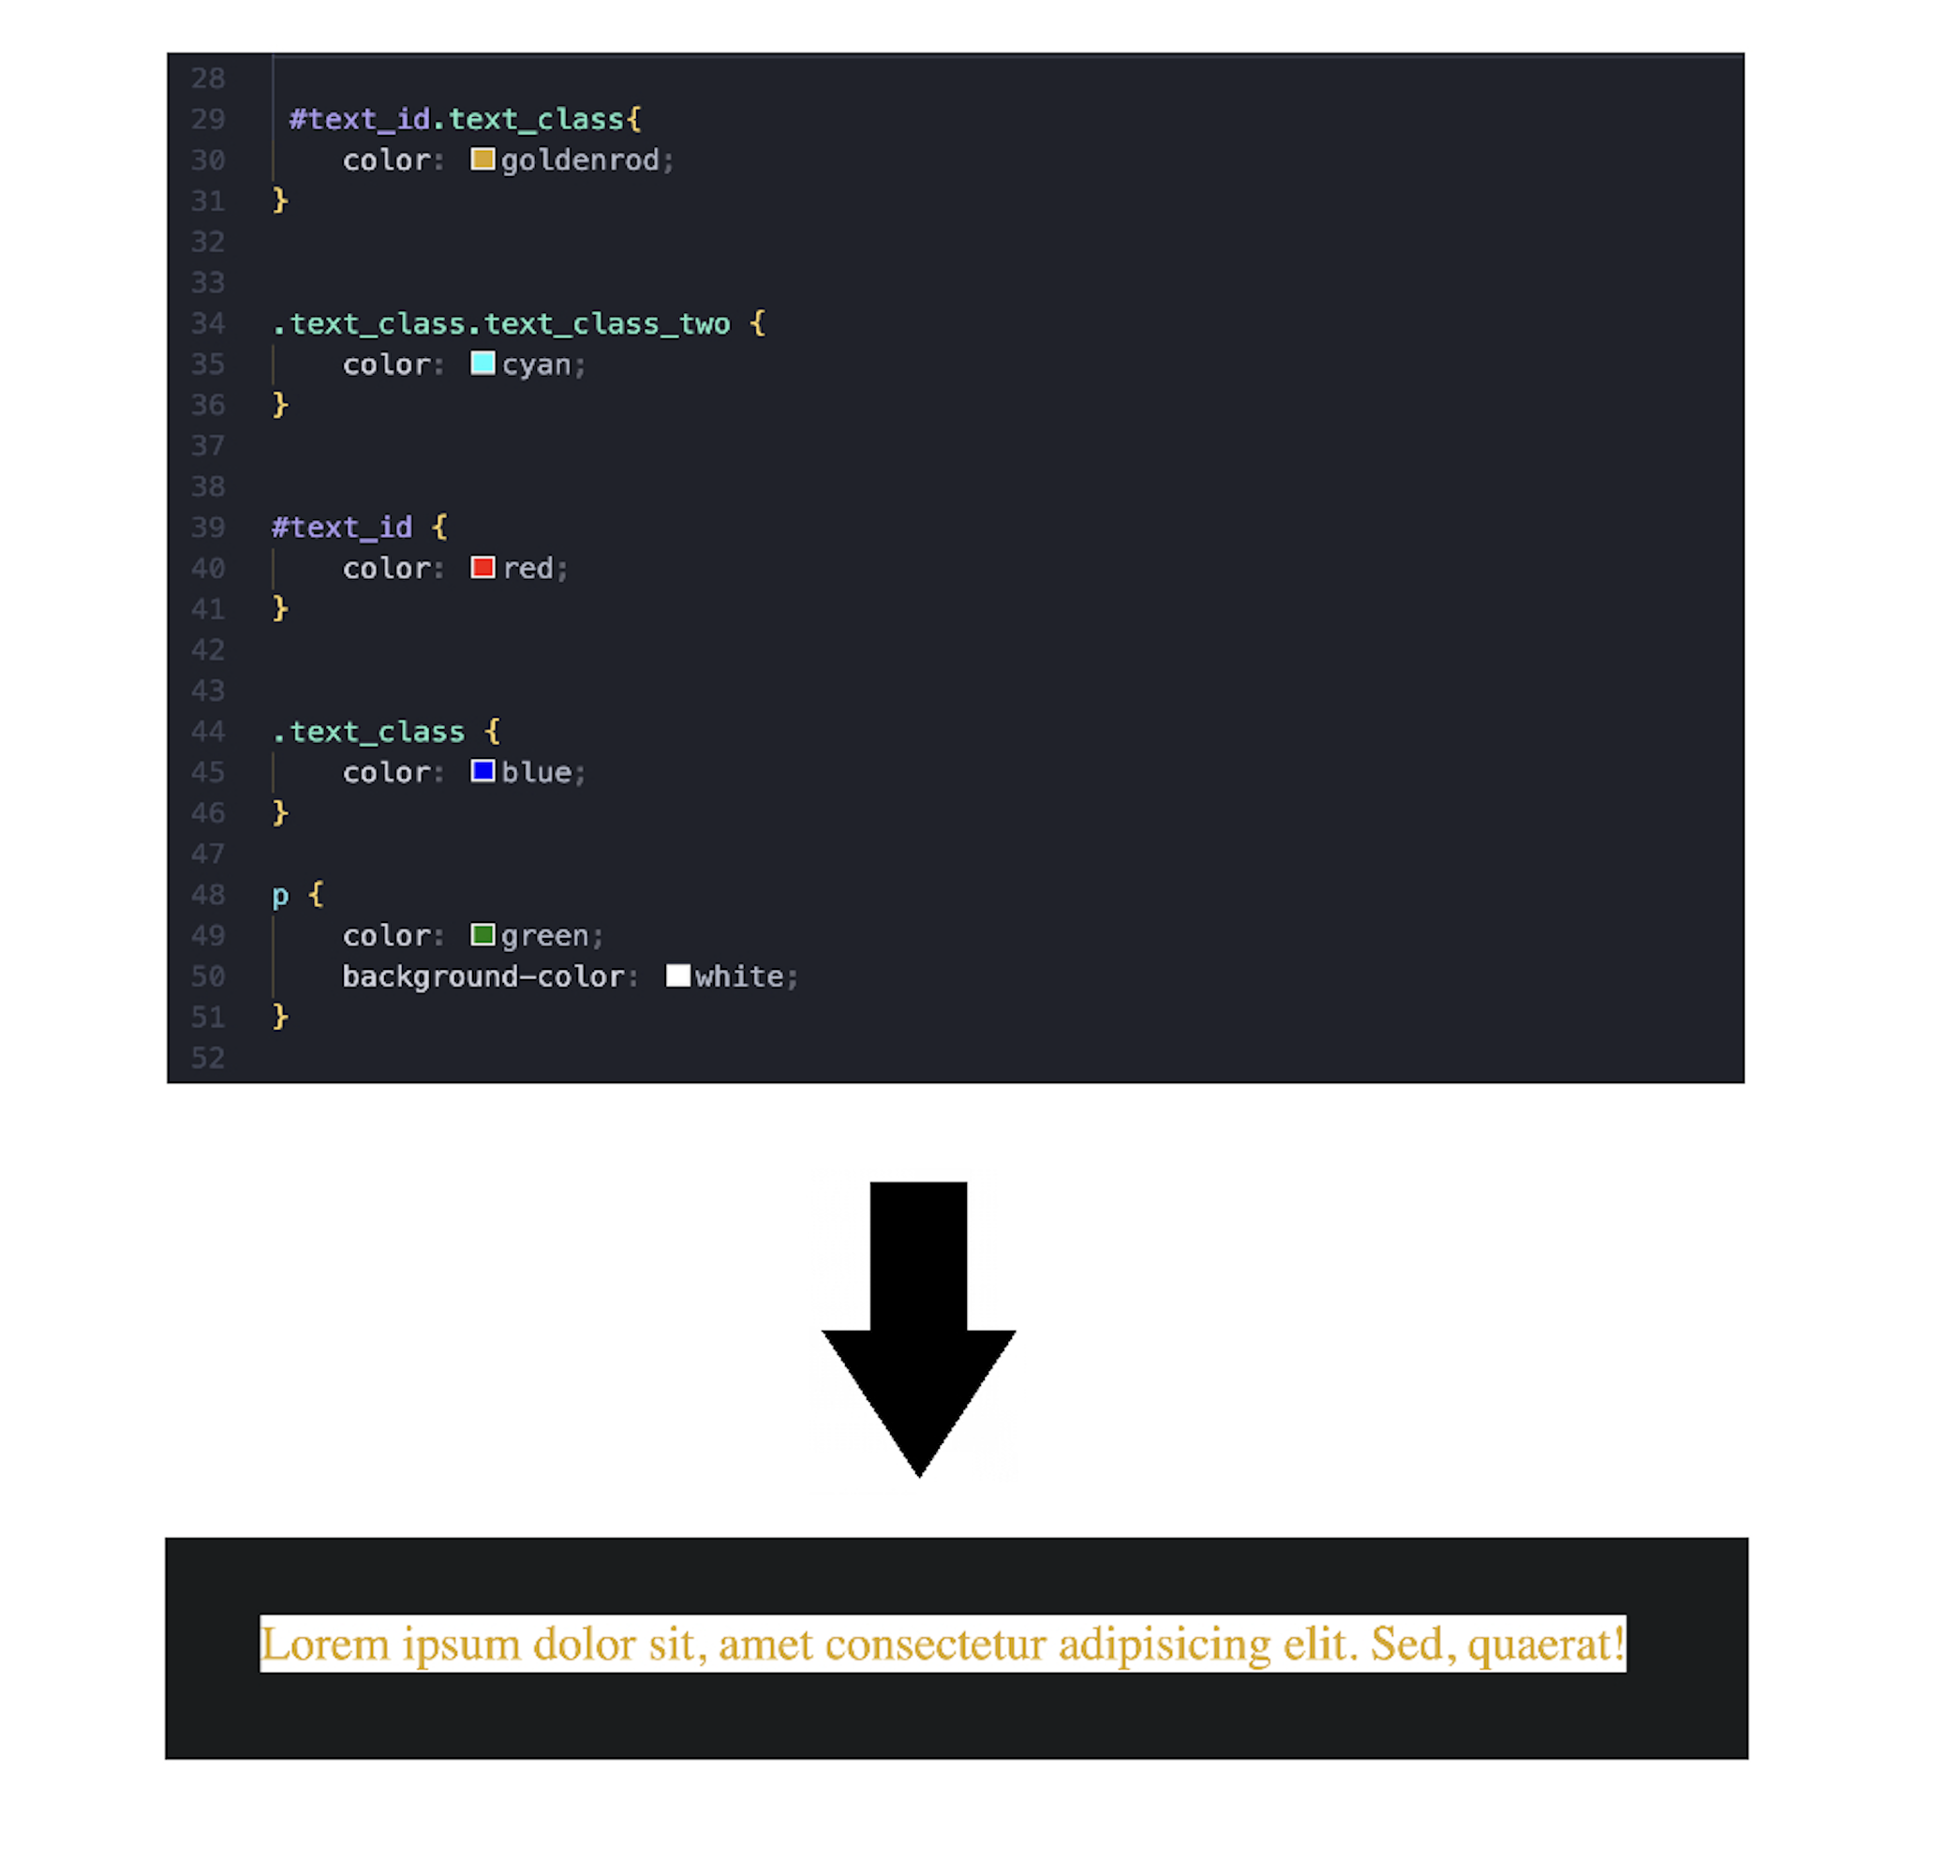
Specificity is: (1, 1, 0)Since the selector combines both an ID and a class, the specificity becomes (1, 1, 0), which is more specific than just the ID alone (1, 0, 0).
That’s why goldenrod wins instead of red.
Combining selectors increases specificity — making your rule stronger in the cascade.
Case VI – Use Internal CSS with the same selector (#text_id.text_class), applying the color cadetblue
Why are we using the same selector (#text_id.text_class)?
Because if we use only the ID selector (#text_id), it has lower specificity than the combined ID and class selector (#text_id.text_class).
So no matter where we use #text_id, it will be overridden by the more specific #text_id.text_class.
Now let’s apply #text_id.text_class in Internal CSS and change the color to cadetblue — see what happens:
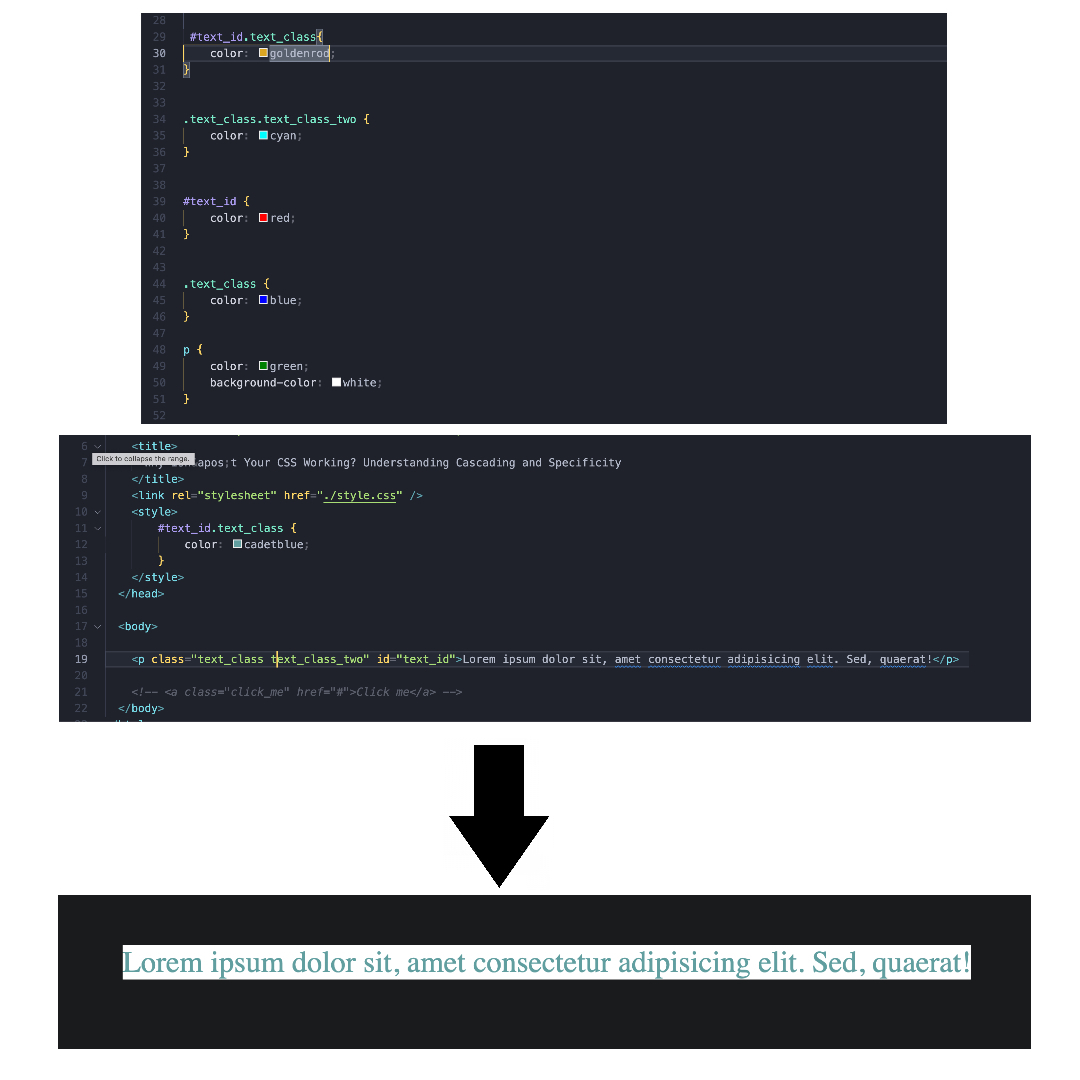
If we target an element with the same selector in Internal CSS, it has higher priority than External CSS. So, the color cadetblue wins.
However, it still gets overridden by inline styles on the same element.
Case VII – Use Inline CSS for the same element, applying the color grey
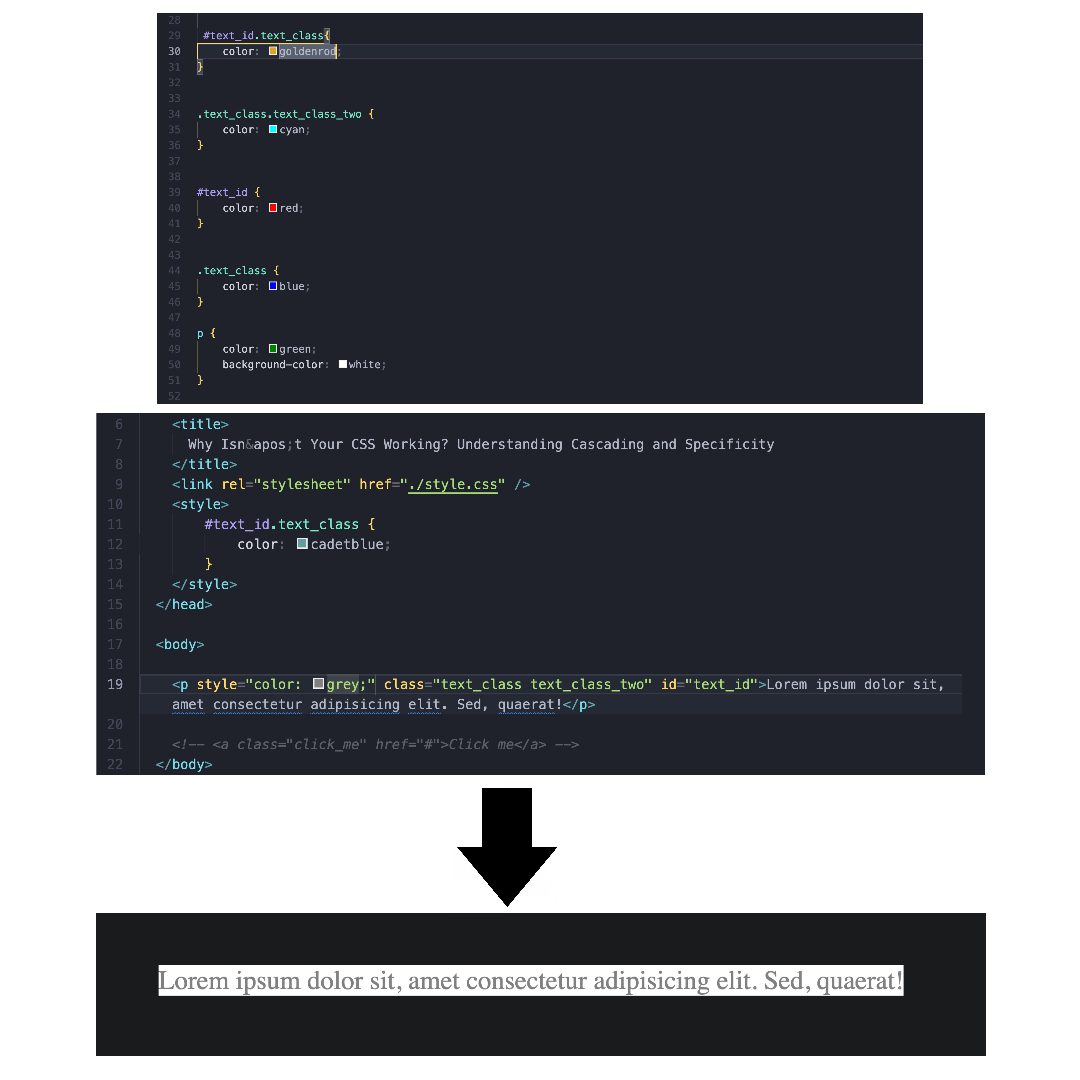
As you can see, inline CSS, with style attribute, overrides everything — external, internal, or embedded styles — even selectors with high specificity, and color grey wins.
But wait, there’s one thing that can break inline style priority:
A keyword called !important.
Case VIII – Use a CSS specificity exception (!important) with the element selector, applying the color green
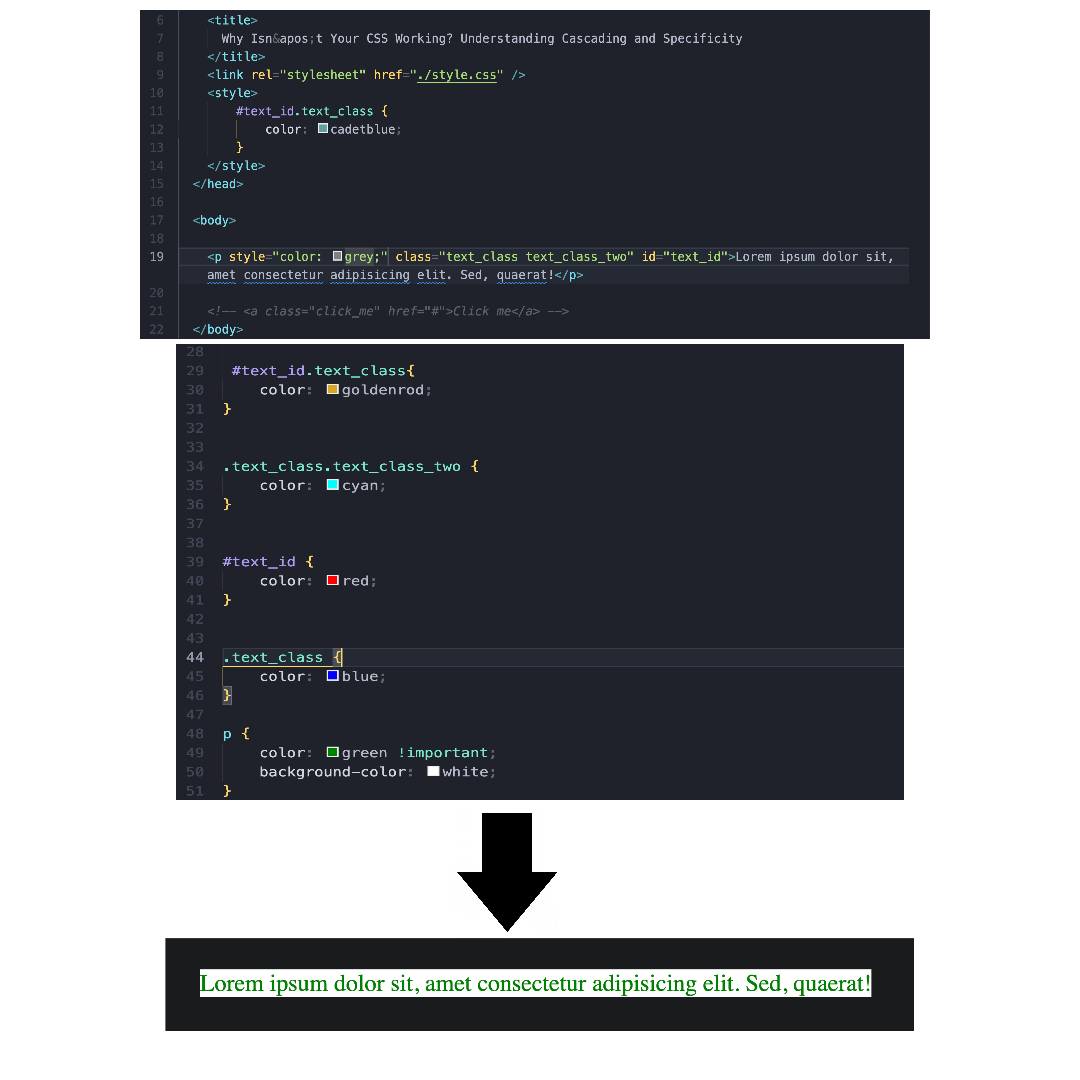
The keyword !important breaks all the rules of specificity, so the color green defined with the (element) selector is applied.
When you add !important to a CSS rule, it tells the browser:
"No matter what the specificity is, apply this rule."
Even inline styles get overridden by a low-specificity rule (like an element selector) if it’s marked !important.
Bottom Line
CSS specificity determines which rule wins when multiple rules target the same element. Here's a recap of what we learned:
- Element selectors have the lowest specificity — they work until something more specific comes along.
- Class selectors override element selectors because they have higher specificity.
- ID selectors beat both element and class selectors — no matter where they appear in the stylesheet.
-
Combined selectors (like
.class1.class2or#id.class) have higher specificity than their individual parts. More selectors = more specific. -
Internal CSS (within
) can override external CSS if specificity is equal, due to its higher location in the cascade. - Inline styles override both external and internal styles, regardless of their specificity.
- The
!importantkeyword breaks all specificity rules. It forces a style to apply, even beating inline styles — no matter the selector's specificity.
Think of specificity like weight classes — the heavier rule always wins.
And!importantis like a cheat code — use it only when absolutely necessary, as it can make debugging harder.
Quick Quiz: Strengthen Your Understanding of the Specificity
Question:
What color will the element render in the browser?
class="title" id="header">Hello#header h1 { color: blue; }
.title { color: red; }
h1 { color: green; }Wrapping Up
That’s the end of this Part One article of the “Why Isn’t Your CSS Working?” series.
Here, we’ve covered specificity in depth — from element, class, ID, to inline and even !important.
But this is only half the picture.
Next, we’ll explore the second half of the puzzle: Cascading — the rule of order.
Because Specificity and Cascading are the soulmates of CSS — understanding one without the other still leads to confusion.
I hope this helped you in your web development journey.
If you have any confusion, corrections, or suggestions, feel free to drop a comment below!
Thanks for reading.
SOLUTION OF THE QUIZ
Answer: Red
Explanation
Let’s break down the specificity of each selector:
#header h1→ Specificity: (1, 0, 1)
This targets aninside an element with the IDheader.
But in our HTML, theitself has the IDheader, it’s not inside an element with that ID.
So this rule does not apply..title→ Specificity: (0, 1, 0)
This applies to any element with the classtitle.
Thehas this class, so this rule applies.h1→ Specificity: (0, 0, 1)
This applies to alltags.
So it also applies.
Now, between .title and h1, the .title selector has higher specificity, so its color red wins.
