Deploying web applications manually on a Windows Server can be tedious, error-prone, and time-consuming. Every new server setup requires multiple steps — installing IIS, configuring app pools, setting permissions, publishing code, assigning ports, and so on.
What if you could skip all of that?
What if you could go from zero to a fully running ASP.NET Core application hosted on IIS with just one command?
That’s exactly what this PowerShell script is designed to do.
What Are We Automating?
We’re automating the entire process of deploying an ASP.NET Core web application (SGBookPortal) onto IIS (Internet Information Services) on a Windows Server machine.
By the end of the script, you’ll have:
- IIS installed and ready
- Your application cloned from GitHub
- Code built and published to the right folder
- Folder permissions properly set
- An IIS site and application pool fully configured
- Your app running and accessible via
http://localhost:
How This Would Be Done Manually on Windows Server
Here’s a step-by-step explanation of what this deployment would look like if you were to do it manually without automation:
Step 1: Launch PowerShell as Administrator
Why? Most IIS, system configurations, and software installations require elevated privileges.
Step 2: Install IIS
- Go to Server Manager > Add Roles and Features
- Select the Web Server (IIS) role
- Enable management tools like IIS Management Console
- Complete the wizard and restart if required
Purpose: IIS is the Windows component that will host and serve our ASP.NET Core site.
Step 3: Install Git
Download and install Git from https://git-scm.com/download/win.
This is needed to clone the code repository.
*Step 4: Install .NET SDK and Hosting Bundle *
Install the appropriate .NET SDK version from https://dotnet.microsoft.com/download.
Purpose: We use the SDK to build and publish the ASP.NET Core project to a deployable format.
Step 5: Clone the Repository
- Open PowerShell or Git Bash
- Run
git cloneto download the project into your local file system
Step 6: Create Web Root Directory
- Manually go to
C:\inetpub\wwwroot - Create a folder named
sgbookportal - This will serve as the deployment folder for the app files
Step 7: Publish the ASP.NET Core App
- Navigate to the project folder
- Run:
dotnet publish BookPortel.csproj -c Release -o C:\inetpub\wwwroot\sgbookportalThis compiles the application and outputs the binaries, views, configs, and dependencies needed for production.
Step 8: Set Folder Permissions
- Right-click the deployment folder
- Go to Properties > Security
- Grant Read and Execute permission to the user group:
IIS_IUSRS
Purpose: IIS worker process needs permissions to serve the app from this directory.
Step 9: Assign an Available Port
Since IIS sites bind to specific ports, you need to:
- Check which ports are already in use (especially 80/443)
- Pick an unused one (e.g., 8081)
Step 10: Create IIS Website and Application Pool
- Open IIS Manager
- Right-click Sites > Add Website
- Site name:
SGBookPortal - Physical path:
C:\inetpub\wwwroot\sgbookportal - Port: e.g.,
8081
- Site name:
- Click OK
Note: For ASP.NET Core, App Pool should be configured with “No Managed Code” since .NET Core apps run as standalone processes (Kestrel).
However, IIS auto-generates and manages this App Pool when you create the site via PowerShell, so no need to configure it manually.
Step 11: Start the Website
From IIS Manager, select the site and click Start in the right-hand panel.
Visit http://localhost:8081/swagger/index.html to test the app.
Now Let's Explain the Script in Bits
Now we’ll walk through and explain each part of the script — line by line.
1. Ensure Script is Run as Administrator
if (-not ([Security.Principal.WindowsPrincipal] ...)) {
    Write-Host "This script must be run as Administrator." -ForegroundColor Red
    exit 1
}
Checks if the current PowerShell session is running with admin privileges. If not, it exits to prevent permission errors.
2. Install IIS
Install-WindowsFeature -Name Web-Server -IncludeManagementToolsInstalls the Web-Server (IIS) role along with tools like the IIS Manager GUI.
3. Ensure Git is Installed
if (-not (Get-Command git ...)) {
    Write-Host "Git is not installed..."
}
Checks for Git. If not available, asks the user to install it manually.
4. Ensure .NET SDK is Installed
if (-not (Get-Command dotnet ...)) {
    Write-Host ".NET SDK is not installed..."
}
Checks for the dotnet CLI which is used to build and publish .NET apps.
5. Define Variables
$repoUrl   = "https://github.com/softwaregurukulamdevops/SGbookportal.git"
$clonePath = "C:\SGbookportal"
$sitePath  = "C:\inetpub\wwwroot\sgbookportal"
$siteName  = "SGBookPortal"
$poolName  = "SGBookPortalPool"
These variables define:
- The GitHub repo URL
- Local directory to clone the repo
- Final publish target (IIS web root)
- IIS site and app pool names
6. Clone the Repository
if (-not (Test-Path $clonePath)) {
    git clone $repoUrl $clonePath
}
Clones the codebase from GitHub if it doesn't already exist.
7. Create Web Root Directory
New-Item -Path $sitePath -ItemType Directory -ForceCreates the folder under IIS's wwwroot where the app will live.
8. Publish the App
dotnet publish "$clonePath\BookPortel\BookPortel.csproj" -c Release -o $sitePathBuilds the app in Release mode and deploys it to $sitePath.
9. Set IIS Permissions
icacls $sitePath /grant "IIS_IUSRS:(OI)(CI)RX" /TGrants Read/Execute permissions to IIS user groups on the deployed folder recursively.
10. Assign Available Port
$startingPort = 80
$usedPorts = (Get-NetTCPConnection -State Listen).LocalPort
$port = $startingPort
while ($usedPorts -contains $port) { $port++ }
Checks for an unused port starting from 80 and selects the first one available.
11. Configure IIS
Import-Module WebAdministrationLoads IIS management commands into the session.
if (Get-Website | Where-Object { $_.Name -eq $siteName }) {
    Remove-Website -Name $siteName
}
Removes any existing IIS site with the same name.
if (-not (Test-Path "IIS:\AppPools\$poolName")) {
    New-WebAppPool -Name $poolName
    Set-ItemProperty ... -Name "managedRuntimeVersion" -Value ""
}
Creates an App Pool with No Managed Code, suitable for .NET Core apps.
New-Website -Name $siteName -Port $port -PhysicalPath $sitePath -ApplicationPool $poolNameCreates a new IIS site, bound to the selected port, and linked to the specified app pool.
12. Start the Website
Start-Website -Name $siteNameStarts the newly created site.
User is informed they can access the app at http://localhost:$port/swagger/index.html.
Summary
This script removes all the manual overhead of:
- Installing necessary tools
- Publishing the application
- Setting permissions
- Configuring IIS (sites + app pool)
- Starting the hosted service
Troubleshooting IIS Deployment Issues for ASP.NET Core
During my deployment of an ASP.NET Core application to IIS, I encountered two major errors that I think are common and worth documenting for others:
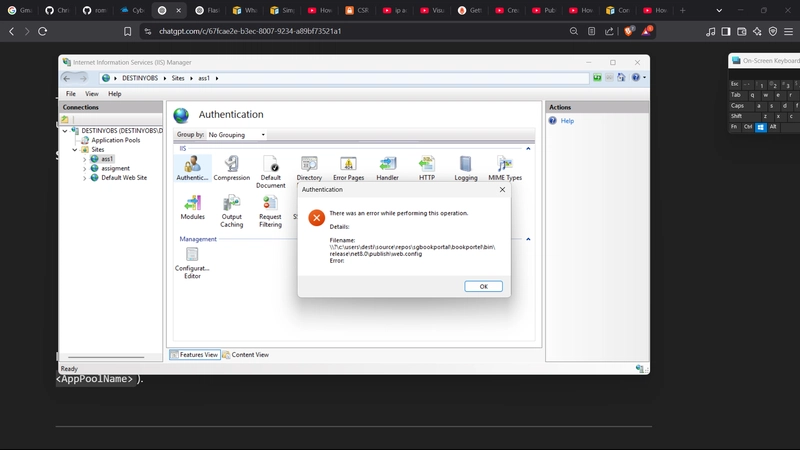
Error 1: While Performing Authentication Settings in IIS
There was an error while performing this operation.
Details:
Filename: \\?\C:\users\...\.config
Error: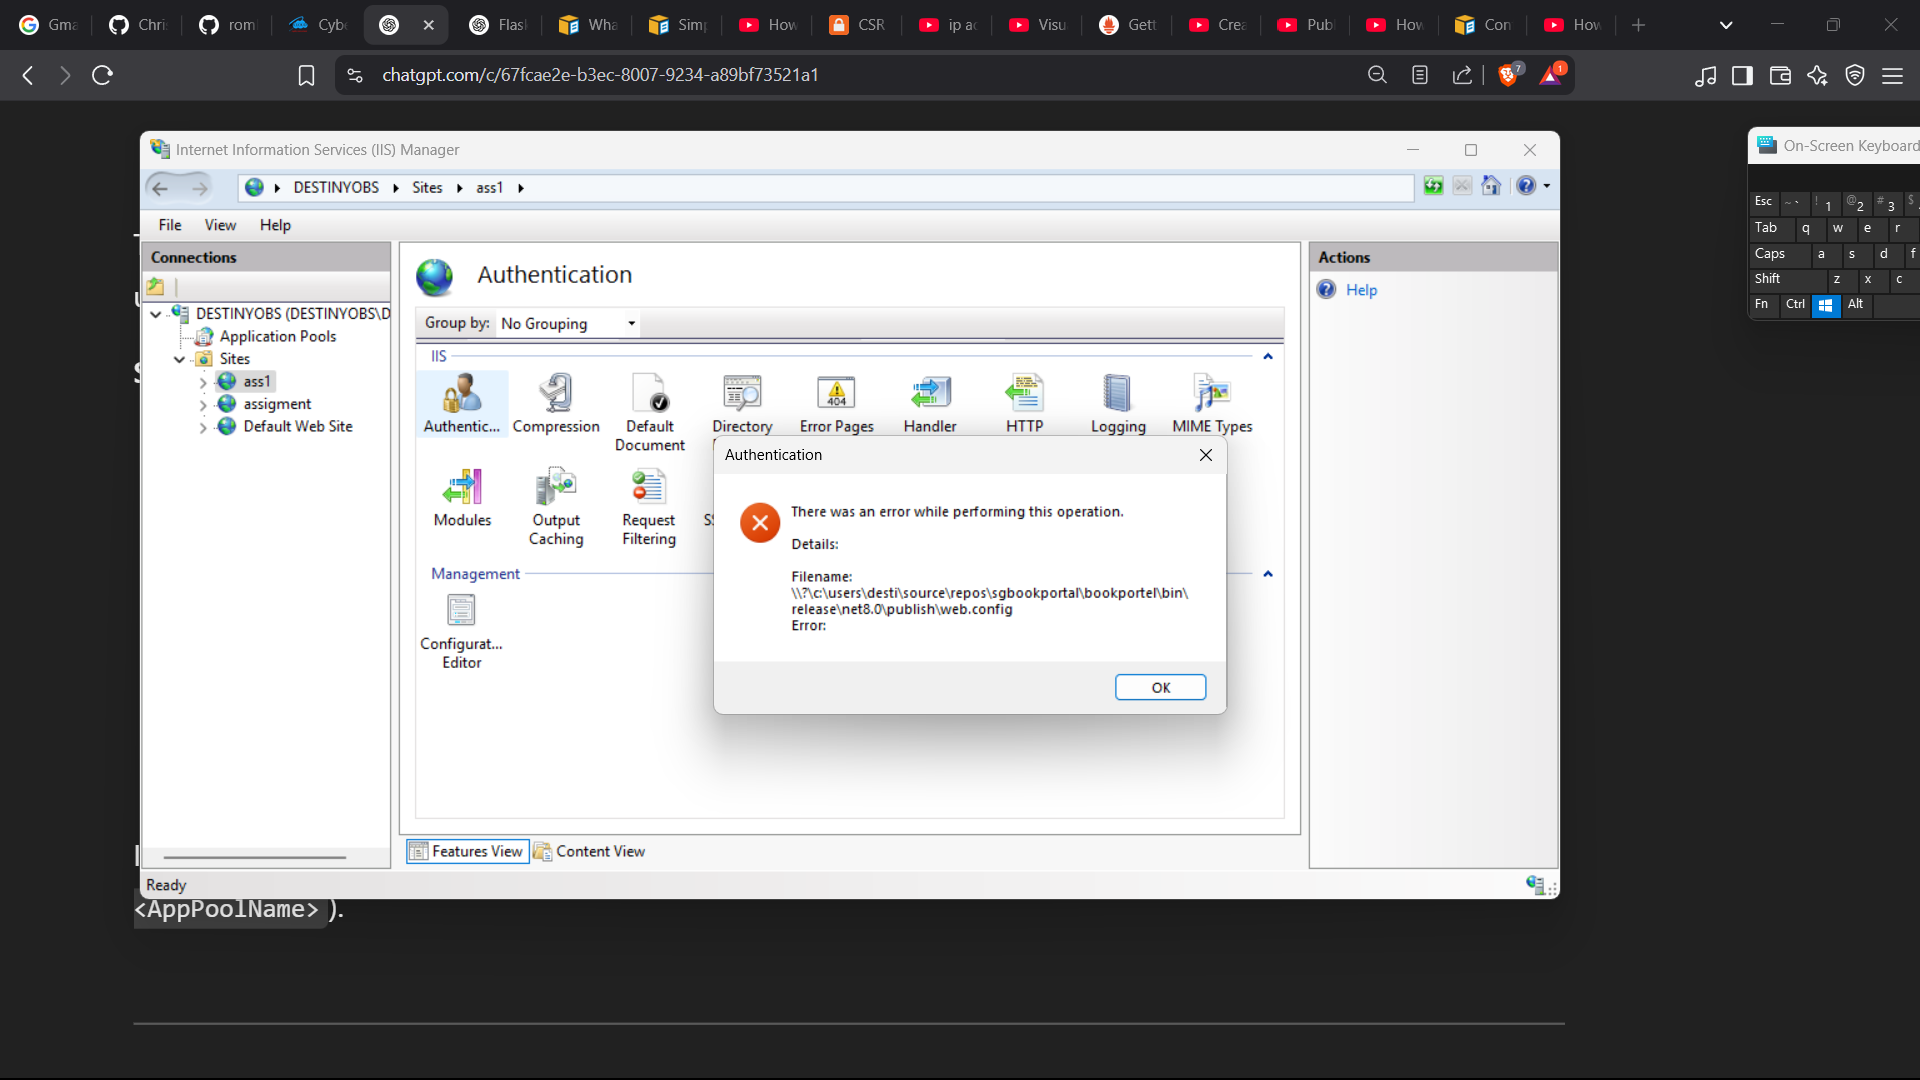
Error 2: HTTP Error 500.19 – Internal Server Error
The requested page cannot be accessed because the related configuration data for the page is invalid.
Error Code: 0x8007000d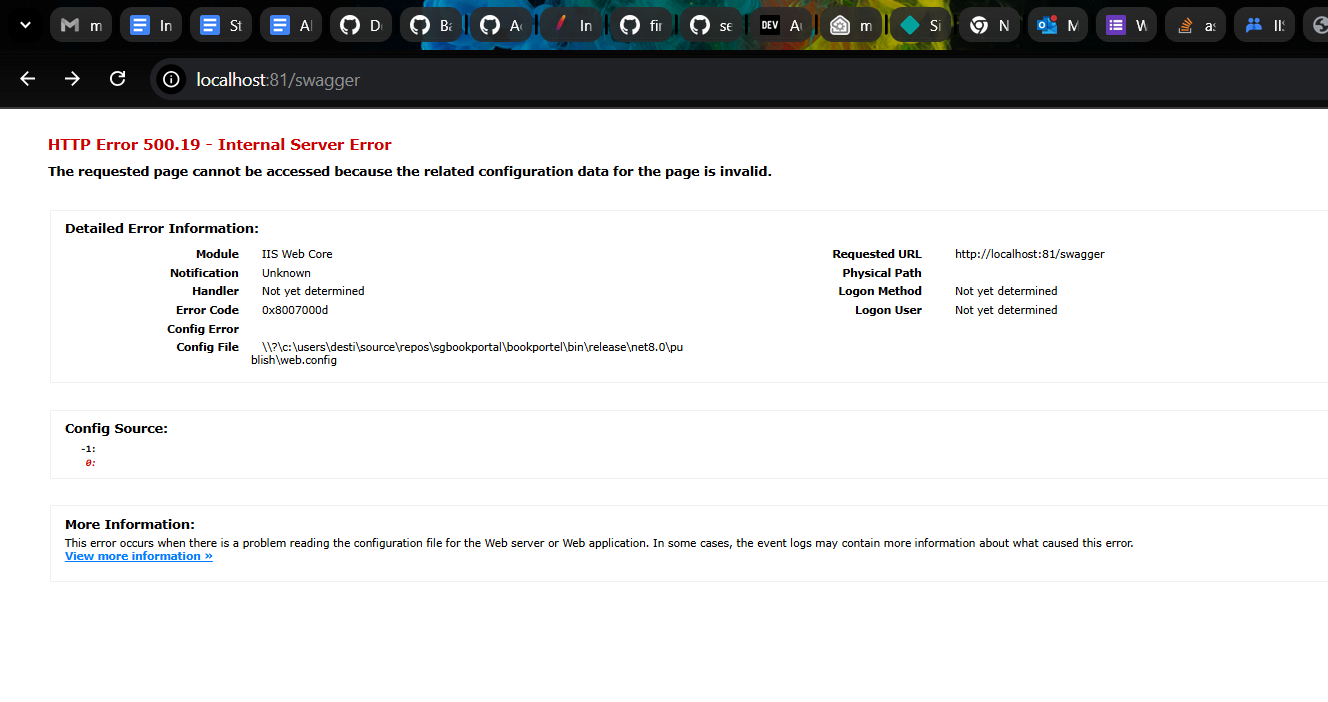
What to Check When You See These Errors:
-
Check for
web.configFile- Go to your published folder (e.g.,
bin\release\net8.0\publish) and make sure the file is namedweb.configand not justweb. - IIS requires a proper
web.configfile to know how to run your ASP.NET Core app. If it’s missing or malformed, IIS won't know how to serve your application.
- Go to your published folder (e.g.,
-
Check if the .NET Core Hosting Bundle is Installed Correctly
- These types of errors can also mean that the ASP.NET Core Hosting Bundle is either not installed or not configured correctly.
- This bundle allows IIS to run ASP.NET Core applications using the in-process hosting model.
Recommended Fix:
If you run into these kinds of issues:
-
Start Fresh:
- Uninstall any previous hosting bundle installations if you're unsure of their integrity.
- Reinstall the latest .NET Core Hosting Bundle compatible with your app version. > You can download it from Microsoft's official .NET download page.
-
🛠️ Re-Publish Your Application:
- Use Visual Studio or
dotnet publishagain to regenerate the files, ensuring theweb.configis created properly.
- Use Visual Studio or
In Summary
These are the errors I personally faced during deployment. If you run into something similar, start by checking the
web.configpresence and reinstalling the .NET Hosting Bundle. That’s what worked for me!
# Deploys the SGBookPortal ASP.NET Core application to IIS

# Step 1: Ensure script is run as Administrator
if (-not ([Security.Principal.WindowsPrincipal] [Security.Principal.WindowsIdentity]::GetCurrent()).IsInRole([Security.Principal.WindowsBuiltinRole] "Administrator")) {
    Write-Host "This script must be run as Administrator." -ForegroundColor Red
    exit 1
}

# Step 2: Install IIS
Write-Host "Installing IIS..."
try {
    Install-WindowsFeature -Name Web-Server -IncludeManagementTools -ErrorAction Stop
} catch {
    Write-Host "Failed to install IIS: $_" -ForegroundColor Red
    exit 1
}

# Step 3: Check for Git
if (-not (Get-Command git -ErrorAction SilentlyContinue)) {
    Write-Host "Git is not installed. Install Git from https://git-scm.com/download/win and rerun the script." -ForegroundColor Red
    exit 1
}

# Step 4: Check for .NET SDK
if (-not (Get-Command dotnet -ErrorAction SilentlyContinue)) {
    Write-Host ".NET SDK is not installed. Install from https://dotnet.microsoft.com/download and rerun the script." -ForegroundColor Red
    exit 1
}

# Step 5: Define variables
$repoUrl   = "https://github.com/softwaregurukulamdevops/SGbookportal.git"
$clonePath = "C:\SGbookportal"
$sitePath  = "C:\inetpub\wwwroot\sgbookportal"
$siteName  = "SGBookPortal"
$poolName  = "SGBookPortalPool"

# Step 6: Clone the repository if not already present
if (-not (Test-Path $clonePath)) {
    try {
        Write-Host "Cloning repository..."
        git clone $repoUrl $clonePath
    } catch {
        Write-Host "Repository clone failed: $_" -ForegroundColor Red
        exit 1
    }
} else {
    Write-Host "Repository already exists. Skipping clone."
}

# Step 7: Create web root directory
if (-not (Test-Path $sitePath)) {
    try {
        Write-Host "Creating web root directory..."
        New-Item -Path $sitePath -ItemType Directory -Force
    } catch {
        Write-Host "Failed to create web root directory: $_" -ForegroundColor Red
        exit 1
    }
}

# Step 8: Publish the ASP.NET Core project
try {
    Write-Host "Publishing the application..."
    dotnet publish "$clonePath\BookPortel\BookPortel.csproj" -c Release -o $sitePath
} catch {
    Write-Host "Publish failed: $_" -ForegroundColor Red
    exit 1
}

# Step 9: Grant IIS read/execute permissions
try {
    Write-Host "Setting permissions..."
    icacls $sitePath /grant "IIS_IUSRS:(OI)(CI)RX" /T | Out-Null
} catch {
    Write-Host "Failed to set folder permissions: $_" -ForegroundColor Red
    exit 1
}

# Step 10: Check and assign available port (start from 80)
$startingPort = 80
$usedPorts = (Get-NetTCPConnection -State Listen).LocalPort | Sort-Object -Unique
$port = $startingPort
while ($usedPorts -contains $port) {
    $port++
}
Write-Host "Selected port: $port"

# Step 11: Configure IIS - Remove existing site and create app pool
Import-Module WebAdministration

# Remove existing site if it exists
if (Get-Website | Where-Object { $_.Name -eq $siteName }) {
    try {
        Write-Host "Removing existing site '$siteName'..."
        Remove-Website -Name $siteName
    } catch {
        Write-Host "Failed to remove existing IIS site: $_" -ForegroundColor Red
        exit 1
    }
}

# Create App Pool (No Managed Code for .NET Core)
if (-not (Test-Path "IIS:\AppPools\$poolName")) {
    New-WebAppPool -Name $poolName
    Set-ItemProperty "IIS:\AppPools\$poolName" -Name "managedRuntimeVersion" -Value ""
}

# Create new IIS website
try {
    Write-Host "Creating IIS site '$siteName'..."
    New-Website -Name $siteName -Port $port -PhysicalPath $sitePath -ApplicationPool $poolName
} catch {
    Write-Host "Failed to create IIS site: $_" -ForegroundColor Red
    exit 1
}

# Step 12: Start the website
try {
    Start-Website -Name $siteName
    Write-Host "`nDeployment completed successfully."
    Write-Host "You can access the application at: http://localhost:$port/swagger/index.html`n"
} catch {
    Write-Host "Failed to start IIS site: $_" -ForegroundColor Red
    exit 1
}