Azure Service Bus enables reliable, asynchronous communication between microservices or distributed components in your app. It helps in:
- Decoupling services (e.g., API triggers a background worker)
- Buffering traffic (e.g., spikes in request volume)
- Enabling retries and fault tolerance
- Scalable message handling with minimal coupling
Step-by-Step: Azure Service Bus Integration in .NET
Prerequisites:
- An Azure subscription
- An Azure Service Bus namespace and a queue or topic
- A .NET 6 or later project (console, web API, etc.)
Step 1: Install the NuGet Package
In your terminal or Package Manager Console, run:
#bash
dotnet add package Azure.Messaging.ServiceBus
Or via Visual Studio's NuGet UI:
Manage NuGet Packages → Search for Azure.Messaging.ServiceBus → Install
Step 2: Configure the Connection String
Go to Azure Portal → Your Service Bus namespace → Shared Access Policies → RootManageSharedAccessKey → Copy the Connection String.
Add it to appsettings.json:
#json
{
"ServiceBus": {
"ConnectionString": "",
"QueueName": "your-queue-name"
}
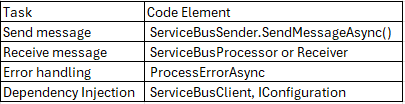
}Step 3: Send a Message
Sending a message using a ServiceBusSender
#csharp
using Azure.Messaging.ServiceBus;

var client = new ServiceBusClient("");
var sender = client.CreateSender("your-queue-name");

var message = new ServiceBusMessage("Hello from .NET");
await sender.SendMessageAsync(message);

Console.WriteLine("Message sent!");
You can also use dependency injection and IConfiguration to get config from appsettings.json.
Step 4: Receive Messages
Using ServiceBusProcessor (recommended for background processing)
#csharp
var processor = client.CreateProcessor("your-queue-name", new ServiceBusProcessorOptions());

processor.ProcessMessageAsync += async args =>
{
    string body = args.Message.Body.ToString();
    Console.WriteLine($"Received: {body}");

    await args.CompleteMessageAsync(args.Message);
};

processor.ProcessErrorAsync += args =>
{
    Console.WriteLine($"Error: {args.Exception.Message}");
    return Task.CompletedTask;
};

await processor.StartProcessingAsync();

// Optional: Stop when done
// await processor.StopProcessingAsync();
Step 5: Use Dependency Injection (in ASP.NET Core)
Add this to your Startup.cs or Program.cs:
#csharp
builder.Services.AddSingleton(serviceProvider =>
{
    var config = serviceProvider.GetRequiredService();
    return new ServiceBusClient(config["ServiceBus:ConnectionString"]);
});

builder.Services.AddSingleton(serviceProvider =>
{
    var client = serviceProvider.GetRequiredService();
    return client.CreateSender(config["ServiceBus:QueueName"]);
});
Step 6: Bonus – Send JSON or Custom Object
#csharp
var payload = new { OrderId = 123, Status = "Processed" };
var json = JsonSerializer.Serialize(payload);

var message = new ServiceBusMessage(json)
{
    ContentType = "application/json"
};
await sender.SendMessageAsync(message);
Sample Use Case:
Let’s say you're building a food delivery app:
- The Order API sends an order placed event to the queue.
- A Delivery Service listens to the queue and schedules a delivery.
- A Notification Service sends an SMS or email, also triggered from the queue.
Summary: