
This is a submission for the Permit.io Authorization Challenge: Permissions Redefined
LeetCall is built for DEV Challenge, but is open to the public to try!
📚 Table of Contents
- What I Built: LeetCall
- Sharing Workspace Securely
- Prerequisites
- How Does LeetCall Work?
-
Demo & Project Access
- 5.1 Try the Demo
- 5.2 Project Repository
- My Journey Building LeetCall
- Using Permit.io for Authorization
- Related Articles
What I Built
The idea is I wanted to start doing leetcode and I find a way to learn it by utilizing the Space Repetition method, basically working on the problem with a space repetition theory. I can manage and schedule the space repetition in spreadsheet manually, but why don’t I create the web app and let other users who wanted to use this method in leet code access this also — currently there’s no similar space repetition app made for programmer.
LeetCall lets you input LeetCode problems, which are then reviewed later using spaced repetition, all the you need to do is add LeetCode problem to be tracked in LeetCall and let LeetCall reminds you with our Spaced Repetition Simplified Algorithm.
Sharing Progress
At LeetCall, we've made sharing your progress effortless. You can share your tracked LeetCode problems and current progress with anyone you choose — whether it's friends, mentors, or study partners. Let others see how far you've come and stay motivated together. Thanks to Permit IO that made ReBAC (Relationship-Based Access Control) easy.
Prerequisites
- Permit IO Account.
- Deployed PDP if you want to deploy the app locally — either local or a vps. Since we are working with ReBAC, we need to start our own PDP. You can check my article to deploy PDP in heroku under 5 minutes here.
- Supabase if you want to deploy the app locally.
How Does LeetCall Works?
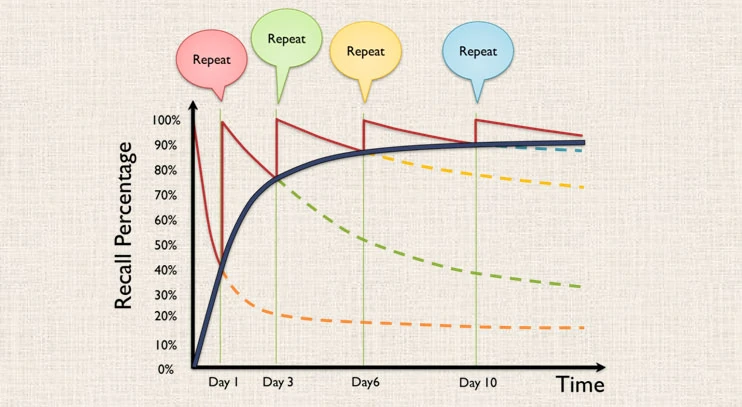
LeetCall offers an automated spaced repetition system to support your LeetCode journey, helping you revisit solved problems and strengthen your memory of them.
1. User Add LeetCode Problem to be Tracked
The first step is to add your initial LeetCode problems to be tracked by LeetCall. After that, you can review your progress on the problems you've solved.
2. How Does the Space Repetition Algorithm Works?
LeetCall uses a simplified spaced repetition algorithm — it's a minimal viable formula designed to launch quickly, yet effective enough to support meaningful review sessions. Here’s how we define the formula
- LeetCall scoring is range from 0-3 with
- 0: Again(Blackout), complete blackout about the problem’s solution
- 1: Hard, still need to peek for public solution
- 2: Good, correct but with some difficulty
- 3: Easy, perfect response
- Simplified Formula(SF)
- SF(n) = round(n * (score / 3) * learningStep);
- With n is repetition
- 3 is maximum score
- Learning Step is [1, 3, 7] in days
- If its your first time reviewing the problem — in this case we will use Two Sum Problem. Then any score you pick you will still have to review it tomorrow.
- If its your second time reviewing the problem, then it will follow our Simplified Formula with learning step is 3 days.
- If its your third or more time reviewing the problem, then it will follow Simplified Formula with learning step 7 days.
Demo
You can sign up to LeetCall and start tracking your leetcode progress, would be happy if you can give some review too! Currently LeetCall is in development, so you don't need to confirm your email on sign up!
I built this app with the help of AI, if you are curious go to my other articles here where I write down the whole journey from creating the PRD and Database Model with the help of AI.
You can use this demo account if you don't want to sign up
email: [email protected]
password: 2025DEVChallengeemail: [email protected]
password: 2025DEVChallenge
Project Repo
Heads up to the repo if you want to deploy it locally or contributing to the project!
LeetCall GitHub Repository
LeetCall Demo Video
My Journey
Designing Authorization Schema
Designing the authorization schema get a little confusing in the beginning since this is my first time designing ReBAC authorization policy. But thanks to Permit IO that provide clear ReBAC documentation and examples.
Problem When Building With External Authorization
We store user information in our database, including their workspace and tracked problems. However, we now also need to sync this data with Permit IO — meaning that whenever a user is created, updated, or deleted, the same action must be reflected in Permit IO. I guess that’s the price that we need to pay for a fine-grained authorization. However, it still very easy to setup since the API and SDK docs is very clear.
How Can External Authorization Help Building an Entire Application?
The highest benefit I felt when using external authorization is how simple it is to check user’s authorization. Instead of doing nested left join to many tables, now I just need to simply do
await permit.check('authorization request details here')I felt like this saved me a ton of time when building apps. Also Permit IO’s UI makes authorization super easy to manage — everything's laid out clearly, and I can handle access just by clicking a few buttons. No need to build extra user management pages or write complex logic for access control.
Using Permit.io for Authorization
In this section we will explore how do I design the authorization schema and how to build a similar schema using Permit CLI.
How Does the Sharing Workspace Designed?
As you have seen before, LeetCall utilize Permit IO ReBAC authorization, which we will have roles, resource and resource instances in this project.
Top Level Roles
On the top level authorization, basically there’s just two roles:
- Admin, which the admin that own the app — basically me lol.
- User, other users that sign up.
Resource
There is only one resource which is workspace, each user will have their own workspace.
Resource Instances
Every unique workspace is considered as a resource instances, with uuid as the key i.e. (workspace#uuid-here).
Instance Roles
Here’s the roles that exist within the workspace in Permit IO this is called as Instance Roles :
- Viewer, which can only view your progress and tracked problems.
- Reviewer, can review your tracked problems but cannot add more tracked problems.
- Editor, which can edit your entire workspace, add more tracked problems and review it for you.
How to Set Up Your Authorization Schema Using the Permit CLI
In order to complete this section you need to pull the project repository here, so you can get the schema template
For Permit IO Devs, I have tried using permit CLI to deploy the ReBAC authorization, but I just can’t figure out. There is no documentation about:
- Create a resource instances, the only resource I can create is a resource, but not with resource instance
- Create an instance role, I also check the code and seems like it just doesn’t support it yet.
- Assign an instance role to a user
And with that problem, we still need Permit IO Node JS SDK to add a resource instance and assign instance role to a user, lets support the devs to maintain the CLI — I also consider to contribute to their permit CLI, but I don’t have any contributing experience, if you guys have suggestions my dm is open.
- Install Permit CLI Check out the installation guides here Permit CLI Docs
-
Setup Permit CLI
First you need to login to the permit cli by doing
permit loginand it will open up a browser to login to your application. -
Run Permit Policy Decision Point (PDP)
Since we need ReBAC policy, we need to run our own local PDP, if you want to deploy it in Heroku, I wrote another article for it here Deploy PermitIO PDP to Heroku Under 5 Mins.
In this case, we can run it locally by doing
permit pdp runand you will get the port where the pdp is running, by default the pdp runs athttp://localhost:7766. -
Now lets initiate the schema
Make sure you already clone the LeetCall repository, you will find
permitio-migration.jswhich consist of the schema initialization of LeetCall authorization. All you need to do is to runnode permitio-migration.js --permit_pdp="the default url or your deployed one" --permit_api_key="your api key" - And if success you will see a couple initial check on the users permissions in the output.
Lets talk about the permitio-migration.js file
The first step is to create the resource with its instance roles and what action is available to the resource
await permit.api.createResource({
      key: "workspace",
      name: "workspace",
      actions: {
        create: { name: "create" },
        read: { name: "read" },
        update: { name: "update" },
        delete: { name: "delete" },
        review: { name: "review" },
      },
      roles: {
        owner: {
          name: "owner",
          permissions: ["create", "read", "update", "delete", "review"],
        },
        editor: {
          name: "editor",
          permissions: ["create", "read", "update", "review"],
        },
        reviewer: {
          name: "reviewer",
          permissions: ["read", "update", "review"],
        },
        viewer: {
          name: "viewer",
          permissions: ["read"],
        },
      },
    });
Next lets define the top level roles which is admin and user
await permit.api.createRole({
      key: "admin",
      name: "admin",
      permissions: [
        "workspace:create",
        "workspace:read",
        "workspace:update",
        "workspace:delete",
        "workspace:review",
      ],
    });

    await permit.api.createRole({
      key: "user",
      name: "user",
      permissions: [
        "workspace:create",
        "workspace:read",
        "workspace:update",
        "workspace:delete",
        "workspace:review",
      ],
    });
After that, we can create users and assign the user role to them
await permit.api.syncUser({
      key: "[email protected]",
    });

await permit.api.users.assignRole({
      user: "[email protected]",
      role: "user",
      tenant: "default",
    });

await permit.api.syncUser({
      key: "[email protected]",
    });

await permit.api.users.assignRole({
      user: "[email protected]",
      role: "user",
      tenant: "default",
    });
And then lets each user’s workspace and assign them as the owner of their own workspace
await permit.api.resourceInstances.create({
key: "alice-workspace",
resource: "workspace",
tenant: "default",
});
await permit.api.users.assignRole({
user: "[email protected]",
resource_instance: `workspace:alice-workspace`,
role: "owner",
});
await permit.api.resourceInstances.create({
key: "bob-workspace",
resource: "workspace",
tenant: "default",
});
await permit.api.users.assignRole({
user: "[email protected]",
resource_instance: "workspace:bob-workspace",
role: "owner",
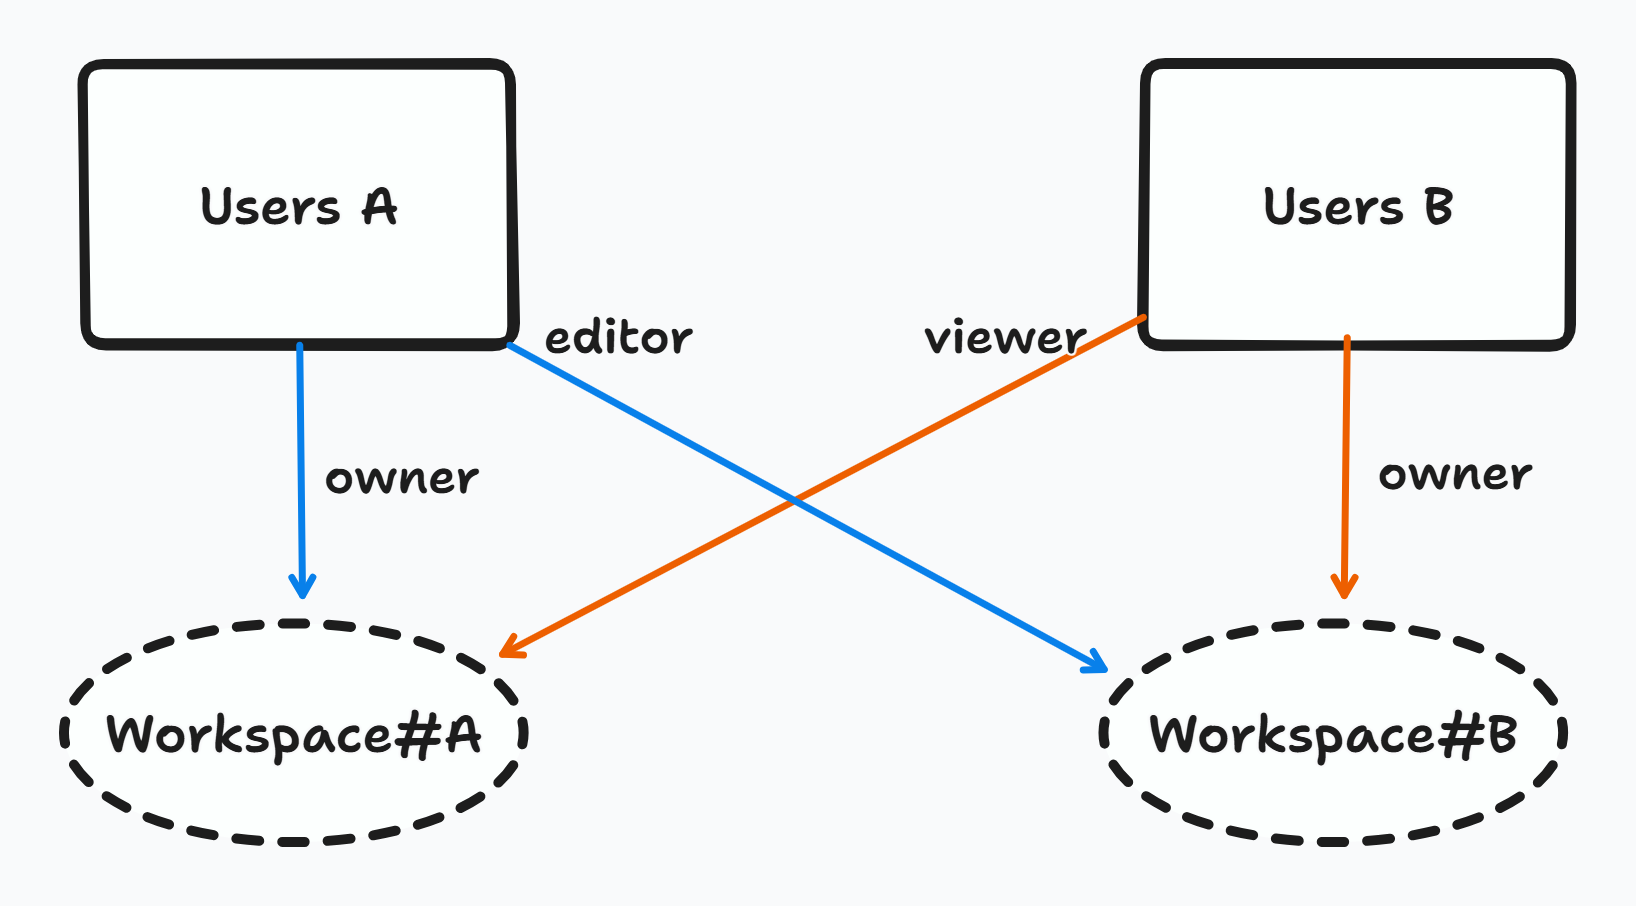
});Here I will assign alice -> viewer -> bob-workspace and bob -> editor -> alice-workspace
await permit.api.users.assignRole({
      user: "[email protected]",
      resource_instance: "workspace:alice-workspace",
      role: "editor",
    });

await permit.api.users.assignRole({
      user: "[email protected]",
      resource_instance: "workspace:bob-workspace",
      role: "viewer",
    });
And lets test each other roles on each other workspace
// Check if alice is bob's workspace editor
const aliceRoleOfBobWorkspace = await permit.getUserPermissions(
    "[email protected]",
    [`workspace:bob-workspace`]
  );
const isAliceEditorOfBob =
  aliceRoleOfBobWorkspace[`workspace:bob-workspace`].roles.includes("editor");
const isAliceViewerOfBob =
  aliceRoleOfBobWorkspace[`workspace:bob-workspace`].roles.includes("viewer");
  console.log("Is Alice an editor of Bob's workspace?", isAliceEditorOfBob);
  console.log("Is Alice a viewer of Bob's workspace?", isAliceViewerOfBob);

// Check if bob is alice's workspace editor
const bobRoleOfAliceWorkspace = await permit.getUserPermissions(
    "[email protected]",
    [`workspace:alice-workspace`]
  );
const isBobEditorOfAlice =
    bobRoleOfAliceWorkspace[`workspace:alice-workspace`].roles.includes(
      "editor"
    );
console.log("Is Bob an editor of Alice's workspace?", isBobEditorOfAlice);
And there you go, now we have already set up our authorization schema and you just need to implement it within your application.
Conclusion
Building LeetCall has been a rewarding journey—combining the power of spaced repetition with LeetCode problem-solving to help developers retain what they’ve learned. Through this project, I also explored how Permit.io’s ReBAC authorization can simplify complex access control requirements, especially in collaborative features like sharing workspaces. While there were challenges—particularly around syncing user data and working with Permit IO External Authorization—the experience taught me a lot about designing fine-grained permissions in a real-world application. I'm excited to keep improving LeetCall and invite others to contribute, use the app, or just give feedback. Let’s make studying algorithms smarter, together.
