
Zero Trust Architecture in AWS
is a security framework that implements Zero Trust principles across AWS services and workloads. It’s designed to verify every request for access to resources—regardless of its origin—based on identity, device state, and security posture.
This hands-on lab focuses on applying Zero Trust principles to the service-to-service architectures used in many micro-architecture or distributed environments today.
High-level architecture of the lab
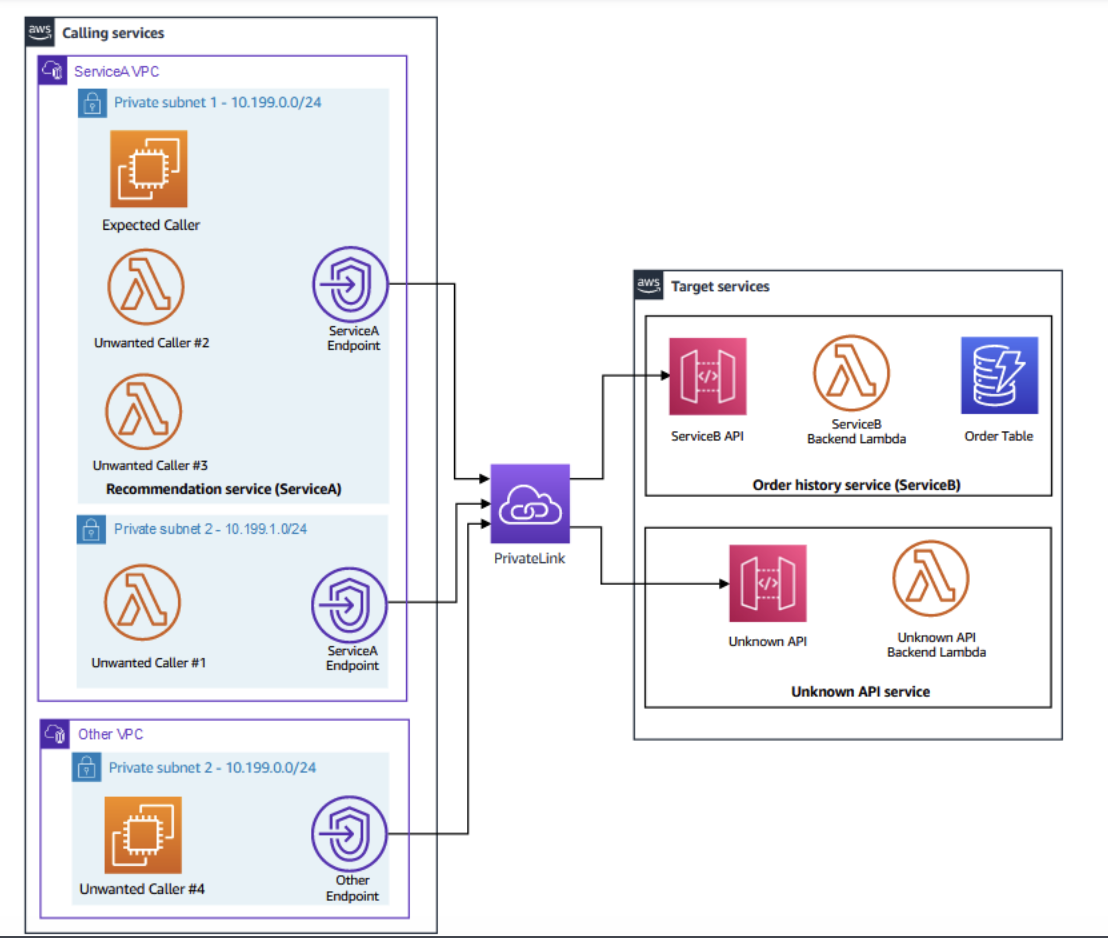
The scenario is comprised of two services:
- The calling services component has multiple compute nodes which make API calls to the target services. The API calls are made by a fleet of Amazon Elastic Compute Cloud (Amazon EC2) instances and AWS Lambda functions. These compute nodes resides in different subnets within multiple Amazon VPCs.
- The target services component has multiple REST APIs hosted by the API Gateway, multiple backend Lambda functions and other backend services like Amazon DynamoDB tables.
- Because the REST APIs are set as private, VPC Endpoints are configured within the calling services subnets to provide a network path for the API calls from the calling services using AWS PrivateLink.
Task 1: Review the lab scenario current state service-to-service architecture
Recommendation service (ServiceA) : Generates recommendations based on previous orders retrieved from the Order History service (ServiceB). ServiceA valid compute nodes are represented by the EC2 instance denoted as Expected Caller.
Order History service (ServiceB) : Provides access to customers past orders. This is represented by the ServiceB API. The API communicates at the backend with a Lambda function and a DynamoDB table to store the order table.
In addition to the above, there are other unwanted callers and unknown APIs which perform other functions but should not be able to interact with the main two services above.
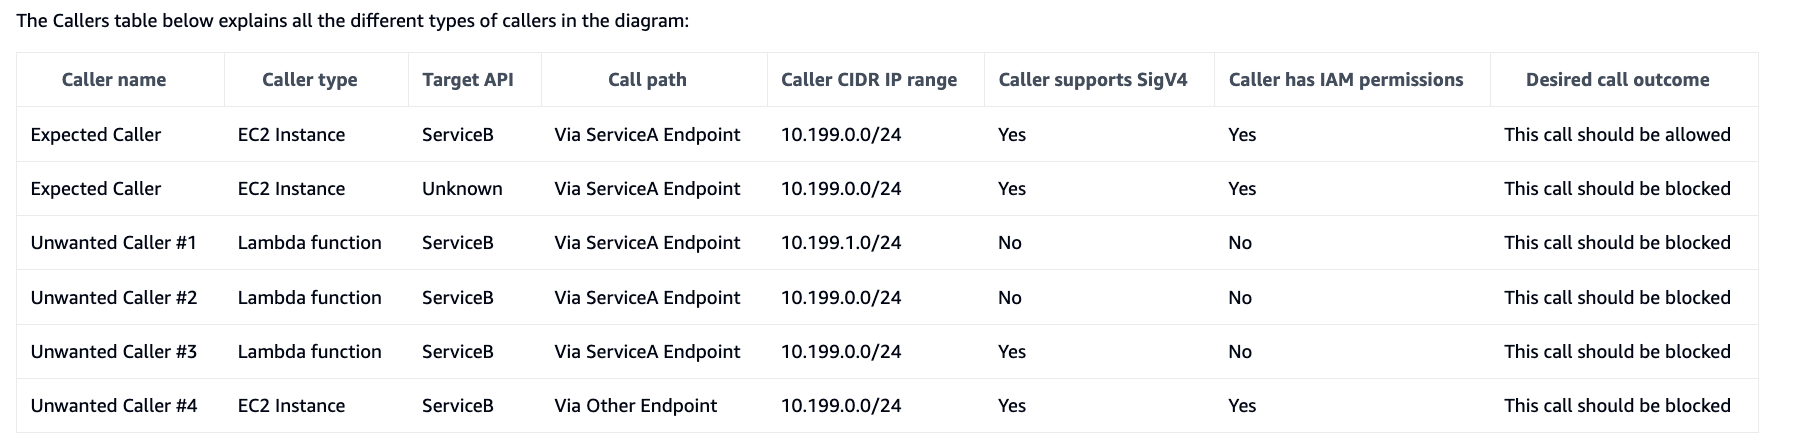
There are many conditions that you can use to allow or block the API call using different security controls:
- Does the caller need to make an API call to the target service?
- Does the API call has a valid path to the target service?
- Is the API call sourced from a valid CIDR IP range?
- Does the caller have the correct IAM permissions to make the API call via IAM role?
- Is the API call authenticated (signed) using AWS Signature V4 (SigV4) algorithm?
- Note: AWS Signature V4 is an algorithm used to sign the API calls. When enforced, it requires that the caller uses valid IAM credentials to sign the API calls.
Task 2: Review the existing security controls
where you can apply security controls in the solution:
API Gateway:
- IAM authorization on the API level: This is where you can require that the caller has valid IAM credentials and the API call is signed using SigV4. If turned off, the API can be called by any entity without having valid IAM credentials.
- Resource policy: This is where you can apply an IAM resource policy with specific conditions to restrict making calls to the API.
- API Endpoint Type: You can control where the API can be called from depending on the type you choose. In the lab scenario, both the ServiceB API and Unknown API are set to Private. This means that calls must be initiated from a API Gateway VPC endpoint from within a VPC.
VPC Endpoint:
- Resource policy: This is where you can apply an IAM resource policy with specific conditions to restrict making calls to the API. This is similar to the API Gateway resource policy but configured closer to the source of the API call.
- Security Group: You can define inbound/outbound rules to control the traffic traversing through the VPC endpoint.
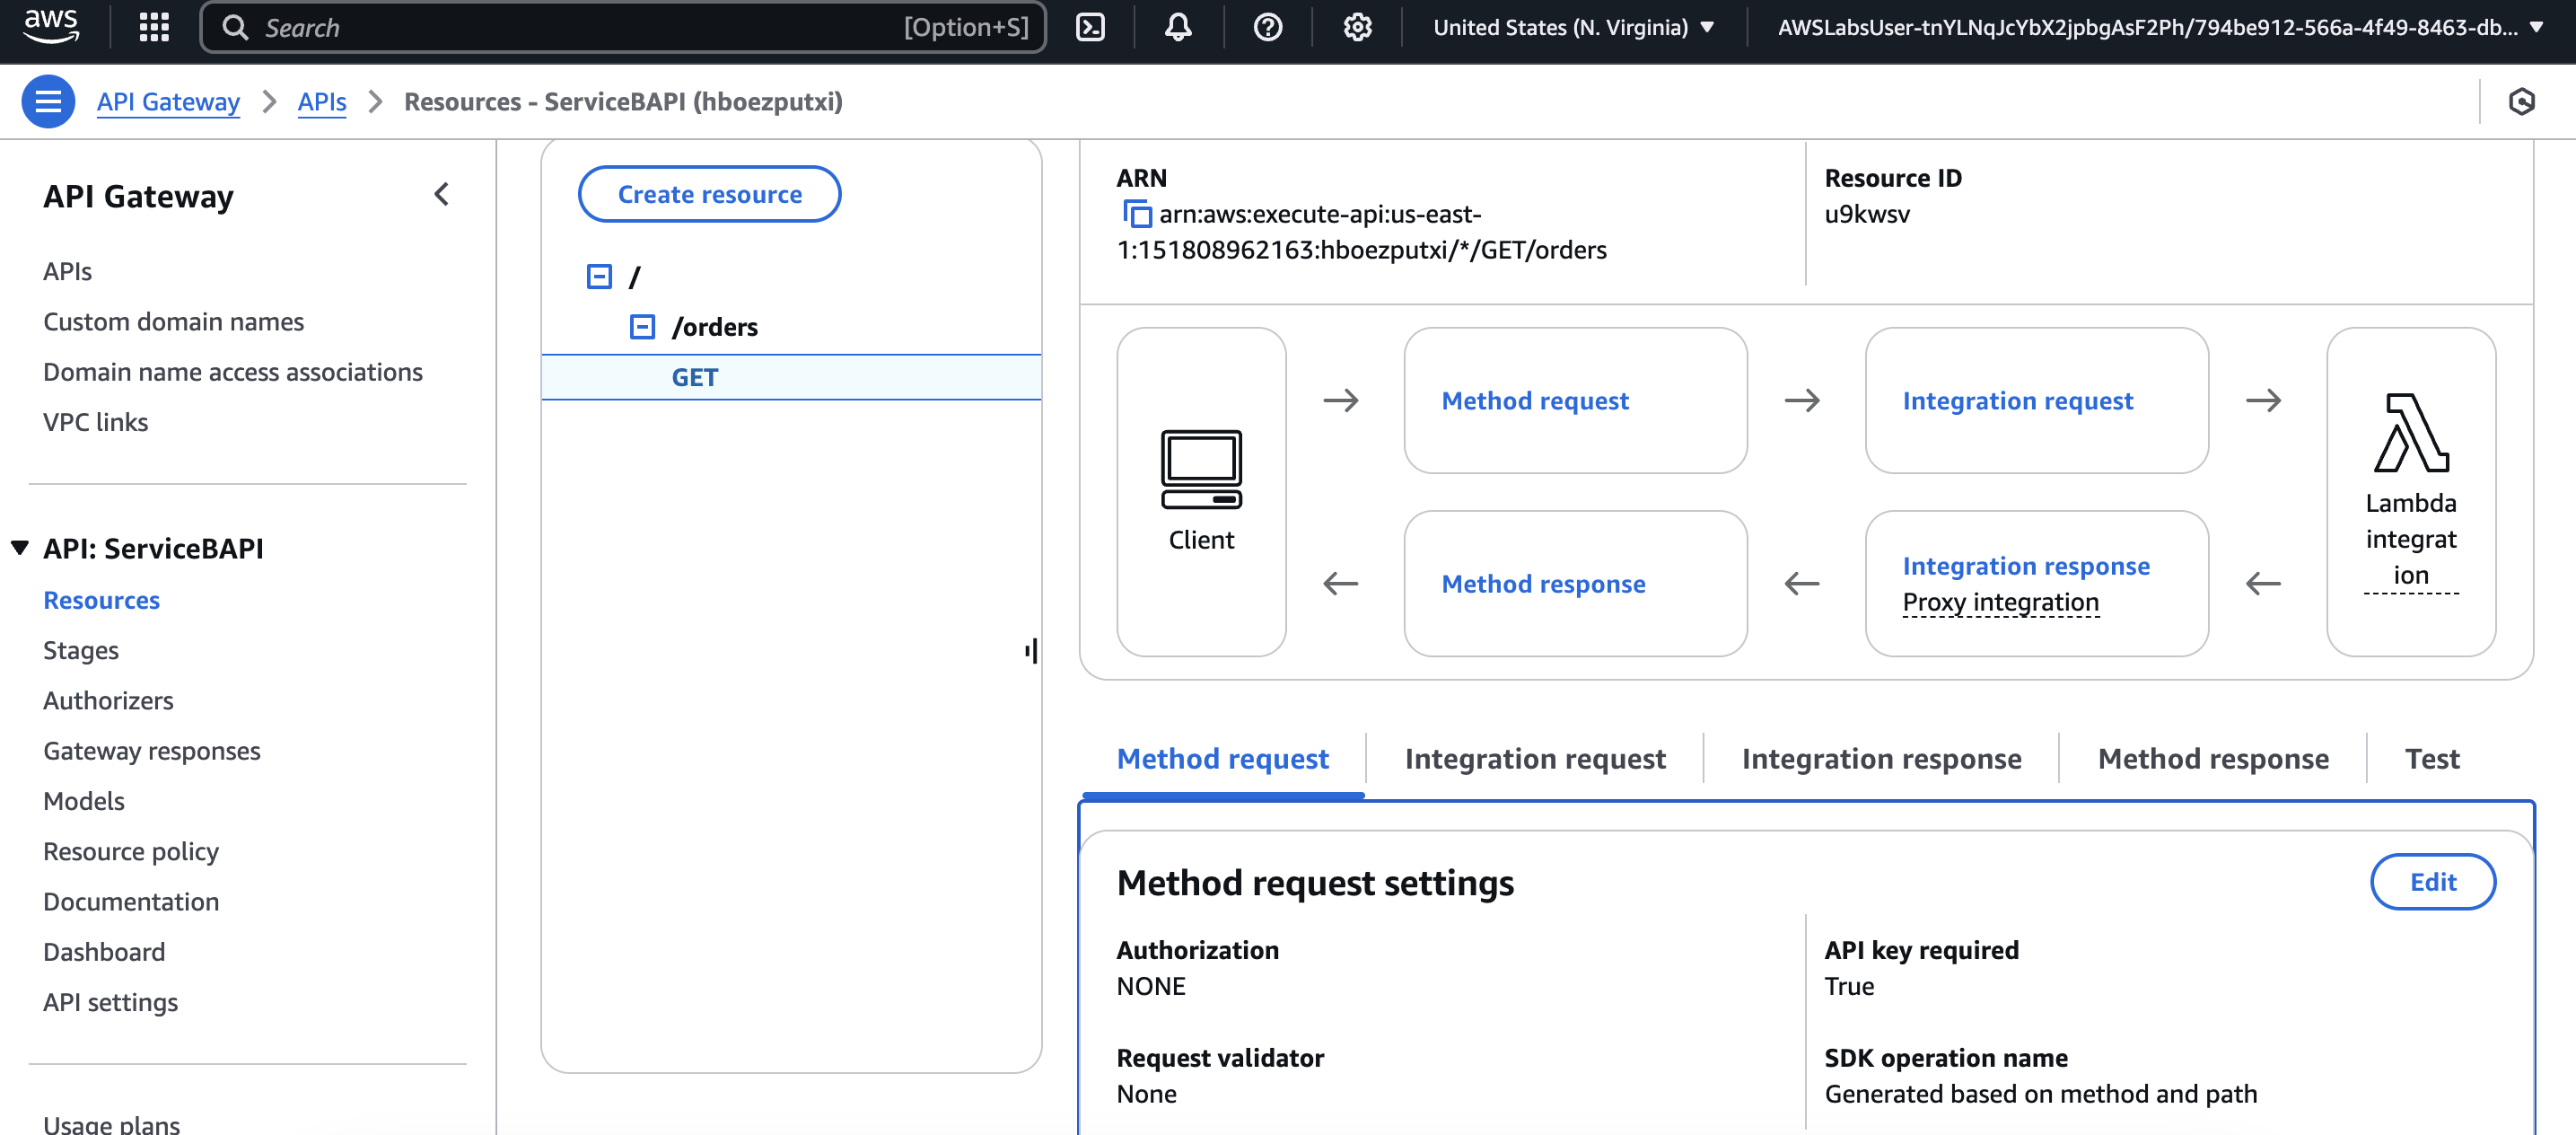
Step 1: Open API Gateway
Step 2: In the list of APIs, under the name column, choose the ServiceBAPI link.
Step 3: In the Resources pane, under /orders, choose GET.
Step 4: In the /orders-GET-Method Execution section, choose the Method request tab.
Step 5: In the Settings page, verify that Authorization is set to NONE.
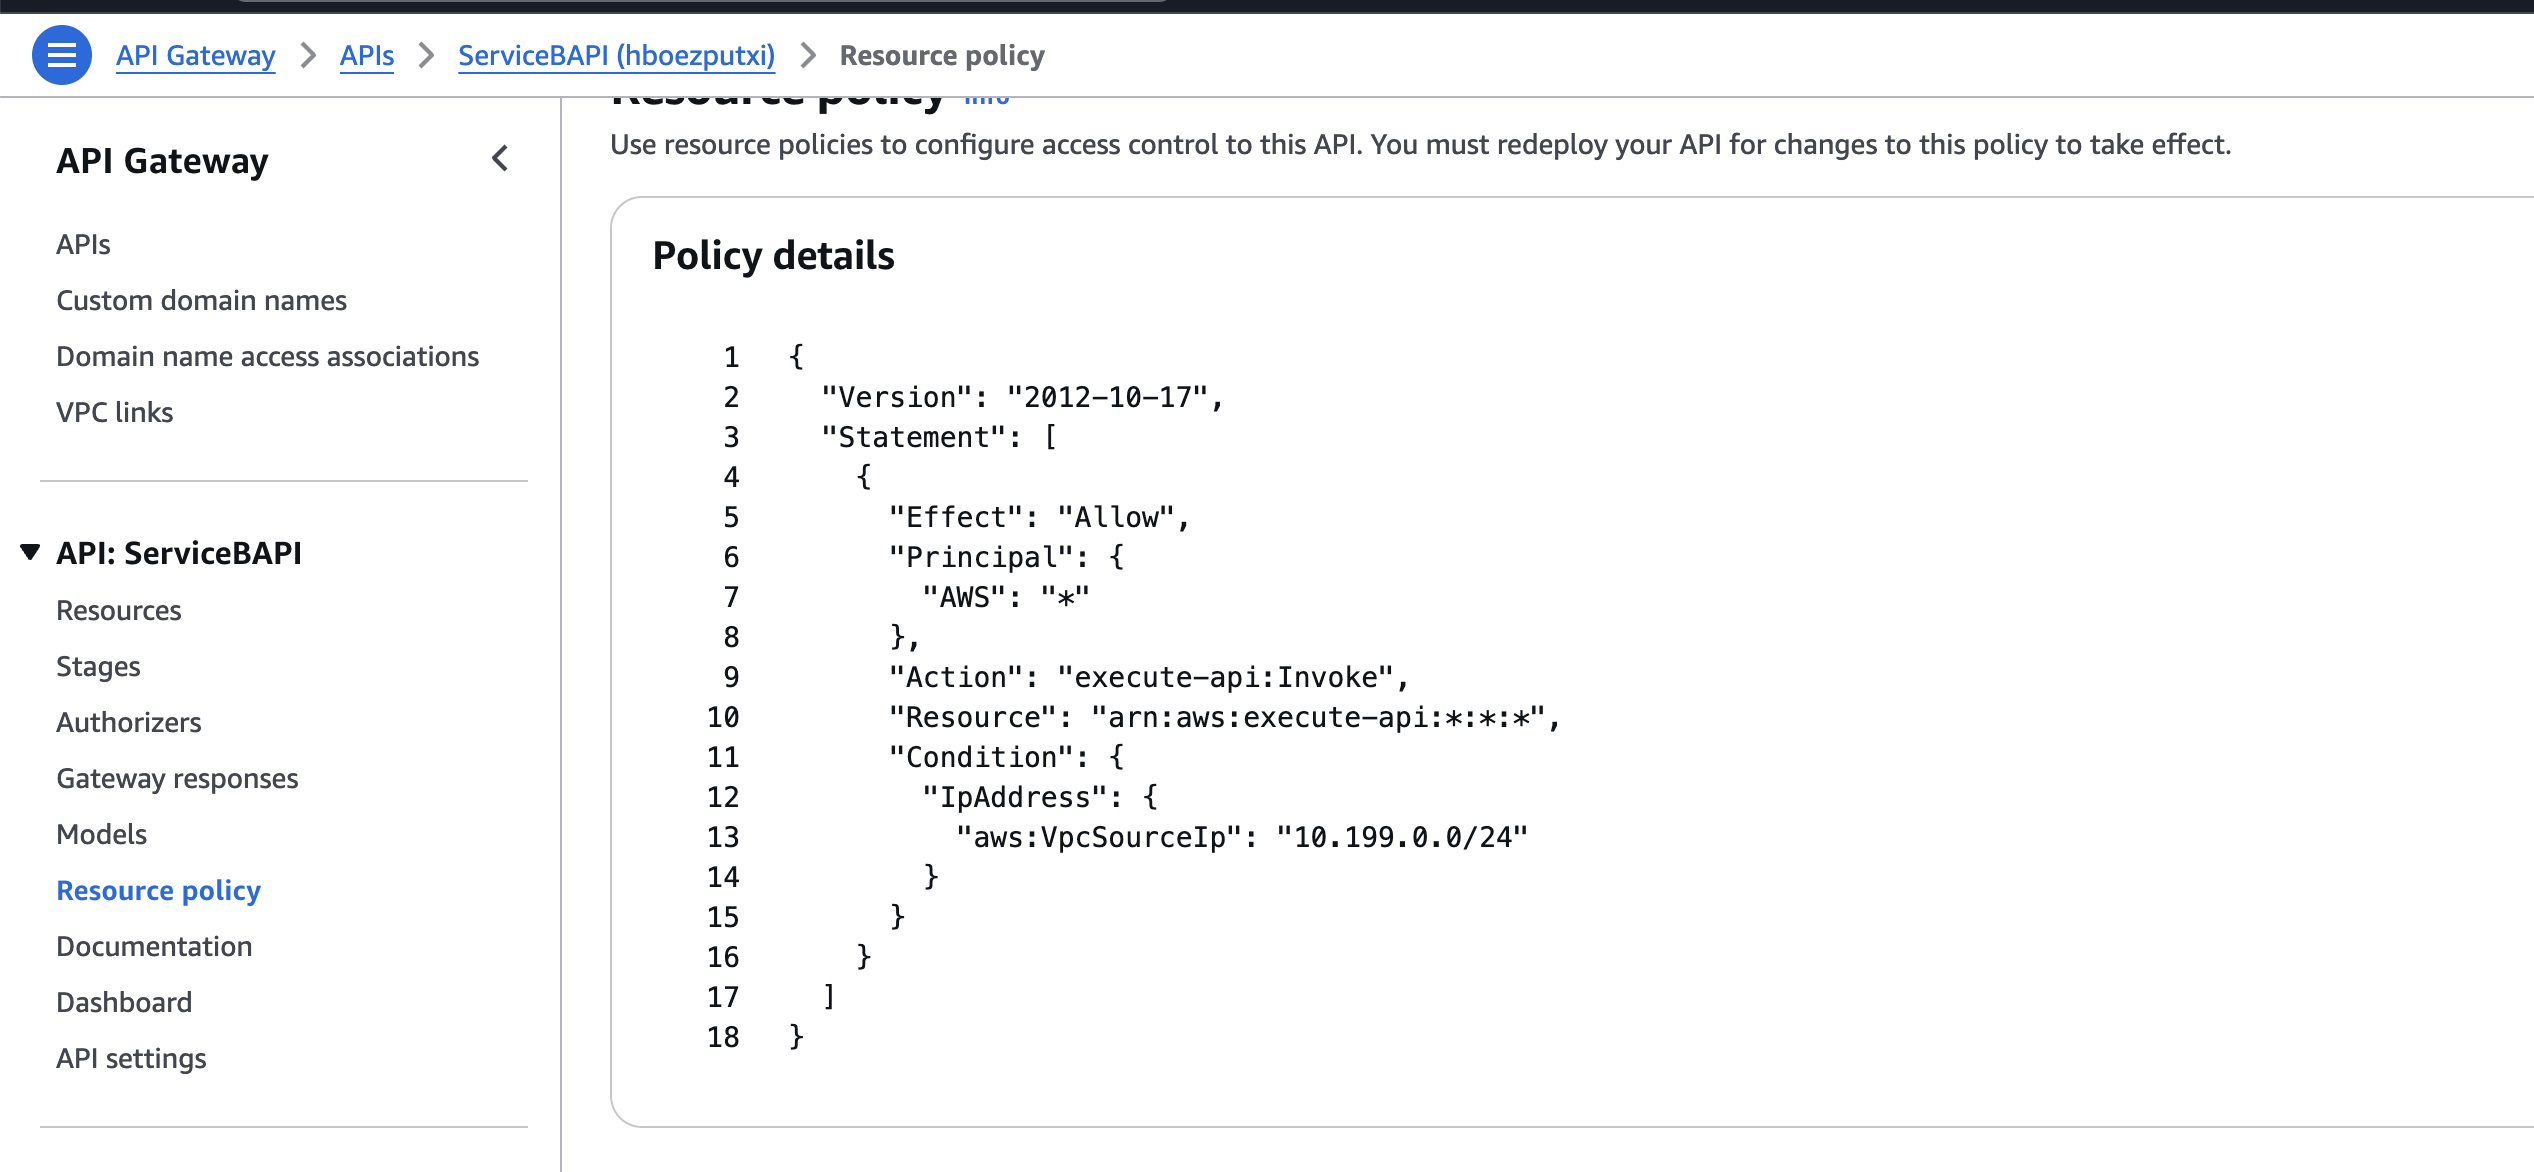
Step 6: In the navigation pane at the left of the page, in the API:ServiceBAPI section, choose Resource policy.
Step 7: Check the existing IAM resource policy configured on the ServiceBAPI. The policy allows any call sourced from an IP address within the 10.199.0.0/24 range. This range is similar to the range of Private subnet 1 in the ServiceA VPC and also the Private subnet 2 in the Other VPC. You can verify the ranges using the Detailed architecture diagram and/or the Callers table presented earlier.
Step 8: Open VPC
Step 9: In the navigation pane at the left of the page, in the Virtual private cloud section, choose Endpoints
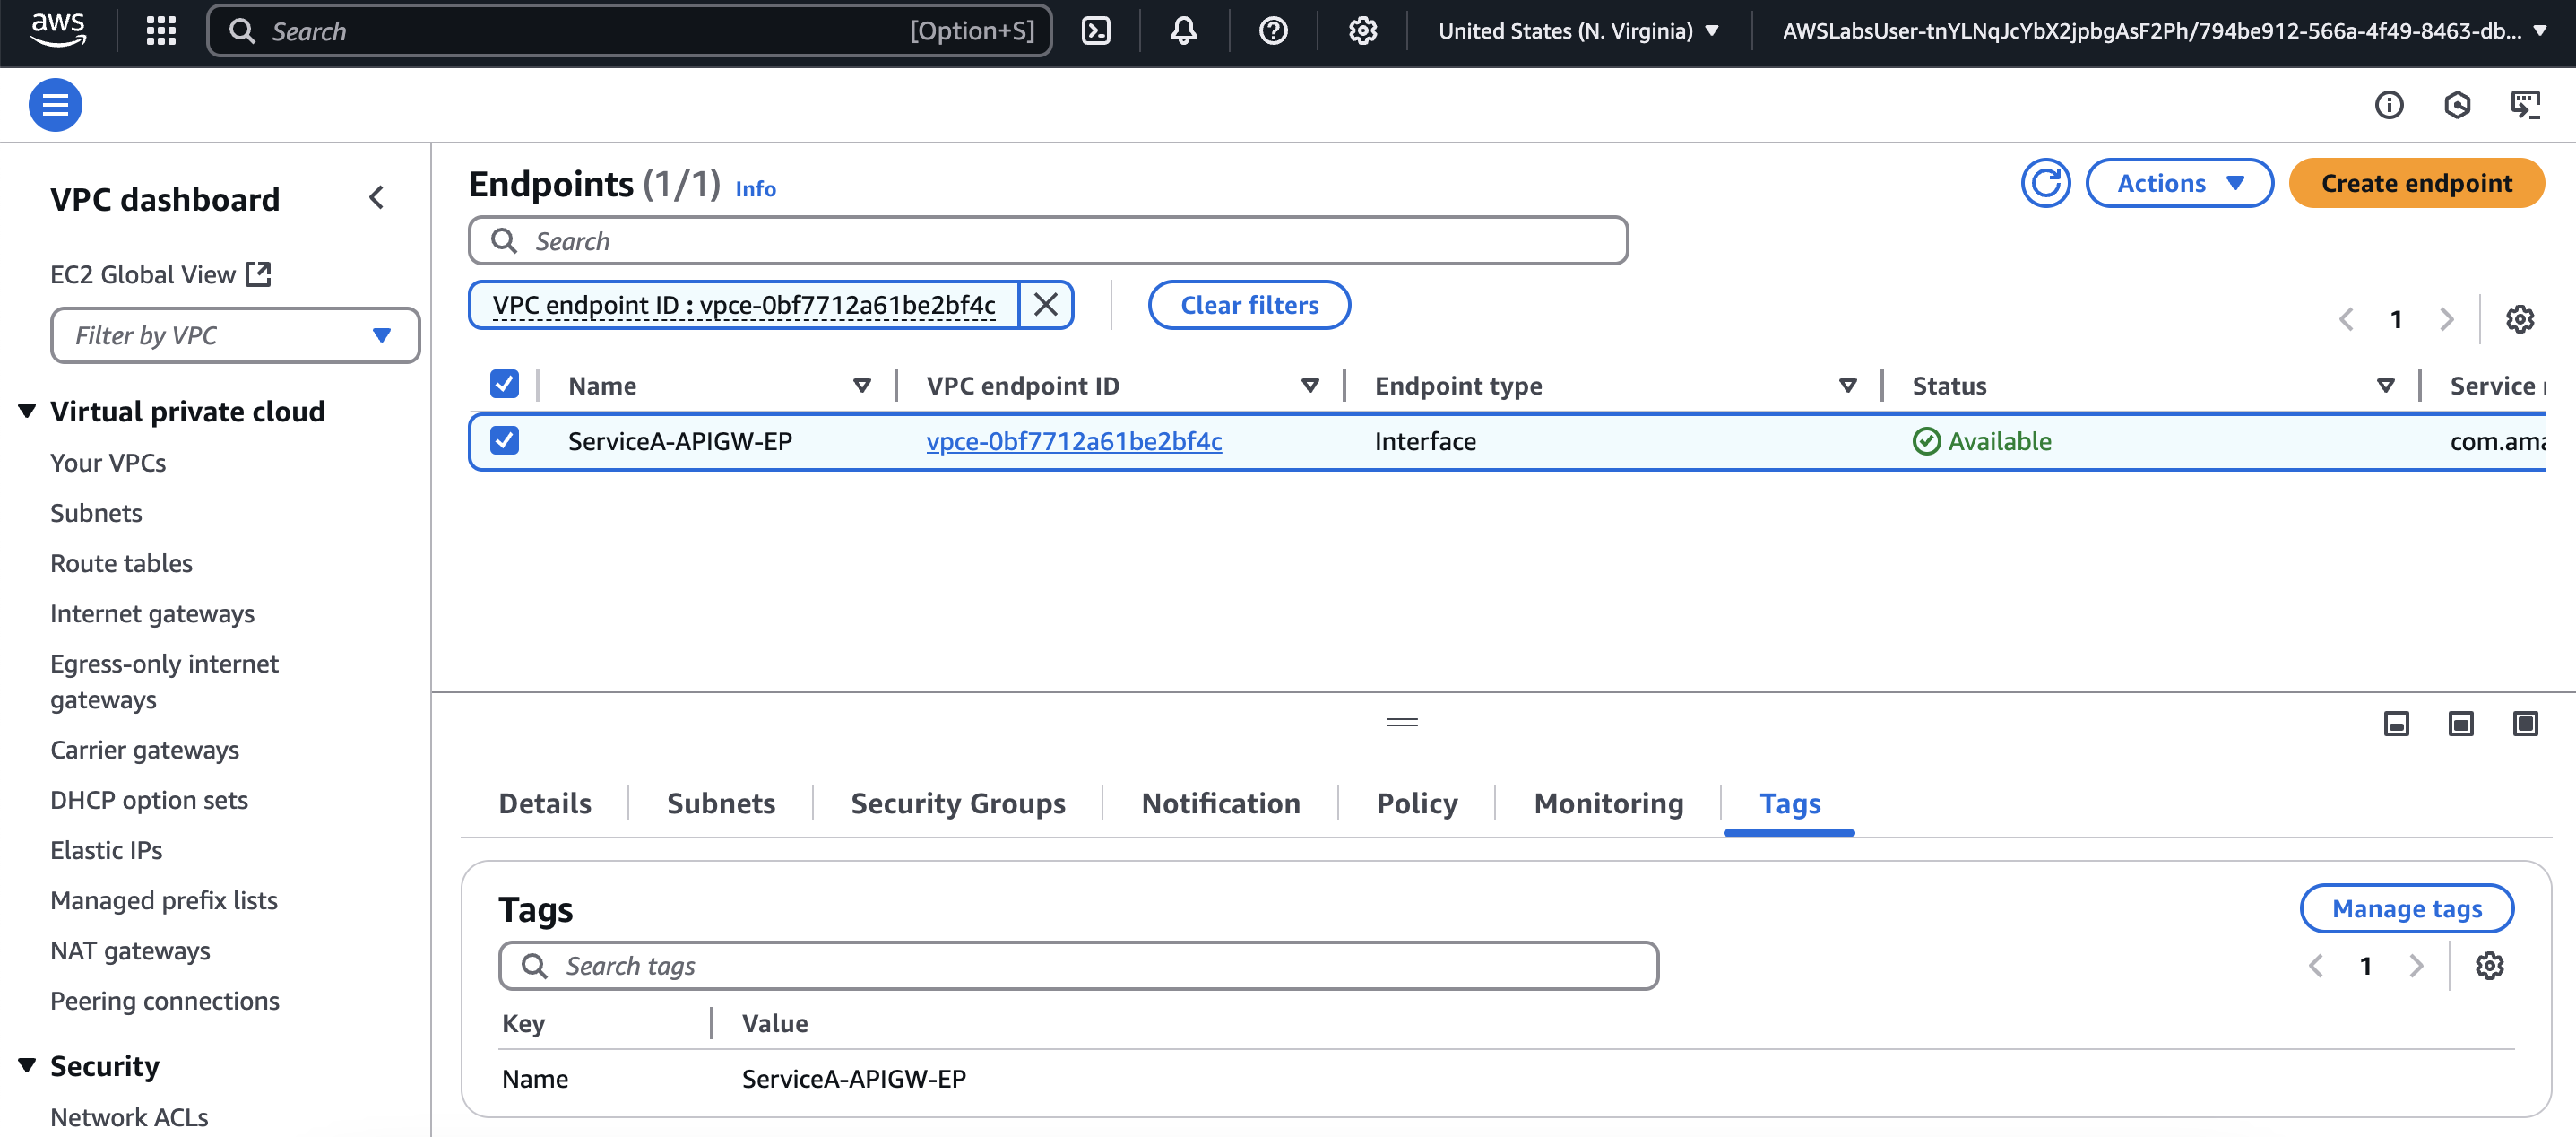
Step 10: In the Endpoints page, select the endpoint with a VPC endpoint ID that matches the APIGWVPCEndpointID value that is listed to the left of these instructions.
Step 11: In the VPC endpoint Details section under the list of Endpoints, choose the Tags tab, then choose Manage tags.
Step 12: Choose Add new tag.
Step 13: On the Manage tags page, in the Tags section:
For Key, enter Name.
For Value - optional, enter ServiceA-APIGW-EP.
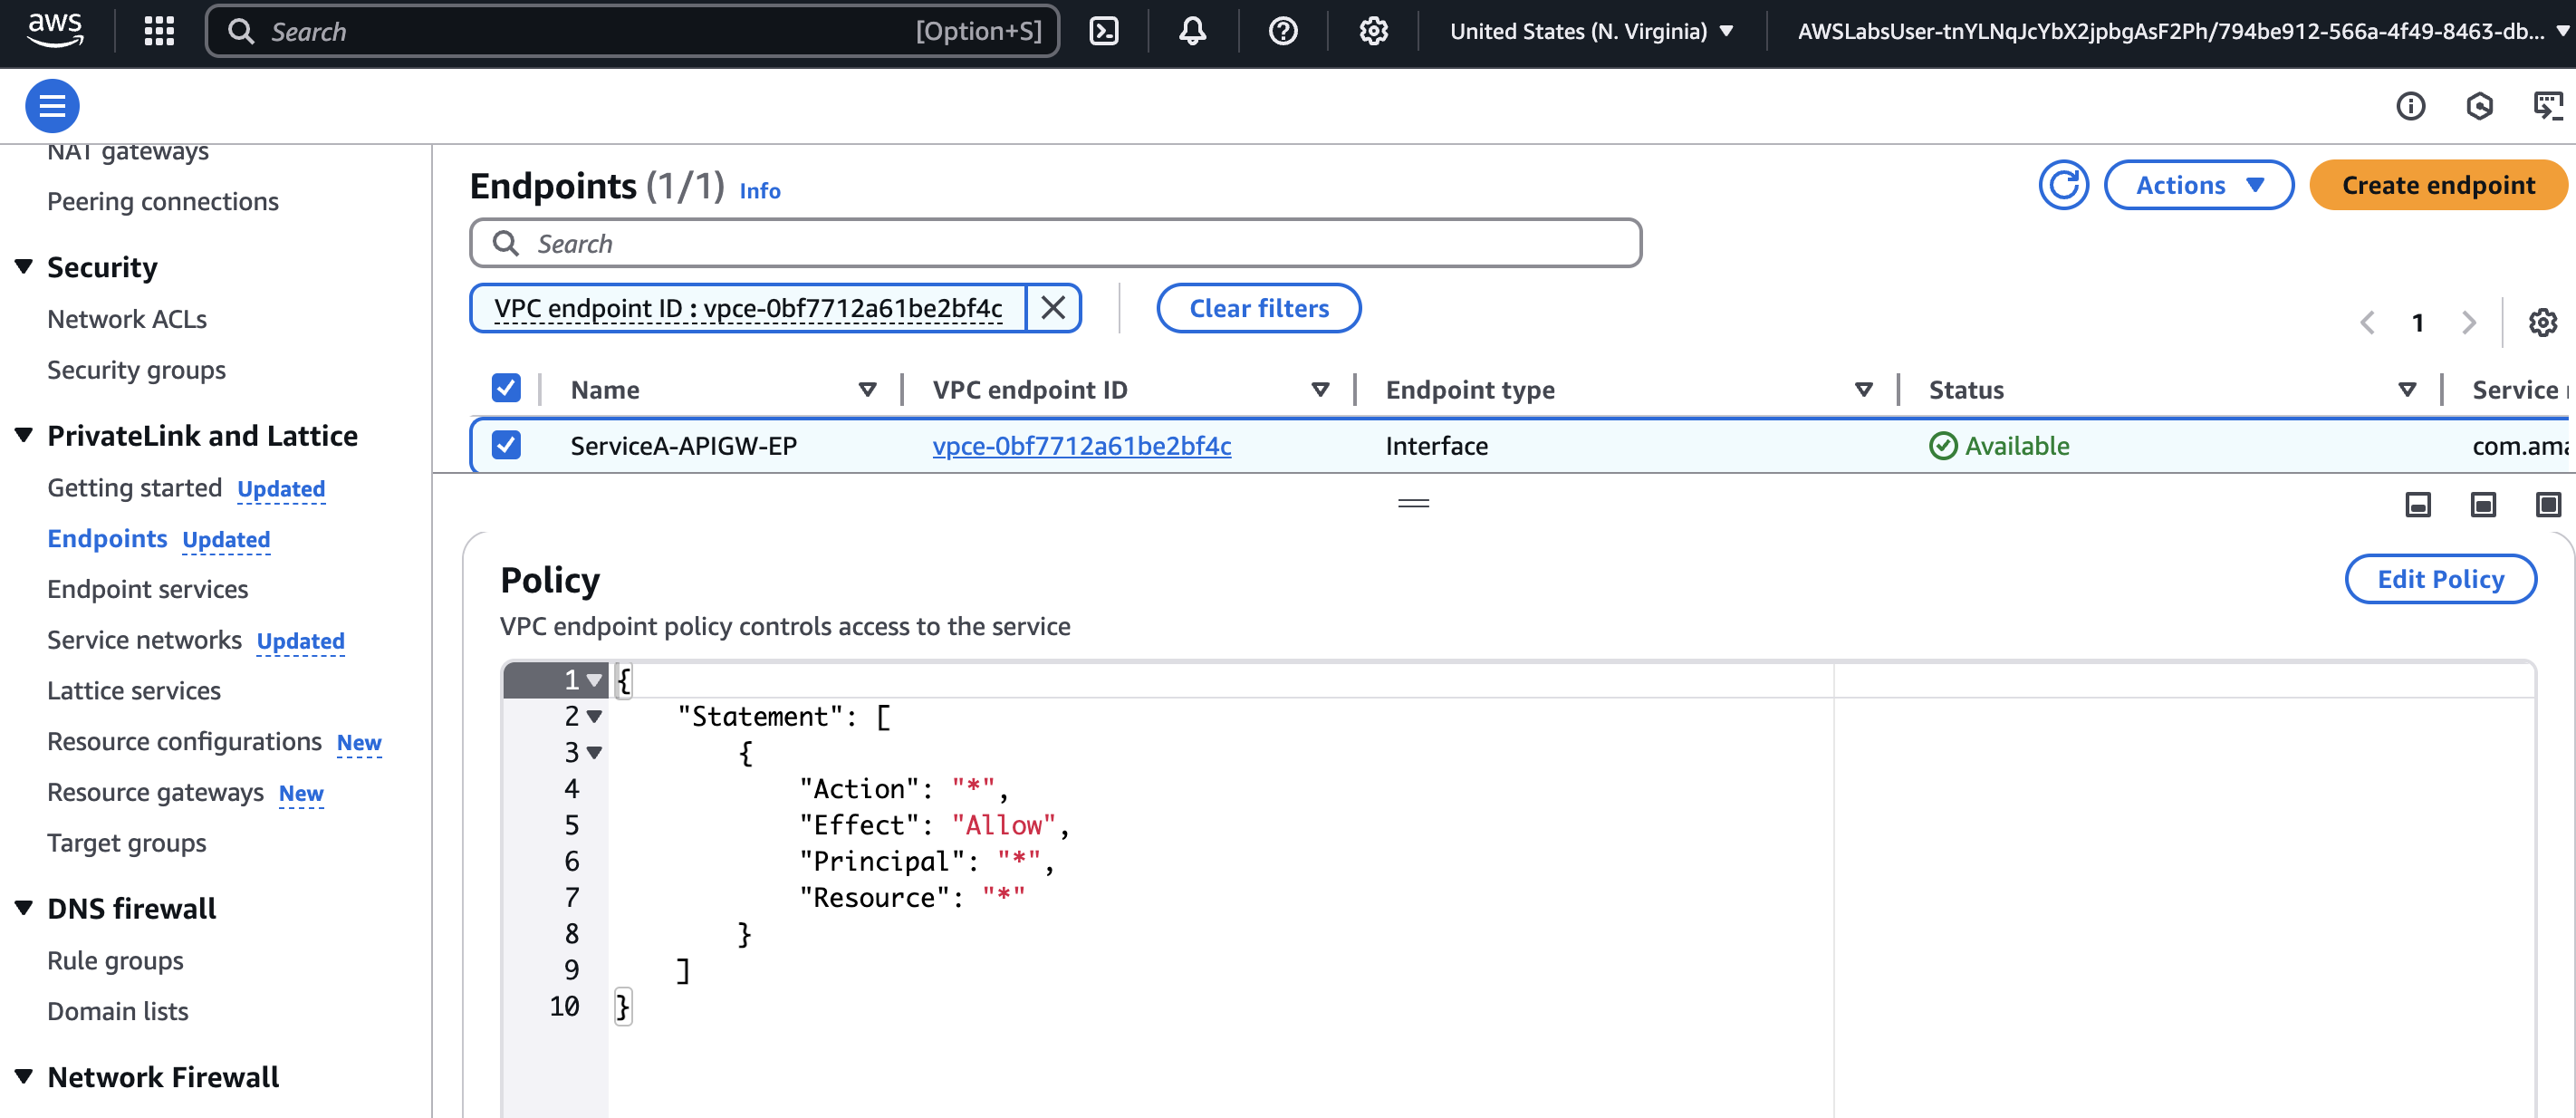
Step 14: Save and While the ServiceA-APIGW-EP endpoint name is selected, choose the Policy tab.
Note that the existing policy allows all traffic to traverse through the endpoint to make a call to any Private API in the same region with no restrictions.
Task 3: Run an assessment to evaluate your current security posture
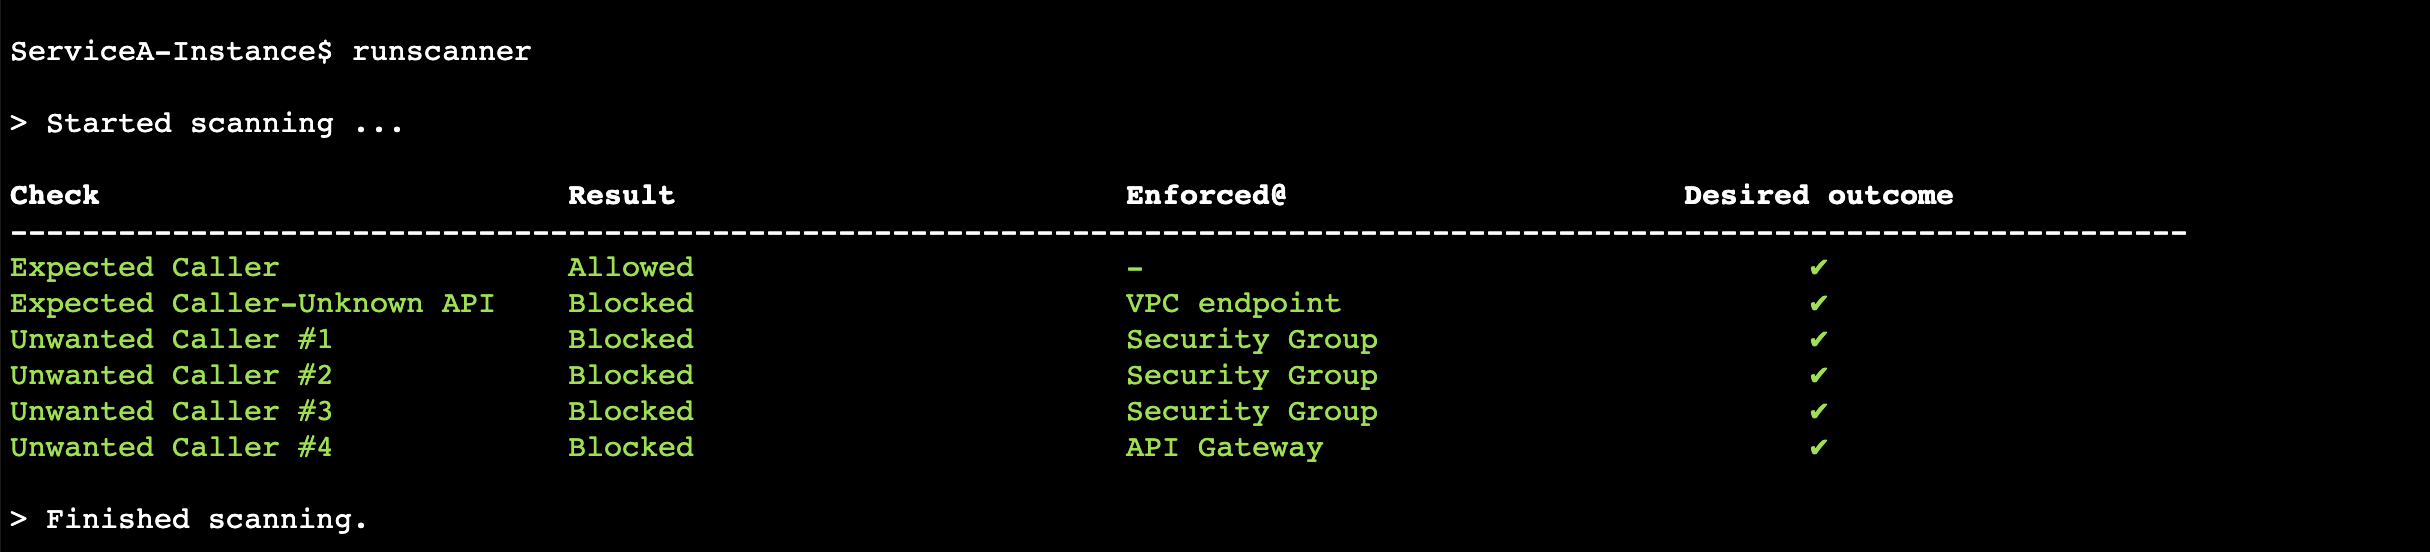
Step 1: Connect to Service A EC2 instance.
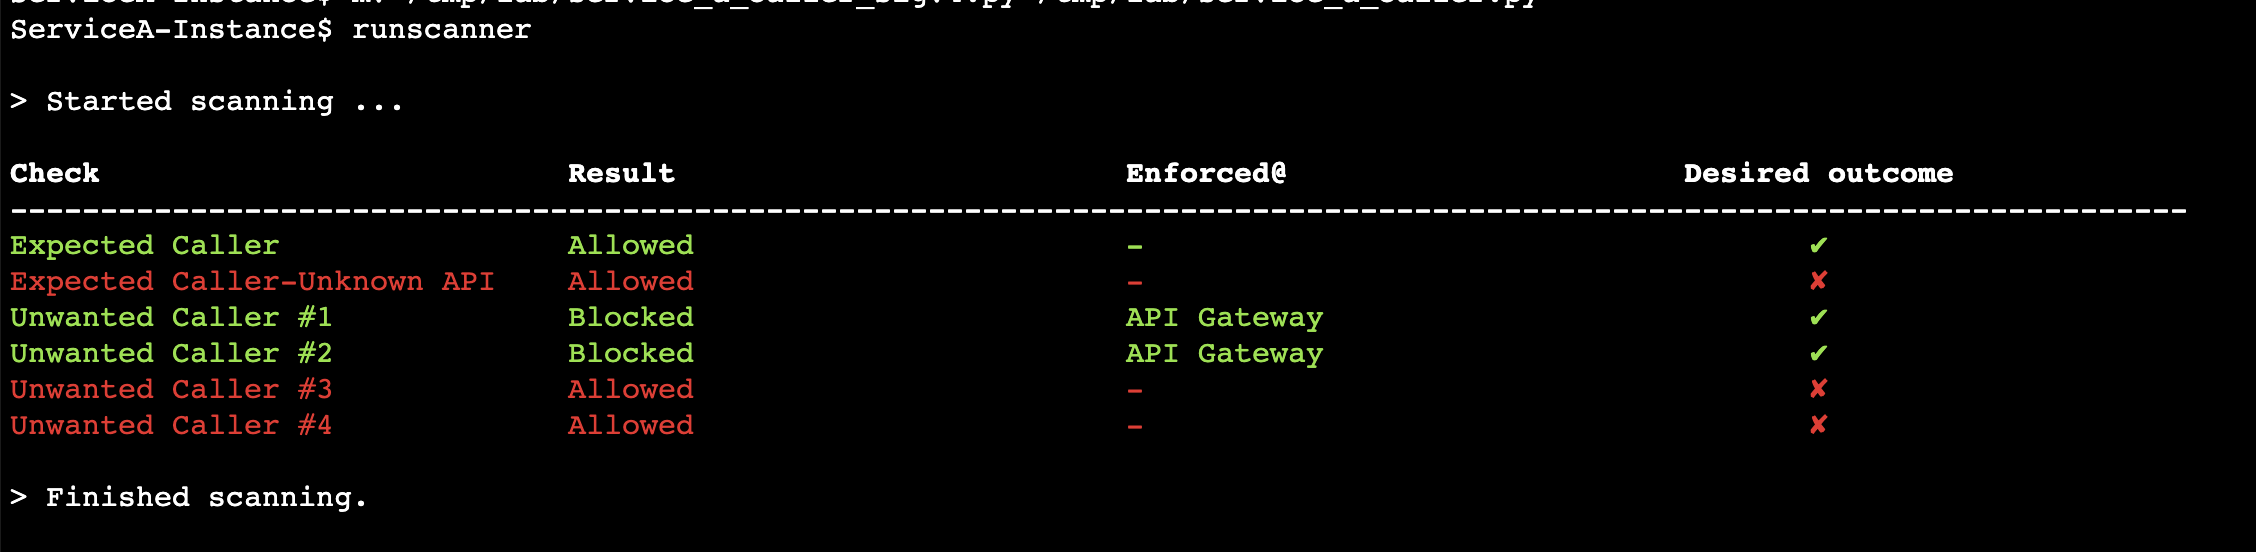
Step 2: run the command "runscanner" to run the scan.
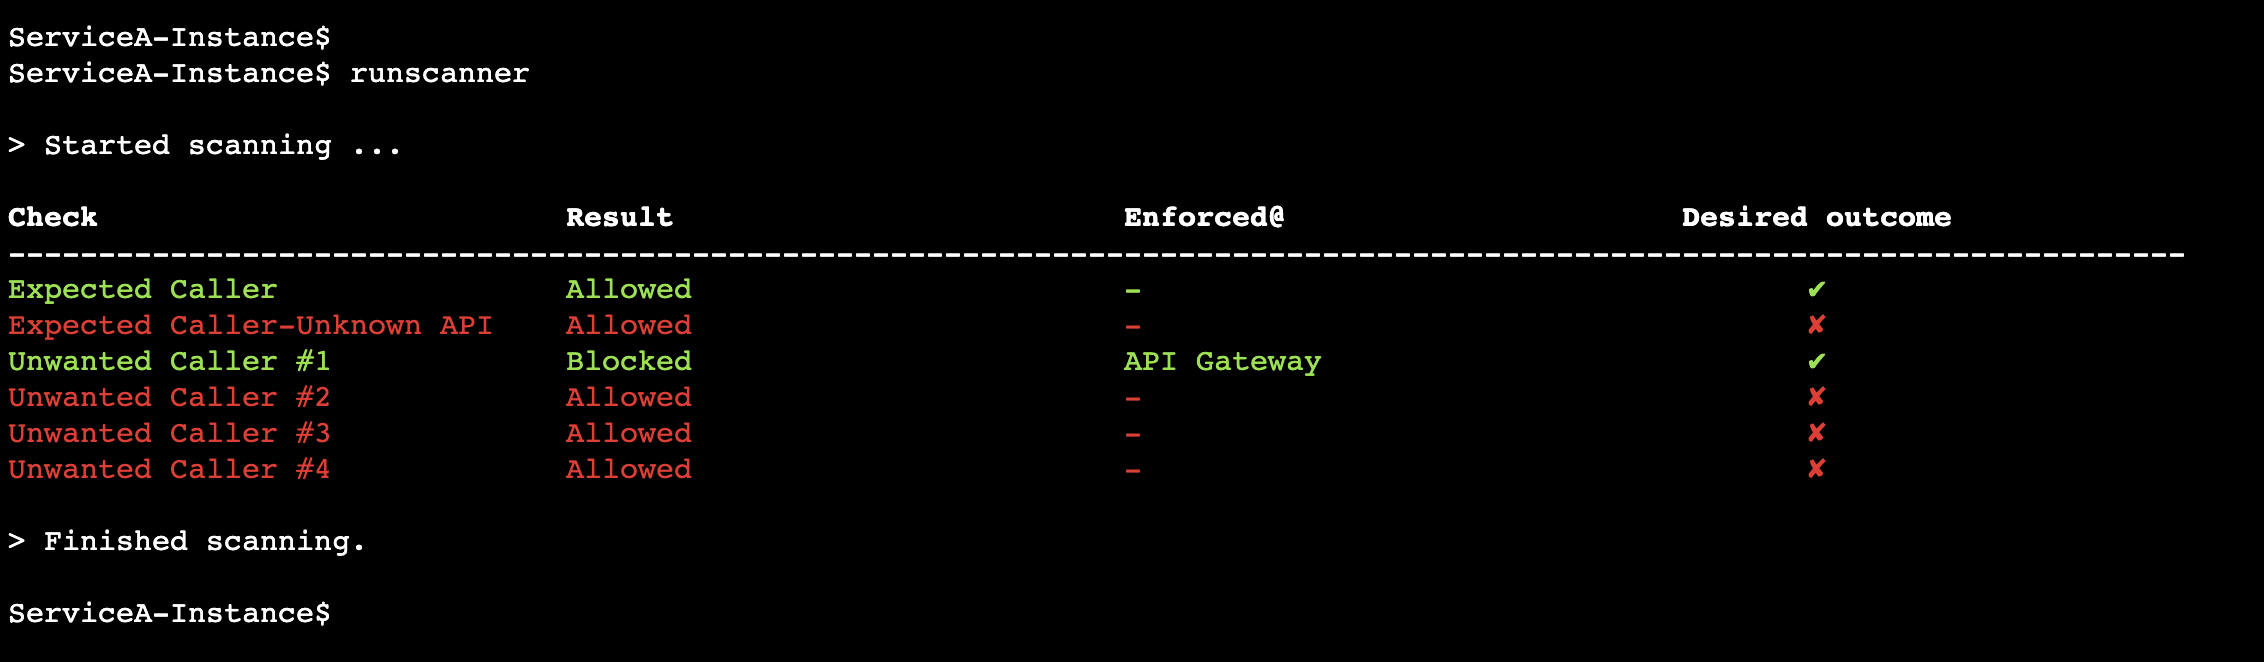
Based on the assessment results above, only two out of six API calls patterns comply with desired security outcome. This really raises an alarm and does not fit well with the Zero Trust principles that you need comply with.
Task 4: Improve your security posture using IAM authorization on the API Gateway
Step 1: choose API Gateway.
Step 2: In the list of APIs, under the name column, choose the ServiceBAPI link.
Step 3: In the Resources panel, under the /orders, choose GET.
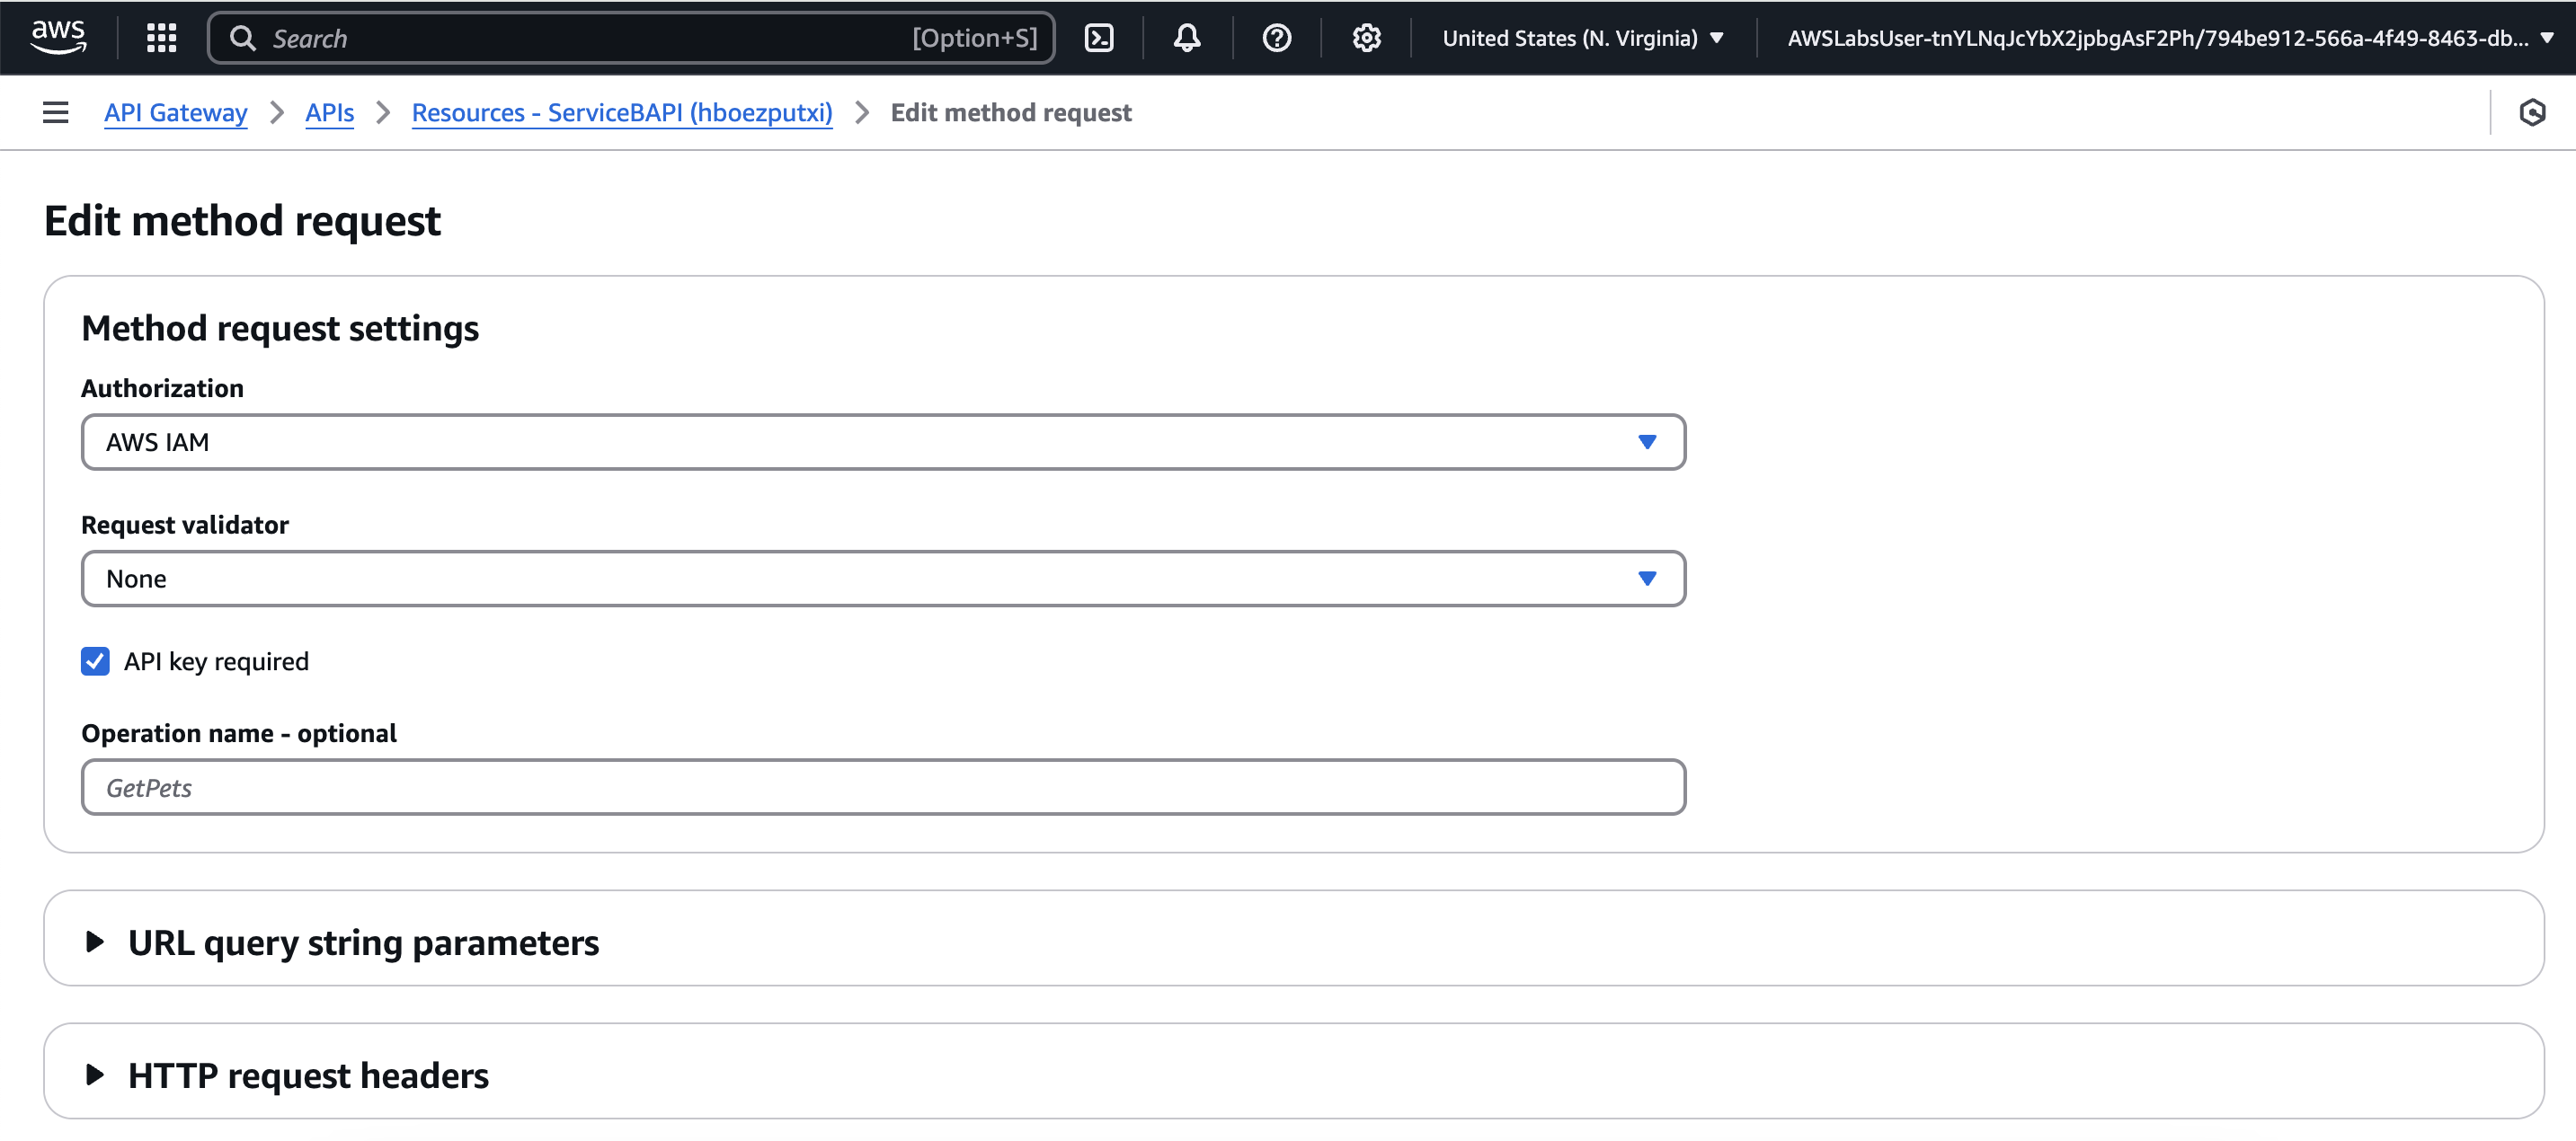
Step 4: In the /orders-GET-Method Execution section, choose the Method request tab.
Step 5: In the Method request settings section, choose Edit, and then from the Authorization drop-down menu, select AWS IAM.
Step 6: To save your selection, choose Save.
Step 7: After saving your selection, you need to deploy the API for your changes to take effect.
Step 8: In the Resources panel, choose Deploy API.
- For Stage, select api.
- Choose Deploy.
Task 5: Improve your security posture using API Gateway resource policy
Step 1: Return to the API Gateway Console browser tab.
Step 2: In the ServiceBAPI left panel, choose Resource policy.
Step 3: Choose Edit, and then delete the entire policy.
Step 4: In the Policy details pane, add the following policy after making these two changes:
Replace the INSERT_AWS_ACCOUNT_ID placeholder value with the AWSAccountID value that is listed to the left of these instructions (keep the quotes).
Replace the INSERT_APIGW_VPC_ENDPOINT_ID placeholder value with the APIGWVPCEndpointID value that is listed to the left of these instructions (keep the quotes).
{
    "Version": "2012-10-17",
    "Statement": [
        {
            "Effect": "Allow",
            "Principal": "*",
            "Action": "execute-api:Invoke",
            "Resource": "arn:aws:execute-api:*:*:*"
        },
        {
            "Effect": "Deny",
            "Principal": "*",
            "Action": "execute-api:Invoke",
            "Resource": "arn:aws:execute-api:*:*:*",
            "Condition": {
                "StringNotEquals": {
                    "aws:PrincipalAccount": "INSERT_AWS_ACCOUNT_ID"
                }
            }
        },
        {
            "Effect": "Deny",
            "Principal": "*",
            "Action": "execute-api:Invoke",
            "Resource": "arn:aws:execute-api:*:*:*",
            "Condition": {
                "StringNotEquals": {
                    "aws:SourceVpce": "INSERT_APIGW_VPC_ENDPOINT_ID"
                }
            }
        }
    ]
}
Step 5: Save
After saving the policy, you need to deploy the API for your changes to take effect.
Step 6: In the navigation pane at the left of the page, in the API:ServiceBAPI section, choose Resources.
Step 7: In the Resources panel, choose Deploy API.
- For Stage, select api.
- Choose Deploy.

Step 8: Open the Session Manager terminal session to the ServiceA-Instance.
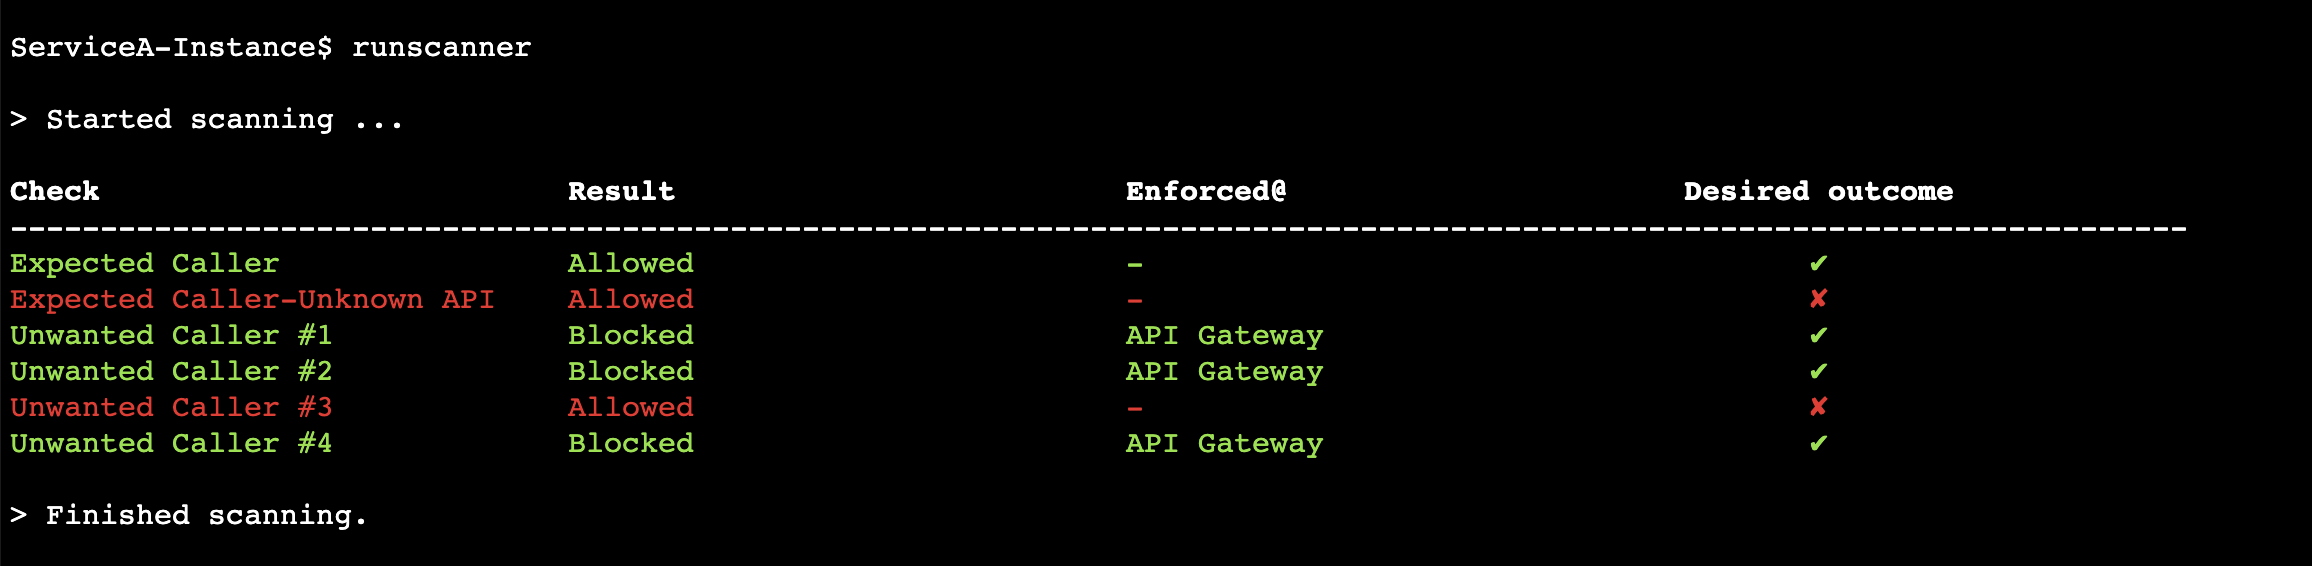
Step 9: Run command "runscanner"
Task 6: Improve the security posture using VPC endpoint policy
Step 1: Return to the API Gateway Console browser tab.
Step 2: At the top of the AWS Management Console, in the search bar, search for and choose VPC.
Step 3: In the navigation pane at the left of the page, in the Virtual private cloud section, choose Endpoints.
Step 4: In the list of Endpoints, under the Name column, locate the ServiceA-APIGW-EP and select it.
Step 5: In the VPC endpoint Details section under the list of Endpoints, choose the Policy tab.
Step 6: In the Policy pane, choose Edit Policy.
Step 7: In the Edit policy page, ensure that Custom is selected.
Step 8: Select the existing policy and delete it.
Step 9: In the Policy pane, add the following policy after making these two changes:
Replace the INSERT_SERVICEA_INSTANCE_ROLE_ARN placeholder value with the ServiceAInstanceRoleARN value that is listed to the left of these instructions (keep the quotes).
Replace the INSERT_API_METHOD_ARN placeholder value with the APIMethodARN value that is listed to the left of these instructions (keep the quotes).

Step 10: Save
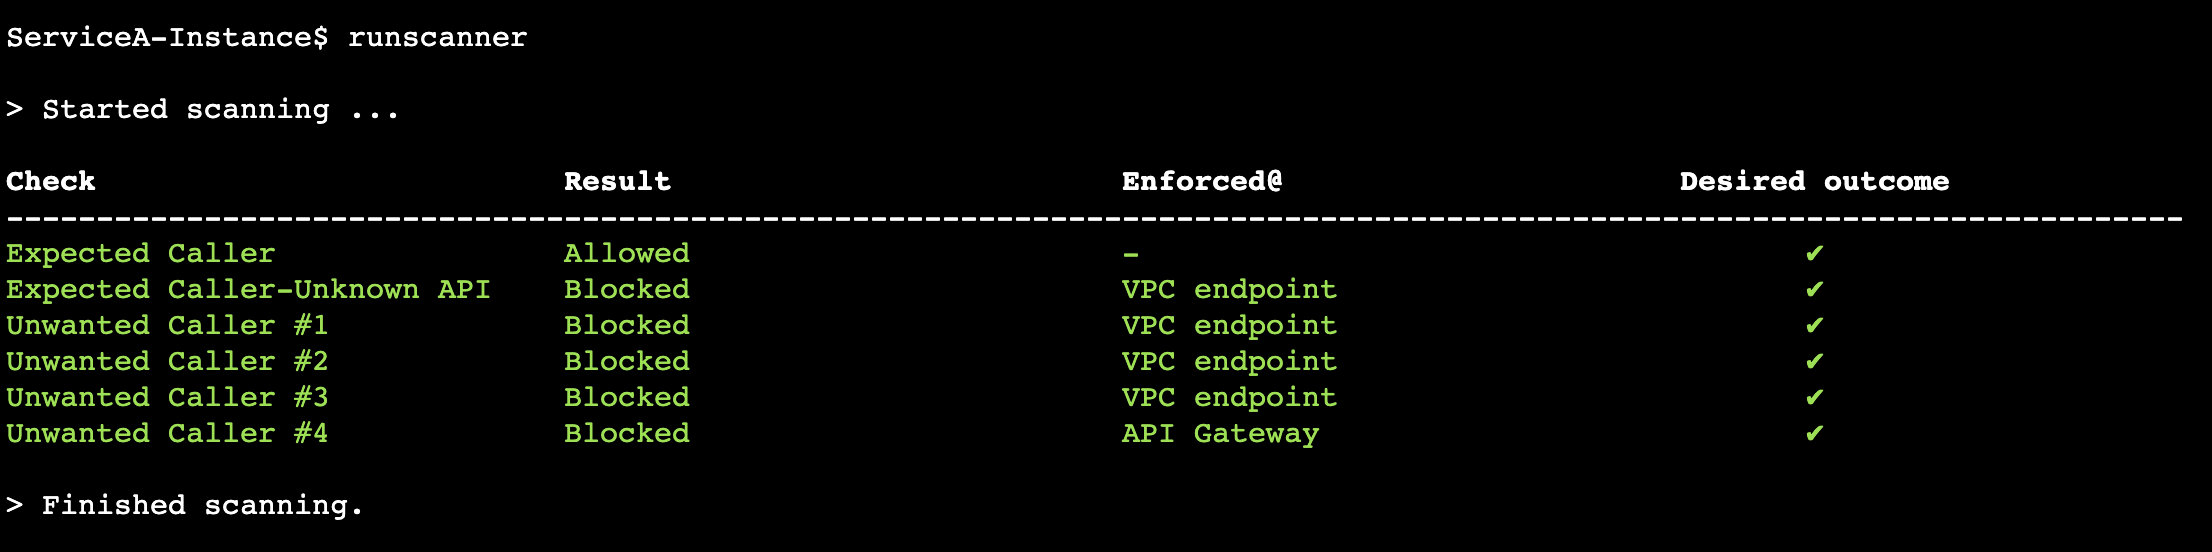
Step 11: Open TerminalA and run command "runscanner"
Task 7: Improve the security posture by tuning the VPC endpoint security group
Step 1: In the list of Endpoints, select ServiceA-APIGW-EP endpoint if not already selected.
Step 2: Choose the Security Groups tab. There is one security group applied to the VPC endpoint.
Step 3: Under the Group ID, choose the security group link.
Step 4: On the Security Groups page, choose the security group link.
Step 5: In the Security Group Details section, choose the Inbound rules tab and examine the existing inbound rule.
Step 6: The current rule allows all HTTPS (TCP:443) traffic inbound to the VPC endpoint from the whole ServiceA VPC CIDR range of 10.199.0.0/16. This represents any subnet in the ServiceA VPC even though the expected caller resides only in Private subnet 1. This is a broad range of IP addresses which you need to narrow down.
Step 7: First, you delete the current rule and then add a new rule.
Step 8: Choose Edit inbound rules.
Step 9: To delete the existing rule, choose Delete.
Step 10: To add a new rule, choose Add rule.
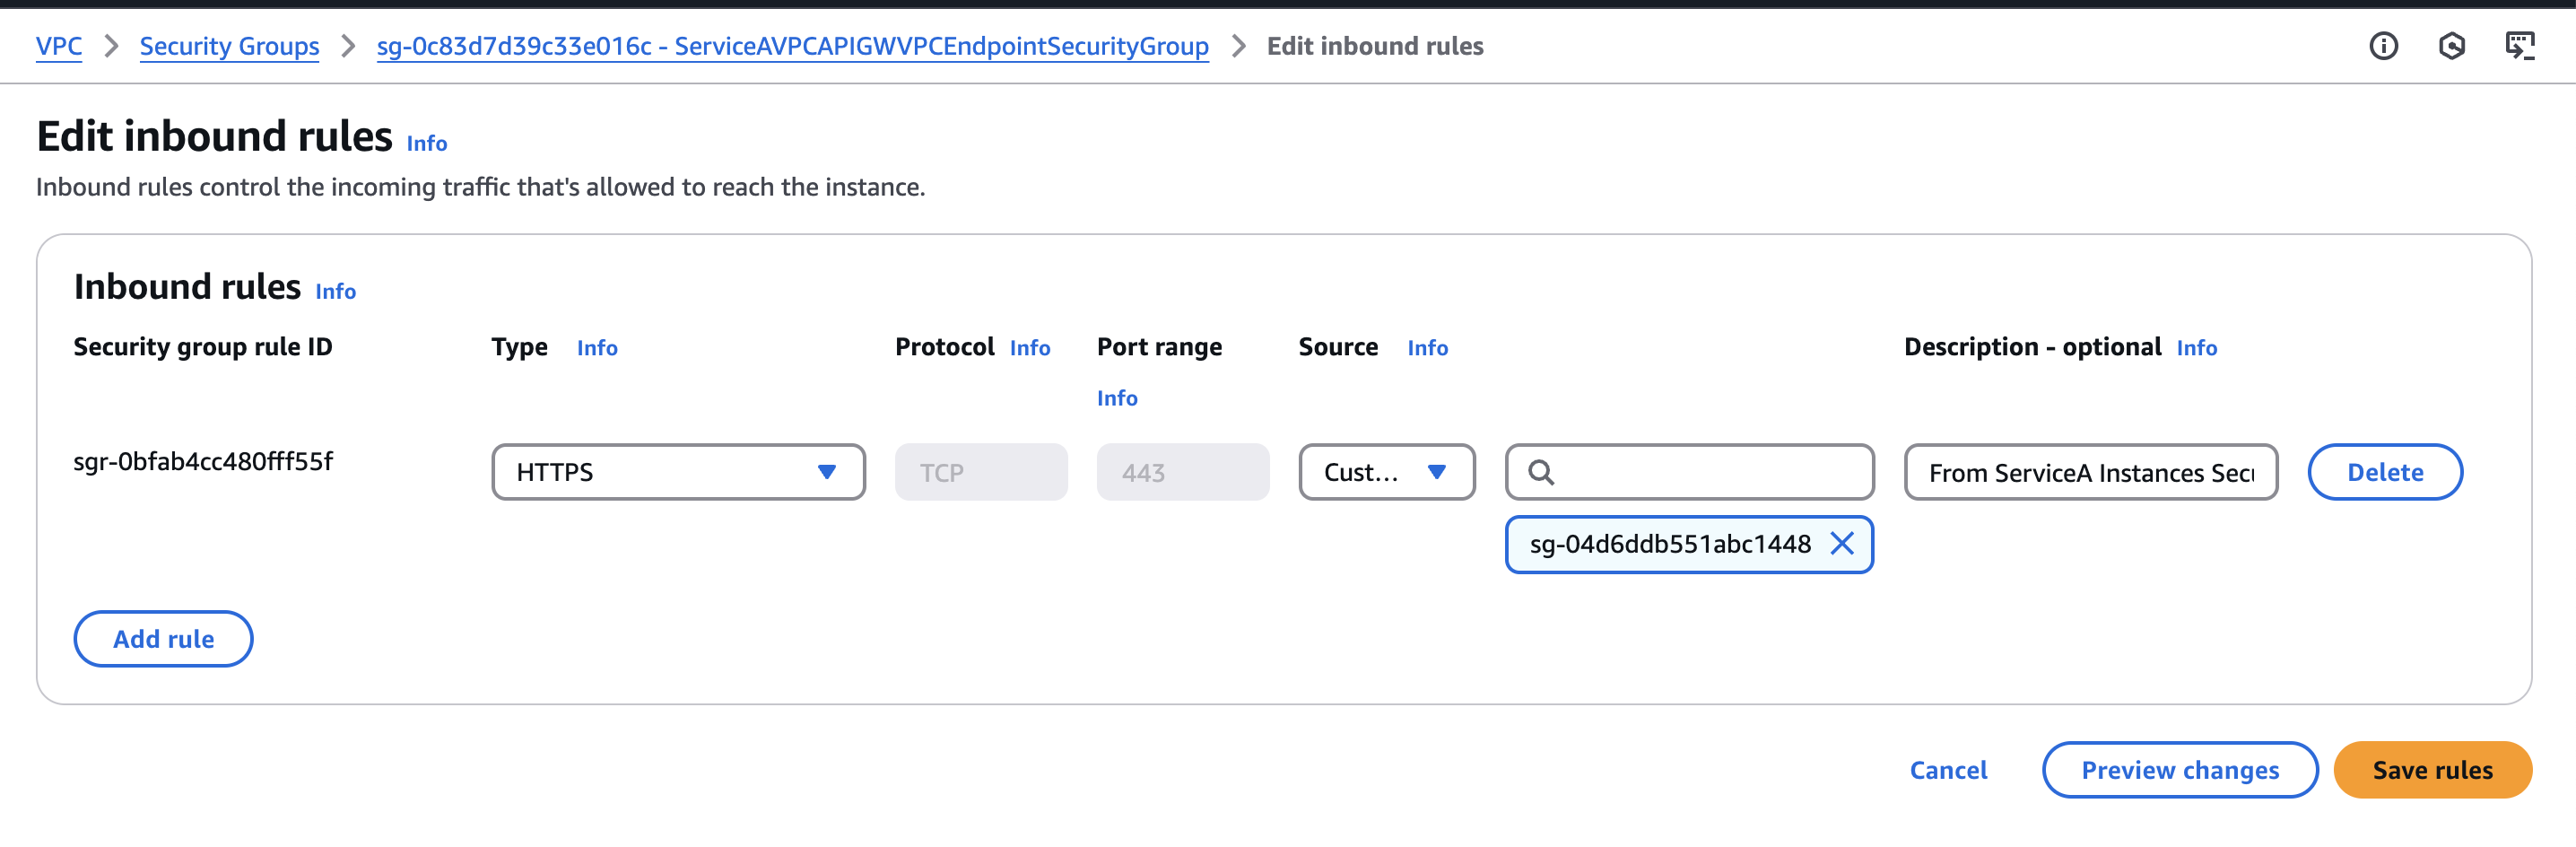
Step 11: For the new rule, configure the following settings:
- For Type, choose HTTPS
- For Source, choose Custom, then in the search field, select the security group that has ServiceASecurityGroup in its name.
- For Description - optional, enter From ServiceA Instances Security Group
Step 12: Choose Save rules.
Step 13: Open TerminalA and run command "runscanner"
From the assessment results, you can see that all security requirements are still met. However, Unwanted Callers #1, #2, and #3 are now blocked by the VPC endpoint security group level which is closer to the source.
https://aws.amazon.com/blogs/security/zero-trust-architectures-an-aws-perspective/