Google recently introduced the Agent-to-Agent (A2A) Protocol, and it’s already making waves in the AI space. From travel planning to enterprise automation, real-world use cases are popping up fast.
Over 50 tech partners—including MongoDB, Atlassian, SAP, PayPal, and Cohere—have already adopted it, highlighting just how impactful A2A is becoming.
As an AI enthusiast, I spent the weekend exploring A2A, and in this article, I’ll break down what I’ve learned.
To keep things simple, I’ve split it into two parts:
- Theory – What A2A is, how it works, and why it matters.
- Practical – How to build with A2A and integrate MCP to connect tools and data sources seamlessly.
So, let’s begin.
What is A2A

Source : Github
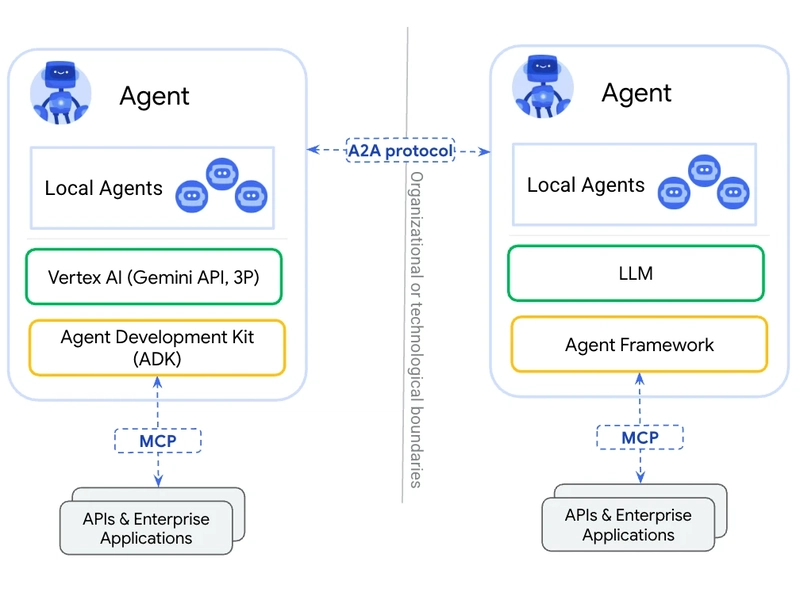
A2A stands for Agent-to-Agent protocol. It is designed to enable different, specialized AI agents to communicate directly with each other, delegate tasks, and work together as a team.
For example, it allows a main agent (like a personal assistant) to act as a project manager, coordinating a team of specialist agents
This solves the problem of current ai agents working in isolation and opens up new ways & possibilities to build complex multi agentic system.
It is built on 5 key principles (from docs itself):
- Simple: Reusing existing standards (HTTP, JSON-RPC, SSE, Push Notify)
- Enterprise Ready: Built in Auth, Security, Privacy, Tracing, Monitoring Support
- Async First: Can handle (Very) Long running-tasks while providing meaningful updates.
- Modality Agnostic: Supports wide range of modalities: text, audio/video, forms, Iframe,, etc.
- Opaque Execution: Agents do not have to share thoughts, plans, or tools.
Think of it as creating a standard way for AI agents to introduce themselves, share what they can do, and work together on tasks.
Now let’s look at components that make up A2A
Components of A2A Protocol
Before understanding how the A2A works, it's important to know the core components that powers it.
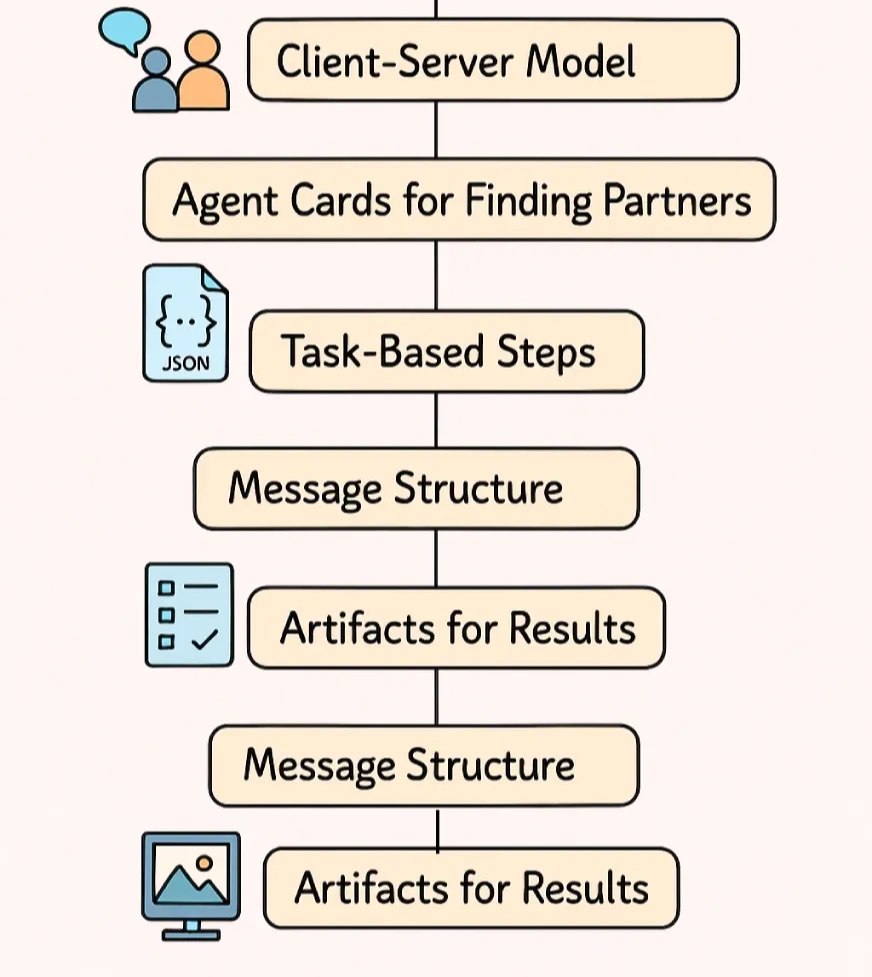
These are the core components of A2A:
- Client - Server Model: The A2A works on client server architecture, where client (agent) asks for a task to be done and server (specialized agent/ tool) does the task. However, roles can keep changing during the task flow
-
Agent Cards: Agent Cards are json file that act as an agent's profile. It lists down
idnamejobtypesecurtiy details,mcp supportand much more. It helps in agent discovery by client. - Task: A Task is the main unit of work and moves through clear stages —submitted, working, input-required, completed, failed, or cancelled. This helps to manage progress and workflow.
- Message Structure: Inside the task, agents talk using messages. Message contains parts which consist of the actual content (multimodal).
- Artifacts: The output of the task is delivered through artifacts. Artifacts are structured results to ensure final output is consistent and easy to use.
💡Note For simplicity, I have only covered the essential, detailed dive can be found here
With the fundamentals of core component under the belt, let’s look at how it all ties up together
How A2A Protocol Works
When a task is assigned to an agent, it goes through following stages:
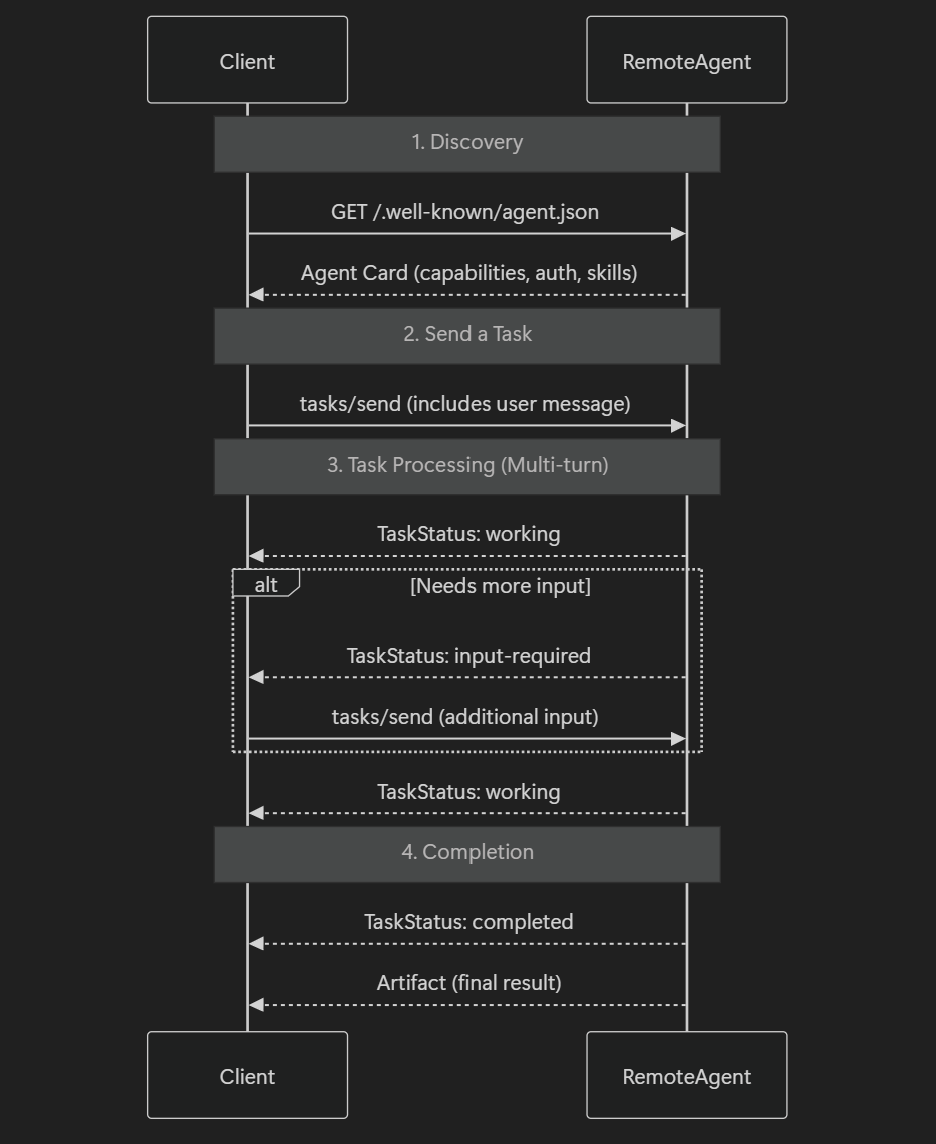
Agent Discovery
- Each specialist agent publishes an Agent Card (like a resume).
- The card includes capabilities (e.g., “travel_planning”, “budget_analysis”).
- A requesting agent uses these cards to discover the right specialists for the task.
Task Delegation
- The requesting agent assigns tasks to the selected specialists.
- Tasks are expressed in natural language, allowing flexibility.
- Example: “Find affordable flights and hotel options.”
- Specialist agents interpret and act on these high-level requests using their own intelligence.
Task Processing (Multi Turn)
- Tasks go through a lifecycle: pending → running → intermediate updates → completed/failed.
- The requesting agent can receive acknowledgements, track progress, get partial results, and continuously monitor task updates.
Completion & Delivery
- Once all tasks are done, the requesting agent collects and merges results (artifacts).
- The final output is a coherent, combined solution (e.g., full vacation itinerary).
- The agent may also refine or post-process the gathered data for presentation or further use.
With seamless collaboration between multiple agent’s complex workflows are possible but often time these multi-agent systems gets stuck with tool mismatch, context loss and misaligned goals.
To tackle these problems, MCP comes to the rescue.
A2A + MCP - A great Match
MCP (Model Context Protocol) is a new standard protocol that allows agents to connect with custom tools, APIs, and data sources.
By adding an MCP layer, you can keep everything in sync and ensure smooth collaboration between agents by handling:
- Context Loss: MCP Shares key background info so all agents know what’s going on.
- Tool Mismatch: MCP Tells agents what tools are available and how to use them.
- Misaligned Goals: MCP Helps agents understand the task’s purpose so they work toward the same goal.
- Data Confusion: MCP Standardizes how agents share and read data to avoid miscommunication.
- Handoffs: MCP Makes sure the next agent picks up where the last one left off, with all the right info.
Here is an example on how the trip planning task flow look like with MCP.
Example
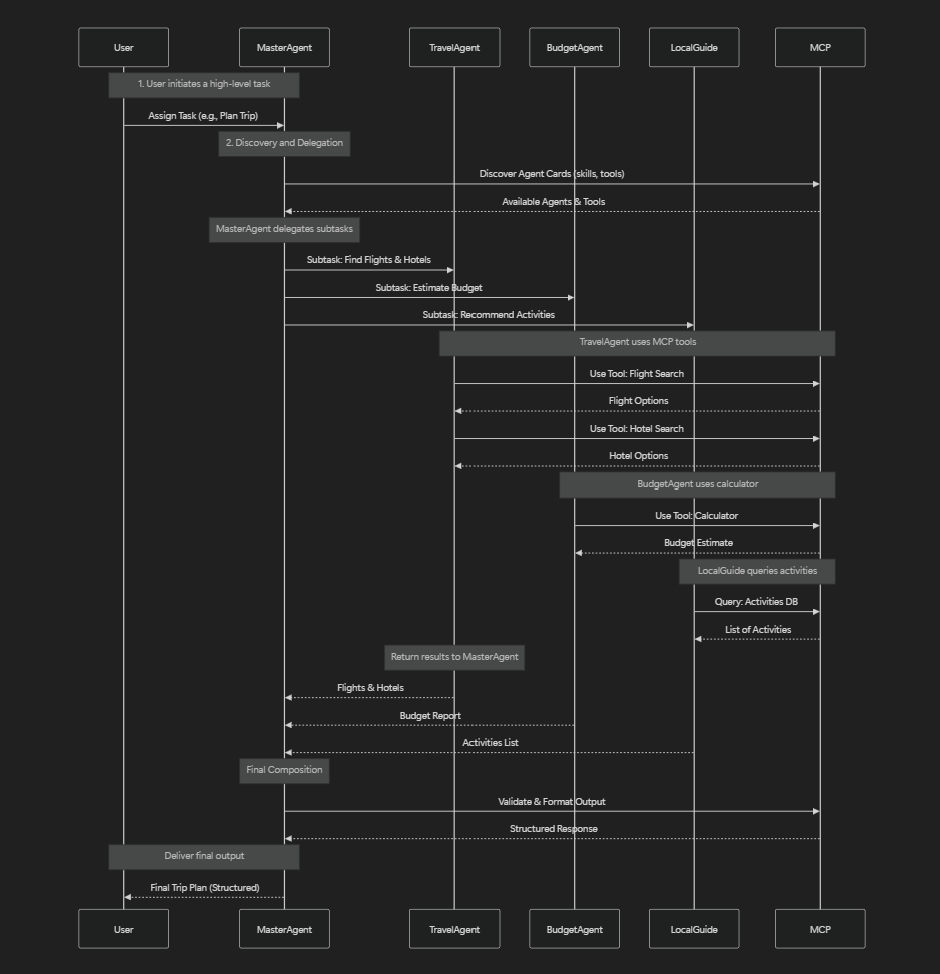
User assigns a trip planning task and, master agent looks for agent cards for specialized agent, say Travel. Budget & Local Guide
Now agents can be given a set of tools to complete its task managed by MCP.
For example (with no meditaries as in chart):
- Travel Agent can use MCP to search flights and hotels using flight and hotel search tools
- Budget Agent might use an MCP-linked calculator tool
- Local Guide can access an activities database. (data sources)
Finally, once all the agents are done returning resources, the master agent combine all and generate the final response in a structured format (.
In this setting, A2A coordinates who does what, while MCP ensures each agent can actually do it using the right tools and agents stay on track. - a key difference between A2A and MCP.
I hope, you understood the context, now let’s move on to second part of the blog, building with A2A protocol.
Building With A2A Protocol using Composio, Gemini & Anthropic
In my experience, building tools and MCP servers is time consuming. and often error prone (specially setup part). If you followed my earlier blog on Building MCP Server From Scratch, you might know it too.
So, to reduce the time, I will use Composio & Anthropic which host a directory of over 200+ predefined MCP servers with tool integration to make the process faster.
Now let’s get building
Problem Statement
For this demo, let’s build a browser automation agent that leverages puppeteer MCP server to browse the web and perform actions autonomously.
Workflow
Sample Project Workflow
If this feels complicated, things will clarify as we move along.
Let’s setup the workspace.
Workspace Setup
Open terminal and run the given commands one by one
> python -m venv a2a
> a2a\Scriptsa2a\Scripts\activate
> pip install google-adk
> code .
This code will create the environment a2a, activate it and install Google’s Agent Developer Kit (ADK) and open the workspace in vs code (optional).
Google Agent Developer Kit package which will be used to connect to connect MCP servers with A2A agents.
Inside the workspace, create a new file called .env and populate with following value:
GOOGLE_API_KEY=your-api-key
GEMINI_API_KEY=your-api-key
You can get your API key at: Google AI Studio , though you might need to login first!
Time to setup MCP Servers.
Set Up MCP Server (stdio/ sse)
- Head to the MCP Server Repository and open pupeeter mcp server page. We will use installer shortcut from here. I will use npx, feel free to use docker if you like.
- In the page readme, scroll down and find section titled: Usage with VS Code. Click on one click install, give required permission. This install the puppeteer MCP server. You can check
settings.jsonfor verification. - For more granular control over server installation and refer to the readme.
With this MCP setup is done, time to write the actual code.
App Code
Create a file called automation_agent.py in the root.
Import necessary modules and load environment variables defined in .env file
# ./adk_agent_samples/mcp_agent/agent.py
import asyncio
from dotenv import load_dotenv
from google.genai import types
from google.adk.agents.llm_agent import LlmAgent
from google.adk.runners import Runner
from google.adk.sessions import InMemorySessionService
from google.adk.artifacts.in_memory_artifact_service import InMemoryArtifactService # Optional
from google.adk.tools.mcp_tool.mcp_toolset import MCPToolset, SseServerParams, StdioServerParameters

# Load environment variables from .env file in the parent directory
load_dotenv('.env')
Configure MCP Server (stdio based) & Fetch tools
# Import Tools from MCP Server - Puppeteer
async def get_tools_async():
  """Gets tools from the File System MCP Server."""
  print("Attempting to connect to Pupeeter MCP server...")
  tools, exit_stack = await MCPToolset.from_server(
      connection_params=StdioServerParameters(
          command='npx',
          args=["-y",
                "@modelcontextprotocol/server-puppeteer"],
      )
  )
  print("MCP Toolset created successfully.")
  return tools, exit_stack
Focus on the connection_params , its same as in settings.json . This is crucial for fetching tools.
For SSE based server, use this code 👇
async def get_tools_async():
  """Gets tools from the MCP Server."""
  print("Attempting to connect to MCP server...")
  tools, exit_stack = await MCPToolset.from_server(
      connection_params=SseServerParams(url="mcp-sse-server-url")
  )
  print("MCP Toolset created successfully.")

  return tools, exit_stack
Ensure to replace mcp-sse-server-url with actual SSE URL like: https://mcp.composio.dev/gmail/tinkling-faint-car-f6g1zk - composio Gmail MCP server (sse)
Next, create an agent
async def get_agent_async():
    """Creates an ADK Agent equipped with tools from the MCP Server."""
    tools, exit_stack = await get_tools_async()
    print(f"Fetched {len(tools)} tools from MCP server.")
    root_agent = LlmAgent(
        model='gemini-2.0-flash',  # Adjust if needed
        name='web_search_assistant',
        instruction=(
            "You are a web automation assistant. Use browser tools to navigate pages, click, and extract data. "
            "Always try to solve user queries by using the tools instead of answering directly. "
            "If the user asks for news or information from a website, open that site and extract the relevant parts."),
        tools=tools
    )
    # uncomment to see list of tools - for verifiability
    # for tool in tools:
       # print(f"Tool: {tool.name} - {tool.description}")
    return root_agent, exit_stack
Ensure the instruction prompt is detailed and highlight the use case. Better the input, better the tool navigation support.
Finally add the main logic:
# Define the main function to run the agent
async def async_main():
session_service = InMemorySessionService()
artifacts_service = InMemoryArtifactService() # Optional
session = session_service.create_session(
state={}, app_name='mcp_web_search_app', user_id='web_search'
)
# Define reliable query for best results
query = (
"Go to https://news.google.com and extract the top 5 headlines from the homepage. "
"Use your browser automation tools to navigate and extract the text."
)
print(f"User Query: '{query}'")
content = types.Content(role='user', parts=[types.Part(text=query)])
root_agent, exit_stack = await get_agent_async()
runner = Runner(
app_name='mcp_web_search_app',
agent=root_agent,
artifact_service=artifacts_service, # Optional
session_service=session_service,
)
print("Running agent...")
events_async = runner.run_async(
session_id=session.id, user_id=session.user_id, new_message=content
)
async for event in events_async:
print(f"Event received: {event}")
print("Closing MCP server connection...")
await exit_stack.aclose()
print("Cleanup complete.")
if __name__ == '__main__':
try:
asyncio.run(async_main())
except Exception as e:
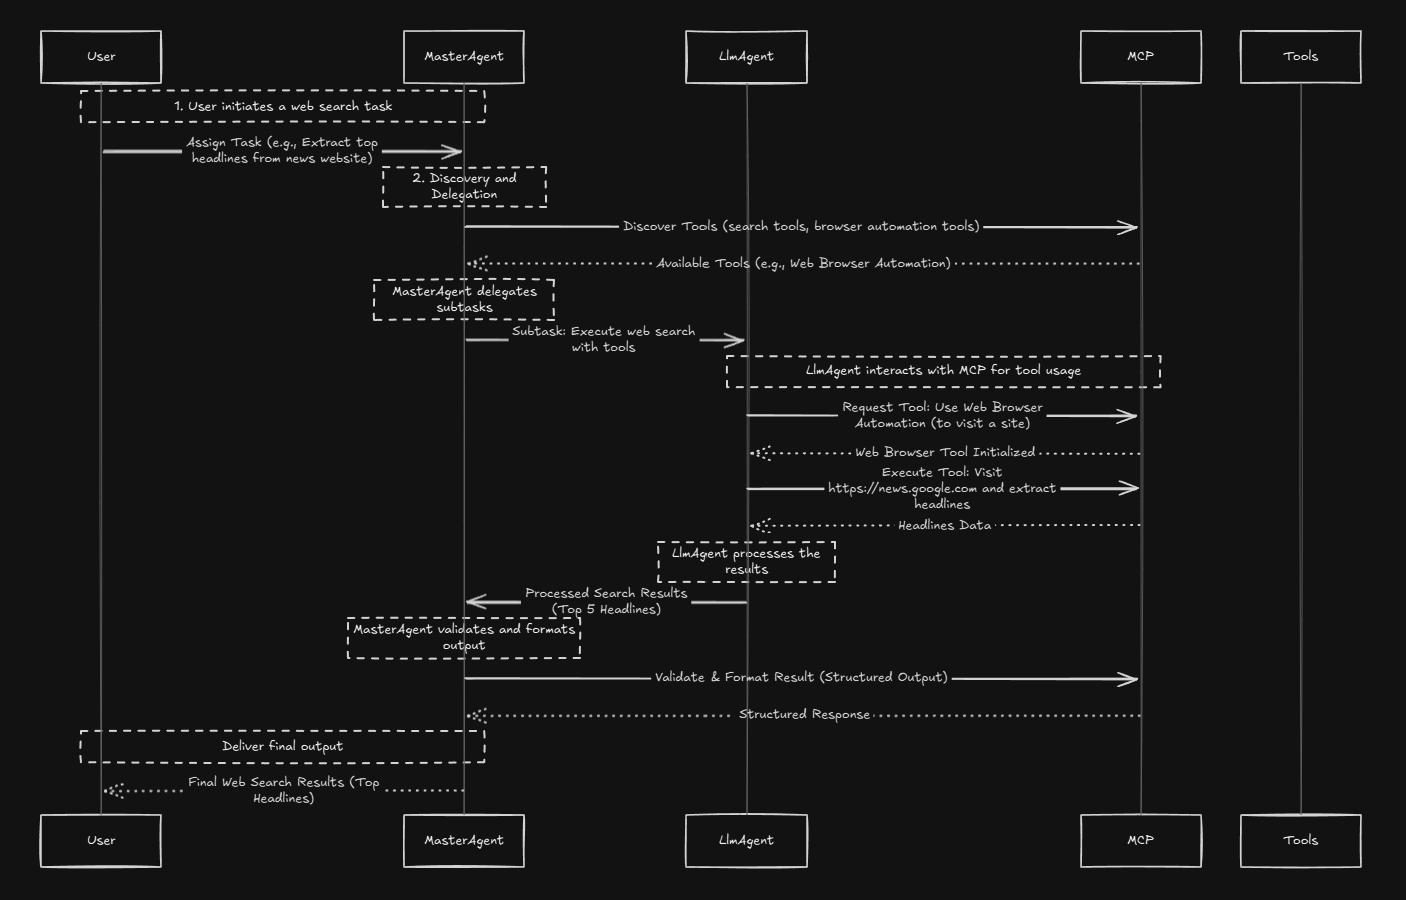
print(f"An error occurred: {e}")The above script runs an AI agent that takes a query to “extract the top 5 Google News headlines”, processes it asynchronously, prints the agent’s responses, and then cleans up the session. The main function handles error handling and runs the program.
Make sure to prompt the exact requirements in query parameter/ keep user inputed for better results.
But how this all gets executed? Agent Cards!
In the Google A2A ecosystem, an Agent Card is like a profile or manifest for the agent. It tells the ADK runner info about agent capabilities like skills, endpoint URL, and other relevant information.
All agent cards are accessible at: url/.well-known/agent.json , so any developer need follow the format of Agent Card to expose the functionality.
Lucky for us google ADK does it in background through LlmAgent . So, in this case agent card might look like:
{
  "name": "WebSearchAgent",
  "description": "An agent that performs web searches and extracts information.",
  "url": "http://localhost:8000",
  "capabilities": {
    "streaming": true,
    "pushNotifications": false
  },
  "defaultInputModes": ["text"],
  "defaultOutputModes": ["text"],
  "skills": [
    {
      "id": "browser",
      "name": "browser automation",
      "description": "Performs web searches to retrieve information."
    }
  ]
}
The card holds the following information:
-
Name/Description → The Agent name and the
instructionprompt. -
URL → Placeholder
localhost:3000, adjust based on MCP server hosting. - Provider/Version → Project/org details.
- Capabilities → SSE Based streaming with no push notification
- Input Output Mode→ Text based
- Skills → One main skill: navigating websites and extracting information via Puppeteer tools.
This agent card is then fetched by Runner runnable to identify the agent to delegate the task and wait for the response.
Internally:
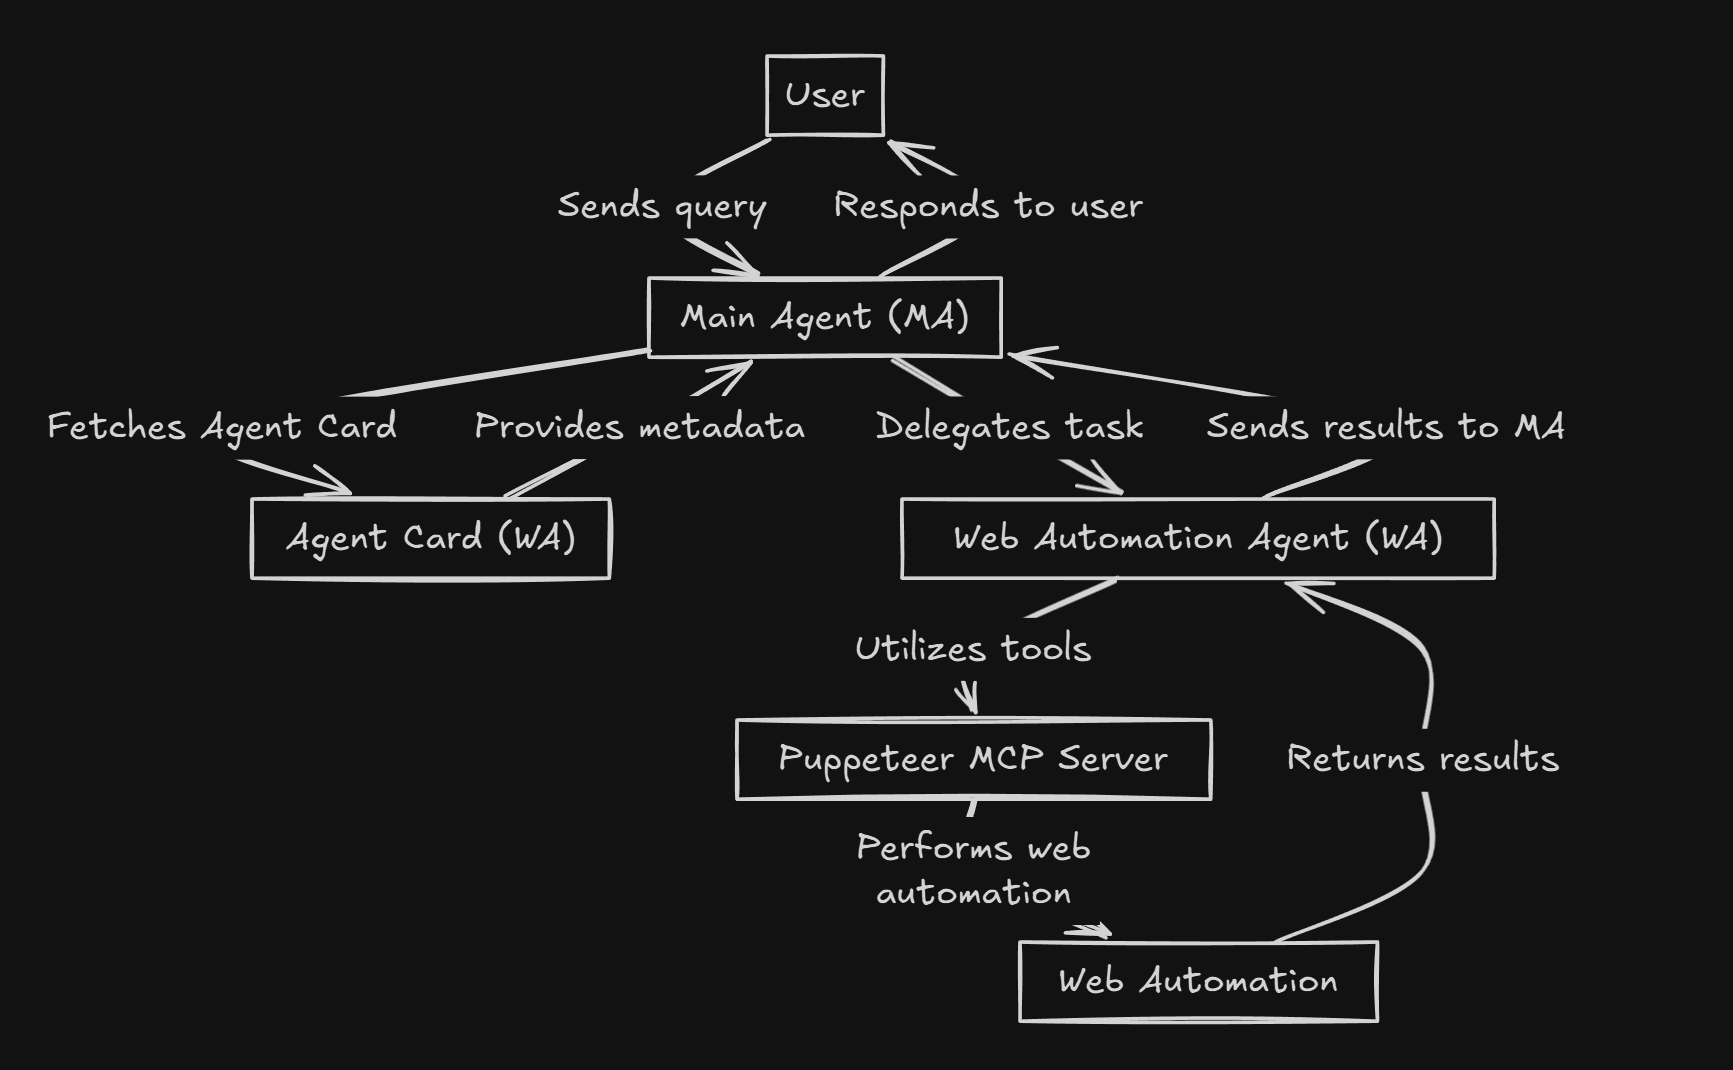
The diagram represents the following flow: (WA - web automation agent, MA - master / main agent)
- User sends a query to the Main Agent (MA).
- The MA fetches the Agent Card of the Web Automation Agent (WA) to understand its capabilities.
- The Agent Card provides metadata about the WA.
- The MA delegates the task to the WA.
- The WA utilizes tools defined in the Agent Card, such as the Puppeteer MCP Server.
- The Puppeteer MCP Server performs web automation tasks.
- The results are returned to the WA.
- The WA sends the results back to the MA.
I hope you understood the internal detail, if not drop a comment, I will be happy to explain
Now it's time to test the agent.
Now time to test the agent.
Results Time
- Run the MCP Server using:
CTRL+SHIFT+P→ List MCP Servers → Puppeteer → Start Server. - Run the script using:
python *automation_agent.py*
The puppeteer-server opens a browser, heads to the google news page, fetches the output and displays in terminal as artifacts, showcasing it using A2A and MCP under the hood.
Here is a quick demo of me using it:
For demonstration purpose, so left the results saving part. You are free to implement it, if you like.
Congrats on making your first A2A + MCP agent. Hope you had fun. Really excited to see what you all come up with.
Anyways here are some final notes from building this project, before I end this article.
Conclusion
Often, line between MCP and Agents get blurry and can be used interchangeably, but they are different and complement each other. Always Keep in mind:
- MCP helps agents talk to tools that connect with outside apps,
- Agent2Agent helps agents collaborate together.
Both are steps toward making agent development more standard, easier and automated.
It'll be interesting to see how they shape the future of agents together!