Blog Co-Authored by @madhusri-j
Ever Wondered How Chatbots Just Know What You’re Asking For?
Imagine typing a question into a chatbot and instantly receiving a relevant and accurate response. How does the chatbot understand your intent so effectively?
It’s all thanks to intent classification - the magic behind a chatbot's ability to figure out whether you’re asking for an answer, a summary, or just chatting. Without it, bots would be lost in translation, and you'd end up frustrated.
In this blog, let’s unravel how intent classification works, exploring practical methods to get it right. Whether you're building a bot or tweaking an existing one, there’s something here for everyone.
Why Does Intent Classification Matter?
If you’re training your bot to handle different situations. Maybe you want it to recognize:
- A direct question (e.g., What’s the time in New York?).
- A request for a summary (e.g., Can you summarize this article?).
- A comparison task (e.g., What’s better, A or B?).
- Or even casual banter (e.g., Tell me a joke!).
The better the bot is at understanding these, the smarter and more useful it feels. Let’s explore the different ways you can achieve this.
Approaches to Intent Classification
There’s no one-size-fits-all solution, but here are four popular methods to get you started:
1. Machine Learning / Deep Learning Models
What’s Needed? A labeled dataset.
This approach involves teaching your chatbot to identify patterns in user inputs, using machine learning algorithms.
How It Works: You collect examples of what users might say (a dataset), convert those into numbers the machine understands, and train a model to predict intents based on this data.
So Intent classification can be achieved by building machine learning models such as Random Forest , Naive Bayes or by training a Multi Layered Perceptron neral nets, using a labeled training dataset. The training dataset must be gathered with multiple utterance samples for each intents. These utterances has to be converted numercial form using any of the tokenizers/vectorizers (we have used basic TfidfVectorizer). Once the model is trained, the resulting weights are saved in a pickle file, which can be loaded for inference in your application.
Here’s the gist:
Prepare Data → Create Pipeline → Train Model → Evaluate Model → Export Weights
- Prepare Data: Ensure you have a dataset containing the input and its desired classification.
-
Create Pipeline: Here, we convert the text data using
TfidfVectorizerand then pass to our Naive Bayes model,MultinomialNB. - Train Model: Fit the model on the dataset.
- Evaluate Model: Validate the model’s performance on test data.
- Export Weights: Save the trained model and label encoder to pickle files.
Here’s how you might integrate it:
- Sample dataset:
dataset.csv- Format: Contains the input text and corresponding classification labels.
- Example notebook:
naive_bayes.ipynb- Running this Jupyter notebook will produce two output files:
-
intent_classifier.pkl(trained model weights) -
label_encoder.pkl(for decoding classification labels)
-
- Running this Jupyter notebook will produce two output files:
import joblib
from loguru import logger


def classify_question_intent(prompt: str) -> tuple[str, float]:
    """
    Classify the intent of a given prompt using a pre-trained model.

    Args:
        prompt (str): The input text to classify.

    Returns:
        tuple[str, float]: The predicted intent and its confidence score.
    """
    logger.info("Classifying Intent")
    file_path = "app/internal/artifacts"  # Path to saved model files

    # Load the pipeline and label encoder
    pipeline = joblib.load(f"{file_path}/intent_classifier.pkl")
    label_encoder = joblib.load(f"{file_path}/label_encoder.pkl")

    # Predict intent
    intent_index = pipeline.predict([prompt])[0]
    intent_confidence = max(pipeline.predict_proba([prompt])[0])
    intent = label_encoder.inverse_transform([intent_index])[0]

    logger.debug(f"Intent: {intent}, Confidence: {intent_confidence}")
    return intent, intent_confidence
Why Choose This?
- It’s quick and efficient once trained.
- You have full control over the process, making it easy to customize for your needs.
- Works great if you’ve got a solid, clean dataset to start with.
Challenges:
- You’ll need enough labeled training data, which can take time to prepare.
- Training and deploying the model requires extra steps like validation and exporting weights.
2. Large Language Models (LLMs)
What’s Needed? Just a good prompt.
For scenarios where creating datasets is not feasible, Large Language Models offer a convenient alternative. Large language models like GPT can handle intent classification right out of the box.
How It Works:
You give the LLM a structured prompt and a list of possible intents. Optionally, throw in a few examples, and it’ll figure out what the user wants.
Classify the intent of the user request and respond with one of the following intent [RAG, Compare, AI, Summay]

Question:
User: "Can you summarize this?" → Intent: Summary
Why Choose This?
- No datasets or pre-training required—you’re ready to roll with just a good prompt.
- Super easy to implement, even for those new to AI.
Challenges:
- It might be a bit slower since it requires multiple API calls for each query.
- Costs can add up quickly if you’re handling a lot of user queries.
3. Azure Language Service
What’s Needed? A labeled dataset and access to Azure.
AWS Alternative: Comprehend Custom Classification
If you’re dealing with enterprise-scale systems, Azure’s Custom Text Classification can do the heavy lifting.
-
Steps to Set Up in Azure:
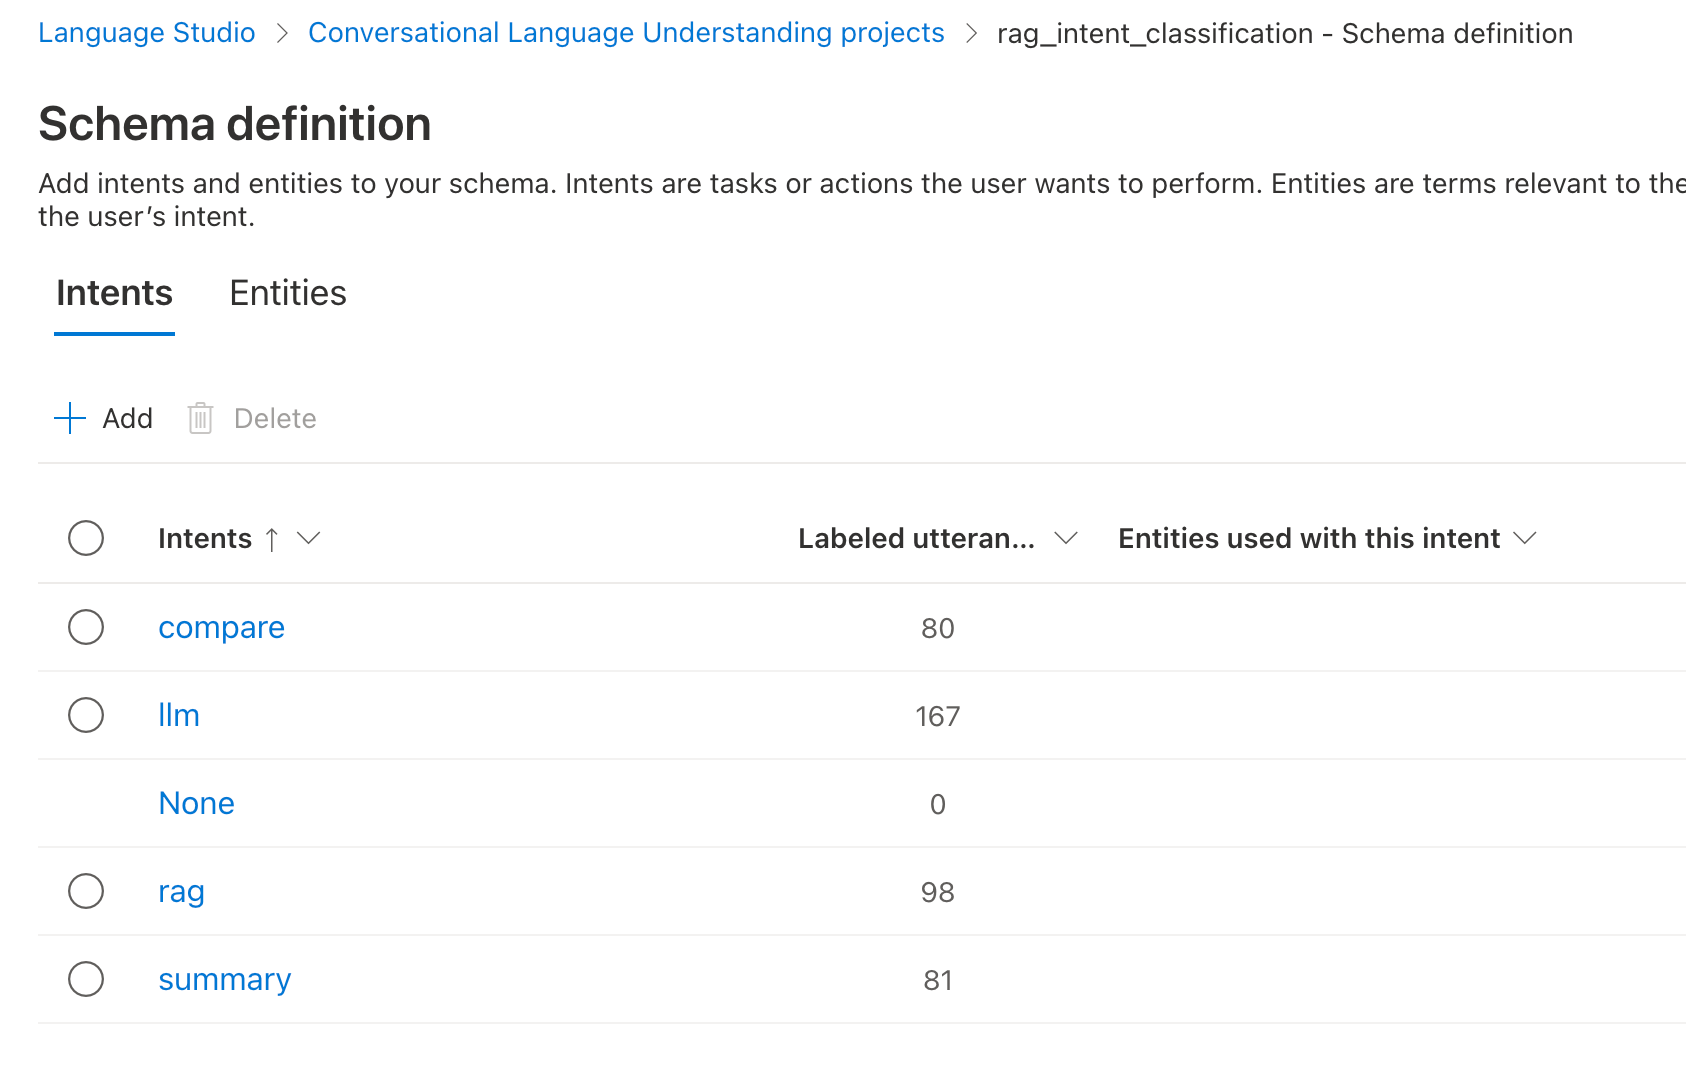
- Provision a Custom Text Classification project in Azure Language Studio.
- Upload a labeled dataset (text with corresponding intent labels).
- Train the model on the dataset.
- Deploy the trained model for API-based predictions.
-
Sample Schema:
- Intents:
compare,llm,rag,summary,None. - Example Utterances:
-
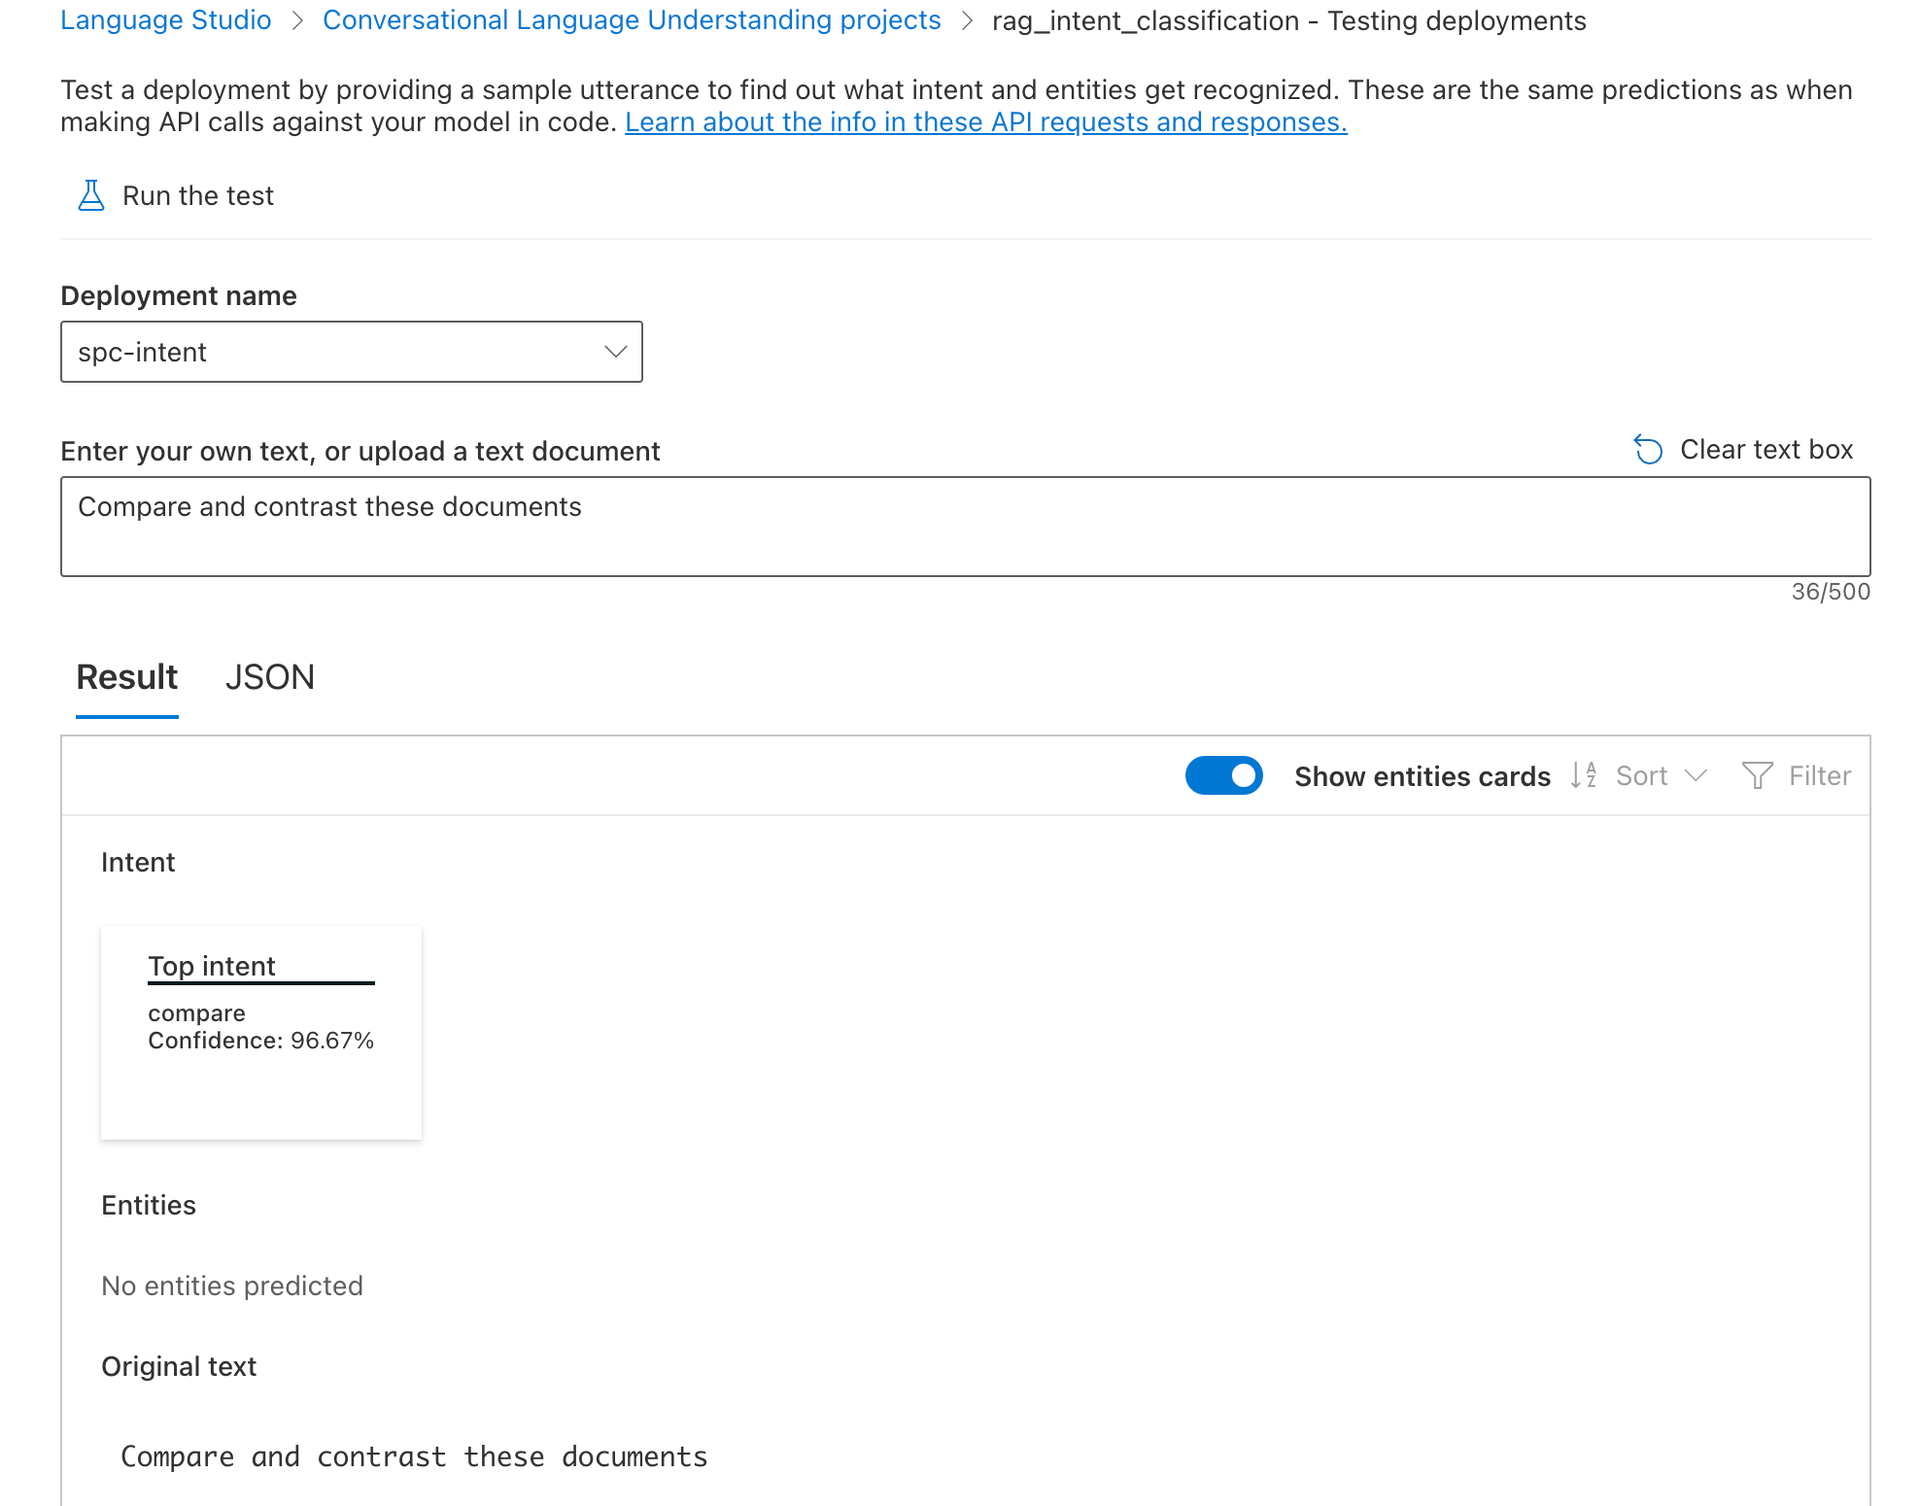
"Compare and contrast these documents" → Intent:
compare(Confidence: 96.67%, as seen in the second image).
-
"Compare and contrast these documents" → Intent:
- Intents:
-
Integration:
- Deploy the model as an endpoint in Azure.
- Call the endpoint using Azure API to classify user input.
Why Choose This?
- Pre-built infrastructure means less manual coding.
- Perfect for scaling and integrating with cloud-based systems.
- Azure provides a user-friendly interface to train and deploy models without heavy lifting.
Challenges:
- Requires labeled data to train the model.
- Text length is capped at 1,000 characters, which can be limiting for complex queries.
- Cloud services aren’t always cheap, though free tiers are available.
- ### In-Memory Vector Store
What’s Needed? A dataset and embedding tools.
This method leverages a vector store to indentify the closest matching intents. Sample user queries are embedded as vectors, with metadata tagging each vector to a specific intent. This data is stored in a vector store. When a user asks a questions, querying the vector store with the current user question, the top result (based on highest similarity) provides the predicted intent. The efficiency of this approach depends on various factors like the quality of the source dataset, vector retrival technique and embedding algorithm
How does it work?
Prepare Data → Load Data to VectorStore → User Query → Pick the Intent
-
Prepare Data:
- Create a dataset where each entry consists of a user query (text) and its corresponding intent label.
- Example:
| User Query | Intent |
|---|---|
| "Summarize this document" | summary |
| "Compare and contrast these" | compare |
-
Load Data to Vector Store:
- Convert the user queries into embeddings (using tools like
OpenAI Embeddings,Sentence Transformers, or similar). - Store the embeddings in an in-memory vector store (e.g., FAISS, ChromaDB) with intent labels stored as metadata.
- Convert the user queries into embeddings (using tools like
-
User Query:
- Convert the incoming user query into an embedding.
- Query the vector store to find the most similar vector (using cosine similarity).
-
Pick the Intent:
- Fetch the metadata (intent) of the top result from the vector store.
Why Choose This?
- Lightning-fast when dealing with small-to-medium datasets.
- Uses semantic similarity, making it a great fit for Retrieval-Augmented Generation workflows.
- Scalable with tools like FAISS or ChromaDB for larger use cases.
Challenges:
- You’ll need embeddings generated by models like OpenAI’s or Sentence Transformers.
- Memory constraints can be a bottleneck if you’re storing everything in-memory.
- A well-prepared dataset is key to making this method shine.
Which Method Should You Pick?
Let’s simplify this:
- New to this? Start with LLMs—they’re easy and flexible.
- Tight on budget? Try machine learning—it’s cost-effective.
- Scaling for enterprise? Azure or AWS services are great.
- Need speed? Vector-based methods are a solid choice.
Intent classification isn’t just tech—it’s the art of making your chatbot feel human, smart, and intuitive. Whether you’re building something from scratch or optimizing an existing bot, there’s a method here for every stage of your journey.
Start simple, experiment, and watch your bot evolve into the assistant users can’t live without!
What’s your favorite approach? Let’s discuss in the comments!