Welcome back to the series! 👋
In Part 2, we added chat history support, allowing our app to maintain conversation context like a real assistant.
Today, we’re taking another big step forward — enabling our chatbot to read and discuss uploaded PDF files!
Imagine uploading a research paper, a business report, or a contract — and asking the LLM to summarize, explain, or extract information from it.
Let's make it happen!
💡 What we’re building?
By the end of this part, you’ll be able to:
- 📎 Upload multiple PDF files
- 🗂 See a list of uploaded documents
- 🗑️ Remove individual files or clear all uploads
- 💬 Chat with the LLM about the content inside the PDFs
- 📄 Persist uploaded files between page reloads
All files will be stored safely and reliably, with a clean user interface and correct file handling behind the scenes.
📦 One more thing before we begin: Embeddings model.
Before we move on, we need to add one more model to support document understanding — an embeddings model.
This model is used behind the scenes to analyze and chunk your PDF content in a way that the LLM can actually understand and reference during conversation.
🛠️ If you were using the MaIN.NET CLI, this step would happen automatically.
I’ll cover the CLI setup in a separate tutorial, but for now let’s do it manually.
👉 Download the model from Hugging Face:
https://huggingface.co/Inza124/Nomic
Once downloaded, place the .gguf file in the same folder where you stored your Gemma model — for example /Documents/MainModels/.
We’ll reference this embeddings model automatically later when chatting with PDFs. That’s all for setup — now let’s build!
🛠 Key features we’re adding.
🔼 File upload UI.
We will enhance the message input area to not only send text messages but also easily attach PDF files.
Find this part of code and remove it:
class="d-flex gap-2">
     type="text" class="form-control"
           @bind="messageToLLM"
           @bind:event="oninput"
           @onkeydown="HandleKeyDown"
           placeholder="Type your message..." />
     class="btn btn-primary" @onclick="SendMessage">Send
We’ll slightly reorganize the layout:
- Keep the familiar text input field for typing your messages.
- Add a new file attachment button (with a paperclip icon) to upload PDF files.
- Keep the Send button aligned next to it for a smooth user experience.
At this point, the entire input and button section should look like this:
class="border rounded p-3">
     class="d-flex gap-2 mb-2">
         type="text" class="form-control"
               @bind="messageToLLM"
               @bind:event="oninput"
               @onkeydown="HandleKeyDown"
               placeholder="Type your message..." />

         class="d-flex gap-2">
             class="btn btn-outline-secondary px-2 d-flex align-items-center" style="cursor: pointer;">
                 class="bi bi-paperclip">
                 OnChange="@LoadFiles" multiple accept=".pdf" class="d-none" />

             class="btn btn-primary px-4" @onclick="SendMessage">Send
This layout keeps everything compact and intuitive:
you can type, attach PDFs, and send messages — all from the same place!
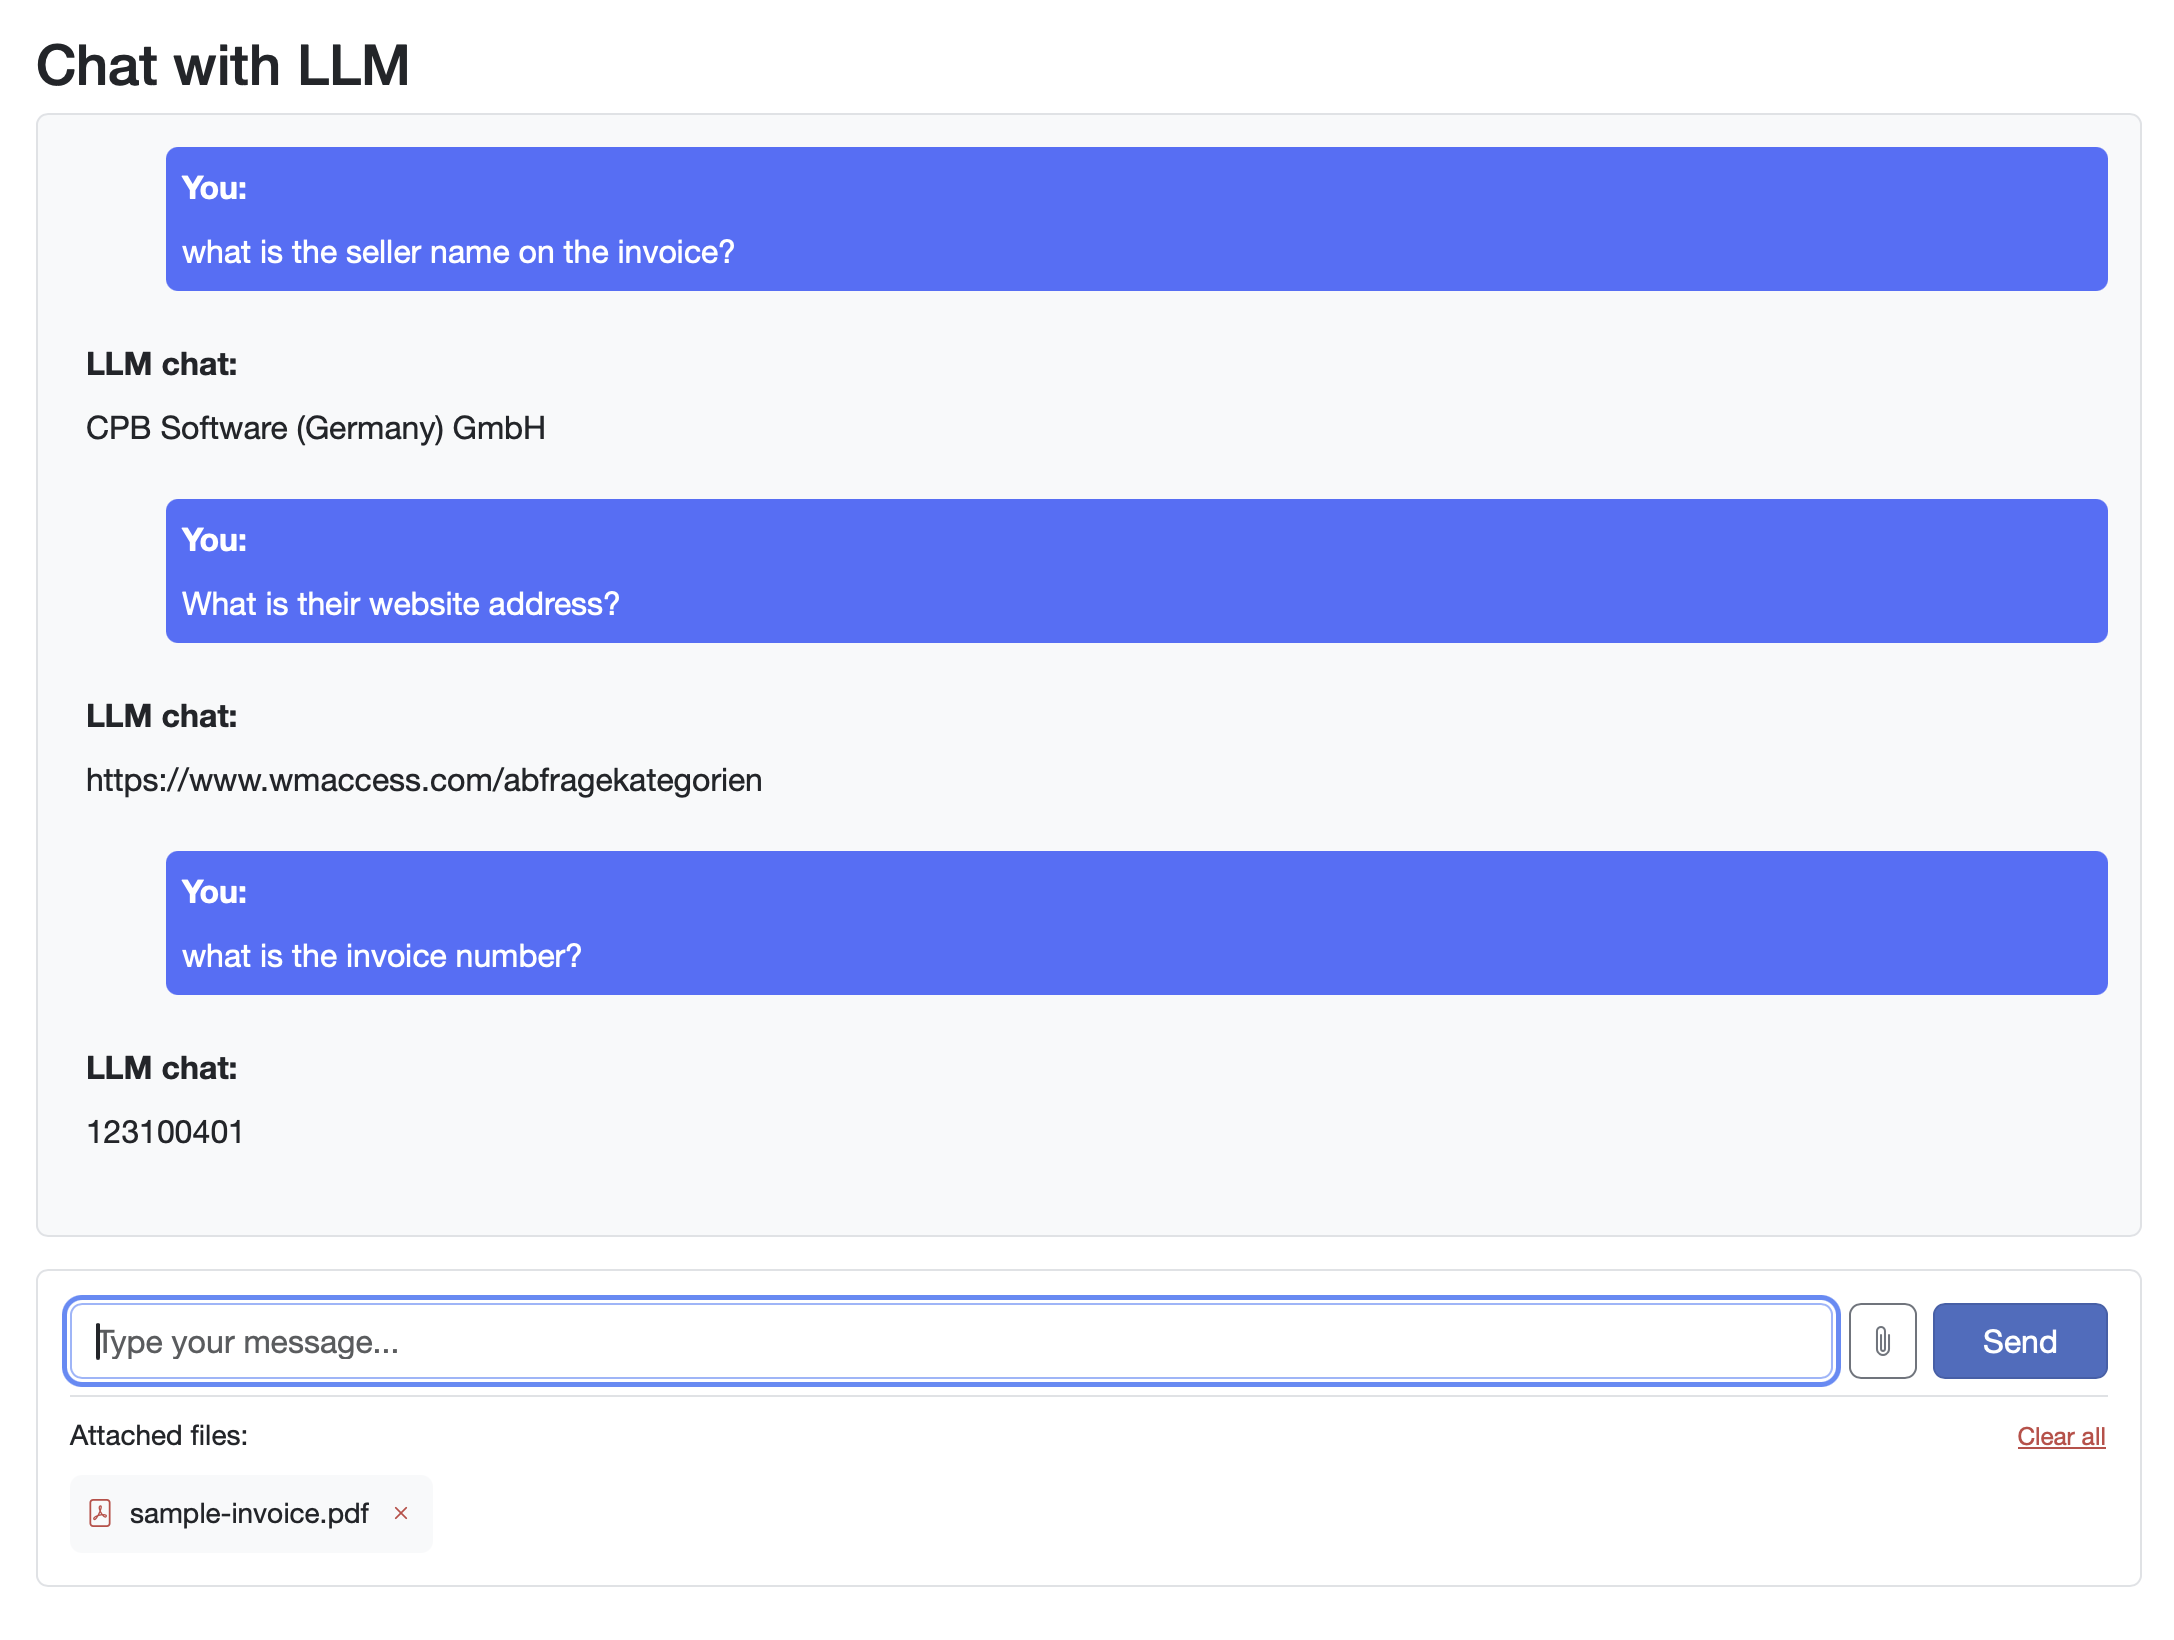
After the files are uploaded, we wand to display:
A clear files button to remove all uploaded documents
A list of uploaded files with nice PDF icons and the original filenames
A remove button next to each file for individual deletion
To achieve that, we need to add the code below:
@if (uploadedFiles.Any())
    {
         class="border-top pt-2">
             class="d-flex justify-content-between align-items-center mb-2">
                Attached files:
                 class="btn btn-link btn-sm text-danger p-0" @onclick="ClearFiles">
                    Clear all


             class="d-flex flex-wrap gap-2">
                @foreach (var file in uploadedFiles)
                {
                     class="bg-light rounded p-2 d-flex align-items-center" style="font-size: 0.875rem;">
                         class="bi bi-file-pdf text-danger me-2">
                         class="text-truncate" style="max-width: 200px;">@file.Name
                         class="btn btn-link text-danger p-0 ms-2" style="font-size: 0.875rem;" @onclick="() => RemoveFile(file)">
                             class="bi bi-x">


                }


    }
IMPORTANT Don't forget to create the "uploads" directory in the wwwroot. You can do it directly from Terminal inside the project by:
mkdir -p wwwroot/uploadsIMPORTANT-2😜 Don't forget to link the bootstrap icons as it's not a part of Blazor app boilerplate. In the App.razor file insert the line in the head section:
rel="stylesheet" href="https://cdn.jsdelivr.net/npm/[email protected]/font/bootstrap-icons.min.css">🧰 File handling logic behind the scenes.
Our backend logic ensures that files are properly managed:
-
LoadFileshandles file uploads, saves them to thewwwroot/uploadsdirectory
private async Task LoadFiles(InputFileChangeEventArgs e)
    {
        foreach (var file in e.GetMultipleFiles())
        {
            if (Path.GetExtension(file.Name).ToLower() == ".pdf")
            {
                var fileName = Path.GetRandomFileName() + "_" + file.Name;
                var filePath = Path.Combine(uploadsPath, fileName);

                await using (var stream = File.Create(filePath))
                {
                    await file.OpenReadStream().CopyToAsync(stream);
                }

                uploadedFiles.Add(new UploadedFile
                {
                    Name = file.Name,
                    Path = filePath
                });
            }
        }
}-
RemoveFilelets users delete specific uploaded files
private void RemoveFile(UploadedFile file)
    {
        try
        {
            if (File.Exists(file.Path))
            {
                File.Delete(file.Path);
            }
            uploadedFiles.Remove(file);
        }
        catch (Exception ex)
        {
            Console.WriteLine($"Error deleting file: {ex.Message}");
        }
}-
ClearFilesremoves all uploaded files at once
private void ClearFiles()
    {
        foreach (var file in uploadedFiles.ToList())
        {
            RemoveFile(file);
        }
}- Automatic file cleanup happens when the component is disposed to keep the storage clean
public void Dispose()
    {
        ClearFiles();
    }
🌐 Handling web root and persistence.
We made sure the file system logic is environment-agnostic and persistent:
- Injected
IWebHostEnvironmentto dynamically get the correctwwwrootpath. Add this two lines below using declarations.
@using Microsoft.AspNetCore.Hosting
@inject IWebHostEnvironment Environment- Created a computed
uploadsPathproperty that points to the uploads directory and a list of uploaded files:
private List<UploadedFile> uploadedFiles = new();
private string uploadsPath => Path.Combine(Environment.WebRootPath, "uploads");- In
OnInitialized, we:- Ensure the uploads folder exists
- Load any pre-existing files if they were uploaded before
protected override void OnInitialized()
    {
        // Ensure uploads directory exists
        Directory.CreateDirectory(uploadsPath);

        // Load existing files
        LoadExistingFiles();
    }

    private void LoadExistingFiles()
    {
        uploadedFiles.Clear();
        var files = Directory.GetFiles(uploadsPath);
        foreach (var filePath in files)
        {
            var originalName = Path.GetFileName(filePath).Split('_', 2).Last();
            uploadedFiles.Add(new UploadedFile
            {
                Name = originalName,
                Path = filePath
            });
        }
    }
This way, uploaded PDFs persist across page reloads, and you always see the correct files on app startup.
💬 Updated chat functionality.
We updated the SendMessage method so that:
- It sends not only your chat message but also the paths to uploaded PDFs to the LLM
- The LLM now has full access to the contents of the uploaded documents when responding
Below you can find updated SendMessage method code:
private async Task SendMessage()
    {
        if (string.IsNullOrWhiteSpace(messageToLLM))
            return;

        // Add user message to history
        chatHistory.Add(new ChatMessage { Content = messageToLLM, IsUser = true });
        var userMessage = messageToLLM;
        messageToLLM = "";

        try
        {
            if (chatInstance == null)
            {
                chatInstance = AIHub.Chat()
                    .WithModel("gemma3:4b");
            }

            var result = await chatInstance
                .WithMessage(userMessage)
                .WithFiles(uploadedFiles.Select(f => f.Path).ToList())
                .CompleteAsync();

            // Add chat response to history
            chatHistory.Add(new ChatMessage { Content = result.Message.Content, IsUser = false });
        }
        catch (Exception ex)
        {
            chatHistory.Add(new ChatMessage { Content = $"Error: {ex.Message}", IsUser = false });
        }
    }
We also introduced a new UploadedFile class to manage uploaded file states. You can create it below the ChatMessage class:
private class UploadedFile
    {
        public string Name { get; set; } = "";
        public string Path { get; set; } = "";
    }
🎯 How it works now?
✅ Upload one or more PDFs
✅ See uploaded files with original names and icons
✅ Remove individual files or clear all uploads
✅ Persist uploaded files across page reloads
✅ Chat about the content inside PDFs with the LLM!
All operations are smooth, safe, and ready for real-world use cases.
🚀 What’s next?
In Part 4, we’ll focus on making our app look and feel even better!
We’ll refine the chat UI, improve the layout, and make it more incredible.
Expect:
- Design tweaks
- Chat bubble animations
- Typing indicators... and maybe even dark mode 🌙
<< To be continued >>
💬 If you enjoyed this part, leave a comment, share the tutorial, and don’t forget to ⭐ the MAIN.NET GitHub repo!