
Looking to learn React Native by building something practical and stylish? In this tutorial, we’ll walk through building a Swipable ToDo App from scratch—complete with gesture support, optimized logic, and a minimalist UI. You’ll pick up core concepts like state management, component separation, memoization, and animations using react-native-gesture-handler.
Whether you're a beginner or an intermediate dev, this guide is for you!
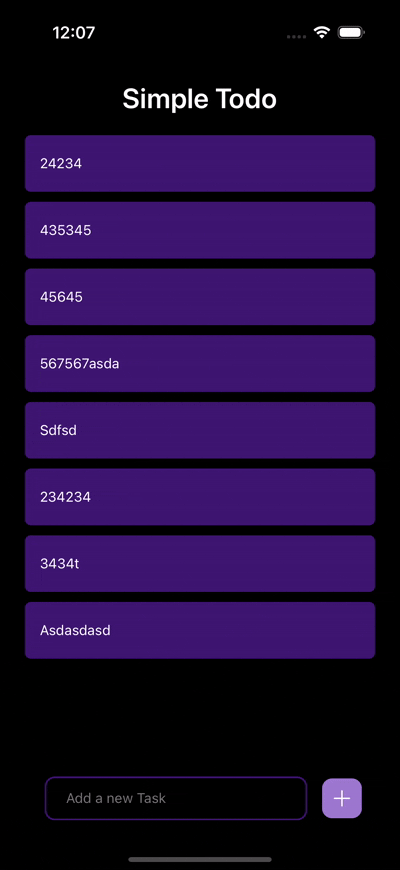
🚀 What We'll Build
A functional and clean ToDo app with gesture-based actions. Users will be able to:
- ✅ Add a Task
- ✏️ Edit a Task (via right swipe)
- ❌ Delete a Task (via left swipe)
- 📱 Enjoy a modern, stylish user interface
🧩 Code Structure
To keep things clean and modular, we’ve separated the swipeable logic into its own component (ListView.js), while keeping the main logic inside ToDoComponent.js.
🔁 Swipable ListView Component
This handles gesture detection and UI for swipe actions.
import React, { useRef } from 'react';
import { StyleSheet, Text, TouchableOpacity, View } from 'react-native';
import { Swipeable } from 'react-native-gesture-handler';
import { DeleteIcon, EditIcon } from '../../assets';
import {Swipeable} from 'react-native-gesture-handler';

const ListView = ({
  item,
  index,
  onContentPress = () => {},
  onDeletePress = () => {},
  openRowRef,
  setInput,
}) => {
  const swipeableRef = useRef(null);

  const handleSwipeableOpen = () => {
    setInput('');
    if (openRowRef.current && openRowRef.current !== swipeableRef.current) {
      openRowRef.current.close();
    }
    openRowRef.current = swipeableRef.current;
  };

  const leftSwipe = () => (
     onDeletePress(item.id)}>


  );

  const rightSwipe = () => (
     onContentPress(item.id, item.text)}
      style={styles.rightActionContainer}>


  );

  return (


        {item.text}


  );
};

export default ListView;

const styles = StyleSheet.create({
  taskContainer: {
    backgroundColor: '#3E1671',
    marginHorizontal: 25,
    marginBottom: 10,
    paddingVertical: 20,
    paddingHorizontal: 15,
    borderRadius: 6,
    flexDirection: 'row',
    alignItems: 'center',
  },
  taskText: {
    color: '#fff',
    flex: 1,
  },
  leftActionContainer: {
    backgroundColor: '#D83A56',
    justifyContent: 'center',
    alignItems: 'center',
    width: 75,
  },
  rightActionContainer: {
    backgroundColor: '#FFD700',
    justifyContent: 'center',
    alignItems: 'center',
    width: 75,
  },
});
🧠 Main ToDo Component with Optimizations
This handles app state, text input, and integrates the swipable list.
import React, { useCallback, useState, useRef } from 'react';
import {
  FlatList,
  SafeAreaView,
  StyleSheet,
  Text,
  TextInput,
  TouchableOpacity,
  View,
} from 'react-native';
import { AddButton } from '../../assets';
import ListView from './ListView';

const ToDoComponent = () => {
  const [input, setInput] = useState('');
  const [data, setData] = useState([]);
  const [editingId, setEditingId] = useState(null);
  const inputRef = useRef(null);
  const openRowRef = useRef(null);

  const onSendPress = useCallback(() => {
    const trimmedInput = input.trim();
    if (!trimmedInput) return;

    if (openRowRef.current) openRowRef.current.close();

    if (editingId !== null) {
      setData(prev =>
        prev.map(task =>
          task.id === editingId ? { ...task, text: trimmedInput } : task
        )
      );
      setEditingId(null);
    } else {
      setData(prev => [...prev, { id: Date.now(), text: trimmedInput }]);
    }

    setInput('');
  }, [input, editingId]);

  const onDeletePress = useCallback(taskId => {
    setData(prev => prev.filter(task => task.id !== taskId));
  }, []);

  const onContentPress = useCallback((taskId, taskText) => {
    setEditingId(taskId);
    setInput(taskText);
    inputRef.current?.focus();
  }, []);

  const renderItem = useCallback(
    ({ item, index }) => (

    ),
    [onContentPress, onDeletePress]
  );

  return (

      Simple Todo

       item.id.toString()}
        contentContainerStyle={styles.listContent}
        bounces={false}
        showsVerticalScrollIndicator={false}
      />


  );
};

export default ToDoComponent;

const styles = StyleSheet.create({
  container: {
    flex: 1,
    backgroundColor: '#000',
  },
  heading: {
    fontSize: 28,
    textAlign: 'center',
    fontWeight: '600',
    color: '#fff',
    marginVertical: 20,
  },
  listContent: {
    paddingBottom: 150,
  },
  bottomContainer: {
    position: 'absolute',
    bottom: 30,
    flexDirection: 'row',
    alignItems: 'center',
    backgroundColor: '#000',
    padding: 20,
  },
  textInputContainer: {
    borderWidth: 1.5,
    borderColor: '#3E1671',
    marginLeft: 25,
    marginRight: 15,
    width: '75%',
    paddingVertical: 12,
    borderRadius: 10,
    backgroundColor: '#000',
  },
  textInput: {
    paddingLeft: 20,
    color: '#fff',
  },
});
🎯 What’s Next?
You can take this ToDo app further by:
- ✅ Persisting data using AsyncStorage or MMKV
- 💾 Syncing with a backend API
- 🌙 Adding dark/light theme support
- ⚡ Integrating animations (e.g., React Native Reanimated)
📸 Final UI Preview
💬 Conclusion
With just a few lines of code and some optimization tricks, you’ve built a clean and functional ToDo app in React Native. Optimizations like memoization and separation of concerns make the app easier to maintain and more performant.
Happy coding! 🚀
