Hi! I’m Dmytro, a Dev Advocate at Chromia. Recently, I’ve been feeling a strong urge to start building my own fun side projects, and Chromia’s infrastructure fits perfectly for that. No gas fees, a simple and compact relational programming language (Rell), access to a public testnet, good documentation, and a learning platform — all of this gives us the chance to build and launch our first MVP pretty fast. To start, we’ll keep things very simple and focus only on the minimum functionality. Then step-by-step, we’ll add more features and develop the dapp further. I think with time, we could even integrate some AI features into the project.
So, let’s build a Prediction Market on Chromia! The idea is: a user can create a simple event like “Will Chromia hit $10 tomorrow?” and allow others to vote “Yes” or “No” using our own LOL token. Here’s the rough functionality for the MVP (Phase 1):
- Create events
- Stake LOL tokens to vote
- Manual resolution of event outcomes (admin)
- Distribute rewards among winners
- Very simple UI: a homepage with a list of active markets
- User profiles with voting history
- Deploy dapp on Chromia testnet
- Open access for early testers
Let’s get started with the environment setup! I’m working on MacOS, so I’ll explain things from that perspective. If you are using a different system, you can find instructions on installing and setting everything up in the Chromia documentation and learning platform.
Chromia is a relational blockchain — it stores data in a relational format, which makes it very unique and developer-friendly. So first, we need to setup PostgreSQL:
brew install postgresql@16brew services start postgresql@16createuser -s postgrespsql -U postgres -c "CREATE DATABASE postchain WITH TEMPLATE = template0 LC_COLLATE = 'C.UTF-8' LC_CTYPE = 'C.UTF-8' ENCODING 'UTF-8';" -c "CREATE ROLE postchain LOGIN ENCRYPTED PASSWORD 'postchain'; GRANT ALL ON DATABASE postchain TO postchain;"Now we need the Chromia CLI, which will make it much easier to deploy, test, and launch our dapp to the testnet.
Install it using:
/bin/bash -c "$(curl -fsSL https://raw.githubusercontent.com/Homebrew/install/HEAD/install.sh)"brew tap chromia/core https://gitlab.com/chromaway/core-tools/homebrew-chromia.gitbrew install chromia/core/chrCheck that everything installed correctly:
chr --versionWithout thinking too much about the name, let’s call our project Oddly, and create it:
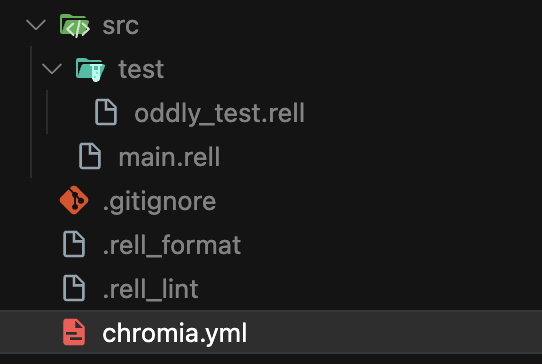
chr create-rell-dapp oddly --template=plainOpen the project in Cursor (or your preferred editor) — and boom, the basic template is ready!

I won’t dive into all the details just yet, but let’s quickly review the project structure:
- In the
srcdirectory, you’ll find the main modulemain.rell, which contains the core logic of the dapp. Over time, we’ll expand it and break it into multiple files for better structure. - The
testsfolder is pretty self-explanatory. - Files like
.rell_formatand.rell_lintare configuration files for formatting and linting — we’ll leave them with default settings for now. - The key file is
chromia.yml, which handles all the dapp configurations. We’ll refer to it often, and I’ll explain the important parts as we go.
My suggestion: don’t get stuck in the tiny details at this point. Let’s focus on building a working project first — the deep understanding will come naturally through the process.
Let’s keep moving! 🚀