If you're looking to truly understand how NGINX works under the hood, building it from source is the best way to do it. In this tutorial, I’ll walk you through how to build and modify NGINX from source on Ubuntu (or WSL, if you're using Windows). But we won’t stop at just building it — we’ll also dive into the configuration and build scripts to understand how NGINX checks for system capabilities and prepares itself to be built.
Why Build NGINX from Source?
If you're someone who loves understanding systems at a deep level, building from source is a must. It lets you peek into how things are wired internally, how configurations are set, how features are toggled, and what the compiler is doing under the hood. You’ll walk away not just with a binary — but with knowledge.
Step 1: System Update
Make sure your system is updated:
sudo apt updateOn Fedora, you’d run
sudo dnf update.
Step 2: Install Build Tools
NGINX is written in C, so we’ll need a C compiler and a build tool:
sudo apt install gcc makegcc stands for GNU Compiler collection its mostly used for C/C++ development but also has supports for other languages as well.
At its core, GCC takes your source code (like .c or .cpp files) and compiles it into machine code — typically a binary executable your computer can run. It's the magic bridge between human-readable code and the stuff computers actually execute.
make is a build automation tool. It looks at your files, checks what needs to be (re)built based on changes, and runs the necessary commands — usually compilation — only for what’s changed.
It uses a file called a Makefile to know how to build your project.
Step 3: Install Required Libraries
NGINX uses PCRE for regex, zlib for compression, and optionally OpenSSL for HTTPS support:
sudo apt install libpcre3-dev zlib1g-dev libssl-devlibpcre3-dev stands for Perl Compatible Regular Expressions. It is a library that provides functions for working with regular expressions, offering syntax and behavior similar to Perl. This makes it powerful and flexible for pattern matching in text. It's commonly used in various applications such as web servers, text processors, and parsers where advanced string matching is required. Installing the -dev version provides the necessary header files (.h) and static/shared libraries required for compiling C or C++ programs that depend on PCRE, making it essential for building software from source that uses regular expressions.
zlib1g-dev is the development version of the widely-used zlib library, which provides functions for compression and decompression using the DEFLATE algorithm — the same algorithm used in formats like gzip and PNG. It is a crucial dependency for software that needs to handle compressed data, including web servers, file archivers, and network protocols that support compression. Installing the -dev package gives you access to the necessary header files and linkable libraries required to compile C/C++ programs that utilize zlib for compressing or decompressing data.
libssl-dev If you plan to use SSL certificates to encrypt traffic with TLS.
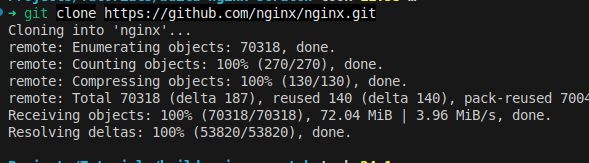
Step 4: Clone NGINX Source
Now get the source:
git clone https://github.com/nginx/nginx.git
cd nginx
Step 5: Run Configuration Script
NGINX comes with its own configuration script in the auto directory. Run it like this:
auto/configure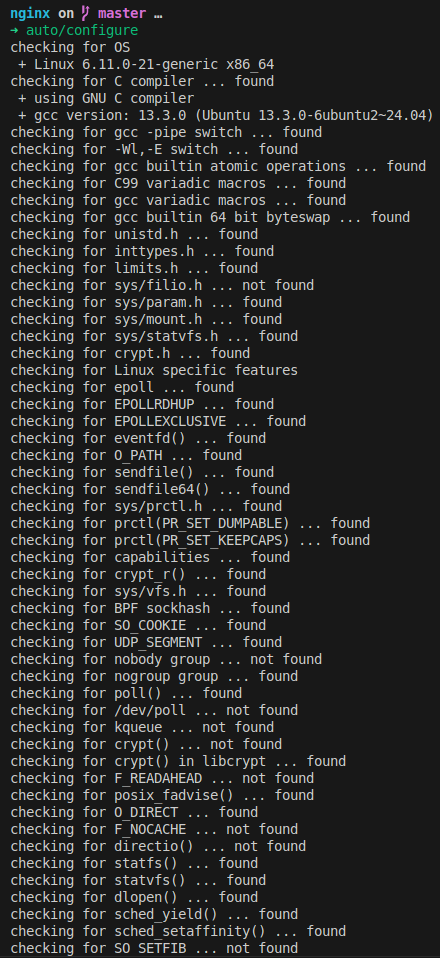
This generates the objs/Makefile, which is what make uses to compile the project.
But let’s not stop here — let’s dive into what’s happening behind the scenes.
🧠 A Deep Dive into the Build Files: How NGINX Configures Itself
NGINX doesn’t use autoconf or CMake. It uses its own set of handcrafted scripts inside the auto/ directory to probe system capabilities and generate the Makefile. It’s fascinating and minimal — and gives you a front-row seat to how things really get wired up before compilation.
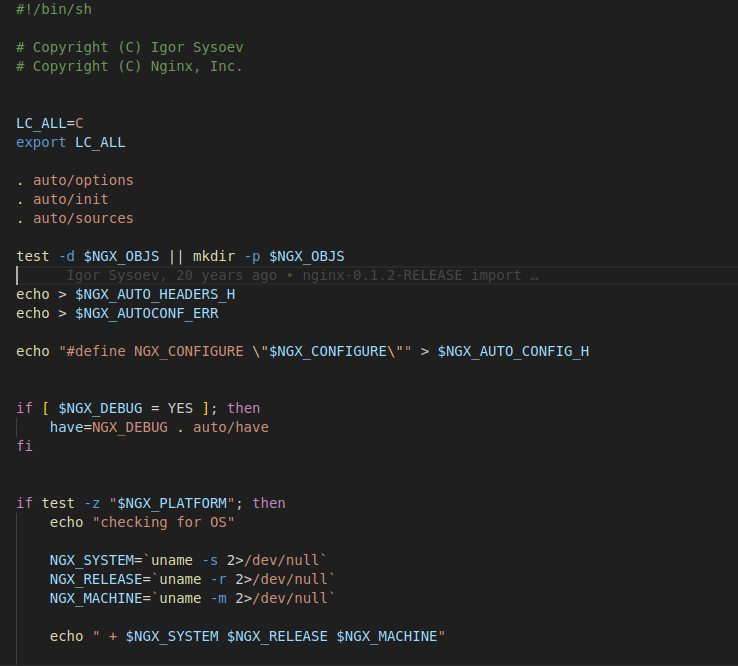
Let’s walk through some of the highlights.
🔍 auto/feature: Dynamic Feature Detection
Here’s how NGINX checks for features like epoll, sendfile, or kqueue:
ngx_feature="epoll"
ngx_feature_name="NGX_HAVE_EPOLL"
ngx_feature_test="epoll_create(1);"
. auto/feature
What this does:
- Sets the feature name and a macro to define.
- Provides a snippet of C code to test.
- The
auto/featurescript generates a small test program using the snippet and tries to compile it.
If compilation succeeds, the feature is assumed to be available, and the macro (e.g., NGX_HAVE_EPOLL) is defined in the generated header files.
Now, you might wonder: how does auto/feature access variables like ngx_feature_test?
Here’s the punchline:
Bash uses dynamic scoping. That means a sourced script or function has access to all variables in its caller’s scope — based on the runtime call stack. There you go — dynamic scoping explained in two sentences.
It’s elegant, powerful, and surprisingly readable once you know the trick.
🧩 What Happens Inside auto/feature
- It takes the
ngx_feature_incs,ngx_feature_test, and other config values. - Dynamically generates a test C file with includes and the test snippet.
- Compiles it using the configured compiler.
- If the resulting executable builds and runs, NGINX enables that feature.
This is how NGINX verifies not just headers — but full compile+run support for every system feature.
🔨 auto/configure: The Main Entry Point
The configure script ties everything together. It:
- Calls various sub-scripts for compiler, OS, modules, etc.
- Calls
auto/makeat the end to generate theobjs/Makefile.
From there, make can pick it up and start compiling.
I focused mainly on the major and interesting pieces, but here’s a quick summary of what you’ll find in the auto/ directory:
🧩 Other Noteworthy Build Scripts
| File | Purpose |
|---|---|
auto/cc/conf |
Sets compiler and linker flags. |
auto/headers |
Loads system headers (Linux-specific, skipped for Windows). |
auto/os/conf |
Detects OS and sets platform-specific configs. |
auto/threads |
Checks for threading support. (Sorry Windows — no threads for you 😎). |
auto/modules |
Dynamically determines which modules (HTTP, Mail, etc.) to include. |
auto/module |
Handles inclusion of each individual module (called from auto/modules). |
auto/lib/conf |
Loads configuration scripts for specific libraries. |
auto/lib/make |
Adds library-specific rules to the Makefile. |
auto/install |
Defines how NGINX will be installed after compilation. |
auto/stubs |
Provides fallback stubs for unsupported features or modules. |
Together, these files form a highly modular, Bash-driven build system that’s surprisingly readable and hackable — once you understand how Bash scoping and sourcing work.
That's a very brief overview if we were to write every single details then this article wont suffice.
Step 6: Compile NGINX
Once configured, build it:
makeYou’ll get your binary at objs/nginx.
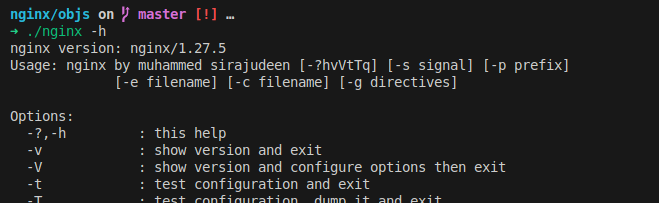
Step 7: Run It
Let’s test if it worked:
cd objs
./nginx -h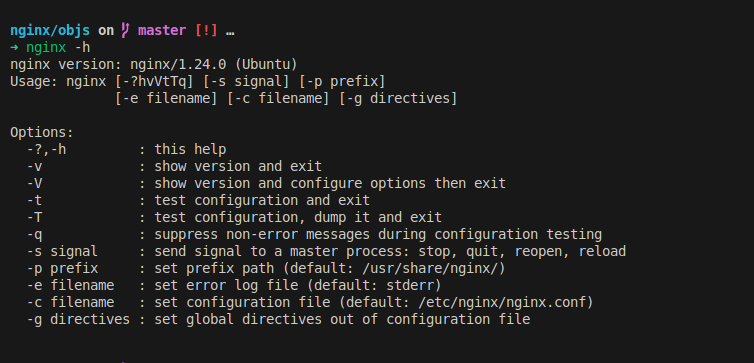
Step 8: Modify the Source Code
Let’s personalize NGINX.
Open:
src/core/nginx.cFind this line (around line 415):

"nginx version: nginx/1.21.3"Change it to:
"nginx version: nginx by Muhammed Sirajudeen"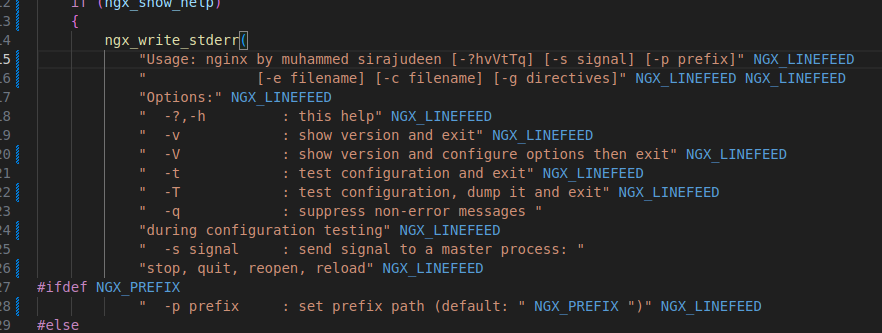
Save it.
Step 9: Rebuild and Run
make
cd objs
./nginx -h
You should see your personalized version string!
Conclusion
You didn’t just build NGINX — you understood how it detects system features, how the build system is orchestrated, and how to make it your own. That’s what truly mastering a tool looks like.
Want to go further? Try adding a custom directive to NGINX, or explore how modules are loaded.
Happy hacking — and keep exploring.