Introduction
Most tutorials out there use Passport.js to implement Google Sign-In in your app, but Passport’s default session-based approach is poorly documented and forces you to build your own user-creation and token-storage logic. It overcomplicates what should be a simple process.
In this guide, I’ll walk you through integrating Google’s officially supported Node.js Auth Library — clean, straightforward, and free from the usual headaches. I’ll also show you how to implement role-based access control so that admins can perform sensitive operations while regular users simply browse. By the end, you’ll have:
- A clean login flow that issues access and refresh tokens
- Automatic token renewal via an Axios interceptor
- Middleware to validate tokens on every request
- RBAC policies that let only admins delete, editors create/update, and viewers read.
If you prefer visual learning, check out the video instead.
What Is OAuth 2.0?
OAuth 2.0 (Open Authorization) is the industry-standard protocol that lets your app access resources on another platform on behalf of a user without ever touching their password. It uses scopes to control which data and actions your app can perform. Although OAuth 2.0 itself handles only authorization and not authentication, adding an identity layer called OpenID Connect (OIDC) enables secure user sign-in (“Sign in with Google”) by issuing ID tokens alongside access tokens.
Together, OAuth 2.0 and OIDC power most third-party integrations such as calendar syncing and social logins, so you no longer need to manage dozens of usernames and passwords. Your app simply exchanges tokens to call APIs securely and refreshes them automatically when they expire. I explained this process with an example in the video, so feel free to check it out. Let’s dive into the implementation!
Basic Setup
This guide is focused on authentication and role-based access, so I’ve provided client and server boilerplate code. Let’s prepare our project structure and install the necessary dependencies so both the client and server are ready for OAuth integration.
1. Clone the boilerplate from GitHub:
git clone -b Basic-Setup https://github.com/CyberW0lves/Google-OAuth-RBAC.git2. Inside the project you’ll find two folders:
- Client/ (Next.js app)
cd client
npm install
npm run dev- Server/ (Express app)
cd server
npm install
Don’t start the server yet — you’ll need to configure environment variables first.
3. At server/.env file, add your MongoDB URI and Client URL.
DB = mongodb+srv://:@cluster0.mongodb.net/mydb
CLIENT_URL = http://localhost:3000
GOOGLE_CLIENT_ID =
GOOGLE_CLIENT_SECRET =
GOOGLE_REDIRECT_URI =
PERMIT_API_KEY =
PERMIT_PDP_URL =
I’m using MongoDB to save users, but you can swap in an in-memory store if you just want to experiment.
Google Credentials
Now let’s obtain credentials for the client i.e. Client ID and Secrets from the authorization server. In this tutorial, the client is your application and the authorization server is Google.
Creating a Project:
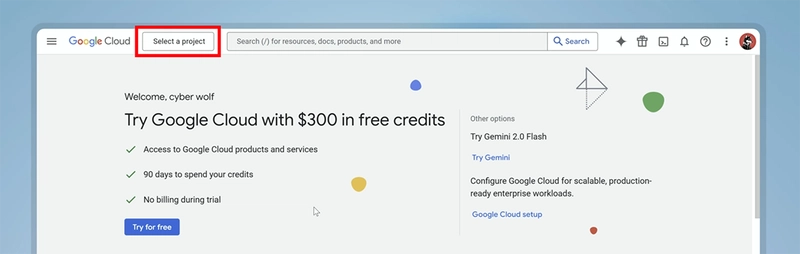
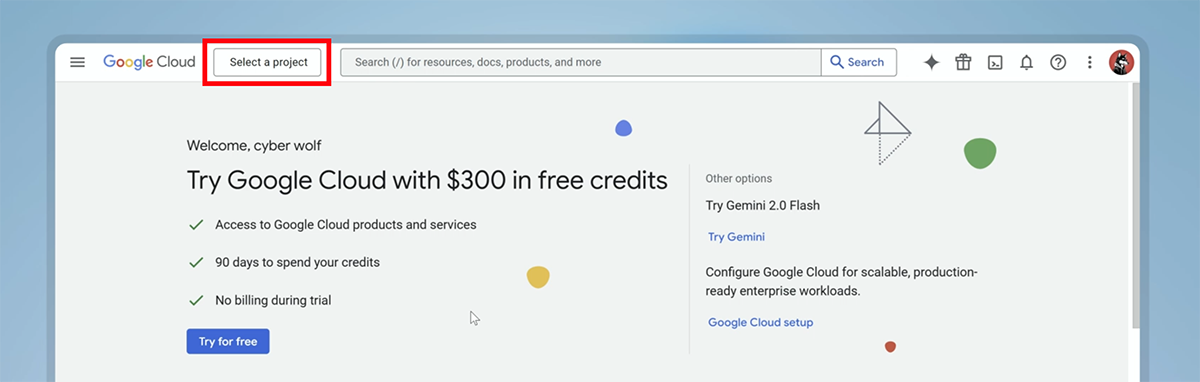
1. Go to the Google Cloud console.
2. Click on select project on the top left of the screen and select New project to create a new project.
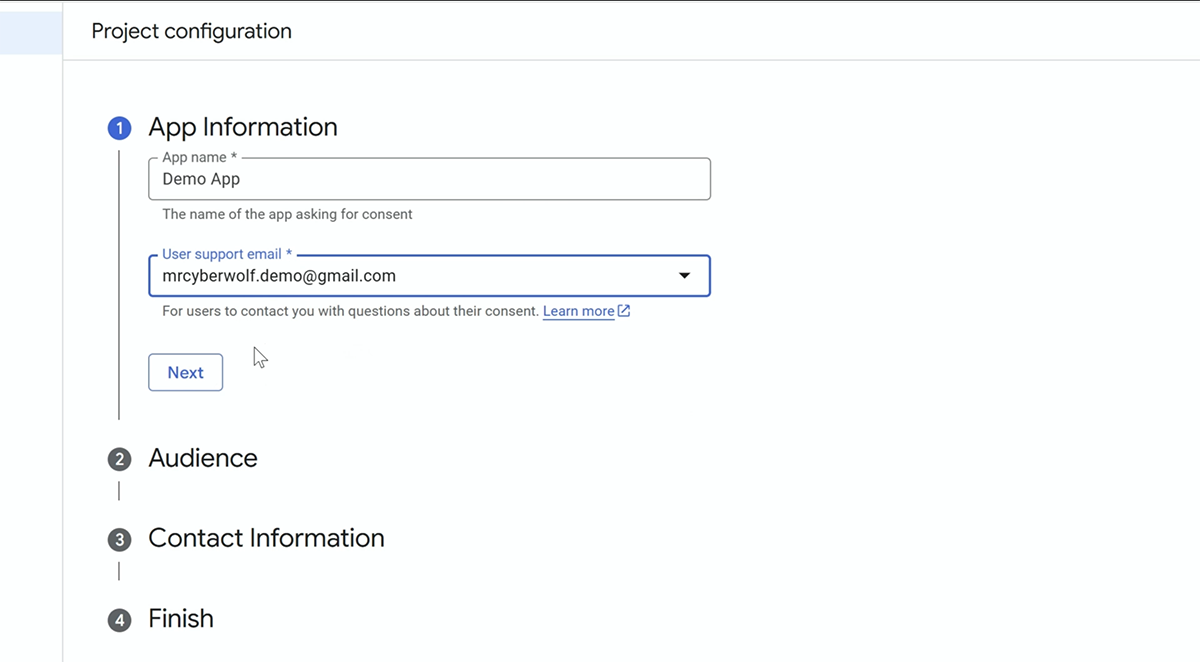
Configuring Consent Screen:
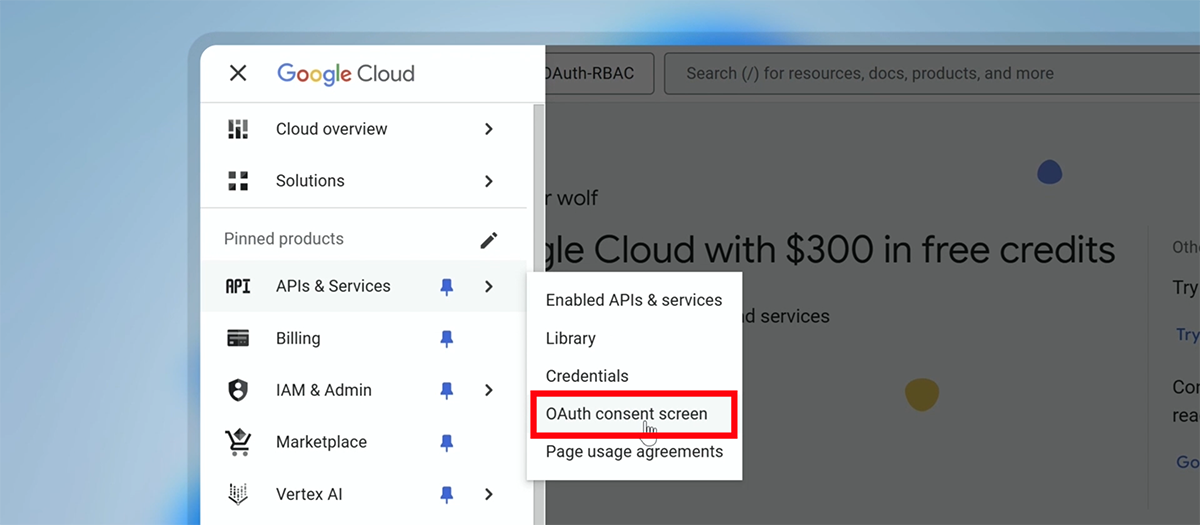
1. Click on APIs & Services on the top left menu and select OAuth consent screen to create your app’s consent screen.
2. Enter your application name and support email, then select “External” as the audience type.

3. Complete the consent screen setup by accepting Google’s Privacy Policy.
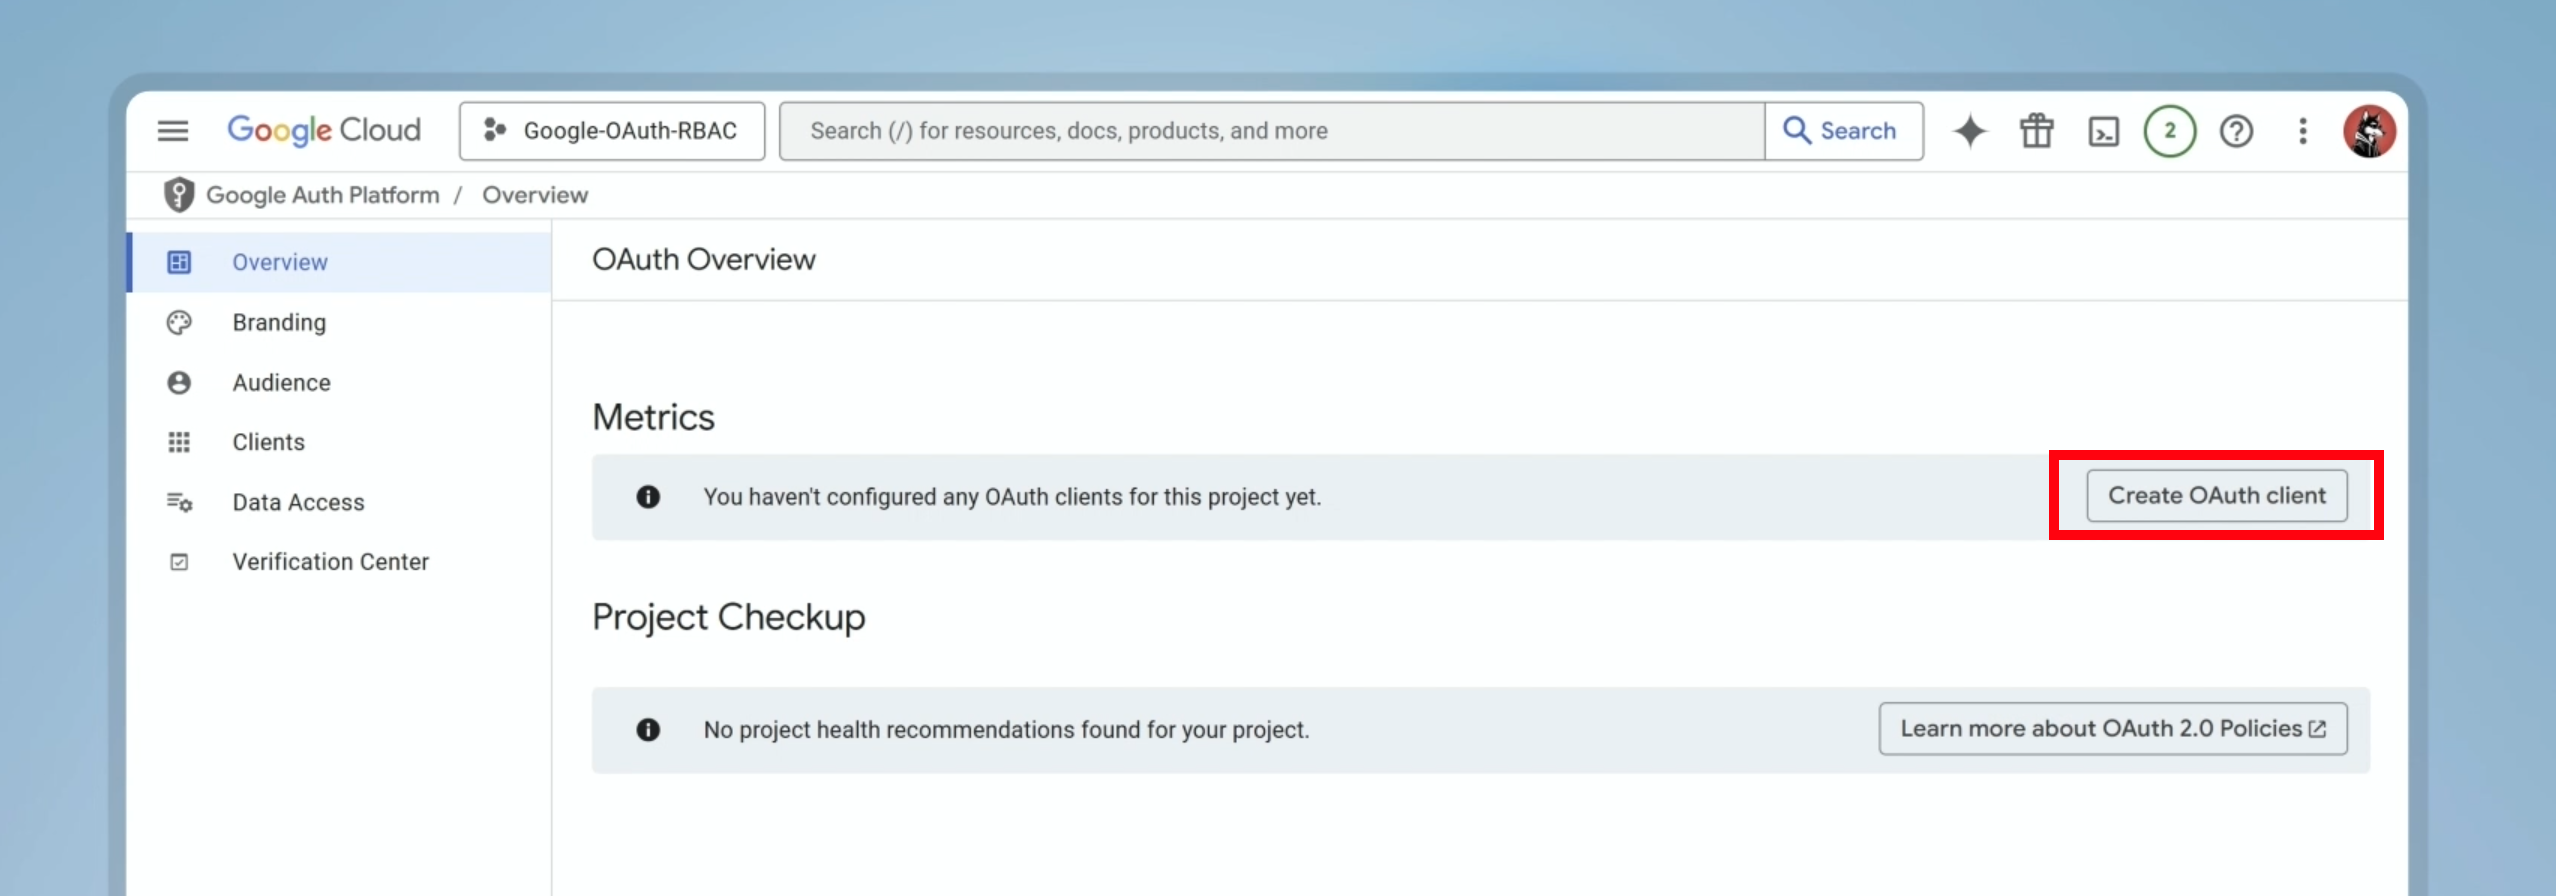
Creating OAuth Client:
1. Click on Create OAuth Client.
2. Select the application type as web and add name for your OAuth client.
3. Enter “http://localhost:3000” as authorized origin.
4. Enter “http://localhost:3000/redirect” as authorized redirect URL.
5. Click on Create to obtain the client ID and client secrets.
6. Copy the generated credentials and add them to your server/.env file.
DB = mongodb+srv://:@cluster0.mongodb.net/mydb
CLIENT_URL = http://localhost:3000
GOOGLE_CLIENT_ID = **********************
GOOGLE_CLIENT_SECRET = **********************
GOOGLE_REDIRECT_URI = http://localhost:3000/redirect
PERMIT_API_KEY =
PERMIT_PDP_URL =
Google OAuth Routes
Let’s implement our Express routes for login, callback, token refresh, and logout using Google’s Auth Library. First, create a new file at server/routes/auth.ts. In that file:
Import and Initialize OAuth2 client:
import express, { Request, Response } from "express";
import { OAuth2Client } from "google-auth-library";
import User from "../models/User";

const router = express.Router();

const client = new OAuth2Client(
  process.env.GOOGLE_CLIENT_ID,
  process.env.GOOGLE_CLIENT_SECRET,
  process.env.GOOGLE_REDIRECT_URI
);
1. Import the Express router, the Google Auth Library, and the User model.
2. Configure the OAuth2 client to generate authorization URLs, exchange authorization codes for tokens, and handle token refreshes.
Generate the Authorization URL:
...
router.post("/login", (req: Request, res: Response) => {
  const authUrl = client.generateAuthUrl({
    access_type: "offline",
    scope: ["openid", "email", "profile"],
  });

  res.status(200).json({ authUrl });
});
1. access_type: "offline" requests a refresh token so you can get new access tokens later without user interaction.
2. scope: ["openid", "email", "profile"] tells Google exactly which user data your app needs.
3. On the frontend, we use this URL to redirect users to Google’s sign-in page.
Exchange Authorization Code for Tokens:
...
router.post("/callback", async (req: Request, res: Response): Promise<any> => {
  try {
    const { code } = req.body;
    if (!code) return res.status(400).json({ error: "Invalid code" });

    const { tokens } = await client.getToken(code);
    if (!tokens || !tokens.access_token || !tokens.id_token)
      return res.status(400).json({ error: "Invalid code" });

    const ticket = await client.verifyIdToken({
      idToken: tokens.id_token,
    });
    const payload = ticket.getPayload();

    let user = await User.findOne({ email: payload?.email });
    if (!user) {
      user = await new User({
        firstName: payload?.given_name,
        lastName: payload?.family_name,
        email: payload?.email,
        picture: payload?.picture,
        refreshToken: tokens.refresh_token,
      }).save();
    }

    res.cookie("accessToken", tokens.access_token, {
      maxAge: 1 * 60 * 60 * 1000,
      httpOnly: true,
      sameSite: "strict",
      secure: true,
    });
    res.cookie("refreshToken", user.refreshToken, {
      maxAge: 30 * 24 * 60 * 60 * 1000,
      sameSite: "strict",
      secure: true,
    });
    res.cookie("userInfo", JSON.stringify(user), {
      maxAge: 30 * 24 * 60 * 60 * 1000,
      sameSite: "strict",
      secure: true,
    });
    res.status(200).json({ message: "Authentication successful" });
  } catch (error) {
    console.log(error);
    return res.status(500).send("Authentication failed");
  }
});
1. Grab the authorization code from req.body. If it’s missing, return a 400 error.
2. Call client.getToken(code) to exchange the code for tokens.
3. Verify the id_token with client.verifyIdToken({ idToken }) and extract the user’s information.
4. Check if a user with the provided email already exists; if not, create a new user record and store the refresh token.
5. Send back cookies containing the tokens and user information, each with the appropriate expiration time.
Obtain a New Access Token:
...
router.post("/refresh", async (req: Request, res: Response): Promise<any> => {
  try {
    const refreshToken = req.cookies.refreshToken;
    if (!refreshToken)
      return res.status(400).json({ message: "No refresh token found" });

    client.setCredentials({ refresh_token: refreshToken });
    const { token: accessToken } = await client.getAccessToken();

    res.cookie("accessToken", accessToken, {
      maxAge: 1 * 60 * 60 * 1000,
      httpOnly: true,
      sameSite: "strict",
      secure: true,
    });
    res.status(200).json({ message: "Access token refreshed" });
  } catch (error) {
    console.log(error);
    res.status(500).json({ message: "Failed to refresh access token" });
  }
});
1. Grab the refresh token from req.body. If it’s missing, return a 400 error.
2. Set the refresh token as credentials, then call client.getAccessToken() to request a new access token from Google.
3. Send the new access token back as an HTTP-only cookie.
Logout by Clearing Cookies:
...
router.post("/logout", (req: Request, res: Response) => {
  res.clearCookie("userInfo");
  res.clearCookie("refreshToken");
  res.clearCookie("accessToken");
  res.status(200).json({ message: "Logged out" });
});

export default router;
1. Clear all cookies and send back a success response.
2. Don’t delete the refresh token unless absolutely necessary; losing it forces the user to re-authorize, so store it securely.
3. Export the router and import it in your server/index.ts file.
Client API Setup
In this section, we’ll integrate APIs to call our auth endpoints from frontend to handling login, redirects, and guarding the dashboard route. We’ll also add an Axios interceptor to automatically refresh the access token when it expires without interrupting the user.
First, add the API URL in the client/.env file.
NEXT_PUBLIC_API_URL = http://localhost:8080/apiAxios Instance:
Inside the client directory, create a new lib folder. Then add an axios.ts file in that folder and add the following code:
import axios, { AxiosInstance, AxiosResponse, AxiosError } from "axios";

const axiosInstance: AxiosInstance = axios.create({
  baseURL: process.env.NEXT_PUBLIC_API_URL,
  withCredentials: true,
});

axiosInstance.interceptors.response.use(
  (response: AxiosResponse) => response,
  async (error: AxiosError) => {
    if (error.response?.status === 401) {
      try {
        await axios.post(
          `${process.env.NEXT_PUBLIC_API_URL}/auth/refresh`,
          {},
          { withCredentials: true }
        );
        ``;
        const retryResponse = await axios({
          ...error.config,
          withCredentials: true,
        });
        return retryResponse;
      } catch (refreshError) {
        return Promise.reject(refreshError);
      }
    }
    return Promise.reject(error);
  }
);

export default axiosInstance;
1. Initialize the Axios instance with API URL and enable withCredentials
2. The Axios interceptor handles 401 errors by calling the refresh endpoint to obtain a new access token, then retries the original request with the updated credentials.
Redirect to Google Sign-In Page:
In client/app/page.tsx file, add the following code:
"use client";
import Image from "next/image";
import axiosInstance from "@/lib/axios";

export default function Home() {
  const handleLogin = async () => {
    try {
      const { data } = await axiosInstance.post("/auth/login");
      window.location.href = data.authUrl;
    } catch (error) {
      console.log(error);
    }
  };

  return (...
  );
}
1. Call the login API when the user clicks the “Sign In” button.
2. Once you receive the authUrl, redirect the user to that URL.
Invoke the Callback API:
In client/app/redirect/page.tsx file, add the following code:
"use client";
import { useEffect, useState } from "react";
import Link from "next/link";
import { useRouter, useSearchParams } from "next/navigation";
import axiosInstance from "@/lib/axios";

const Redirect = () => {
  const [error, setError] = useState<boolean>(false);
  const router = useRouter();
  const searchParams = useSearchParams();
  const text = "Loading...";

  useEffect(() => {
    const code = searchParams.get("code");

    const fetchToken = async () => {
      try {
        await axiosInstance.post("/auth/callback", { code });
        router.push("/dashboard");
      } catch (error) {
        console.log(error);
        setError(true);
      }
    };

    if (code) {
      fetchToken();
    } else {
      setError(true);
    }
  }, [searchParams]);

  return (...
  );
};

export default Redirect;
1. Use the search params hook to retrieve the authorization code when the page loads.
2. call the callback API with that code, then redirect the user to the dashboard.
Invoke the Logout API:
In client/components/LogoutBtn.tsx file, add the following code:
"use client";
import { useRouter } from "next/navigation";
import axiosInstance from "@/lib/axios";

const LogoutBtn = () => {
  const router = useRouter();

  const handleLogout = async () => {
    try {
      await axiosInstance.post("/auth/logout");
      router.push("/");
    } catch (error) {
      console.log(error);
    }
  };

  return (...
  );
};

export default LogoutBtn;
1. Call the logout API using axios instance, which clears the user’s cookies on the server.
2. After a successful response, call router.push("/") to redirect the user back to the home page.
Retrieve User Information:
In client/app/dashboard/page.tsx file, add the following code:
import { cookies } from "next/headers";
import { redirect } from "next/navigation";
import LogoutBtn from "@/components/LogoutBtn";

const getUserInfo = async () => {
  const cookieStore = await cookies();
  const refreshToken = cookieStore.get("refreshToken");
  if (!refreshToken) return redirect("/");

  const userInfo: any = cookieStore.get("userInfo");
  return JSON.parse(userInfo?.value);
};

const Deshboard = async () => {
  const userInfo = await getUserInfo();
  console.log(userInfo);

  return (...
  );
};

export default Deshboard;
1. Use Next.js cookies() helper to read cookies from the incoming request.
2. Checks for a refreshToken cookie; if it’s missing, immediately redirects the user to the home page.
3. Gets the userInfo cookie and parses it into a JavaScript object for use in the component.
Middleware's & RBAC
In this section, we’ll set up middleware’s to secure our routes so that only authenticated users with the appropriate roles can access the API. Instead of scattering role check logic throughout codebase, we’ll use Permit.io to centralize RBAC and keep it clean. Let’s get started!
Auth Middleware:
In server/src, create a middlewares folder. Inside it, add an authMiddleware.ts file and add the following code:
import { NextFunction, Request, Response } from "express";
import { OAuth2Client } from "google-auth-library";
import User from "../models/User";

const authMiddleware = async (
  req: Request,
  res: Response,
  next: NextFunction
): Promise<any> => {
  const accessToken = req.cookies.accessToken;
  if (!accessToken) return res.status(401).json({ error: "Unauthorized" });

  try {
    const client = new OAuth2Client(
      process.env.GOOGLE_CLIENT_ID,
      process.env.GOOGLE_CLIENT_SECRET,
      process.env.GOOGLE_REDIRECT_URI
    );
    const tokenInfo = await client.getTokenInfo(accessToken);
    if (!tokenInfo || tokenInfo.aud !== process.env.GOOGLE_CLIENT_ID) {
      return res.status(401).json({ error: "Unauthorized" });
    }

    const user = await User.findOne({ email: tokenInfo.email });
    if (!user) return res.status(401).json({ error: "Unauthorized" });
    req.body.userInfo = user;

    next();
  } catch (error) {
    console.log(error);
    return res.status(500).send("Internal server error");
  }
};

export default authMiddleware;
1. Grab accessToken from req.cookies; if it’s missing, return a 401 Unauthorized response.
2. Initialize an OAuth2Client with your Google credentials and call client.getTokenInfo(accessToken). Verify that the token’s aud matches your GOOGLE_CLIENT_ID; if not, return a 401 response.
3. Check if a user with that email exists in the database; if not, return a 401 response.
4. Attach the user object to req.body.userInfo and call next() to grant access to the protected route.
Permit Credentials:
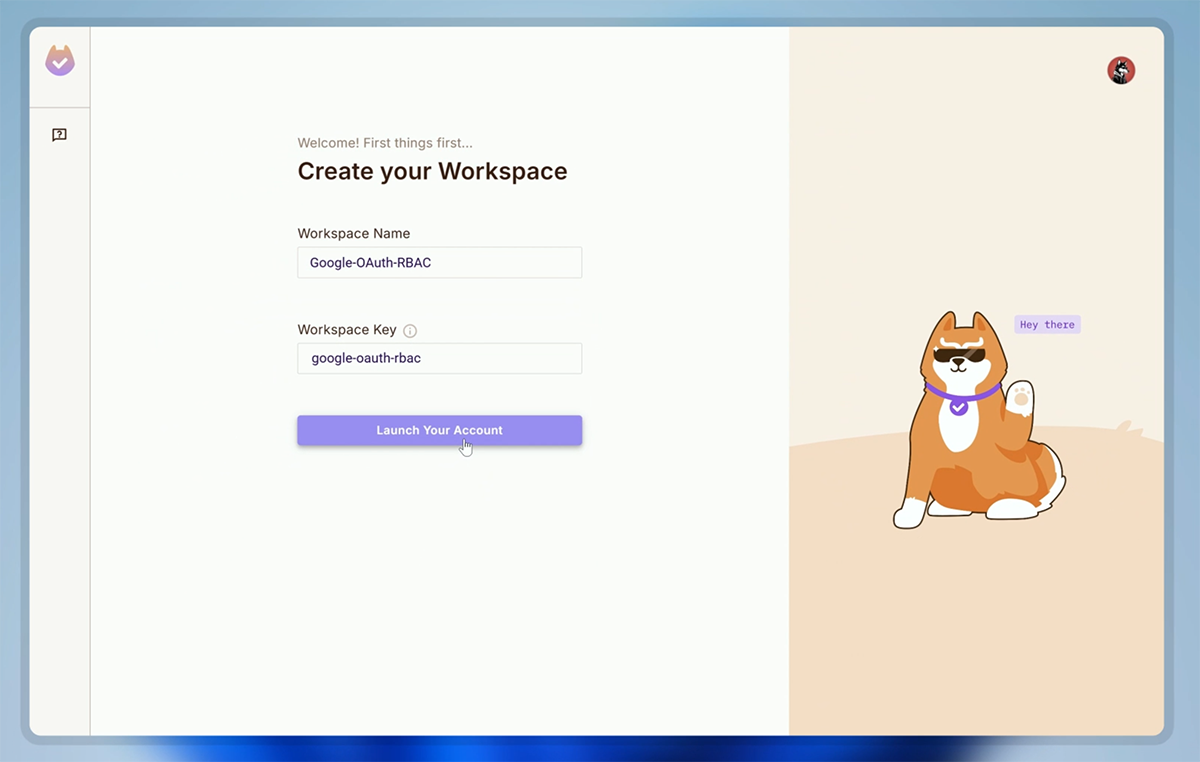
1. Go to Permit.io and create an account
2. Create a workspace by choosing a name and a unique key.
3. Add a “Products” resource and enable all CRUD actions.
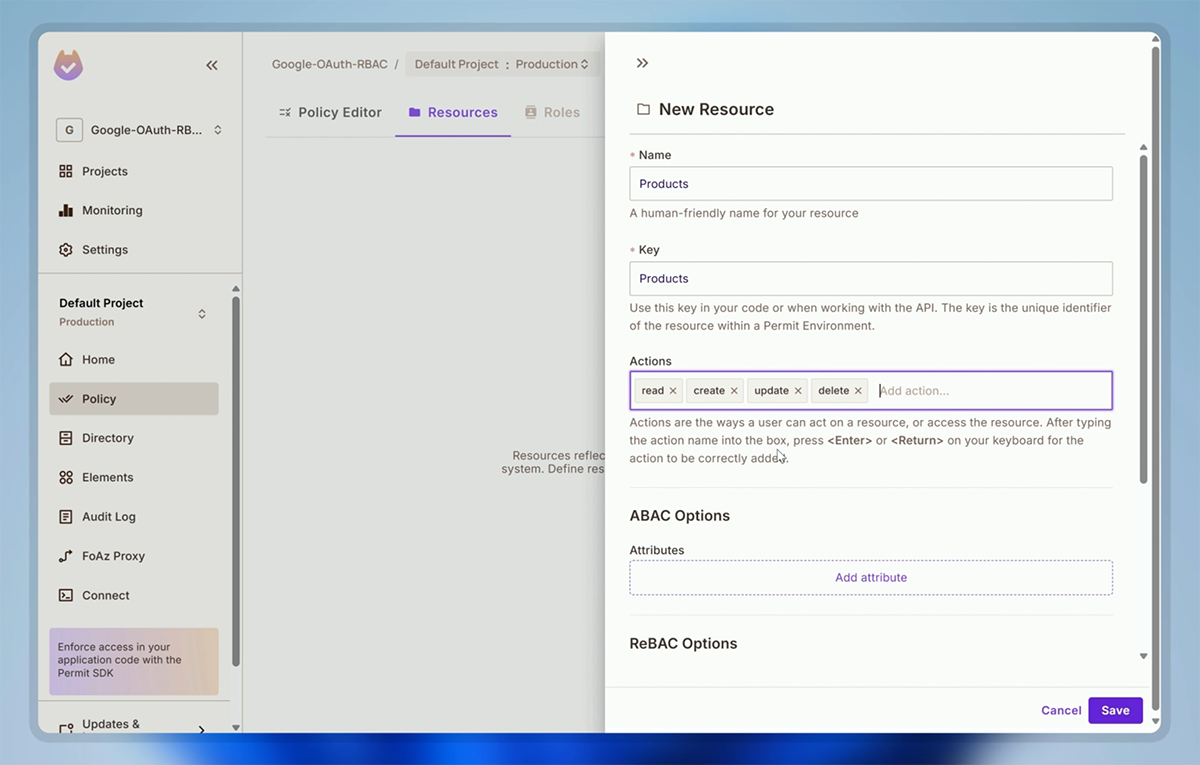
4. In the policy editor, assign permissions to each role—admin, editor, and viewer—so you control who can do what.
5. Install the Permit SDK via npm (we already installed while setting up basic setup).
6. Copy your PDP URL and API key.
7. Add those credentials to your server/.env file.
DB = mongodb+srv://:@cluster0.mongodb.net/mydb
CLIENT_URL = http://localhost:3000
GOOGLE_CLIENT_ID = **********************
GOOGLE_CLIENT_SECRET = **********************
GOOGLE_REDIRECT_URI = http://localhost:3000/redirect
PERMIT_API_KEY = **********************
PERMIT_PDP_URL = **********************
Initialize Permit & Sync Users:
In server/routes/auth.ts file, add the following code:
import express, { Request, Response } from "express";
import { OAuth2Client } from "google-auth-library";
import { Permit } from "permitio";
import User from "../models/User";
const router = express.Router();
const client = new OAuth2Client(
process.env.GOOGLE_CLIENT_ID,
process.env.GOOGLE_CLIENT_SECRET,
process.env.GOOGLE_REDIRECT_URI
);
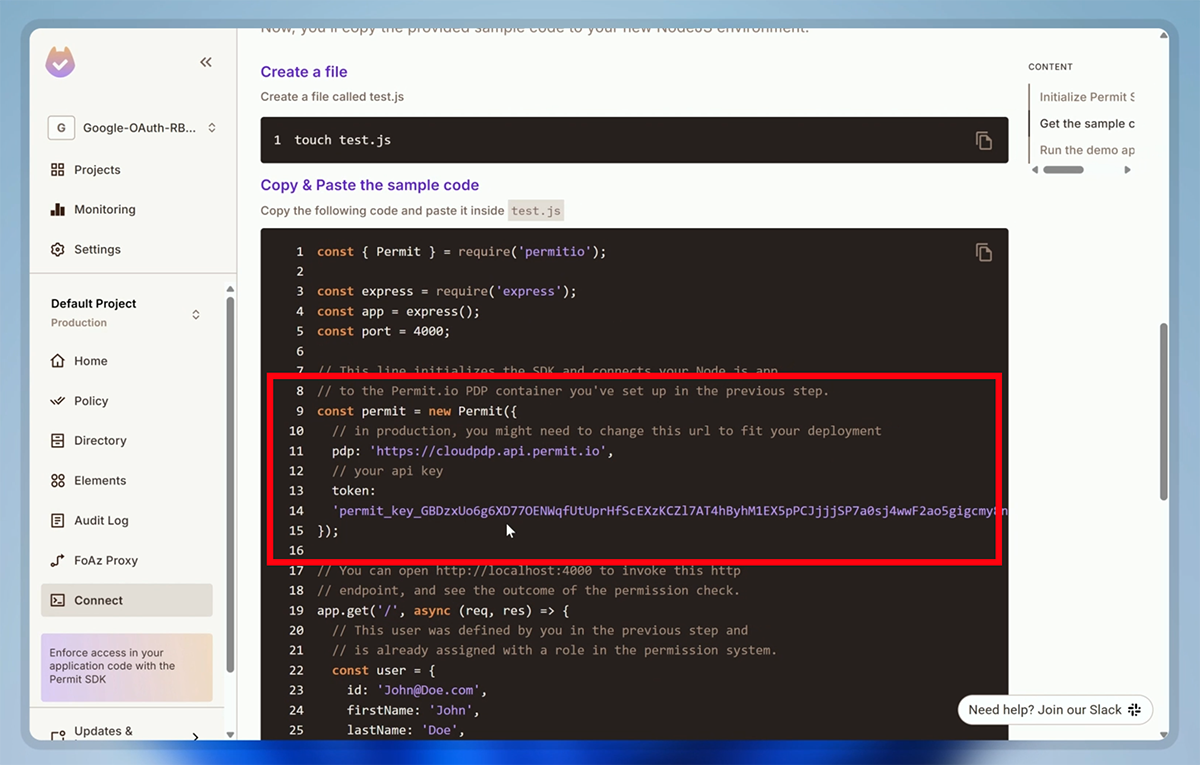
const permit = new Permit({
token: process.env.PERMIT_API_KEY,
pdp: process.env.PERMIT_PDP_URL,
});
router.post("/login", (req: Request, res: Response) => {
...
});
router.post("/callback", async (req: Request, res: Response): Promise<any> => {
try {
...
let user = await User.findOne({ email: payload?.email });
if (!user) {
user = await new User({
firstName: payload?.given_name,
lastName: payload?.family_name,
email: payload?.email,
picture: payload?.picture,
refreshToken: tokens.refresh_token,
}).save();
await permit.api.syncUser({
key: user._id.toString(),
email: user.email,
first_name: user.firstName,
last_name: user.lastName,
});
}
...
});
...1. Import and initialize Permit using the Token key and PDP URL.
2. In callback API, after saving the user to your database, sync that user with Permit also.
Role Check Middleware:
In the server/src/middlewares folder, create a roleCheckMiddleware.ts file and add the following code:
import { NextFunction, Request, Response } from "express";
import { Permit } from "permitio";

const roleCheckMiddleware = (action: string, resource: string) => {
  return async (
    req: Request,
    res: Response,
    next: NextFunction
  ): Promise<any> => {
    try {
      const permit = new Permit({
        token: process.env.PERMIT_API_KEY,
        pdp: process.env.PERMIT_PDP_URL,
      });
      const userId = req.body.userInfo._id.toString();
      const allowed = await permit.check(userId, action, resource);
      if (!allowed) return res.status(403).json({ message: "Forbidden" });
      next();
    } catch (error) {
      console.error(error);
      res.status(500).json({ message: "Internal server error" });
    }
  };
};

export default roleCheckMiddleware;
1. Grab the authenticated user’s information from req.body
2. Call Permit with the user’s ID, action, and the resource to verify permissions.
3. If the check passes, call next() to grant access; otherwise, return a 403 Forbidden response.
Protecting Product APIs:
In server/routes/products.ts file, add the following code:
import express, { Request, Response } from "express";
import Product from "../models/Product";
import authMiddleware from "../middlewares/authMiddleware";
import roleCheckMiddleware from "../middlewares/roleCheckMiddleware";
const router = express.Router();

router.post(
  "/",
  authMiddleware,
  roleCheckMiddleware("create", "Products"),
  async (req: Request, res: Response) => {
    try {
      const product = await new Product(req.body).save();
      res.status(201).json(product);
    } catch (error) {
      console.log(error);
      res.status(500).send("Failed to create new product");
    }
  }
);

router.get("/", async (req: Request, res: Response) => {
  try {
    const products = await Product.find();
    res.status(200).json(products);
  } catch (error) {
    console.log(error);
    res.status(500).send("Failed to retrieve products");
  }
});

router.put(
  "/:id",
  authMiddleware,
  roleCheckMiddleware("update", "Products"),
  async (req: Request, res: Response) => {
    try {
      const product = await Product.findByIdAndUpdate(req.params.id, req.body, {
        new: true,
      });
      res.status(200).json(product);
    } catch (error) {
      console.log(error);
      res.status(500).send("Failed to update product");
    }
  }
);

router.delete(
  "/:id",
  authMiddleware,
  roleCheckMiddleware("delete", "Products"),
  async (req: Request, res: Response) => {
    try {
      const deletedProduct = await Product.findByIdAndDelete(req.params.id);
      res.status(200).json(deletedProduct);
    } catch (error) {
      console.log(error);
      res.status(500).send("Failed to delete product");
    }
  }
);

export default router;
1. Import authMiddleware and roleCheckMiddleware.
2. Apply authMiddleware to any route that requires an authenticated user.
3. Then apply roleCheckMiddleware(action, resource) to enforce the specific permission.
Conclusion
We’ve integrated Google authentication using Google’s official Node.js Auth Library — clean, straightforward, and free of unnecessary complexity. On the backend, you saw how to exchange codes for tokens, verify ID tokens, and secure routes with middleware. On the frontend, you learned to call those auth endpoints, handle redirects, display loading and error states, and automatically refresh your access token with an Axios interceptor. Finally, we added role-based access control so only the right users can perform sensitive actions.
If this tutorial saved you time, I’d love your support. You can buy me a coffee or Subscribe to my YouTube Channel. Every bit of feedback helps me create better guides, so thanks for reading and happy coding!
Source Code : https://github.com/CyberW0lves/Google-OAuth-RBAC
