
Today, I’m sharing how I built my first machine learning project after restarting my tech journey — and I’ll walk you through it step-by-step so even beginners can follow along!
We’ll build a simple Iris Flower Classification project using Python.
Let’s dive in! 🚀
Step 1: Setting Up the Project
First, I created a clean folder structure like this:
iris-classification/
│
├── data/
├── notebooks/
├── src/
├── README.md
├── requirements.txt
└── .gitignore
✅ data/ for datasets
✅ notebooks/ for Jupyter notebooks
✅ src/ for Python scripts
✅ README.md to explain the project
✅ requirements.txt to list all needed Python packages
I highly recommend starting with good organization — it makes everything easier later!
Step 2: Loading and Exploring the Data
I used the famous Iris Dataset.
import pandas as pd

df = pd.read_csv('data/iris.csv')
print(df.head())
Then, I checked basic information:
df.info()
df.describe()
✅ Tip: Always look at your data first before modeling!
Step 3: Visualizing the Data
I made some simple visualizations to understand the features better.
import seaborn as sns
import matplotlib.pyplot as plt
Correlation heatmap
plt.figure(figsize=(10,8))
sns.heatmap(df.corr(), annot=True, cmap='coolwarm')
plt.title('Feature Correlation Heatmap')
plt.show()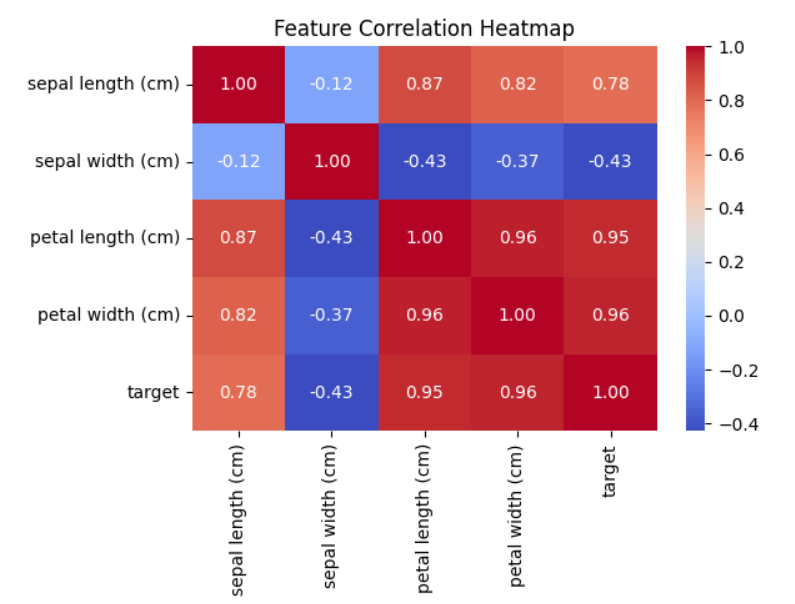
Pairplot
import seaborn as sns
import matplotlib.pyplot as plt

# Create a smaller pairplot using the correct label
g = sns.pairplot(df, hue='target', height=2.3)

# Add a title
g.fig.suptitle('Pairplot of Iris Features', y=1.03)

# Clean layout
plt.tight_layout()

# Save if needed
plt.savefig('pairplot.png', dpi=300, bbox_inches='tight')

plt.show()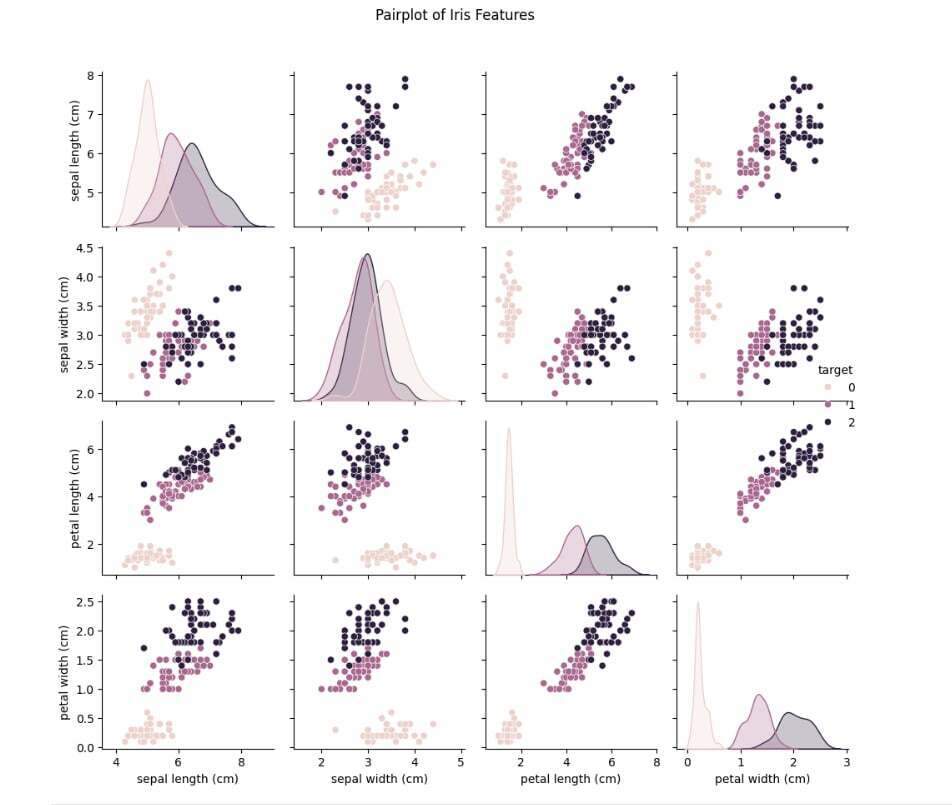
✅ Tip: Visualization helps you see patterns that numbers alone can't show!
Step 4: Preparing the Data
I separated features (X) and labels (y).
X = df.drop('species', axis=1)
y = df['species']
Then I split the data:
from sklearn.model_selection import train_test_split

X_train, X_test, y_train, y_test = train_test_split(X, y, test_size=0.2, random_state=42)
✅ Tip: Always split your data — training and testing on the same data gives fake results.
Step 5: Organizing and Pushing to GitHub
Finally, I learned to push my project properly to GitHub:
git init
git add .
git commit -m "First ML project: Iris Classification"
git branch -M main
git remote add origin https://github.com/ShamantaSristy/iris-classification.git
git push -u origin main
✅ Tip: Save your work online — GitHub shows your growth and makes you look professional!
🎉 What I Learned
💡How to structure and organize a machine learning project
💡How to analyze, visualize, and prepare data
💡How to push and maintain a clean GitHub repository
👉 My full project is here:
🔗 Iris Flower Classification GitHub Repo
If you're also starting your journey, trust me — you can do this! 🌱
One small project at a time, and you’ll get better every day.
See you in the next post, where I'll tackle my next project: the Titanic Survival Prediction 🚢❓


