Hey DevOps folks! 🚀 Welcome back to our Terraform tutorial series. In the last post, we introduced Terraform and the power of Infrastructure as Code (IaC). Now, it's time to get hands-on! In this post, we’ll set up Terraform, write our first configuration, and deploy infrastructure step by step. Let’s dive in!
💬 Got Questions?
If you have any questions or need further clarification while reading this post, please don't hesitate to drop a comment below! I'm here to help, and I'll gladly create new posts to dive deeper into any topics you find challenging. 😊
1. Architecture Overview
Throughout this course, we’ll work with a real-world cloud architecture to demonstrate Terraform’s capabilities in action. Our project centers on deploying a web application on AWS, leveraging a suite of cloud services to ensure high scalability, robust security, and optimal performance. By exploring this architecture, you’ll gain hands-on experience with real-world deployment scenarios, preparing you to tackle production-grade environments confidently.

1.2. Infrastructure Components
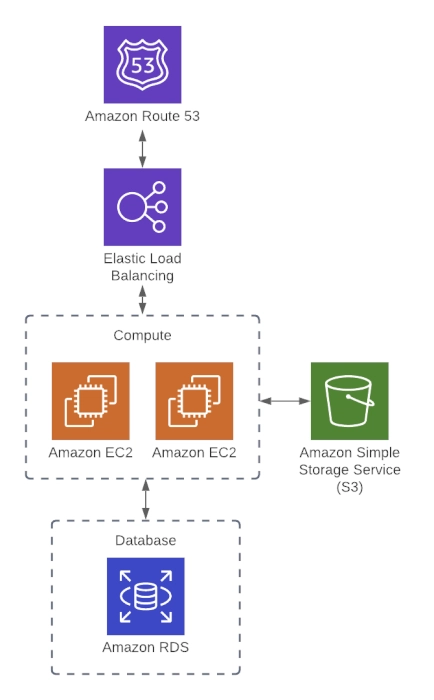
Our architecture leverages a variety of AWS services to build a robust, scalable, and secure web application. Here’s a closer look at the key components:
- EC2 Instances: Compute resources that host our web application, providing the necessary processing power and scalability.
- Elastic Load Balancer (ELB): Distributes incoming traffic across multiple EC2 instances to ensure high availability and fault tolerance.
- RDS (Relational Database Service): A fully managed database service that stores application data reliably, simplifying database maintenance tasks.
- S3 (Simple Storage Service): Object storage for assets such as images, logs, and backups, ensuring durable and scalable storage.
- Route 53: A highly available DNS service used to manage domain names and route traffic efficiently.
- VPC (Virtual Private Cloud): A logically isolated network that provides enhanced security and control over our cloud resources.
1.3. How It Works
Incoming traffic is first routed through Route 53, which directs requests to an Elastic Load Balancer (ELB) that distributes the load evenly across multiple EC2 instances, ensuring high availability and scalability. The web application running on these instances communicates with an RDS database for persistent data storage, while static assets such as images, logs, and backups are stored in S3 for cost-effective and scalable storage. All of these components are deployed within a secure and isolated Virtual Private Cloud (VPC), which enhances overall security and control of the network environment.
1.4. Why This Architecture?
This architecture is designed with modern web applications in mind. Scalability is achieved by combining an Elastic Load Balancer (ELB) with multiple EC2 instances, allowing the system to expand horizontally as demand increases. Resilience is ensured by leveraging managed services like RDS for robust database performance and S3 for durable storage, which together enhance data durability. Security is reinforced by deploying all components within an isolated VPC and using Route 53 for secure domain management. Finally, cost efficiency is maintained by automating resource management with Terraform, which minimizes manual intervention and helps avoid unnecessary expenditures.
This architecture provides a solid foundation for real-world infrastructure automation with Terraform.
2. Setting Up Terraform
Terraform is a powerful Infrastructure as Code (IaC) tool that enables consistent, repeatable, and automated deployment of cloud infrastructure. Before we dive into its robust features and streamlined workflows, it's essential to set up your environment properly. This involves installing Terraform on your system, configuring your preferred cloud provider credentials, and initializing your working directory to download necessary provider plugins. By taking these initial steps, you'll be well-prepared to harness Terraform's full potential in managing and scaling your infrastructure reliably.
2.1. Installing Terraform
Terraform is distributed as a single binary that runs on Windows, macOS, and Linux, making it incredibly portable and easy to install. You can quickly get started by using your favorite package manager, or you can manually download the binary from the official website. This flexibility ensures that no matter your operating system, you can have Terraform up and running in minutes, ready to manage your cloud infrastructure.
Windows (Using Chocolatey or Scoop)
- Using Command Prompt (CMD) Follow the official tutorial to install Terraform via the command line: Terraform AWS Get Started: Install CLI
choco install terraform  # Using Chocolatey
scoop install terraform  # Using Scoop
Manual Installation
Download the Terraform binary manually from the official site:
Terraform Installation Guide-
Post-Installation Setup
After installation, make sure to add Terraform to your system's PATH so you can access it from any command prompt window:- Right-click on This PC and select Properties.
- Navigate to Advanced system settings > Environment Variables.
- Under System variables, find the Path variable, click Edit, and add the directory where Terraform is installed.
macOS (Using Homebrew)
brew tap hashicorp/tap
brew install hashicorp/tap/terraform
Linux (Using APT for Debian/Ubuntu)
sudo apt update && sudo apt install -y terraformAlternatively, download the latest Terraform binary from the official Terraform Download Page.
2.1. Verifying the Installation
After installation, check if Terraform is installed correctly by running:
terraform -v✅ If installed successfully, you’ll see an output similar to:
Terraform v1.6.0Now you're ready to start provisioning infrastructure with Terraform on Windows!
2.2. Configuring Terraform
Terraform uses providers to interact with cloud services. The first step in any Terraform project is defining a provider (e.g., AWS, Azure, GCP).
📌 Example: Configuring Terraform for AWS
1️⃣ Create a new directory and navigate into it:
mkdir terraform-setup && cd terraform-setup2️⃣ Create a new file named main.tf and add the following:
provider "aws" {
  region = "us-east-1"  # Change to your preferred region
}
3️⃣ Initialize Terraform to download required provider plugins:
terraform init✅ You should see an output indicating successful initialization.
2.3. Terraform Workflow Basics
Terraform follows a simple yet powerful workflow:
1️⃣ Write: Define infrastructure in .tf files.
2️⃣ Initialize: Run terraform init to set up the project.
3️⃣ Plan: Use terraform plan to preview changes.
4️⃣ Apply: Run terraform apply to create infrastructure.
5️⃣ Destroy: Remove resources using terraform destroy.
3. Terraform Architecture
Terraform’s architecture is a well-oiled machine, turning your code into real-world cloud resources with precision. Its key components mesh seamlessly—here’s how they bring your infrastructure to life:
3.1. Configuration Files
What They Are: Human-friendly files written in HashiCorp Configuration Language (HCL) or JSON, sketching out your dream infrastructure.
Role: These are your blueprints—telling Terraform what to build, tweak, or tear down.
Think of them as the architect’s plans, guiding every move with clarity and intent.
3.2. State File
What It Is: A local or remote record-keeper, packed with details about your live infrastructure.
Role: It’s Terraform’s memory—tracking what’s out there and spotlighting what needs to change to match your configs.
Key Benefit: Powers idempotency (same result, every run) and safe, step-by-step updates.
This is your reality check, ensuring no surprises sneak in.
3.3. Terraform Core
What It Is: The beating heart of Terraform—the engine under the hood.
Role: Reads your configs, cross-checks the state file, and crafts an execution plan—a roadmap of actions to sync reality with your vision.
Key Functionality:
- Spots the gaps between “desired” and “current.”
- Talks to cloud APIs via Providers to make it happen.
- It’s the mastermind, turning ideas into action with surgical precision.
3.4. Providers
What They Are: Plugins that bridge Terraform to cloud APIs and beyond—think AWS, Azure, GCP, and more.
Role: They’re the translators, converting Terraform’s orders into API calls that providers understand.
Flexibility: With a vast lineup (check the official Terraform Providers docs), you can wrangle almost any resource imaginable.
These are your ambassadors, unlocking a world of platforms with one tool.
Why It Works
Together, these pieces—configs, state, core, and providers—form a tight-knit system. They make Terraform a powerhouse for defining, deploying, and managing infrastructure that’s as robust as it is flexible.
4. Authenticating to AWS
Before you can start provisioning infrastructure with Terraform on AWS, you need to ensure proper authentication. Follow these steps to set up your AWS credentials:
- Ensure You Have an AWS Account Sign up for an AWS account if you haven't already.
Visit the AWS Sign Up Page to create your account.
- Create an IAM User for Terraform For better security and management, create an IAM user specifically for Terraform or for this tutorial.
Tip: Assign only the necessary permissions (e.g., provisioning permissions) to adhere to the principle of least privilege.
Use the AWS IAM Console to create and manage your IAM users.
- Install the AWS CLI The AWS CLI is a command-line tool that lets you interact with AWS services.
Follow the official guide to install the AWS CLI:
AWS CLI Installation Guide
- Configure the AWS CLI After installation, configure the AWS CLI with the access keys of the IAM user you created.
Open your command prompt or terminal and run:
$ aws configure
Enter the following when prompted:
AWS Access Key ID: Your IAM user's access key
AWS Secret Access Key: Your IAM user's secret key
Default region name: e.g., us-east-1
Default output format: e.g., json
This configuration will allow Terraform to authenticate to AWS via the AWS CLI.
With these steps, you've successfully set up AWS authentication for Terraform. Now you're ready to start provisioning resources on AWS using Terraform!
4.1. Example: Deploying an EC2 Instance on AWS with Terraform
In this example, you'll learn the basic steps to:
- Specify the provider and region
- Define resources (an EC2 instance)
- Execute Terraform commands to deploy and destroy infrastructure
📄 Terraform Configuration File (main.tf)
terraform {
  required_providers {
    aws = {
      source  = "hashicorp/aws"
      version = "~> 3.0"
    }
  }
}

provider "aws" {
  region = "us-east-1"
}

resource "aws_instance" "example" {
  ami           = "ami-011899242bb902164" # Ubuntu 20.04 LTS in us-east-1
  instance_type = "t2.micro"
}
4.3. 🚀 Steps to Deploy Your Infrastructure
- Initialize Terraform:
This command downloads the necessary provider plugins and sets up your working directory.
terraform init- Plan the Deployment:
Preview the actions Terraform will perform. This step shows you what resources will be created, updated, or destroyed.
terraform planApply the Configuration:
Execute the plan to create the specified infrastructure.
terraform applyConfirm the action when prompted.
- Verify on AWS:
Log into your AWS EC2 Dashboard to see the newly provisioned EC2 instance.
Destroy the Infrastructure:
Once you’re done, remove the infrastructure to avoid unwanted costs.
terraform destroyConfirm the destruction when prompted.
Tip: Always read the documentation (RTFM!) for more details on resource parameters and best practices. This example provides a simple overview to get you started with Terraform and AWS.
4.4. Basic Terraform (TF) Usage
Before you unleash Terraform’s power, pause and plan. A solid design upfront saves headaches later. Here’s how to kick things off right:
Design Your Infrastructure
🗺️ Map It Out – Sketch your architecture—think big picture—and pick your cloud provider (AWS, Azure, etc.).
📌 Pinpoint Resources – List what you need: EC2 instances, VPCs, databases—whatever your setup demands.
📖 Dig into Docs – Check your provider’s Terraform docs and resource examples to craft a spot-on main.tf file.
This prep work turns chaos into clarity, ensuring your infrastructure takes shape exactly as intended.
🔗 GitHub Repo: [https://github.com/rahimbtc1994/terraform-intermediate/tree/main/part-2] – Find the complete Terraform setup in this repository and follow along! 🚀
# 1. Add the remote backend (aws s3)
terraform {
  required_providers {
    aws = {
      source  = "hashicorp/aws"
      version = "~> 3.0"
    }
  }
}

# 2. Configure the region
provider "aws" {
  region = "us-east-1"
}

# 3. Add a VPC (if you don't want to configure a new vpc just refence the default)
data "aws_vpc" "default_vpc" {
  default = true
}

# 4. Add a Subnet (if you don't want to configure a new Subnet just refence the default)
data "aws_subnet_ids" "default_subnet" {
  vpc_id = data.aws_vpc.default_vpc.id
}

# 5. Define a security group to allow inbound traffic using security group rules
resource "aws_security_group" "instances" {
  name = "instance-security-group"
}

resource "aws_security_group_rule" "allow_http_inbound" {
  type              = "ingress"
  security_group_id = aws_security_group.instances.id

  from_port   = 8080
  to_port     = 8080
  protocol    = "tcp"
  cidr_blocks = ["0.0.0.0/0"]
}

# 6. Add the EC2 instances
resource "aws_instance" "instance_1" {
  ami             = "ami-011899242bb902164" # Ubuntu 20.04 LTS // us-east-1
  instance_type   = "t2.micro"
  security_groups = [aws_security_group.instances.name]
  user_data       = <<-EOF
              #!/bin/bash
              echo "Hello, World 1" > index.html
              python3 -m http.server 8080 &
              EOF
}

resource "aws_instance" "instance_2" {
  ami             = "ami-011899242bb902164" # Ubuntu 20.04 LTS // us-east-1
  instance_type   = "t2.micro"
  security_groups = [aws_security_group.instances.name]
  user_data       = <<-EOF
              #!/bin/bash
              echo "Hello, World 2" > index.html
              python3 -m http.server 8080 &
              EOF
}

# 7. Define a loadbalancer target
resource "aws_lb_target_group" "instances" {
  name     = "example-target-group"
  port     = 8080
  protocol = "HTTP"
  vpc_id   = data.aws_vpc.default_vpc.id

  health_check {
    path                = "/"
    protocol            = "HTTP"
    matcher             = "200"
    interval            = 15
    timeout             = 3
    healthy_threshold   = 2
    unhealthy_threshold = 2
  }
}

# 8. Attach the EC2 instances to loadbalancer target
resource "aws_lb_target_group_attachment" "instance_1" {
  target_group_arn = aws_lb_target_group.instances.arn
  target_id        = aws_instance.instance_1.id
  port             = 8080
}

resource "aws_lb_target_group_attachment" "instance_2" {
  target_group_arn = aws_lb_target_group.instances.arn
  target_id        = aws_instance.instance_2.id
  port             = 8080
}

# 9. Define some security groups for the loadbalancer using security group rules (ingress, egress)
resource "aws_security_group" "alb" {
  name = "alb-security-group"
}

resource "aws_security_group_rule" "allow_alb_http_inbound" {
  type              = "ingress"
  security_group_id = aws_security_group.alb.id

  from_port   = 80
  to_port     = 80
  protocol    = "tcp"
  cidr_blocks = ["0.0.0.0/0"]

}

resource "aws_security_group_rule" "allow_alb_all_outbound" {
  type              = "egress"
  security_group_id = aws_security_group.alb.id

  from_port   = 0
  to_port     = 0
  protocol    = "-1"
  cidr_blocks = ["0.0.0.0/0"]

}

# 10. Define the loadbalancer
resource "aws_lb" "load_balancer" {
  name               = "web-app-lb"
  load_balancer_type = "application"
  subnets            = data.aws_subnet_ids.default_subnet.ids
  security_groups    = [aws_security_group.alb.id]

}

# 11. Setup a loadbalancer listener
resource "aws_lb_listener" "http" {
  load_balancer_arn = aws_lb.load_balancer.arn

  port = 80

  protocol = "HTTP"

  # By default, return a simple 404 page
  default_action {
    type = "fixed-response"

    fixed_response {
      content_type = "text/plain"
      message_body = "404: page not found"
      status_code  = 404
    }
  }
}

# 12. etup a loadbalancer listener rule
resource "aws_lb_listener_rule" "instances" {
  listener_arn = aws_lb_listener.http.arn
  priority     = 100

  condition {
    path_pattern {
      values = ["*"]
    }
  }

  action {
    type             = "forward"
    target_group_arn = aws_lb_target_group.instances.arn
  }
}

# 13. Setup a Route53 to use an actual domain + a Route53 records
resource "aws_route53_zone" "primary" {
  name = "yourdomain.com" # TODO
}

resource "aws_route53_record" "root" {
  zone_id = aws_route53_zone.primary.zone_id
  name    = "yourdomain.com" # TODO
  type    = "A"

  alias {
    name                   = aws_lb.load_balancer.dns_name
    zone_id                = aws_lb.load_balancer.zone_id
    evaluate_target_health = true
  }
}

# 14. Create a db instance
resource "aws_db_instance" "db_instance" {
  allocated_storage    = 10
  name                 = "mydb"
  engine               = "mysql"
  engine_version       = "8.0"
  instance_class       = "db.t3.micro"
  username             = "foo"
  password             = "foobarbaz"
  parameter_group_name = "default.mysql8.0"
  skip_final_snapshot  = true
}

# 15. Add a file storage (S3)
resource "aws_s3_bucket" "bucket" {
  bucket_prefix = "devops-directive-web-app-data"
  force_destroy = true
}
🚀 The Terraform Workflow
Once your configuration is ready, use the command line to manage your infrastructure with these core commands:
4.4.1. terraform init
What It Does: Grabs the provider plugins listed in your main.tf from the Terraform Registry (default: terraform.registry.io).
Details:
- Downloads the exact binaries for your cloud providers (e.g., AWS, Azure), matching their versions and system architecture.
- Spins up a .terraform.lock.hcl file to pin those provider dependencies, locking your workspace into a consistent setup.
Think of it as Terraform gearing up—fetching the tools it needs to turn your code into reality.
4.4.2. terraform plan
What It Does: Pits your desired state (from your config files) against the current state (tracked in the state file) to spot the gaps.
Details:
- The state file mirrors your live infrastructure—sometimes shifted by external tweaks (like GUI edits in your cloud provider).
- The plan lays out a roadmap: what to create, update, or delete to sync reality with your vision.
It’s Terraform’s way of previewing the action—giving you a heads-up before anything goes live.
4.4.3. terraform apply
What It Does: Brings your vision to reality by executing the changes mapped out in terraform plan.
Details:
- Once you green-light it, Terraform talks to your provider’s API to roll out the updates in the cloud.
- Every tweak in your config file—big or small—gets pushed live, aligning your infrastructure with your desired state.
It’s the moment of truth: Terraform turns code into action, sculpting your cloud setup with precision.
4.4.4. terraform state
What It Is: A JSON snapshot of your live infrastructure, as shaped by Terraform.
Details:
- Captures every resource and data object Terraform manages—your setup’s full DNA.
- Holds sensitive bits (like credentials), so lock it down tight.
- Lives locally or remotely, enabling team sync and state locking for smooth collaboration.
It’s Terraform’s memory bank—keeping tabs on reality so your next move is spot-on.
4.4.5. terraform destroy
What It Does: Wipes the slate clean by tearing down all Terraform-managed resources.
Details:
- Perfect for wrapping up a project or course—banishes stray resources to avoid surprise bills.
- Caution: In production or live setups, wield it wisely—this is a full teardown, no turning back!
This command lineup—init, plan, apply, destroy—hands you a controlled, repeatable, and versioned grip on your infrastructure. Each step locks in precision, ensuring your config dreams match your cloud reality. With Terraform, you’re not just managing resources—you’re mastering them.
Now that you've set up Terraform and deployed your first resources, it's time to dive deeper! In Terraform for DevOps: Managing State & Remote Backends (Part 3), we'll explore Terraform state management, local vs. remote backends, and how to securely store your state using Terraform Cloud or AWS S3 with DynamoDB. Don't miss it—keep leveling up your infrastructure automation skills! 🚀
👍 Enjoyed this post?
If you found this content helpful, please hit the like button! Your support inspires me to create even more detailed and practical guides on Terraform and DevOps. Thank you for reading, and happy automating! 🚀
