Ever wished you could just ask your database questions in plain English instead of wrestling with complex SQL queries? This guide breaks down Text-to-SQL in the simplest way possible using the PocketFlow Text-to-SQL Example!
Turn Your Questions into Database Answers, No SQL Required!
Have you ever stared blankly at a database, knowing the answers you need are locked inside, but unsure how to write the SELECT * FROM ... WHERE ... JOIN ... GROUP BY ... magic spells to retrieve them? Or maybe you've tried asking a general AI for data insights, only to be told it doesn't know your specific database structure? These are common hurdles when working with structured data, but there's a powerful solution: Text-to-SQL.
In this beginner-friendly tutorial, you'll learn:
- The core concepts behind Text-to-SQL systems in plain language
- How Large Language Models (LLMs) can translate your questions into database code (SQL)
- How to build a working Text-to-SQL system with just a few hundreds of lines of code
We'll use the PocketFlow Text-to-SQL example - a clear, step-by-step workflow built on the simple PocketFlow framework. Unlike complex setups, PocketFlow lets you see exactly how the natural language question becomes a database query and how potential errors are handled, giving you the fundamentals to understand and build your own conversational database interfaces.
How Text-to-SQL Works: From Question to Answer
So, how does a computer turn your plain English question like "Show me sales figures for last month" into actual data from a database? Imagine you have a super-smart data analyst assistant. Here's how they (and a Text-to-SQL system) would likely tackle it:
- Understand the Tools: First, the analyst checks the database's layout – what tables are available (
customers,orders,products?) and what information (columns) each table holds (name,email,order_date,price?). - Translate the Request: Based on your question and their knowledge of the database layout, they write the precise technical code (SQL) needed to find that specific information.
- Fetch the Data: They run this SQL code against the database.
- Handle Slip-ups: If the database says "Error! I don't understand that code" (maybe a typo or wrong table name), the analyst looks at the error message, figures out what went wrong, corrects the SQL code, and tries running it again.
- Present the Findings: Once the code runs successfully, they gather the results and show them back to you.
Text-to-SQL systems automate this entire process. Let's break down the crucial steps:
Step 1: Understanding the Database Layout (Schema)
Before the system can even think about answering your question, it needs a map of the database. This map is called the schema. It details:
- Tables: What are the main categories of data stored (e.g.,
customers,products,orders)? - Columns: Within each table, what specific pieces of information are tracked (e.g., in
customers, there might becustomer_id,first_name,email,city)? - Data Types: What kind of information is in each column (e.g., text, numbers, dates)?
- (Optional) Relationships: How do tables connect (e.g., an
orderbelongs to acustomer)?
Why is this essential? An AI, even a powerful one, doesn't magically know your specific database. If you ask for "customer emails," it needs the schema to know there's a table called customers and a column called email within it. Without the schema, it's just guessing.
Typically, the system automatically asks the database for this structural information (using commands like PRAGMA table_info in SQLite or similar commands in other database systems) before trying to generate any SQL.
Step 2: Translating English to SQL (LLM Generation)
This is where the AI magic happens. A Large Language Model (LLM) acts as the translator. It receives:
- Your natural language question (e.g., "What are the names of customers in New York?").
- The database schema (the blueprint learned in Step 1).
Using this information, the LLM's job is to generate the corresponding SQL query. For the question above, knowing the schema includes a customers table with first_name, last_name, and city columns, it might generate:
SELECT first_name, last_name
FROM customers
WHERE city = 'New York';
Providing the LLM with clear instructions and the accurate schema is vital for getting correct SQL output. Sometimes, the system might ask the LLM to format the SQL in a specific way (like within a YAML block) to make it easier for the system to extract reliably.
Step 3: Running the Code (SQL Execution)
Generating the SQL is just the first part; now the system needs to actually run it against the database. It connects to the database and sends the generated query.
The outcome depends on the query type:
-
SELECTQueries: If the query asks for data (like the example above), the database sends back the matching rows and columns. - Other Queries (
UPDATE,INSERT,DELETE): If the query modifies data, the database typically responds with a confirmation of success (e.g., "Query OK, 3 rows affected").
This step is the moment of truth – does the generated SQL actually work and retrieve the intended information?
Step 4: Fixing Mistakes (Error Handling & Debugging)
What happens if the LLM makes a mistake? Maybe it misspelled a column name, used incorrect syntax, or tried to query a table that doesn't exist. The database won't just guess – it will return an error message.
Instead of giving up, a smart Text-to-SQL system uses this error as valuable feedback. This enables a debugging loop:
- Execution Fails: The system tries to run the SQL (from Step 3) and gets an error message back from the database (e.g., "no such column:
customer_city"). - Gather Clues: The system takes the original question, the schema, the failed SQL query, and the specific error message.
- Ask for Correction: It sends all this information back to the LLM, essentially asking, "This query failed with this error. Can you fix it based on the original request and schema?"
- Generate Corrected SQL: The LLM attempts to provide a revised SQL query (e.g., correcting
customer_citytocity). - Retry Execution: The system goes back to Step 3 to try running this new SQL query.
To prevent getting stuck in an endless loop if the LLM can't fix the error, this cycle usually only repeats a limited number of times (e.g., 2 or 3 attempts). If it still fails after the maximum retries, the system reports the final error.
Putting It All Together: The Text-to-SQL Workflow
Unlike some AI processes that have separate offline preparation and online answering phases (like RAG), Text-to-SQL typically runs as a single, dynamic workflow every time you ask a question. It combines the steps we've discussed into a sequence, including the potential detour for debugging:
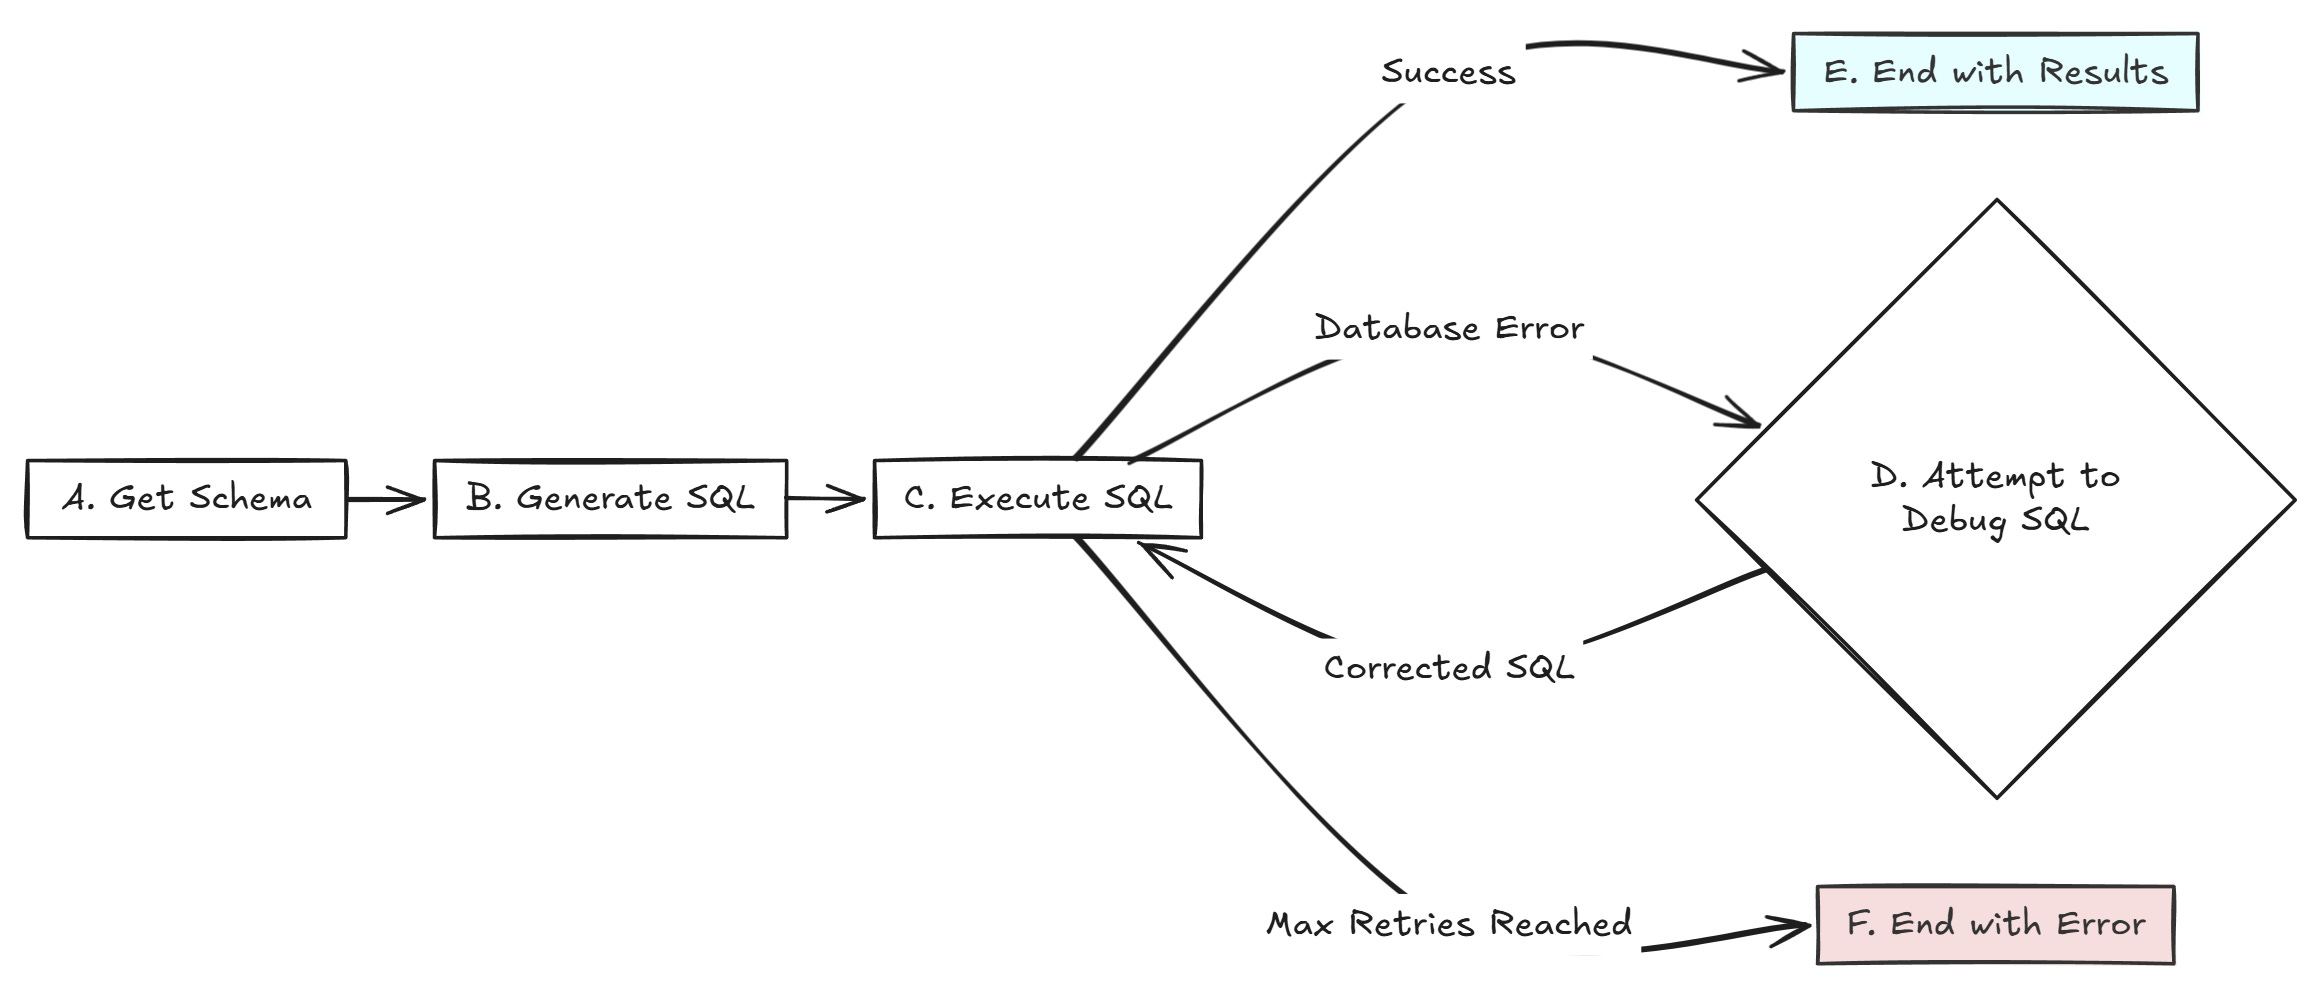
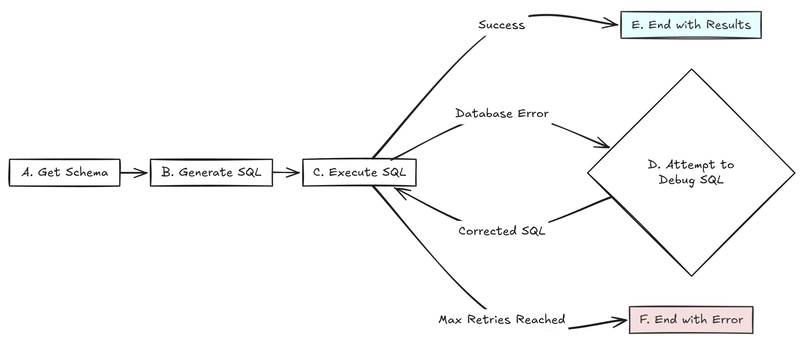
The Flow Explained:
- The process starts by getting the database Schema (A).
- It then uses the schema and your question to Generate SQL (B).
- Next, it attempts to Execute SQL (C).
- If Execution Succeeds: The workflow finishes, providing you the results (E).
- If Execution Fails: It enters the debug loop. The error triggers an attempt to Debug SQL (D).
- The debug step generates corrected SQL, which flows back to Execute SQL (C) for another try.
- This loop (C -> D -> C) continues until either execution succeeds or the maximum number of retry attempts is hit, at which point it ends with an error message (F).
The beauty of this workflow is its ability to translate your request, interact with the database, and even intelligently attempt to recover from errors, all orchestrated to get you the data you asked for.
Building Workflows with PocketFlow: Keep It Simple!
Alright, we've seen the conceptual steps involved in tasks like Text-to-SQL. Now, how do we actually build a system that automates these steps, especially handling conditional logic like error loops? This is where PocketFlow shines!
PocketFlow is designed to make building workflows refreshingly straightforward. Forget getting lost in layers of complex code – PocketFlow uses tiny, understandable building blocks (check out the core logic - it's surprisingly small!) so you can see exactly what's happening under the hood.
Let's imagine building any automated process, like summarizing a document, is like setting up an assembly line:
-
Nodes are the Workstations: Each station has one specific job (e.g., load the document, summarize it, save the summary).
# The basic blueprint for any workstation (Node) class BaseNode: def __init__(self): # Where to go next? Depends on the outcome! self.params, self.successors = {}, {} # Define the next station for a given outcome ('default', 'error', etc.) def add_successor(self, node, action="default"): self.successors[action] = node return node # Handy for chaining connections! # 1. Get ready: What inputs do I need from the central storage? def prep(self, shared): pass # 2. Do the work: Perform the station's main task. def exec(self, prep_res): pass # 3. Clean up & Decide: Store results back in central storage, choose the next step. def post(self, shared, prep_res, exec_res): pass # The standard routine for running a station def run(self, shared): p = self.prep(shared) # Get ingredients/parts e = self.exec(p) # Do the work return self.post(shared, p, e) # Store results & say what's next -
Flow is the Factory Manager: This manager knows the overall assembly line process, directing the task from one station to the next based on the outcome of the previous step. It ensures everything runs in the correct order.
# The Factory Manager (Flow) overseeing the process import copy # Need copy to ensure nodes in loops run correctly class Flow(BaseNode): def __init__(self, start): # Knows where the process begins super().__init__() self.start = start # Figures out which station is next based on the last outcome def get_next_node(self, curr, action): return curr.successors.get(action or "default") # Orchestrates the entire workflow from start to finish def orch(self, shared, params=None): curr = copy.copy(self.start) # Start at the beginning p = (params or {**self.params}) while curr: # Keep going until there are no more stations # Allow setting node-specific params if needed (optional) # curr.set_params(p) action = curr.run(shared) # Run the current station # Move to the next station based on the action returned curr = copy.copy(self.get_next_node(curr, action)) # Kicks off the whole process def run(self, shared): pr = self.prep(shared) # Any prep for the overall flow? self.orch(shared) # Run the main orchestration return self.post(shared, pr, None) # Any cleanup for the flow? -
Shared Store is the Central Parts Bin / Conveyor Belt: This is where all stations get their inputs (like a file path) and place their outputs (like the loaded text or the final summary). Every station can access this shared space.
# Simple Example: Load text -> Summarize -> Save summary
# (Assuming LoadTextNode, SummarizeTextNode, SaveSummaryNode exist)

# Create the workstations
load_node = LoadTextNode()
summarize_node = SummarizeTextNode()
save_node = SaveSummaryNode()

# Connect the assembly line using the default path '>>'
load_node >> summarize_node >> save_node

# Create the Factory Manager, telling it where to start
summarization_flow = Flow(start=load_node)

# Prepare the initial inputs in the parts bin ('shared' dictionary)
shared_data = {
    "input_file": "my_document.txt",
    "output_file": "summary.txt"
}

# Tell the manager to start the assembly line!
summarization_flow.run(shared_data)

# After running, 'shared_data' might contain the summary (if a node put it there)
# and the summary file "summary.txt" should be created.
print(f"Summarization complete! Check {shared_data['output_file']}")
# Example: print(shared_data.get("summary_text"))
Each Node (workstation) keeps things tidy by following three simple steps:
- Prep: Grab the necessary parts and information from the shared store.
- Exec: Perform its specific assembly task (like summarizing text).
- Post: Put the results back into the shared store (or save them) and signal to the manager what happened (e.g., "success, continue" or perhaps "error, stop").
The Flow (manager) then looks at that signal and directs the work to the appropriate next station. This makes defining even complex processes with branches or loops (like our Text-to-SQL debugger will need) quite clear.
With these straightforward concepts – Nodes for tasks, Flow for orchestration, and a Shared Store for data – PocketFlow makes building sophisticated workflows surprisingly manageable and easy to understand!
Okay, let's dive into building our Text-to-SQL assistant using PocketFlow. We'll create the specialist stations (Nodes) for each step we discussed earlier and then connect them using the lab manager (Flow). We'll keep the code super simple here to focus on what each station does. Remember, the full working code with all the details is in the PocketFlow Text-to-SQL Example.
Building the Text-to-SQL Workflow with PocketFlow Nodes
Think of each node as a Python class inheriting from pocketflow.Node. Each one will implement its prep, exec, and post methods.
Station 1: The GetSchema Node - Mapping the Database
This node's job is simple: connect to the database and figure out its structure (the schema).
class GetSchema(Node):
    def prep(self, shared):
        # Needs: The path to the database file
        return shared["db_path"]

    def exec(self, db_path):
        # Does: Connects to the DB and gets table/column info
        print(f"🔍 Getting schema for {db_path}...")
        conn = sqlite3.connect(db_path)
        cursor = conn.cursor()
        # Simplified way to get schema info (real code is more detailed)
        cursor.execute("SELECT sql FROM sqlite_master WHERE type='table';")
        schema_info = "\n".join([row[0] for row in cursor.fetchall()])
        conn.close()
        return schema_info # The schema as a string

    def post(self, shared, prep_res, schema_info):
        # Stores: The schema string on the shared whiteboard
        shared["schema"] = schema_info
print("✅ Schema captured!")-
prep: Grabs the database file location from the shared whiteboard. -
exec: Connects to the database, runs a simplified query to get table structures, and returns that schema information as a string. -
post: Puts the retrievedschemastring onto the shared whiteboard for other nodes to use.
Station 2: The GenerateSQL Node - The AI Translator
This is where the magic happens! This node takes the user's question and the schema, asks the LLM to translate it into SQL, and stores the result.
class GenerateSQL(Node):
    def prep(self, shared):
        # Needs: The user's question and the database schema
        return shared["natural_query"], shared["schema"]

    def exec(self, inputs):
        # Does: Asks the LLM to generate SQL
        natural_query, schema = inputs
        print(f"🤖 Asking LLM to translate: '{natural_query}'")
        prompt = f"Given schema:\n{schema}\n\nGenerate SQLite query for: {natural_query}\nSQL:"
        sql_query = call_llm(prompt)
        return sql_query.strip()

    def post(self, shared, prep_res, sql_query):
        # Stores: The generated SQL query string
        shared["generated_sql"] = sql_query
        # Reset debug counter when generating fresh SQL
        shared["debug_attempts"] = 0
print(f"✅ LLM generated SQL:\n{sql_query}")-
prep: Gets the human question (natural_query) and theschemafrom the whiteboard. -
exec: Creates a prompt combining the schema and question, sends it to the LLM (call_llm), and gets the generated SQL query back. -
post: Stores thegenerated_sqlon the whiteboard and resets thedebug_attemptscounter (since this is a fresh attempt).
Station 3: The ExecuteSQL Node - Running the Code
Time to see if the LLM's SQL actually works! This node runs the query against the database. It's also the crucial point where we decide if we need to enter the debugging loop.
class ExecuteSQL(Node):
    def prep(self, shared):
        # Needs: DB path and the SQL query to run
        return shared["db_path"], shared["generated_sql"]

    def exec(self, inputs):
        # Does: Tries to run the SQL query
        db_path, sql_query = inputs
        print(f"🚀 Executing SQL:\n{sql_query}")
        try:
            conn = sqlite3.connect(db_path)
            cursor = conn.cursor()
            cursor.execute(sql_query)
            results = cursor.fetchall()
            conn.close()
            print("✅ SQL executed successfully!")
            return {"success": True, "data": results}
        except sqlite3.Error as e:
            # Houston, we have a problem!
            print(f"💥 SQL Error: {e}")
            if 'conn' in locals(): conn.close()
            return {"success": False, "error_message": str(e)}

    def post(self, shared, prep_res, exec_result):
        # Stores: Results OR error message. Decides next step!
        if exec_result["success"]:
            shared["final_result"] = exec_result["data"]
            print(f"📊 Got results: {len(exec_result['data'])} rows")
        else:
            # Store the error and increment attempt counter
            shared["execution_error"] = exec_result["error_message"]
            shared["debug_attempts"] = shared.get("debug_attempts", 0) + 1
            max_attempts = shared.get("max_debug_attempts", 3)

            print(f"❗️ Failed attempt {shared['debug_attempts']} of {max_attempts}")

            if shared["debug_attempts"] >= max_attempts:
                print("🚫 Max debug attempts reached. Giving up.")
                shared["final_error"] = f"Failed after {max_attempts} attempts. Last error: {exec_result['error_message']}"
            else:
                # Return 'error_retry': Signal to the Flow to go to the DebugSQL node
                print("🤔 Attempting to debug...")
return "error_retry"-
prep: Gets the database path and thegenerated_sqlfrom the whiteboard. -
exec: Uses atry...exceptblock. It attempts to connect and execute the SQL. If it works, it returns success and data. If it catches ansqlite3.Error, it returns failure and the error message. -
post: This is the critical decision point!- If
execwas successful, store thefinal_resultand returnNone(signaling the default "success" path). - If
execfailed, store theexecution_error, increment thedebug_attemptscounter. Check if we've hit themax_debug_attempts. If yes, store afinal_errorand returnNone(stop the loop). If no, return the specific action string"error_retry"to tell the Flow manager to take the debugging path.
- If
Station 4: The DebugSQL Node - The AI Code Fixer
This station jumps into action only if ExecuteSQL failed and signaled "error_retry". Its job is to ask the LLM to fix the broken SQL.
class DebugSQL(Node):
    def prep(self, shared):
        # Needs: All context - question, schema, bad SQL, error message
        return (
            shared["natural_query"],
            shared["schema"],
            shared["generated_sql"], # The one that failed
            shared["execution_error"]
        )

    def exec(self, inputs):
        # Does: Asks LLM to fix the SQL based on the error
        natural_query, schema, failed_sql, error_message = inputs
        print(f"🩺 Asking LLM to fix SQL based on error: '{error_message}'")
        prompt = f"""
Original Question: {natural_query}
Schema: {schema}
Failed SQL:
{failed_sql}
Error: {error_message}

Provide the corrected SQLite query:
SQL:"""
        corrected_sql = call_llm(prompt)
        return corrected_sql.strip()

    def post(self, shared, prep_res, corrected_sql):
        # Stores: Overwrites the bad SQL with the new attempt
        shared["generated_sql"] = corrected_sql
        shared.pop("execution_error", None)
print(f"✅ LLM suggested fix:\n{corrected_sql}")-
prep: Gathers all the context needed for debugging from the whiteboard: the original question, schema, the SQL that failed, and the error message it produced. -
exec: Constructs a prompt telling the LLM about the failure and asks for a correction. Calls the LLM. -
post: Crucially, it overwrites thegenerated_sqlon the whiteboard with the LLM's new attempt. It also clears theexecution_error. It returnsNone, signaling the default path, which (as we'll see next) leads back to theExecuteSQLnode to try this revised query.
Connecting the Stations: Defining the Flow
Now we wire these stations together using PocketFlow's Flow and the connection operators:
from pocketflow import Flow

# Create instances of our stations
get_schema_node = GetSchema()
generate_sql_node = GenerateSQL()
execute_sql_node = ExecuteSQL()
debug_sql_node = DebugSQL()

# --- Define the main path ---
# Use '>>' for the default success path
get_schema_node >> generate_sql_node >> execute_sql_node

# --- Define the debug loop path ---
# Use '- "action" >>' to specify a path for a specific action string
# If ExecuteSQL returns "error_retry", go to DebugSQL
execute_sql_node - "error_retry" >> debug_sql_node

# If DebugSQL finishes (returns None/default), go back to ExecuteSQL
debug_sql_node >> execute_sql_node

# Create the Flow Manager, telling it where to start
text_to_sql_flow = Flow(start=get_schema_node)

# --- Ready to Run! ---
# Prepare the initial inputs
# shared = { ... }
# text_to_sql_flow.run(shared)
Look how cleanly we defined the process:
- Start with
GetSchema, thenGenerateSQL, thenExecuteSQL. - If
ExecuteSQLspecifically returns"error_retry", then the flow jumps toDebugSQL. - After
DebugSQLcompletes (its default path), the flow goes back toExecuteSQL.
And that's it! We've built the core logic of our Text-to-SQL assistant, complete with an automated debugging loop, using simple, focused PocketFlow nodes.
Conclusion: Unlock Your Data with Plain English!
And there you have it! You've journeyed through the world of Text-to-SQL, transforming simple English questions into powerful database queries. You now understand the elegant dance between:
- Understanding the Map (Schema): Giving the AI the blueprint of your database.
- AI Translation (LLM Generation): Letting the LLM convert your request into SQL code.
- Running the Code (Execution): Actually talking to the database.
- Smart Error Fixing (Debugging Loop): Giving the AI a chance to correct its own mistakes!
While the concept might seem complex initially, frameworks like PocketFlow reveal the underlying simplicity. The entire process, even the clever debugging loop, boils down to a sequence of focused Nodes, orchestrated by a Flow, sharing information via a Shared Store. It's a pattern that makes building powerful, resilient data interaction tools surprisingly manageable.
The real magic of Text-to-SQL lies in breaking down the barrier between humans and their data. No longer is database access solely the domain of SQL wizards. By grounding AI translation with specific database schemas and adding intelligent error handling, these systems make data insights accessible to everyone, faster and more intuitively than ever before.
With the concepts and PocketFlow structure you've learned here, you're now equipped to build your own conversational interfaces for databases in any domain!
Ready to build this yourself? Dive into the code and experiment:
- Get the Code: Find the complete working example used in this tutorial at GitHub: PocketFlow Text-to-SQL Cookbook.
- Explore PocketFlow: Learn more about the simple framework powering this example at the main PocketFlow GitHub Repository.
- Join the Community: Have questions or want to share what you're building? Connect with other developers on the PocketFlow Discord.
Go ahead, connect your databases, and start asking questions!


