If you've ever spun up a Docker container and wondered how does this thing talk to the internet?, you’re not alone.
Docker quietly builds a tiny virtual world behind the scenes — with bridges, fake Ethernet cables (veth), and routing tables. In this post, we'll walk through how Docker’s default bridge network actually works, using a diagram-based example. Ready? Let’s go! 👇
🔍 Quick Overview
When you run:
docker run -d nginxDocker places your container on a network called bridge (unless you tell it otherwise). This bridge is a virtual switch inside your host.
Your container:
- Gets its own virtual Ethernet interface
- Talks to other containers via the bridge
- Reaches the outside world via NAT routing
Let’s break this down visually.
📊 Diagram Walkthrough
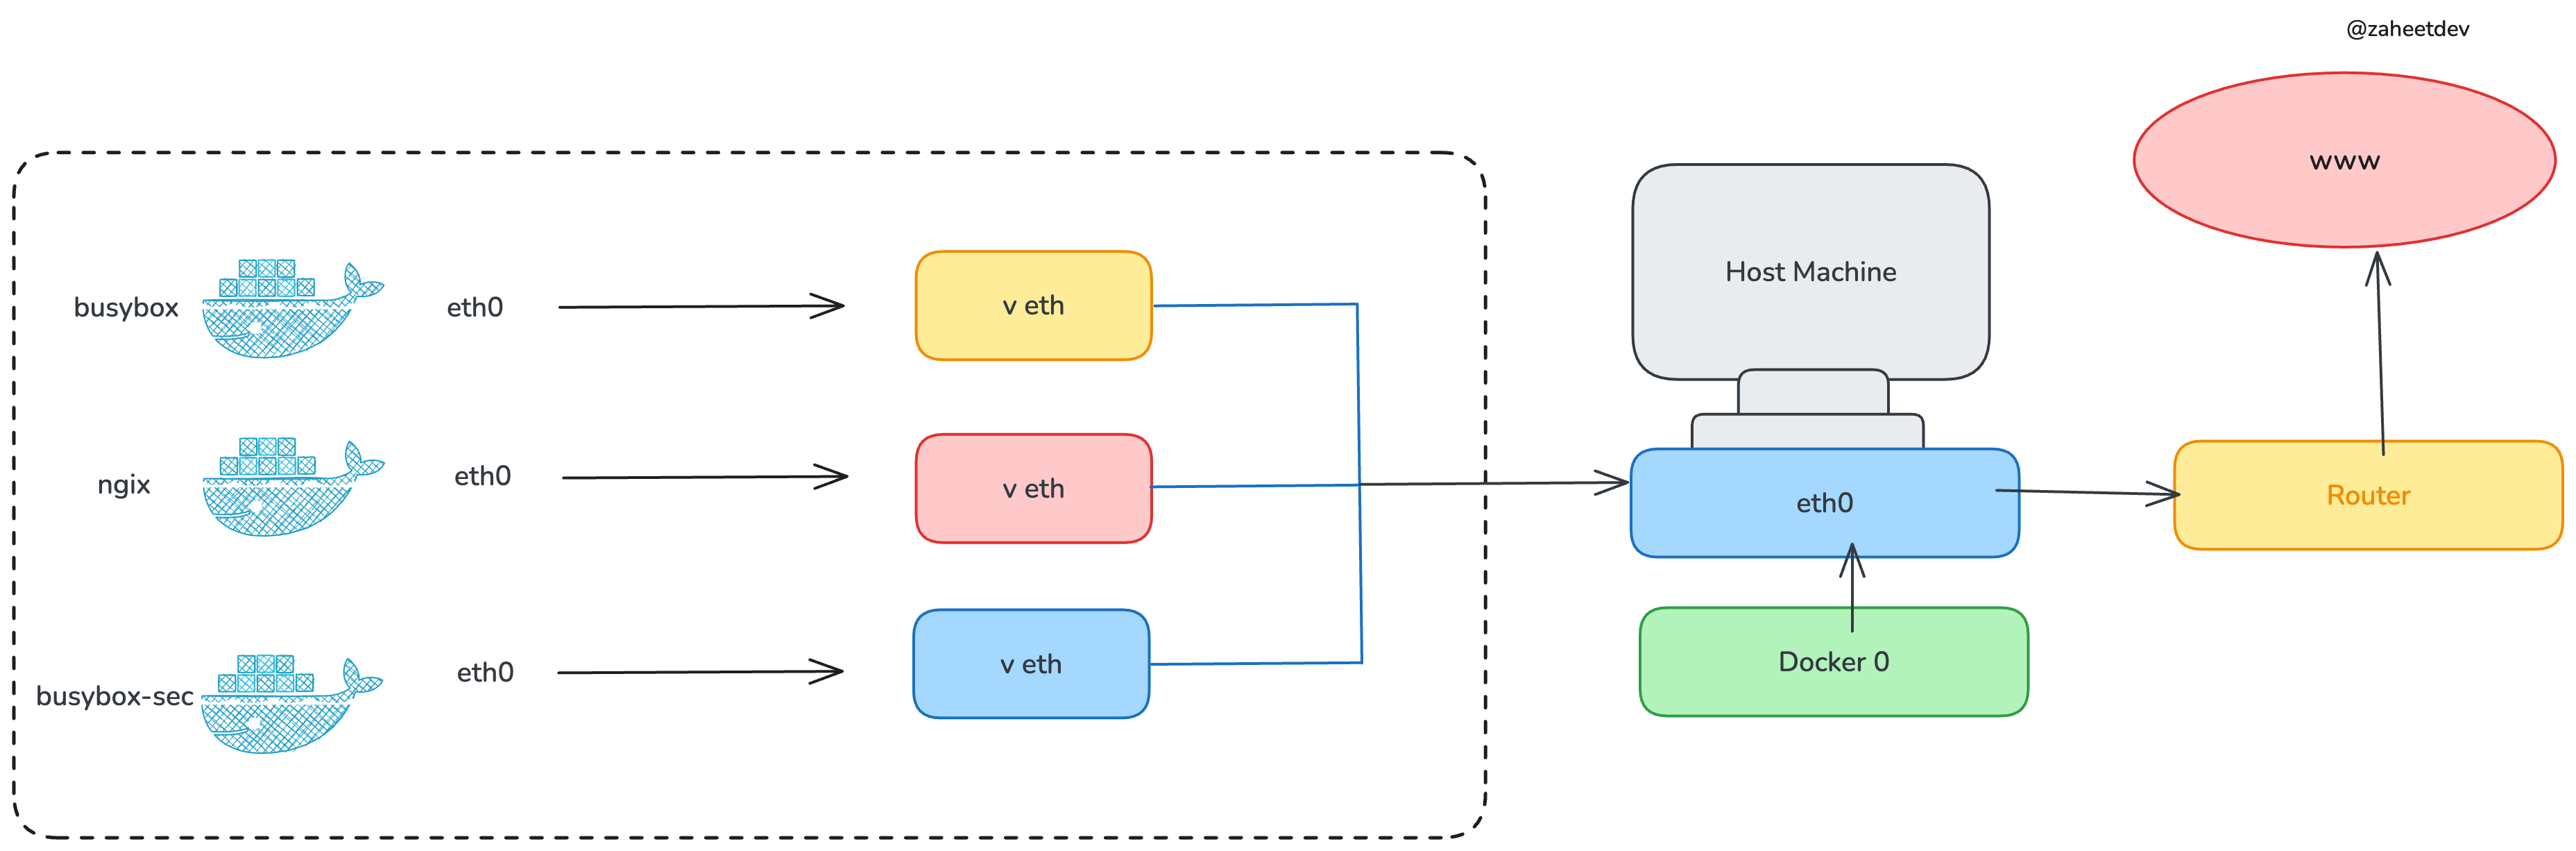
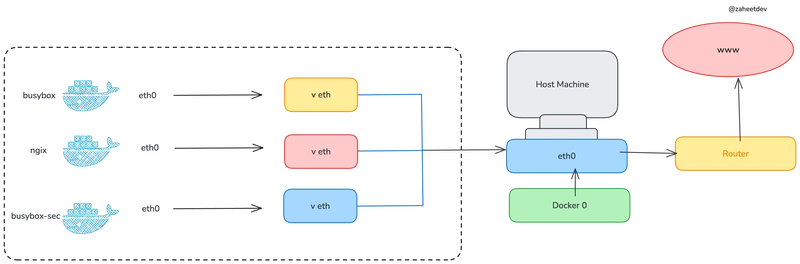
Note: This diagram shows three containers (
busybox,nginx,busybox-sec) connected to Docker's default bridge network on the host.
Here’s what’s going on, step by step:
🐳 1. Each Container Gets a Virtual Ethernet Pair
- Each container has an
eth0interface inside. - This interface is actually one end of a virtual Ethernet pair (
veth). - The other end of that pair is connected to Docker’s bridge (
docker0) on the host.
Think of it like a wire with two ends:
- One end inside the container (
eth0) - One end inside the host (
vethXYZ), plugged into the virtual switch
🧱 2. Docker Bridge (docker0) Acts Like a Router
The green block labeled Docker 0 is the bridge network:
- It connects all the container-side
vethinterfaces - It routes traffic between containers
- It NATs outbound traffic to go through the host's
eth0interface
In simpler terms:
- If
nginxpingsbusybox, the packets go viadocker0 - If
nginxaccesses Google, Docker rewrites the source IP to the host’s IP
🌐 3. Outbound Traffic Flows to the Internet
- A container sends a request to
www - That packet travels via its
veth→docker0→ host'seth0→ your home router - The router forwards the packet to the public internet
Docker handles the source NAT (SNAT), so from the outside world, it looks like the host made the request, not the container.
📌 Key Advantages of Bridge Networking
- ✅ Easy to use: default for most containers
- ✅ Isolated: containers have private IPs
- ✅ Inter-container communication supported
- ✅ Internet access via NAT
🚫 But There Are Limitations
- ❌ No DNS resolution by default (use custom networks for that)
- ❌ Not ideal for inter-host communication
- ❌ Some port mapping gymnastics needed (
-p 8080:80)
🧠 Pro Tip
If you want named service discovery (e.g., call db:5432 instead of an IP), use a custom bridge network:
docker network create mynet
docker run -d --name db --network mynet postgres
docker run -d --network mynet myapp
In this case, myapp can talk to db using its container name. 🚀
💬 Final Thoughts
The bridge network is Docker’s quiet little miracle — simple, powerful, and hidden in plain sight.
That said, as your architecture grows, you'll want to explore:
- Custom bridge networks for service discovery
- Host networking for performance
- Overlay networks for multi-host setups (next post!)
Did this help make things clearer?
If so, follow me for more hands-on Docker and DevOps breakdowns!
Let’s de-mystify containers — one diagram at a time.
✍️ @zaheetdev