Package managers have been the norm throughout different fields of software engineering, from npm in JavaScript to pip in Python. They help simplify the installation, configuration, upgrade, and sharing of software and its dependencies, and Helm charts are no different.
When you deploy applications to Kubernetes, it often means managing dozens of YAML files for deployments, services, ingress rules, and configuration. And as your app grows, so does the complexity, making it harder to maintain consistency, update values, or replicate environments. This manual process can quickly become error-prone and time-consuming.
Helm addresses this challenge by packaging all those Kubernetes resources into a single, versioned chart. With Helm:
- All the Kubernetes objects for your app live in a single chart.
- You use
values.yamlto customize configs per environment without editing the templates. - You can install or upgrade your entire app stack with a single command:
helm install myapp ./myapp-chart- You can publish your chart to a shared repository and let others reuse it with different configs.
In short, Helm charts bring the familiar benefits of package management, templating, and lifecycle automation to Kubernetes. They help teams standardize deployments, eliminate unnecessary duplication, and move faster — all while preserving the power and flexibility of Kubernetes itself. This article walks you through what Helm charts are, how they work, and how you can start using and creating them with confidence.
Prerequisites
To get the most out of this article, make sure you have the following in place:
- A GitHub account. If you don’t have one, create a GitHub account here.
- An Artifact Hub account. You can sign up for a free Artifact Hub account here.
- A basic understanding of Git.
- A basic understanding of Kubernetes.
- A running Kubernetes cluster. You can use tools like Minikube, Kind, or any cloud provider such as AWS EKS, Google GKE, or Azure AKS.
- Helm installed. To verify that Helm is installed, run the following command in your terminal:
helm versionYou should see version information printed in your terminal if Helm is installed correctly:

Refer to the official documentation to install Helm if it is not already installed.
Core Helm concepts
Before diving into building and using Helm charts, it's important to understand some core concepts: Charts, Releases, Config, and Repositories. These are the building blocks that make Helm powerful and flexible for managing Kubernetes applications.
- Chart: A Helm chart is a package that contains all the necessary files to describe a Kubernetes application, including templates for deployments, services, and other resources. Think of it as a blueprint for your app that can be reused, versioned, and shared.
- Release: A release is an instance of a chart that has been deployed to a Kubernetes cluster. You can deploy the same chart multiple times with different configurations, and Helm will manage each as a separate release with its own lifecycle.
-
Config: Configurations in Helm are defined using a
values.yamlfile. This file lets you override default settings in the chart templates — such as replica counts, image tags, or environment-specific variables — without changing the chart structure itself. - Repository: A Helm repository is a place where charts are stored and made available for installation. Similar to npm or PyPI, you can publish your own charts or pull charts from public sources like ArtifactHub to quickly deploy popular open-source tools.
Helm chart anatomy
Understanding the structure of a Helm chart is essential for both using and creating charts effectively. Helm follows a standardized directory layout that organizes your Kubernetes manifests, configuration defaults, metadata, and dependencies.
Let’s explore each component of a typical Helm chart.
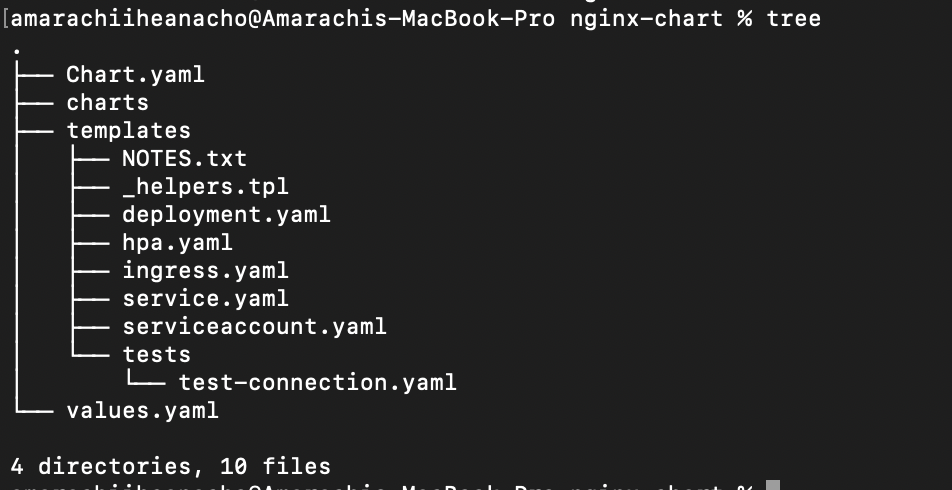
Directory structure
Here’s what a typical Helm chart folder looks like:
myapp-chart/
├── Chart.yaml
├── values.yaml
├── templates/
├── charts/
└── README.md (optional)Chart.yaml: This file contains metadata about the chart, including its name, version, description, and maintainers. Helm uses this information to identify and manage the chart.
name: myapp
version: 0.1.0
description: A Helm chart for deploying MyAppvalues.yaml: This file defines the default configuration values used by the templates in the chart. These values control various aspects of your Kubernetes resources, for example:
- Which Docker image to use
- The number of replicas
- Exposed ports
- Environment variables
- Type of Kubernetes service (ClusterIP, LoadBalancer, etc.)
You can override these values at install time using the --values flag or --set on the command line, making the chart highly customizable and reusable across different environments.
Example:
replicaCount: 2
image:
  repository: myapp
tag: latesttemplates/: This directory contains Go template files that define the Kubernetes resources Helm will generate and deploy. Common files include:
deployment.yamlservice.yamlingress.yamlconfigmap.yamlhpa.yaml
These files resemble standard Kubernetes manifests but use template syntax ({{ ... }}) to inject dynamic values from values.yaml.
When you run:
helm install my-app ./my-chartHelm reads values.yaml, plugs the values into the templates, and generates valid Kubernetes YAML.
To understand what a Helm template looks like, check out this demo deployment template.
In the deployment template, here are some of the most common things you will see:
-
include "template.name" .: Calls a reusable helper template (defined in_helpers.tpl), passing in the current context (.). -
.Values: References values fromvalues.yaml, or overrides via--set. Example:.Values.image.repository. -
.Chart: Accesses the chart metadata. Example:.Chart.Name,.Chart.AppVersion. -
.Template: Information about the current template file. -
with: Changes the context (.) inside the block to the given value. -
if / else / end: Conditional logic. Example: {{ if .Values.autoscaling.enabled }} -
toYaml: Converts an object to YAML format. -
nindent: Indents lines to preserve YAML structure.
Other templates you would see in the templates/ folders are:
-
service.yaml– Defines how your app is exposed within or outside the cluster. -
ingress.yaml– Configures domain-based access via Kubernetes Ingress. -
_helpers.tpl– Stores reusable template snippets for labels, names, etc. -
serviceaccount.yaml– Creates a ServiceAccount for access to the Kubernetes API. -
hpa.yaml– Configures horizontal pod autoscaling. -
configmap.yaml– Injects non-sensitive configuration into your pods. -
secret.yaml– Injects sensitive data like credentials or API keys. -
tests/– Contains Helm test hooks to validate that the chart works after installation. -
NOTES.txt– Provides post-installation instructions or tips displayed in the CLI.
Each of these templates can dynamically adjust based on values in the values.yaml file.
charts/: This optional directory is where you can include other Helm charts as dependencies (subcharts). For example, if your app relies on a PostgreSQL database, you can include the PostgreSQL chart here.
README.md (optional): Although not required, it’s a good practice to include a README.md file to document what the chart does, how to install it, configuration options, and usage examples. This is especially helpful when sharing your chart with others.
Installing and using a Helm chart
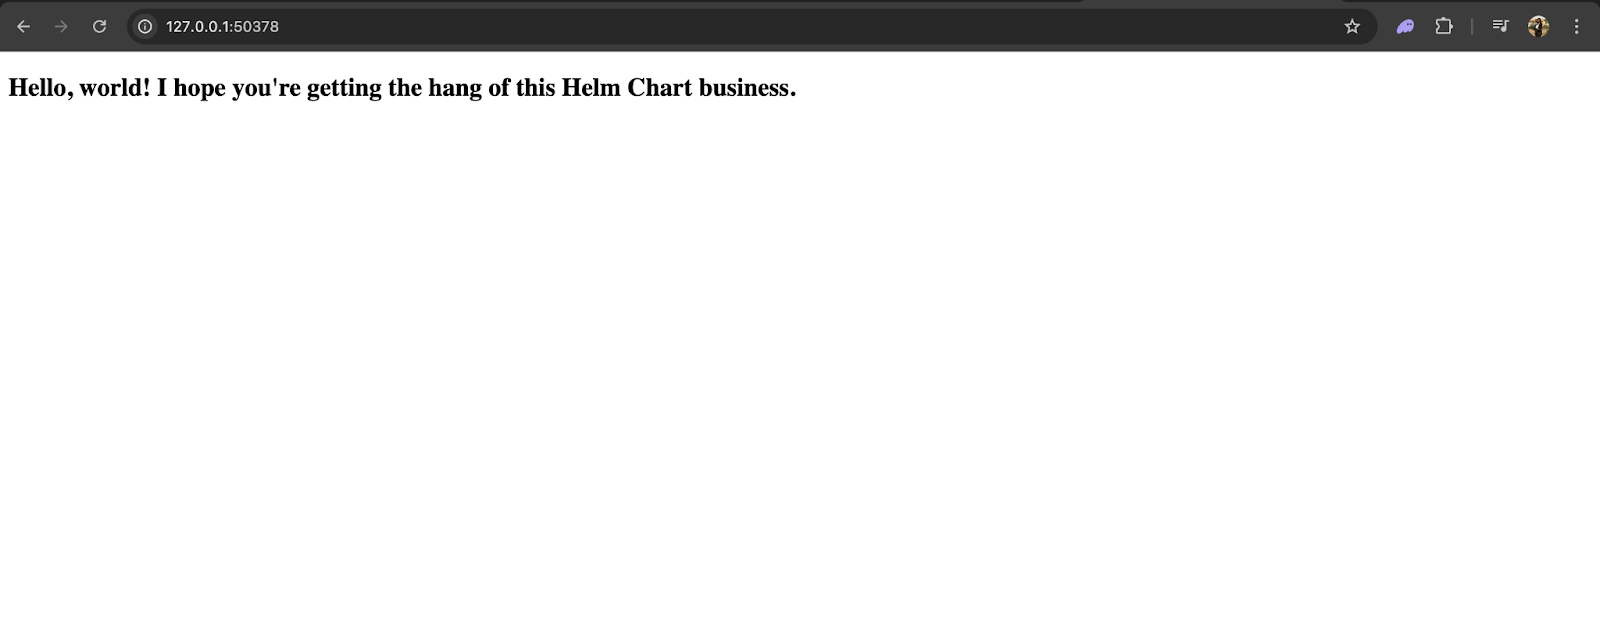
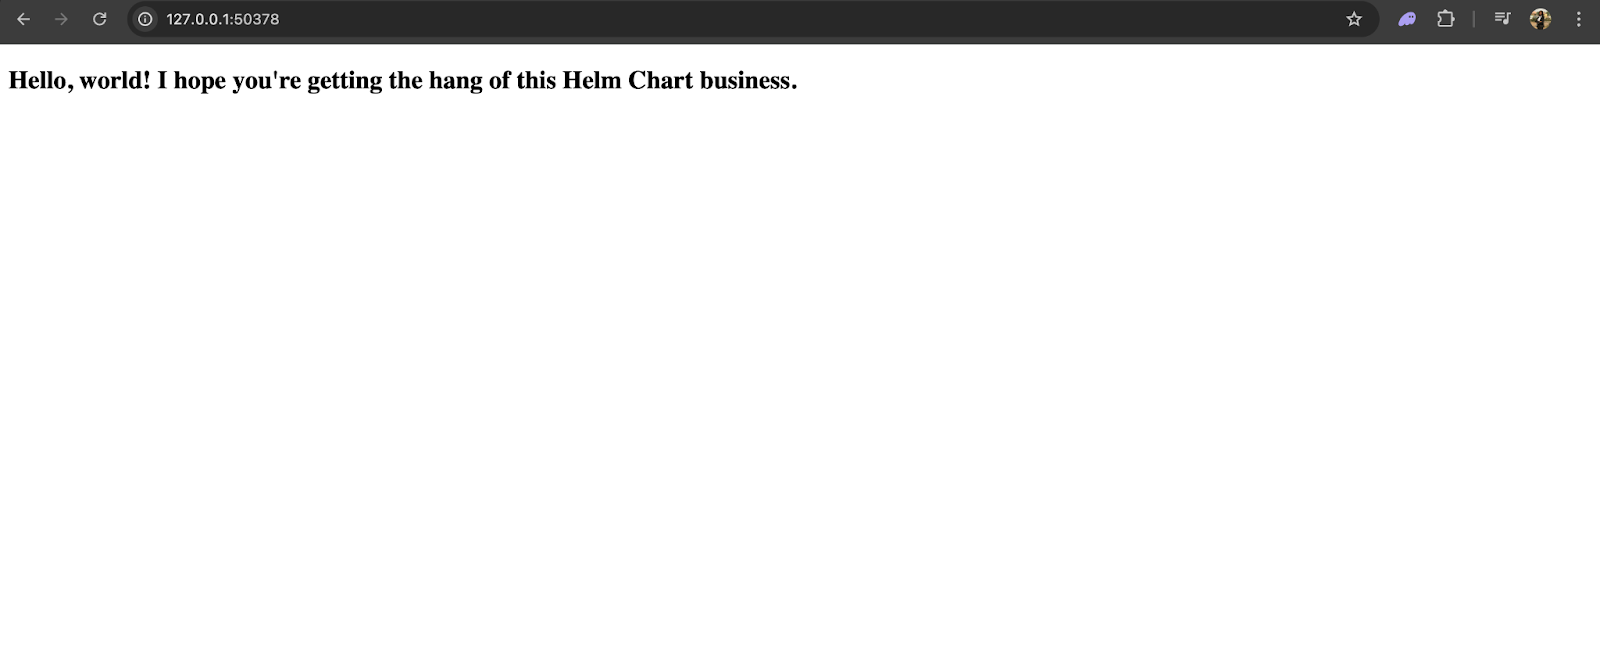
To better understand Helm charts and their significance, let's walk through creating one by templatizing a simple HTML web server built with Nginx. This server simply serves a static webpage that says:
“Hello, world! I hope you're getting the hang of this Helm chart business.”
Step 1: Create a Helm chart
Start by generating the chart structure with the following command:
helm create nginx-chart
cd nginx-chart
This command creates a folder named nginx-chart containing the standard Helm chart directory structure.

Step 2: Update the values.yaml File
In the root directory of your nginx-chart project, locate the values.yaml file. Open it and update the following values with the content below:
image:
  repository: amaraiheanacho/nginx-site
  pullPolicy: IfNotPresent
  tag: "latest"
service:
  type: NodePort
  port: 80
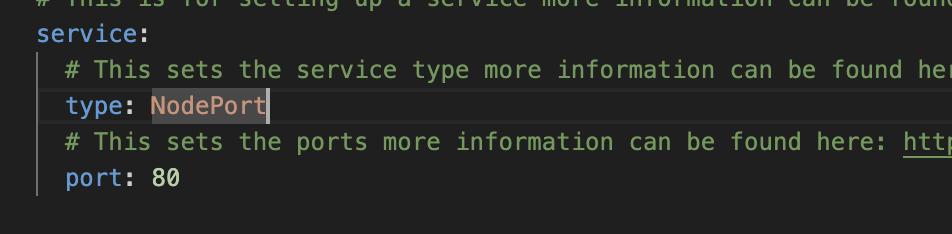
These values define the image source and how the service will be exposed.
Step 3: Confirm the template references
Go into the templates/ folder and review the deployment.yaml and service.yaml templates to ensure they correctly reference the values defined in values.yaml.
In the deployment.yaml template, you should see something like:
image: "{{ .Values.image.repository }}:{{ .Values.image.tag | default .Chart.AppVersion }}"
imagePullPolicy: {{ .Values.image.pullPolicy }}
ports:
  - name: http
    containerPort: {{ .Values.service.port }}
    protocol: TCP
Explanation:
-
image: References the image repository and tag fromvalues.yaml— in this case,amaraiheanacho/nginx-site:latest. -
imagePullPolicy: Uses the value ofimage.pullPolicyfromvalues.yaml, typically set toIfNotPresent. -
containerPort: Retrieves the port number (e.g.,80) fromservice.portinvalues.yaml.
While in the deployment.yaml file, you should see something like:
spec:
type: {{ .Values.service.type }}Explanation:
-
type: Uses theservice.typevalue fromvalues.yaml, which isNodePort. This makes your Nginx server accessible externally.
With these steps complete, you now have a working Helm chart for your Nginx web server.
Deploying the Helm chart
Once you have configured the values for your chart, you can deploy it to your Kubernetes cluster using the following command, replacing the :
helm install my-nginx-releaseThis command installs the chart as a release named my-nginx-release (you can use any name you prefer), using the configuration from the nginx-chart directory.

Viewing your application
If you're using Minikube, you can access the application directly with the following command:
minikube service -For example, if your release is named my-nginx-release and your chart is named nginx-chart, the command would be:
minikube service my-nginx-release-nginx-chart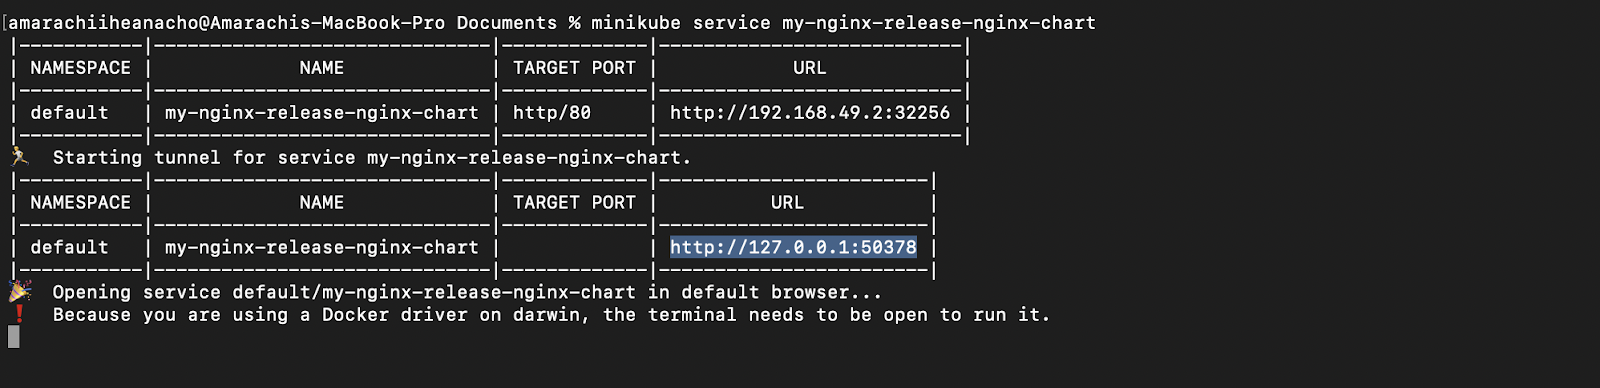
This command opens the app in your default browser using Minikube’s service tunneling.
If you’re using any other Kubernetes cluster, use the following commands to retrieve the external URL of your app:
export NODE_PORT=$(kubectl get --namespace default -o jsonpath="{.spec.ports[0].nodePort}" services nginx-site)
export NODE_IP=$(kubectl get nodes --namespace default -o jsonpath="{.items[0].status.addresses[0].address}")
echo http://$NODE_IP:$NODE_PORT
This will output the full URL to access your deployed application.
Upgrading and rolling back releases
Once deployed, you can update your Helm chart and roll out changes in your release with:
helm upgrade my-nginx-release ./nginx-chartThis command applies any new changes in the chart (like updated images or values) to the existing release.
If something breaks during an upgrade, you can roll back to a previous version:
helm rollback my-nginx-release [REVISION]To view available revisions, run:
helm history my-nginx-releaseThis will list the release history, including version numbers you can roll back to.
Upload your Helm chart to a repository
A Helm chart repository is a location where developers publish Helm charts, allowing others to easily install and deploy applications without needing to write code from scratch. One such popular registry is Artifact Hub, which you'll use in this tutorial.
To publish your Helm chart to Artifact Hub, follow these steps:
Step 1: Ensure that you are currently in your project’s directory
If you're not already in your Helm chart project directory (the one that contains the Chart.yaml file), change to it using:
cdStep 2: Push your project to a GitHub repository
First, push your project to a public GitHub repository. Artifact Hub doesn't store charts directly—it indexes them from externally hosted, Helm-compatible repositories. GitHub Pages is a popular and simple option for this.
Check out the Pushing your first project to GitHub guide if you are new to GitHub.
Step 3: Package your Helm chart
Next, you need to package your Helm chart so it can be distributed and recognized by Helm.
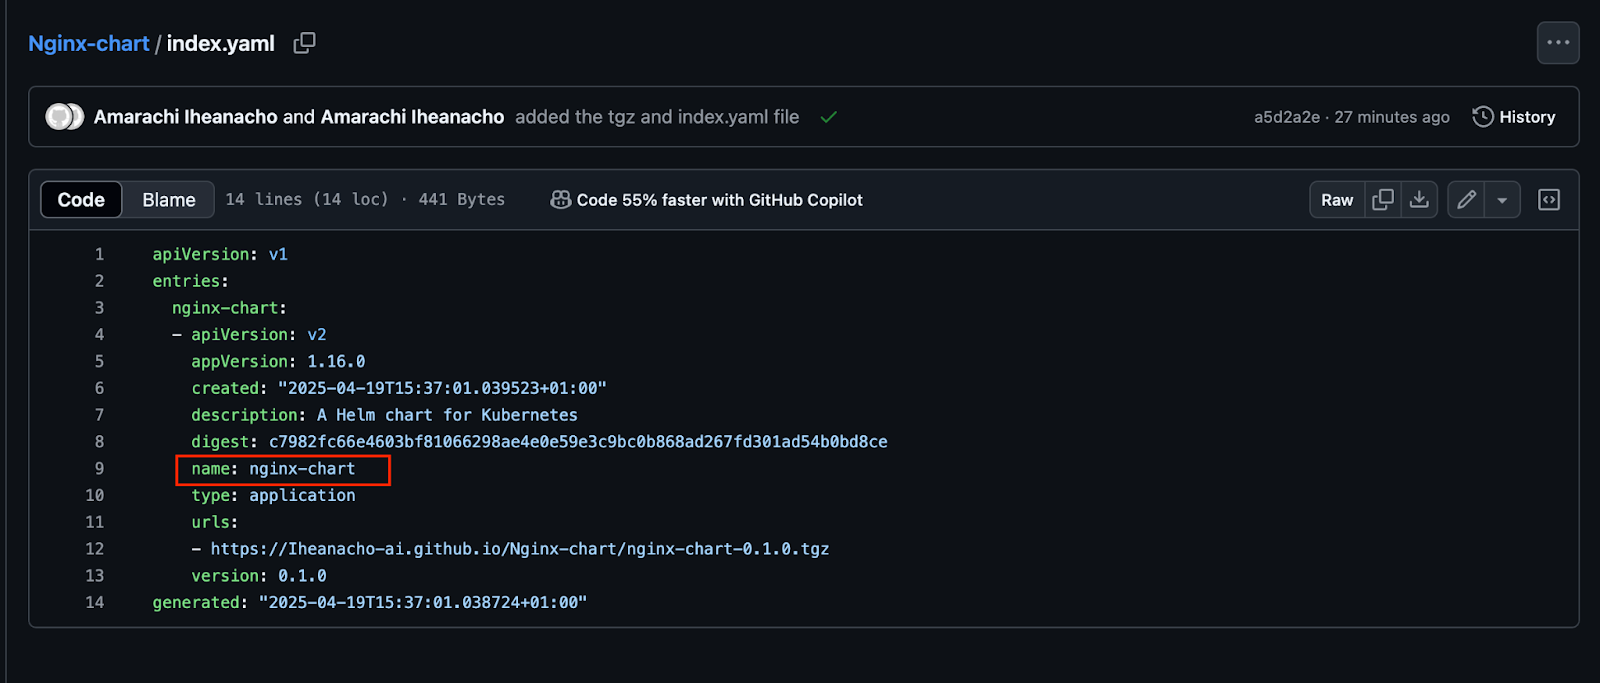
1.From your chart's root directory, run the following command to generate a .tgz file (e.g., nginx-chart-0.1.0.tgz).
helm package .2.Then, create an index.yaml file that references your packaged chart:
helm repo index . --url https://.github.io/Replace:
-
-
3.You should now have two files in your project directory: the .tgz file and the index.yaml. Commit and push both files to your GitHub repository using the following command:
git add .
git commit -m "Add packaged chart and index.yaml"
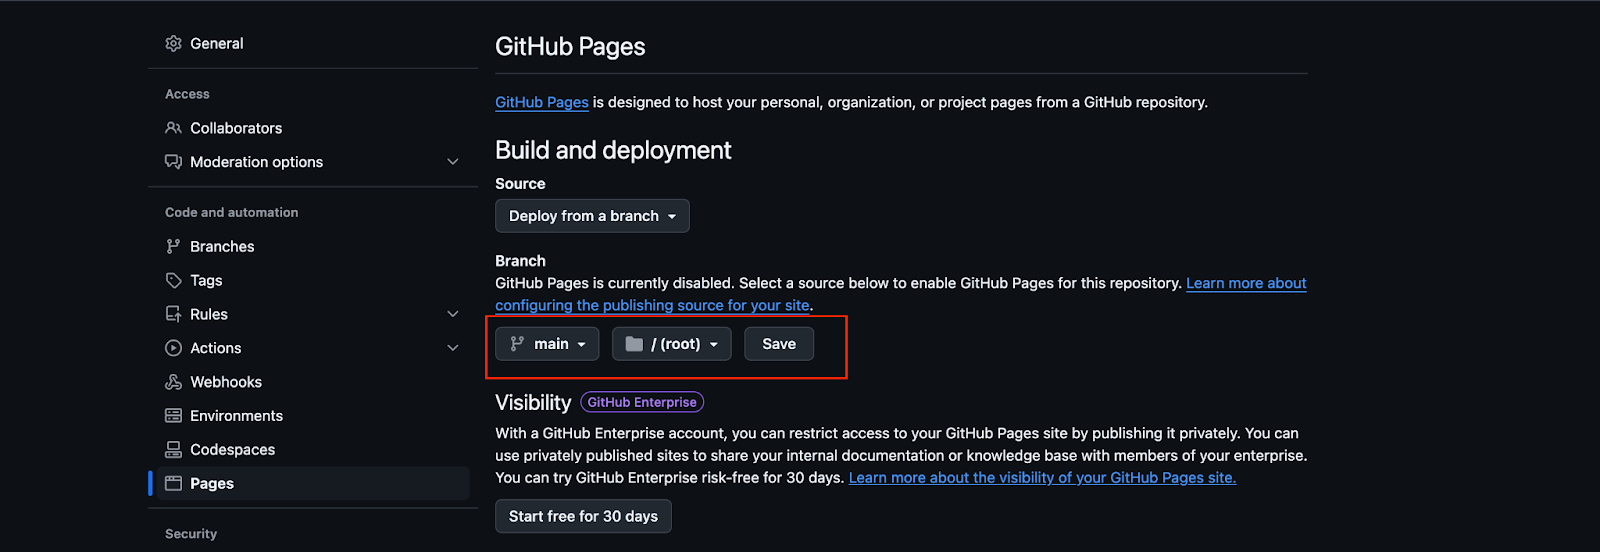
git pushStep 4: Configure GitHub Pages
To serve your Helm chart, you need to enable GitHub Pages:
- Go to your GitHub repository.
Click the Settings tab.

Select Pages from the left sidebar.
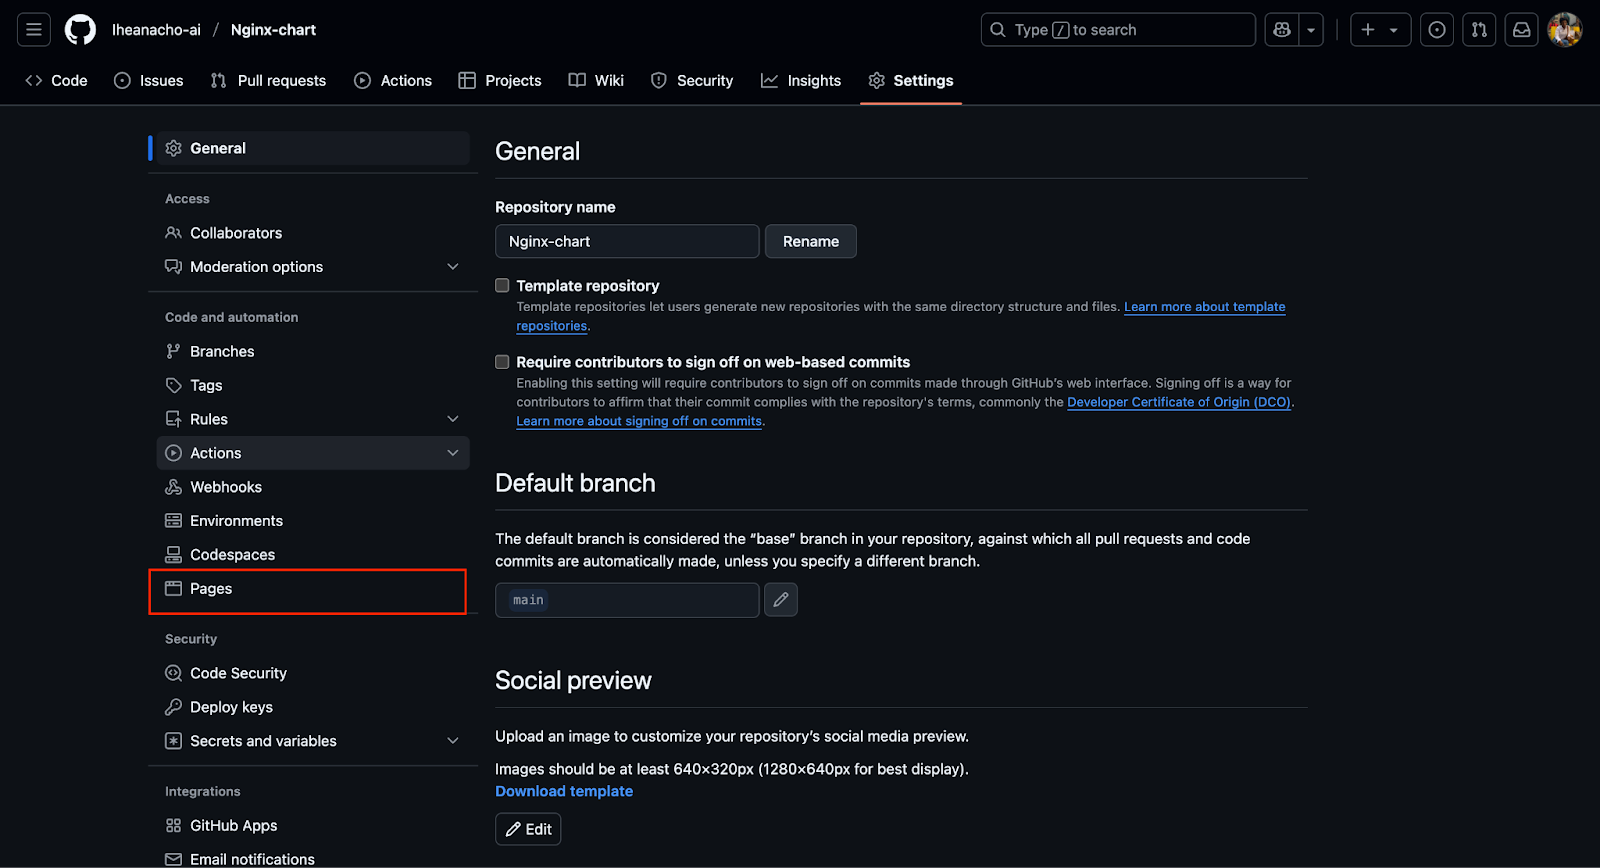
-
In the Build and deployment section, under Branch, choose the branch and folder where your chart files are located. For this guide, use:
-
Branch:
main -
Folder:
/ (root)
-
Branch:
Click the Save button.
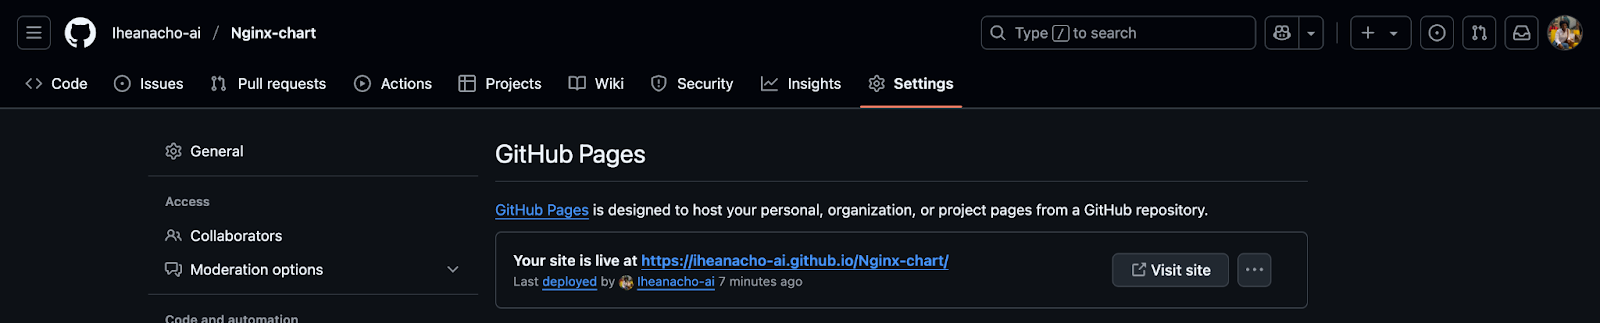
GitHub will now serve your Helm chart at:
https://.
Note: If you don't see the 'Your site is live' message right away, wait a few moments and refresh the page. The message should appear shortly.
Step 5: Register your repository on Artifact Hub
Now you’re ready to publish your chart on Artifact Hub:
- Sign in to Artifact Hub.
Click your profile icon and select Control Panel.
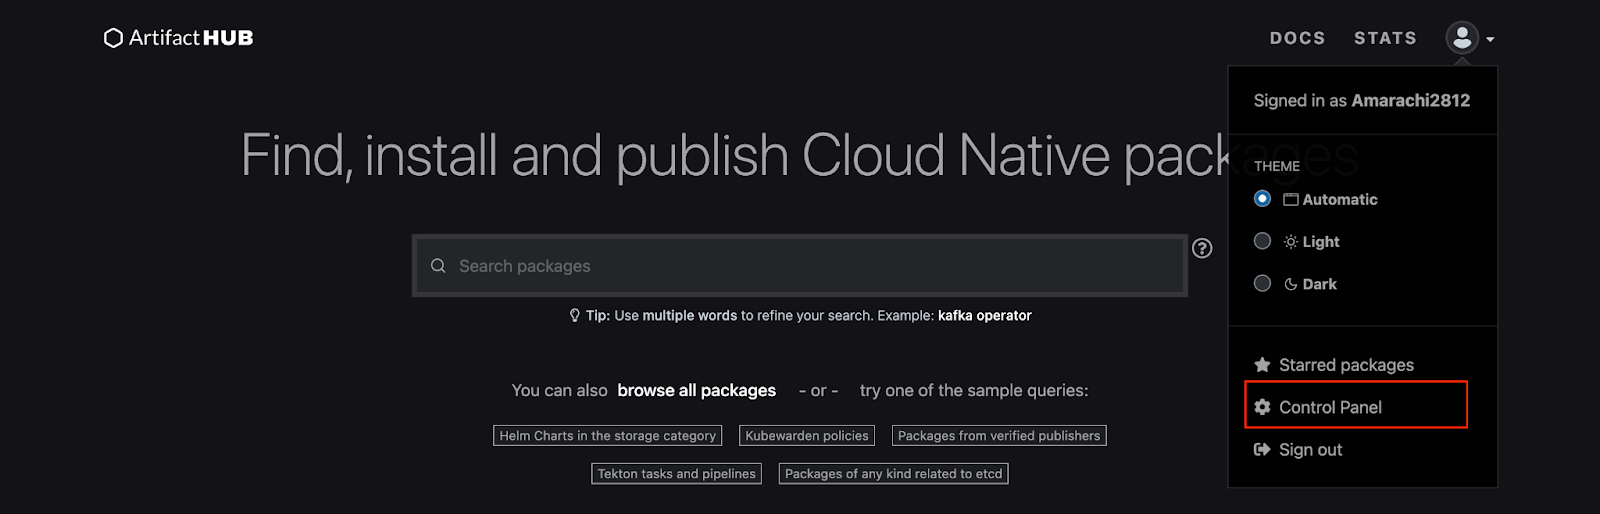
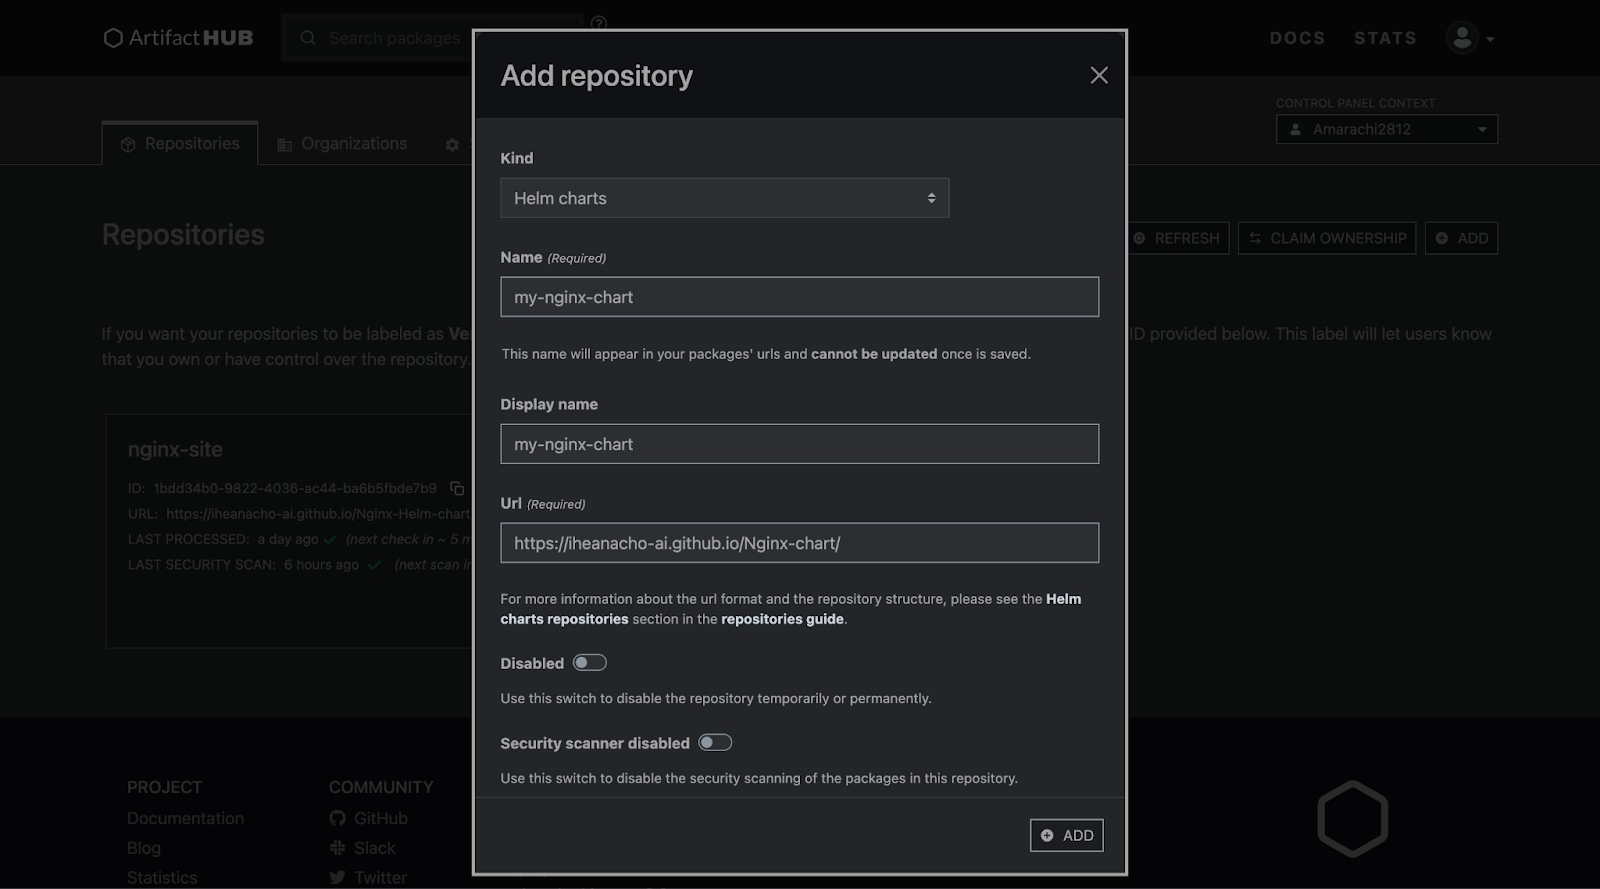
Go to the Repositories tab and click + Add.
-
Fill in the details:
- Repository name: e.g., nginx-site
- Display name: e.g., nginx-site
- URL: Your GitHub Pages URL from Step 3
Click + Add to create your repository.
Once added, Artifact Hub will index your chart. Congratulations! You've successfully published your Helm chart to Artifact Hub.
Verify that your Helm chart was uploaded successfully
Now that your Helm chart has been uploaded, it's time to install and use it to start the Nginx server — all without writing a single line of code.
Step 1: Clean up any existing Nginx release
Before proceeding, make sure there are no existing Helm Nginx releases running. This will help you avoid confusing the release created from the Artifact Hub chart with the one created from your local chart. You can check for existing releases using:
helm list
If you see an Nginx release, delete it by copying the release name and running:
helm uninstallReplace

Step 2: Install your Helm chart
The process of installing a Helm chart is generally consistent across charts. Here's how to do it:
1.Add your Helm chart repository to your local list of Helm repositories:
helm repo addReplace

2.Update your Helm repositories to ensure you have the latest version:
helm repo update3.Install your Helm chart by running the command below. Replace the placeholders with your actual values:
helm install /-
-
-
For example, if your release name is nginx-chart-release, the repository name is nginx-chart, and the chart name is also nginx-chart,the command would be:
helm install nginx-chart-release nginx-chart/nginx-chart
Step 3: Confirm the Deployment
To verify that your Nginx server is running, check the pods again:
kubectl get podsYou should see your Nginx pod listed and running.
Step 4: Access Your Nginx Web Server
- If you're using Minikube, run the following to get the external URL:
minikube serviceFor instance:
minikube service nginx-chart-release- If you're using another Kubernetes setup, run the following commands to get the Node IP and Node Port, then open the URL in your browser:
export NODE_PORT=$(kubectl get --namespace default -o jsonpath="{.spec.ports[0].nodePort}" services nginx-chart-release)
  export NODE_IP=$(kubectl get nodes --namespace default -o jsonpath="{.items[0].status.addresses[0].address}")
  echo http://$NODE_IP:$NODE_PORT
And that’s it! You've successfully created a Helm chart, pushed it to your repository, and deployed it to your Kubernetes cluster using Helm.
Wrapping up
Helm charts are a game-changer for managing Kubernetes applications at scale. By turning complex, multi-file Kubernetes manifests into reusable, versioned packages, Helm simplifies application deployment, configuration, and maintenance. Whether you're working solo on side projects or collaborating with a team on production-grade systems, Helm lets you ship faster with fewer errors and greater consistency.
As you've seen throughout this article, understanding the building blocks of Helm charts, from the basic concepts to the anatomy of a Chart, gives you the tools to build and manage your own charts with confidence.
Start small by templating a basic service, tweaking some values, and installing it. Then gradually expand your charts to support real-world configurations, secrets, and dependencies. Like any good tool, the more you use Helm, the more indispensable it becomes.