Disclaimer: I’m the creator of Ember Link, which is used in this project for real-time collaboration. This post demonstrates one way Ember Link can be used in practice, but the project is still evolving — feedback and contributions are always welcome!
Most folks have used Notion at some point — it’s clean, intuitive, and collaborative by design.
In this post, we’re going to build a simplified version of Notion using Next.js, ShadCN, and Ember Link for real-time collaboration. No database (for now), just a few powerful libraries.
Features covered in this article:
- Spinning up a Next.js project
- Building a clean, responsive layout with ShadCN components
- Integrating BlockNote as a rich-text editor
- Adding Ember Link and Yjs for real-time collaboration
By the end, you’ll have a working Notion-style app where multiple users can edit documents at the same time.
🛠 Initial Setup
Start by creating a new Next.js app:
npx create-next-app@latestThen, install ShadCN for a great component system built on top of Tailwind CSS:
npx shadcn@latest initTo structure the layout, we will use the sidebar component from ShadCN. It provides a polished navigation layout with minimal effort:
npx shadcn@latest add sidebarAfter we have all of that setup we can delete the placeholder content in app/layout.tsx and app/page.tsx
🧭 Main Layout and Sidebar
Our application is going to mimic Notion's two-column approach with a persistent sidebar and a dynamic content area on the right.
To begin, create a simple sidebar component:
// src/components/app-sidebar.tsx
'use client';

import * as React from 'react';
import {
  Sidebar,
  SidebarContent,
  SidebarGroup,
  SidebarGroupAction,
  SidebarGroupContent,
  SidebarGroupLabel,
  SidebarHeader,
  SidebarMenu,
  SidebarMenuButton,
  SidebarMenuItem,
  SidebarRail
} from '@/components/ui/sidebar';
import { Plus } from 'lucide-react';
import Link from 'next/link';

const data = {
  navMain: [
    {
      title: "'Documents',"
    }
  ]
};

export function AppSidebar({ ...props }: React.ComponentProps<typeof Sidebar>) {
  return (
    <Sidebar {...props}>
      <SidebarHeader>
        <Link href="/">Notion CloneLink>
      SidebarHeader>
      <SidebarContent>
        {/* We create a SidebarGroup for each parent. */}
        {data.navMain.map((item) => (
          <SidebarGroup key={item.title}>
            <SidebarGroupLabel>{item.title}SidebarGroupLabel>
            <SidebarGroupAction title="Create Document">
              <Plus /> <span className="sr-only">Create Doucmentspan>
            SidebarGroupAction>
            {/* Our list of documents goes here */}
          SidebarGroup>
        ))}
      SidebarContent>
      <SidebarRail />
    Sidebar>
  );
}
This sets up a functional sidebar that can later be extended with links to documents.
Now wire the sidebar into the root layout.tsx file:
// src/app/layout.tsx

import type { Metadata } from 'next';
import './globals.css';
import { SidebarInset, SidebarProvider } from '@/components/ui/sidebar';
import { AppSidebar } from '@/components/app-sidebar';

export const metadata: Metadata = {
  title: "\"Notion Clone\","
  description: "Clone of Notion using NoteBlock and Ember Link"
};

export default function RootLayout({
  children
}: Readonly<{
  children: React.ReactNode;
}>) {
  return (
    <html lang="en">
      <body>
        <SidebarProvider>
          <AppSidebar />
          <SidebarInset>
            <main className="flex flex-col h-full">
              <div className="flex-grow h-full">{children}div>
            main>
          SidebarInset>
        SidebarProvider>
      body>
    html>
  );
}
With this, the UI now displays a sidebar alongside an empty content area.
✍️ Integrating with BlockNote
With the layout in place, the next step is to add a rich-text editor. BlockNoteis an open-source, block-based editor that works well.
Installation is straightforward all we need to do is install the required packages:
yarn install @blocknote/react @blocknote/shadcnThen create two components: one for the core editor, and one to load it client-side using Next.js’s dynamic():
// src/components/block-note.tsx
'use client';

import { useCreateBlockNote } from '@blocknote/react';
import { BlockNoteView } from '@blocknote/shadcn';
import '@blocknote/shadcn/style.css';

export function BlockNote() {
  const editor = useCreateBlockNote({
    domAttributes: {
      editor: {
        class: 'h-full'
      }
    }
  });

  return <BlockNoteView editor={editor} className="h-full lg:max-w-[80%] mx-auto p-6" theme="light" />;
}
And dynamically load it:
// src/components/dynamic-block-note.tsx
'use client';

import dynamic from 'next/dynamic';

export const BlockNote = dynamic(async () => (await import('./block-note')).BlockNote, { ssr: false });
And then finally we can add it to our route page.tsx
// src/app/page.tsx

'use client';

import { BlockNote } from '@/components/dynamic-block-note';

export default function Home() {
  return (
    <BlockNote />
  );
}
If you go back to your development server you should see a text editor and be able to type into it!

With that out of the way we are ready to start integrating Ember Link into the project for real-time syncing.
🔗 Real-Time Collaboration with Ember Link
To enable real-time collaboration we are going to be using Ember Link which provides an open-source SDK for real time collaboration.
To get started we need to install some more packages
yarn install @ember-link/react @ember-link/yjs-storage@ember-link/react is the react SDK for Ember Link which provides the needed context and hooks. @ember-link/yjs-provider allows us to use Ember Link as a YJS provider which will hook straight into BlockNote.
We also need an Ember Link server to connect to, you can either follow the docs here or connect to the sandbox server which will be the URL used below.
Once those are installed we can wrap the root layout.tsx with two providers.
The providers need to be in their own file since they need to be client components:
// src/app/layout-provider.tsx
'use client';

import { ChannelProvider, EmberLinkProvider } from '@ember-link/react';
import { useMemo } from 'react';

export function LayoutProvider({ children }: { children: React.ReactNode }) {

  return (
    <EmberLinkProvider baseUrl="https://ember-link-sandbox.onrender.com">
      <ChannelProvider
        channelName="notion-clone"
      >
        {children}
      ChannelProvider>
    EmberLinkProvider>
  );
}
Update the root layout.tsx to use the new provider:
// src/app/layout.tsx
import { LayoutProvider } from './layout-provider';

...

export default function RootLayout({
  children
}: Readonly<{
  children: React.ReactNode;
}>) {
  return (
    <html lang="en">
      <body className="antialiased">
        <LayoutProvider>
          {/* sidebar provider and everything else */}
        LayoutProvider>
      body>
    html>
  );
}
From there, all we have to do to get real-time capabilities working with BlockNote is to set a provider:
// src/components/block-note.tsx
...
import { EmberLinkYjsProvider } from '@ember-link/yjs-provider';
...
export function BlockNote({ provider }: { provider?: EmberLinkYjsProvider }) {
const editor = useCreateBlockNote({
...(provider && {
collaboration: {
provider,
fragment: provider.getYDoc().getXmlFragment('blocknote'),
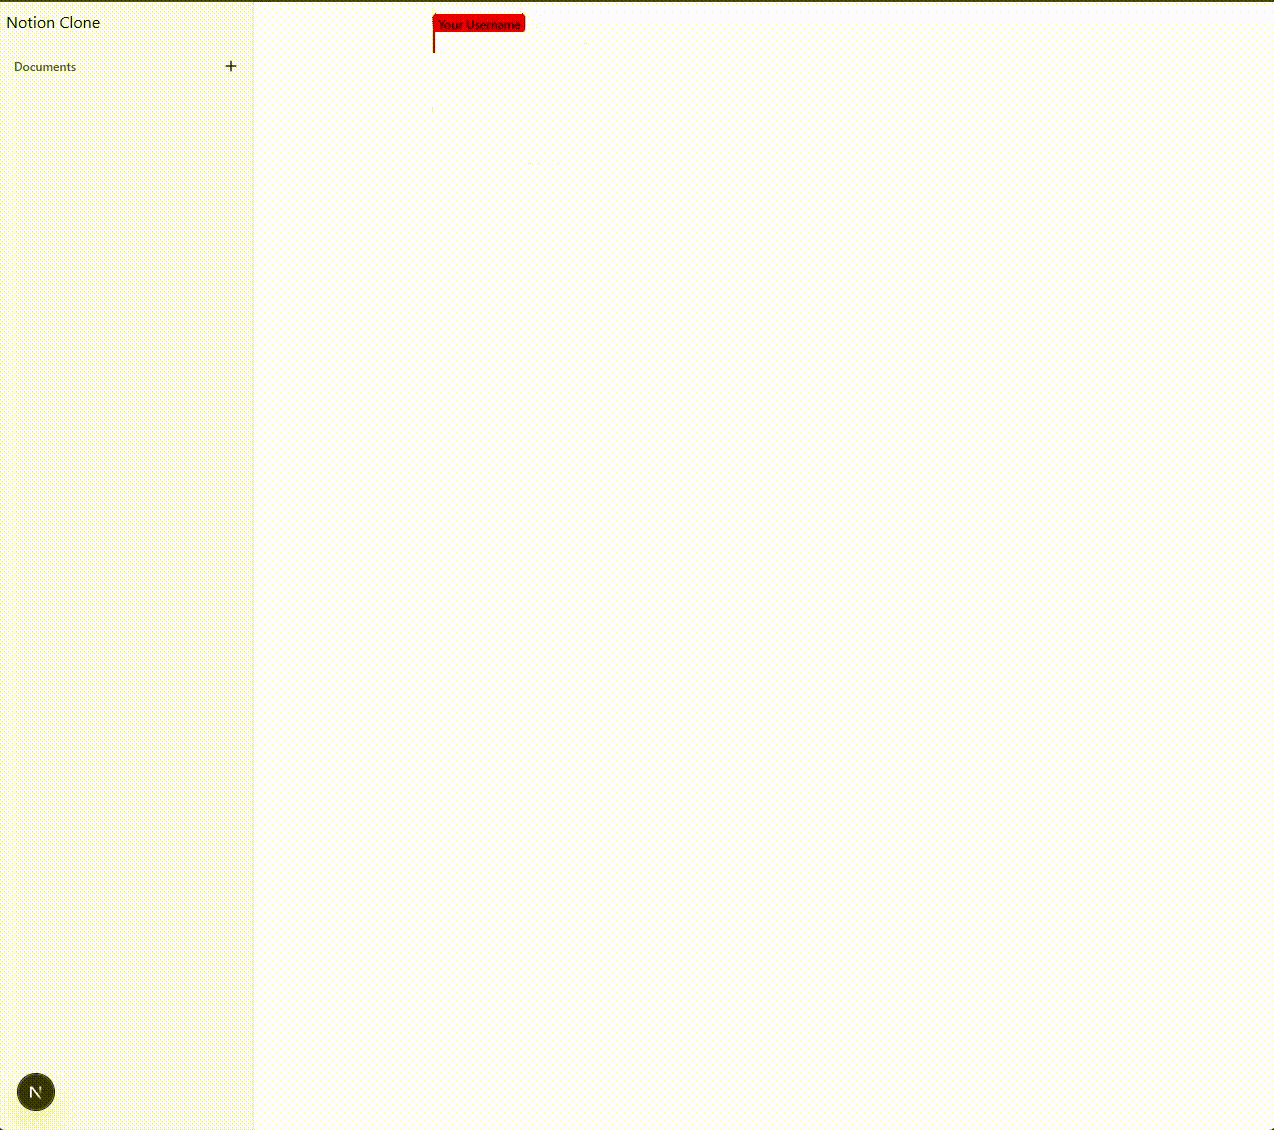
user: { name: 'Your Username', color: '#ff0000' }
}
}),
domAttributes: {
editor: {
class: 'h-full'
}
}
});
...
}And then actually pass in the provider in our root page.tsx
'use client';

import { BlockNote } from '@/components/dynamic-block-note';
import { useChannel } from '@ember-link/react';
import { getYjsProviderForChannel } from '@ember-link/yjs-provider';

export default function Document() {
  const channel = useChannel();
  const provider = getYjsProviderForChannel(channel);

  return <BlockNote provider={provider} />;
}
🔁 Live Editing in Action
Once everything is wired up, editing a document in one tab reflects instantly in another — no refreshes, no delay. With Ember Link it is easy to add collaboration to any app, with minimal code overhead.
Currently, all data is ephemeral. Once all users disconnect from a channel, the state is lost. This setup is ideal for testing or demos, but not for production.
🧪 What’s Next
This is just the beginning. Upcoming posts will cover:
Creating and switching between documents
Persisting data using a database
Listening to Ember Link webhooks to store snapshots
Optional auth and user-level document access
If you have any questions feel free to leave them in the comments and I will address them ASAP!
