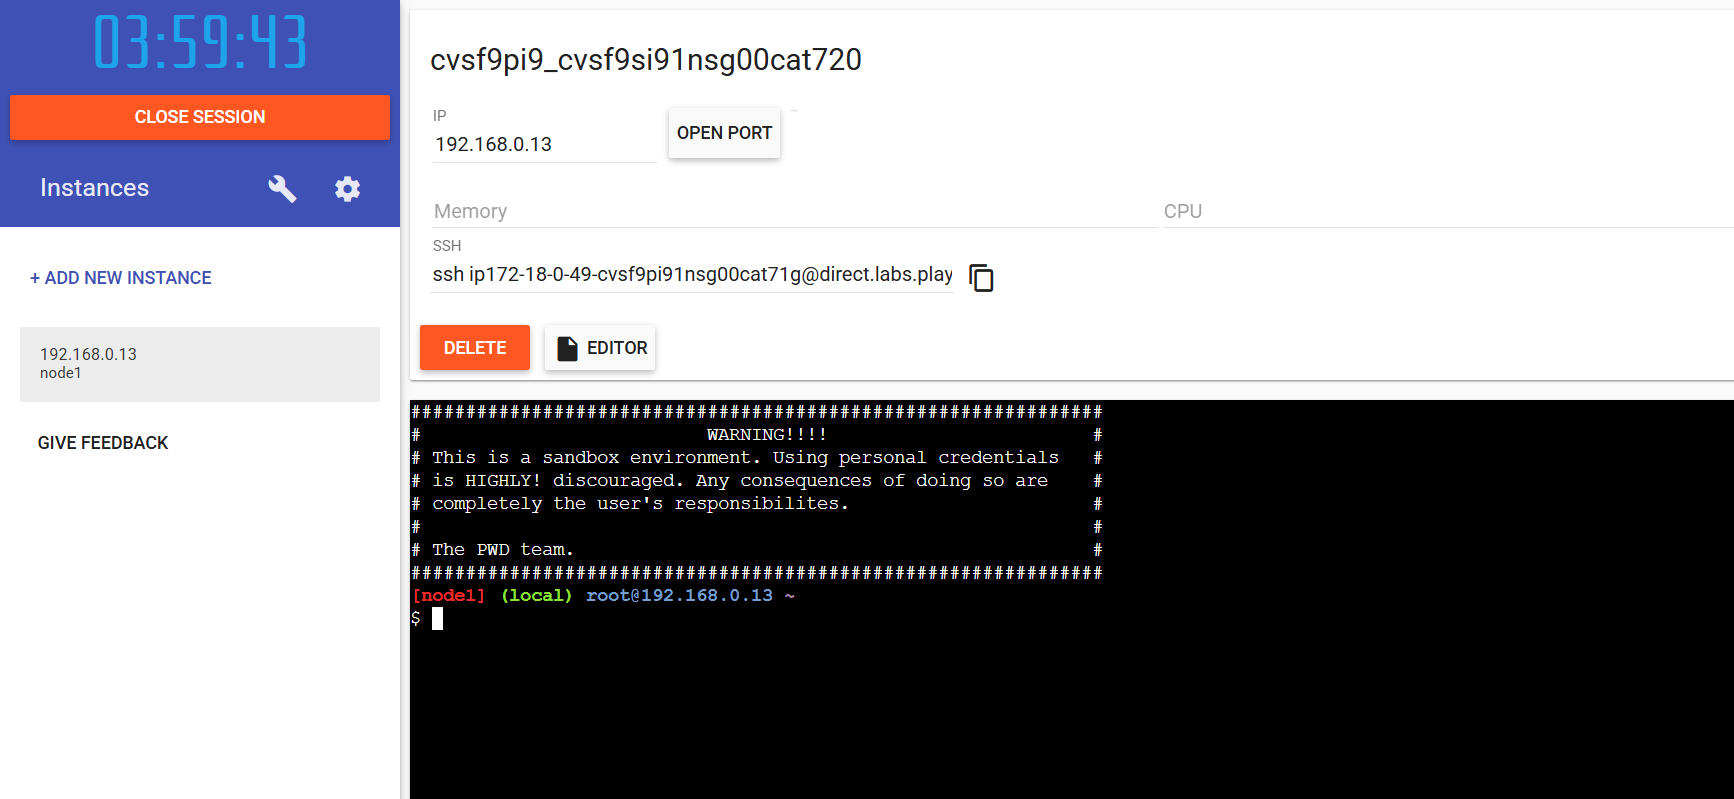
Before moving ahead, let's decide good website where we can work easily, I have chosen Play with docker website which will make our task easy.After successful login, you will directed to interface given below....
Now click on create instance and worker node get created.
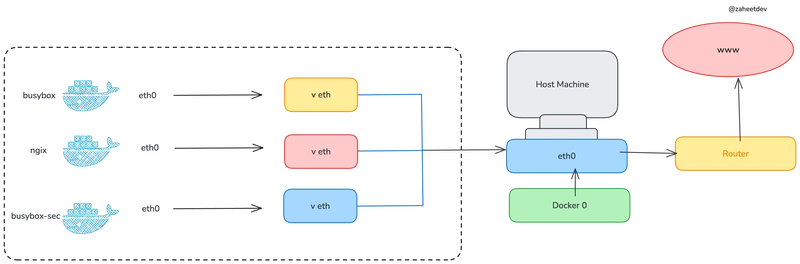
🚀 Set Up Docker Swarm using Play with Docker (PWD)
A beginner-friendly step-by-step guide to build and manage containerized services using Docker Swarm.
🌐 What is Play with Docker?
Play with Docker (PWD) is a free online playground provided by Docker. It allows you to run Docker commands in your browser — no local installation needed! Great for learning and experimenting.
🟢 Step 0: Start with Play with Docker
✅ Follow these steps:
- Go to 👉 https://labs.play-with-docker.com
- Log in with your Docker Hub account (create one if you don’t have it).
- Once logged in, click on “Start” to begin a new session.
- You’ll see a + Add New Instance button — click it to create a Docker node (this will be your Manager Node).
- Repeat this step to create 2 more manager nodes and 3 worker nodes (usually 5 nodes total is great for practice).
🧱 Step 1: Initialize the Swarm
On the first manager node, run:
docker swarm init✅ This sets up the Swarm and gives you two important commands (tokens) to add more:
- Manager nodes
- Worker nodes
➕ Step 2: Add More Manager Nodes
Still on the first manager node, run:
docker swarm join-token managerIt gives a command like this:
docker swarm join --token :2377👉 Copy and run this command on your other manager nodes (Node 2 and Node 3).
➕ Step 3: Add Worker Nodes
On the main manager node, run:
docker swarm join-token workerIt gives a similar command like:
docker swarm join --token :2377👉 Run this on all worker nodes you created.
🔍 Step 4: Check All Nodes Are Connected
Back on the main manager node, run:
docker node ls✅ You should see all manager and worker nodes listed as:
ID     HOSTNAME   STATUS  AVAILABILITY  MANAGER STATUS
abc123 node1      Ready   Active        Leader
xyz456 node2      Ready   Active        Reachable
...
📦 Step 5: Deploy Services in the Swarm
Now we’ll deploy some real services using docker service create:
🌐 A. Nginx Web Server (on port 8080)
docker service create \
--name nginx-service \
--publish 8080:80 \
--replicas 5 \
nginx
⚙️ B. Node.js App (on port 3000)
docker service create \
--name node-service \
--publish 3000:3000 \
--replicas 3 \
🔴 C. Redis (on port 6379)
docker service create \
--name redis-service \
--publish 6379:6379 \
--replicas 5 \
redis
🔄 Step 6: Manage and Scale Services
🔽 Scale Down Node.js to 2 instances:
docker service scale node-service=2🔍 List All Services
docker service ls🔎 Inspect Service Tasks
docker service ps nginx-service✅ Expected Results
- All services (nginx, node.js, redis) should be running
- Replicas should be distributed across multiple nodes
- Redis should respond with
PONGif checked - Scaling should work without restarting services
⚠️ Note: If Port 8080 asks for authentication, try a different port like 8000.
📌 Summary:
By using Play with Docker, you’ve:
- Created a Docker Swarm cluster online
- Added manager and worker nodes
- Deployed services like Nginx, Node.js, and Redis
- Practiced scaling, inspecting, and managing services
📦 Conclusion
By following the above steps, you've set up a highly available Docker Swarm environment with essential services like Nginx, Node.js, and Redis, enabling microservices to scale and failover effectively. This setup mirrors real-world production-ready configurations and is perfect for preparing for DevOps interviews or deploying cloud-native apps.