Docker has grown a lot in popularity in recent years due to the way it simplifies application packaging and deployment. In my view, understanding Docker and its core concepts is essential for software and DevOps engineers alike.
In this article we will cover:
1. What is Docker?
Docker is an open-source platform that allows you to automate your application lifecycle using container technologies. To put it simply, containers are just simple, lightweight, and isolated environments that run your applications.
Docker provides an abstraction layer on top of the host operating system, allowing applications to run consistently regardless of differences in the underlying infrastructure.
Why use Docker?
There are several reasons why Docker has become so adopted in all IT processes.
With Docker you can enable your developers to package their applications and all their dependencies into a single element (container) — ensuring consistency and reusability across different environments. This eliminates (or at least tries) the infamous “It works on my machine” problem, which let’s face it — it’s so annoying.
Docker provides a lightweight alternative to virtualization. The difference between containers and virtual machines is that containers share the host operating system kernel, resulting in reduced overhead and faster startup times compared virtual machines (VMs include a full guest operating system, meaning they come up with their own kernel, which runs on top of a hypervisor).
Docker allows for the easy scaling and deployment of applications across different environments, making it a great solution for cloud-native architectures.
Note: Interviewers will always ask you what’s the difference between containers and virtual machines, so make sure you understand and remember it.
Docker Key benefits
Here are some of the key benefits Docker offers:
Consistency and reusability — Ensures your application will run according to plan, independent of the environment it runs in
Portability — By keeping your Docker images as small as possible, you can easily share them accross different environments.
Efficiency — Being lightweight, Docker containers reduce the overhead when compared to virtual machines. It makes them faster to start and more efficient in terms of resource consumption.
Scalability — Scaling up or down application, is something that Docker can do easily. Combining it with Docker Compose, Docker Swarm or Kubernetes, takes scalability to the next level.
Isolation — Docker ensures that different applications that run on the same host don’t interfere with each other
Version control and rollbacks — By pairing your Docker images and Docker configurations with version control, you can easily have different versions of your Docker images, making rollbacks a piece of cake
Getting Started with Docker
Now that we have a fundamental understanding of Docker is, and what are the benefits of using Docker, let’s get started with the installation and setup.
Installing Docker
Installing Docker is simple, as Docker provides installation packages for different operating systems, including macOS, Linux distributions and Windows. Simply download the appropriate package for your system and follow the installation instructions provided by Docker.
For the majority of the operating systems, the easiest thing to do is installDocker Desktop.
Docker Architecture Overview
To effectively work with Docker, you need to first understand the Docker architecture. At a high level, Docker consists of three main components:
Docker daemon (dockerd)— The Docker daemon is responsible for building, running, and monitoring containers.
Docker client — The Docker client is a command-line tool that allows you to interact with the Docker daemon. It sends commands to the daemon and receives information from it.
Docker registry — The Docker registry is a centralized repository for Docker images. It allows you to pull images from the registry and push your own images.
Docker’s Core Components
In addition to the other architecture components, Docker also relies on others as well:
Image — read-only template that contains everything needed to run an application (code, runtime, libraries, and system tools). You can leverage images created by others, or you have the ability to create your own.
Container — instance of an image that you can run, start, stop, and delete. They are isolated from each other and the host system, ensuring that applications run in a consistent environment. You can easily create multiple containers from the same image.
Registry — centralized place for storing and distributing Docker images. These images can be easily pulled on the host system, and based on them, you can create Docker containers. Docker Hub is the default public registry, but you can also set up private registries or use other public registries as well. Don’t worry, we will cover this in detail in another post.
Docker CLI — primary way to interact with Docker. It provides a set of commands that allow you to manage containers, images, networks, and volumes. With the Docker CLI, you can create, start, stop, and remove containers. You can also build, tag, and push images, as well as manage networks and volumes. We will explore some of the most useful commands below.
Dockerfile — file that contains a set of instructions for building a Docker image. It specifies the base image, different configurations that you want to be made, and commands to be executed when the image is built. The Dockerfile allows you to automate the process of creating Docker images, making it easy to reproduce and share accross different environments.
Docker Compose — tool for defining and running multi-container Docker applications. It allows you to define a group of containers as a single service and configure their dependencies and network connections. With Docker Compose, you can easily define complex application architectures and manage their deployment and scaling.
Docker Swarm — native clustering and orchestration solution provided by Docker. It allows you to create and manage a swarm of Docker nodes, enabling high availability and scalability for your applications. With Docker Swarm, you can deploy and scale your applications across multiple Docker hosts, ensuring that they are always available and can handle increased workloads.
These core components work together to provide a powerful and flexible platform for building, deploying, and managing containerized applications with Docker.
Docker Commands
Now that we have covered the basics of Docker, let’s explore a list of Docker commands that will help you work with Docker more effectively.
Basic Docker Commands
Here are some of the basic Docker commands you’ll frequently use:
docker run: Run a command in a new containerdocker build: Builds a Docker imagedocker tag: Tags an imagedocker start: Start one or more stopped containersdocker stop: Stop one or more running containersdocker rm: Remove one or more containersdocker ps: Gets details of all running Docker containersdocker ps -a: Gets details of all your Docker containersdocker cp: Copies entire files or folders between your local filesystem to your containersdocker logs: Gives you in-depth details into your containers
Docker Compose and Swarm commands
We will dive deep into Docker Compose and Swarm in the next part of this article. In the meantime, here are some commonly used Docker Compose and Swarm commands, just as a little teaser of what we will do:
docker-compose up: Create and start containersdocker-compose down: Stop and remove containers, networks, and volumesdocker-compose build: Build or rebuild servicesdocker swarm init: Initialize a swarmdocker swarm join: Join a swarm as a worker or managerdocker service create: Create a new servicedocker node ls: List nodes in a swarm
This part was originally posted on Medium.
2. Docker images and Docker containers
What is a Docker image?
A Docker image is a template that will be used by your containers, in which you install all the packages required to run your applications.
Let’s get back to Docker images. Acting as blueprints for your Docker containers, a Docker image is composed of multiple read-only layers, stacked on top of each other. We will build a Docker image later on, I will show you the layers, so don’t worry.
Each of these layers is an instruction in your Dockerfile, and these layers may contain different information: you could have a layer that specifies the base image from which you are building your image, or you may have another layer that installs some dependencies that are required for your application, or a layer that simply copies some files from your local filesystem to your Docker image.
Regardless of the underlying infrastructure (having Docker installed on different operating systems), you can be 100% sure, that your image will run on it if Docker is installed (small caveat, your image architecture must match the host system’s architecture).
Building these images in layers means that Docker can reuse the layers to speed up the building process for the current image you are using and even reuse these layers across different images that you may be building. That’s why, to speed things up, you should avoid making changes to superior layers, as caching will be broken.
By default, caching is enabled, but this doesn’t mean that you cannot build an image without reusing the cached information. In some cases, you may want to do that, and there is an argument that comes in handy that lets you do so, and that is the --no-cache arg.
What is a Docker container?
A Docker container is an element created from a Docker image that fits the purpose you have set inside that particular image. Because Docker images are just blueprints, they don’t do anything on their own, and they need to be used inside a container to accomplish the task at hand.
Docker containers run in their own, isolated , environments, meaning that they are separated from each other and even the host system. Each of these containers has its filesystems, processes that are running, and network, while they are still sharing the operating system’s kernel. As mentioned in the previous article, this is one of the main differences between containers and virtual machines, so don’t forget to take note.
Containers are more lightweight when compared to their virtual machine counterparts, and they are designed to be ephemeral. You can easily start, stop, and destroy containers and all of their data may be lost if the data is not explicitly stored outside of it (in a Docker volume, or the relevant information may be pushed to different storing solutions, such as Amazon S3, or Azure Blob storage).
Docker containers are flexible and make them an ideal choice for microservices applications because you can scale them together or independently, or directly in container orchestration platforms such as Kubernetes or Docker Swarm.
Working with existing Docker images
As I’ve mentioned before you can easily use existing Docker images and create containers out of them.
I will just show you an easy example of how to do it, but we will talk more about this when we reach the part dedicated to registries. Docker has a neat way of checking if you have an image locally, otherwise it will pull it from the Docker Hub registry.
Pulling an image
To pull an image, we can use the docker pull image_name command. For the sake of this example, let’s pull the hello-world image and create a container from it:
docker pull hello-world
Using default tag: latest
latest: Pulling from library/hello-world
478afc919002: Pull complete
Digest: sha256:53cc4d415d839c98be39331c948609b659ed725170ad2ca8eb36951288f81b75
Status: Downloaded newer image for hello-world:latest
docker.io/library/hello-world:latest
Now, let’s create the container:
docker run hello-world

Hello from Docker!
This message shows that your installation appears to be working correctly.

To generate this message, Docker took the following steps:
 1. The Docker client contacted the Docker daemon.
 2. The Docker daemon pulled the "hello-world" image from the Docker Hub.
    (arm64v8)
 3. The Docker daemon created a new container from that image which runs the
    executable that produces the output you are currently reading.
 4. The Docker daemon streamed that output to the Docker client, which sent it
    to your terminal.

To try something more ambitious, you can run an Ubuntu container with:
 $ docker run -it ubuntu bash

Share images, automate workflows, and more with a free Docker ID:
 https://hub.docker.com/

For more examples and ideas, visit:
 https://docs.docker.com/get-started/
Pushing an image
To push an image to a registry, you can run the docker push image_namecommand. As I’ve mentioned before, we will deep dive into a different part.
Listing your local images
To list your images, you can simply run the docker images command:
docker images
REPOSITORY     TAG       IMAGE ID       CREATED          SIZE
kindest/node       c67167dbf296   3 months ago     980MB
hello-world    latest    ee301c921b8a   16 months ago    9.14kB
Removing a local image
To remove a local image, you can simply run the docker image rm image_nameor docker image rm first_few_letters_of_id
docker image rm ee
Untagged: hello-world:latest
Untagged: hello-world@sha256:53cc4d415d839c98be39331c948609b659ed725170ad2ca8eb36951288f81b75
Deleted: sha256:ee301c921b8aadc002973b2e0c3da17d701dcd994b606769a7e6eaa100b81d44
Deleted: sha256:12660636fe55438cc3ae7424da7ac56e845cdb52493ff9cf949c47a7f57f8b43
➜  episode2 docker images
REPOSITORY     TAG       IMAGE ID       CREATED          SIZE
kindest/node       c67167dbf296   3 months ago     980MB
What is a Dockerfile?
A Dockerfile is a special document that contains instructions for building a Docker image. It is essentially a script of commands that Docker uses to automatically create a container image.
The Dockerfile supports the following instructions, and I’ll list them in the order of their importance (from my point of view, of course):
FROM — this is creating a new build stage, starting from a base image. This means that if you have two FROM instructions in the same Dockerfile, you will have two build stages
RUN — executes different commands inside the base image you are using. You can have multiple commands in a single RUN instruction, by using “&&”
CMD — the default command the docker container will run
ENTRYPOINT — specifies the default executable
EXPOSE — ports your app is listening on
ADD — adds files from the host system, URLs, and can also add files and extract them
COPY — adds files from the host system only
ARG — build-time variable that can be used in other instructions
ENV — sets env variables inside the docker container
WORKDIR — sets the working directory for any other commands that may run after it
VOLUME — creates a mount point with the specified path
SHELL — sets the shell
USER — sets the user
HEALTHCHECK — defines a command to test the health of the container
STOPSIGNAL — sets the system call signal for exiting a container
ONBUILD — this will set an instruction for the image when it is used as a base image for another one
LABEL — adds metadata to the image in a key-value format
MAINTAINER — deprecated in favor of LABEL, was used to specify the maintainer of the image
Note 1: You will be asked in interviews what is the difference between ADD and COPY. Keep in mind that COPY can be used only for copying files from the host filesystem, while ADD can also get files from a URL or unarchive files.
Note 2 : You will get another question in interviews that refers to the difference between CMD and ENTRYPOINT. CMD is used for providing default arguments for the container’s executable, while ENTRYPOINT defines the executable itself. If you set CMD, and not set ENTRYPOINT, what happens is CMD acts as the ENTRYPOINT.
Dockerfile tutorial
Nothing goes better in a tutorial than a real-life example.
If you want to watch a video instead, I have you covered:
To give you some chills from your agile process, let’s suppose you receive the following ticket:
Title : Create a Docker image that standardizes our team’s development process
As a : DevOps Engineer
I want : To build a standard development environment for my team
So that : We can ensure that everyone develops their code with the same versions
Description : Our image should have the following:
start from an Alpine image
latest open-source version of Terraform installed
OpenTofu 1.8.1
Python 3.12 and pip
kubectl 1.28
Ansible 2.15
Golang 1.21
Acceptance criteria:
A Dockerfile is created that builds the image with all the tools specified and their versions
The image is built successfully and tested to ensure all tools function properly
Documentation on how to use the image is provided
Ok, now that we’ve received the ticket, let’s start building the Dockerfile that solves it.
We will start with a specific version of Alpine, and you may wonder why we are not using the “latest” keyword. This happens because, in a new version, we may face some dependency issues or unexpected changes that may break your image build. It is a best practice to avoid using “latest” for anything that you are building because, in this way, you ensure consistency.
FROM alpine:3.20So, in the above example, I’m specifying the base image as Alpine:3.20.
Now, we haven’t receive exact instructions about what Terraform version to use, but we know that we have to use the latest open-source version. After some research on their repository, we have found out that the latest open-source version is 1.5.7:
Now, we are ready to define our environment with all the versions we want to use. You may wonder why we are defining them inside an ENV block. Well, that’s because we want to be easily able to update the versions when this is required in the future.
Also, I have defined the pipx bin directory to something in our path. This will be required to easily install Ansible.
ENV TERRAFORM_VERSION=1.5.7 \
    OPENTOFU_VERSION=1.8.1 \
    PYTHON_VERSION=3.12.0 \
    KUBECTL_VERSION=1.28.0 \
    ANSIBLE_VERSION=2.15.0 \
    GOLANG_VERSION=1.21.0 \
    PIPX_BIN_DIR=/usr/local/bin
Next, let’s install some of the dependencies and some of the helpers you may require for a successful development environment:
RUN apk add --no-cache \
    curl \
    bash \
    git \
    wget \
    unzip \
    make \
    build-base \
    py3-pip \
    pipx \
    openssh-client \
    gnupg \
    libc6-compat
Now, let’s add the instructions that install Terraform:
RUN wget -O terraform.zip https://releases.hashicorp.com/terraform/${TERRAFORM_VERSION}/terraform_${TERRAFORM_VERSION}_linux_amd64.zip && \
    unzip terraform.zip && \
    mv terraform /usr/local/bin/ && \
    rm terraform.zip
We are first downloading the terraform archive, then we are unzipping it, next, we are moving the executable in our path, and in the end, we are removing the archive.
We will do the same process for OpenTofu:
RUN wget -O tofu.zip https://github.com/opentofu/opentofu/releases/download/v${OPENTOFU_VERSION}/tofu_${OPENTOFU_VERSION}_linux_amd64.zip && \
    unzip tofu.zip && \
    mv tofu /usr/local/bin/ && \
    rm tofu.zip
Next, let’s install kubectl:
RUN curl -LO "https://dl.k8s.io/release/v$KUBECTL_VERSION/bin/linux/amd64/kubectl" && \
    chmod +x kubectl && \
    mv kubectl /usr/local/bin/
This will download the kubectl binary, make it executable, and then move it to the path.
Now, let’s install Ansible:
RUN pipx install ansible-core==${ANSIBLE_VERSION}We are finally ready to install the last tool, golang:
RUN wget https://golang.org/dl/go$GOLANG_VERSION.linux-amd64.tar.gz && \
    tar -C /usr/local -xzf go$GOLANG_VERSION.linux-amd64.tar.gz && \
    rm go$GOLANG_VERSION.linux-amd64.tar.gz && \
    ln -s /usr/local/go/bin/go /usr/local/bin/go && \
    ln -s /usr/local/go/bin/gofmt /usr/local/bin/gofmt
In the same way, we are downloading the archive, unarchiving it, but now we are creating some symlinks to ensure go is in our PATH.
Let’s also set a workdir. When we will run our container, this will be our starting directory:
WORKDIR /workspaceWe should also add the command we want our Dockerfile to run:
CMD ["bash"]In the end, your Dockerfile should look like this:
FROM alpine:3.20

ENV TERRAFORM_VERSION=1.5.7 \
    OPENTOFU_VERSION=1.8.1 \
    PYTHON_VERSION=3.12.0 \
    KUBECTL_VERSION=1.28.0 \
    ANSIBLE_VERSION=2.15.0 \
    GOLANG_VERSION=1.21.0 \
    PIPX_BIN_DIR=/usr/local/bin

RUN apk add --no-cache \
    curl \
    bash \
    git \
    wget \
    unzip \
    make \
    build-base \
    py3-pip \
    pipx \
    openssh-client \
    gnupg \
    libc6-compat

RUN wget -O terraform.zip https://releases.hashicorp.com/terraform/${TERRAFORM_VERSION}/terraform_${TERRAFORM_VERSION}_linux_amd64.zip && \
    unzip terraform.zip && \
    mv terraform /usr/local/bin/ && \
    rm terraform.zip

RUN wget -O tofu.zip https://github.com/opentofu/opentofu/releases/download/v${OPENTOFU_VERSION}/tofu_${OPENTOFU_VERSION}_linux_amd64.zip && \
    unzip tofu.zip && \
    mv tofu /usr/local/bin/ && \
    rm tofu.zip

RUN curl -LO "https://dl.k8s.io/release/v$KUBECTL_VERSION/bin/linux/amd64/kubectl" && \
    chmod +x kubectl && \
    mv kubectl /usr/local/bin/

RUN pipx install ansible-core==${ANSIBLE_VERSION}

RUN wget https://golang.org/dl/go$GOLANG_VERSION.linux-amd64.tar.gz && \
    tar -C /usr/local -xzf go$GOLANG_VERSION.linux-amd64.tar.gz && \
    rm go$GOLANG_VERSION.linux-amd64.tar.gz && \
    ln -s /usr/local/go/bin/go /usr/local/bin/go && \
    ln -s /usr/local/go/bin/gofmt /usr/local/bin/gofmt

WORKDIR /workspace

CMD ["bash"]
Now, let’s go to the directory that contains our Dockerfile and build the image:
docker build -t dev_image:1.0.0 .
[+] Building 38.2s (8/11)                                                                                                                          docker:desktop-linux
[+] Building 48.1s (12/12) FINISHED                                                                                                                docker:desktop-linux
 => [internal] load build definition from Dockerfile                                                                                                               0.0s
 => => transferring dockerfile: 1.46kB                                                                                                                             0.0s
 => [internal] load metadata for docker.io/library/alpine:3.20                                                                                                     0.5s
 => [internal] load .dockerignore                                                                                                                                  0.0s
 => => transferring context: 2B                                                                                                                                    0.0s
 => CACHED [1/8] FROM docker.io/library/alpine:3.20@sha256:0a4eaa0eecf5f8c050e5bba433f58c052be7587ee8af3e8b3910ef9ab5fbe9f5                                        0.0s
 => [2/8] RUN apk add --no-cache     curl     bash     git     wget     unzip     make     build-base     py3-pip     pipx     openssh-client     gnupg     libc  17.3s
 => [3/8] RUN wget -O terraform.zip https://releases.hashicorp.com/terraform/1.5.7/terraform_1.5.7_linux_amd64.zip &&     unzip terraform.zip &&     mv terraform  2.7s
 => [4/8] RUN wget -O tofu.zip https://github.com/opentofu/opentofu/releases/download/v1.8.1/tofu_1.8.1_linux_amd64.zip &&     unzip tofu.zip &&     mv tofu /usr  4.1s
 => [5/8] RUN curl -LO "https://dl.k8s.io/release/v1.28.0/bin/linux/amd64/kubectl" &&     chmod +x kubectl &&     mv kubectl /usr/local/bin/                       5.8s
 => [6/8] RUN pipx install ansible-core==2.15.0                                                                                                                    7.8s
 => [7/8] RUN wget https://golang.org/dl/go1.21.0.linux-amd64.tar.gz &&     tar -C /usr/local -xzf go1.21.0.linux-amd64.tar.gz &&     rm go1.21.0.linux-amd64.tar  9.2s
 => [8/8] WORKDIR /workspace                                                                                                                                       0.0s
 => exporting to image                                                                                                                                             0.5s
 => => exporting layers                                                                                                                                            0.5s
 => => writing image sha256:23fe925c0eb2e0931bc86f592373bcd13916e6dbbb4ce74b18fff846fb8f2f4d                                                                       0.0s
 => => naming to docker.io/library/dev_image:1.0.0                                                                                                                 0.0s

What's next:
    View a summary of image vulnerabilities and recommendations → docker scout quickview
The “-t” flag of the docker build command, lets us specify the image :.
Let’s see our newly created image:
docker images
REPOSITORY     TAG       IMAGE ID       CREATED         SIZE
dev_image      1.0.0     23fe925c0eb2   7 minutes ago   783MB
Now, let’s create a container from our image and check all the image versions to see if we meet the acceptance criteria we have in our ticket:
docker run -ti dev_image:1.0.0
062c8343eef7:/workspace#
These two options combined (“-ti”), allow you to run a container interactively with a terminal attached. This is especially useful for running a shell inside the container, so you can execute commands directly inside the container, as we would like to do with this.
Let’s check out our tools versions:
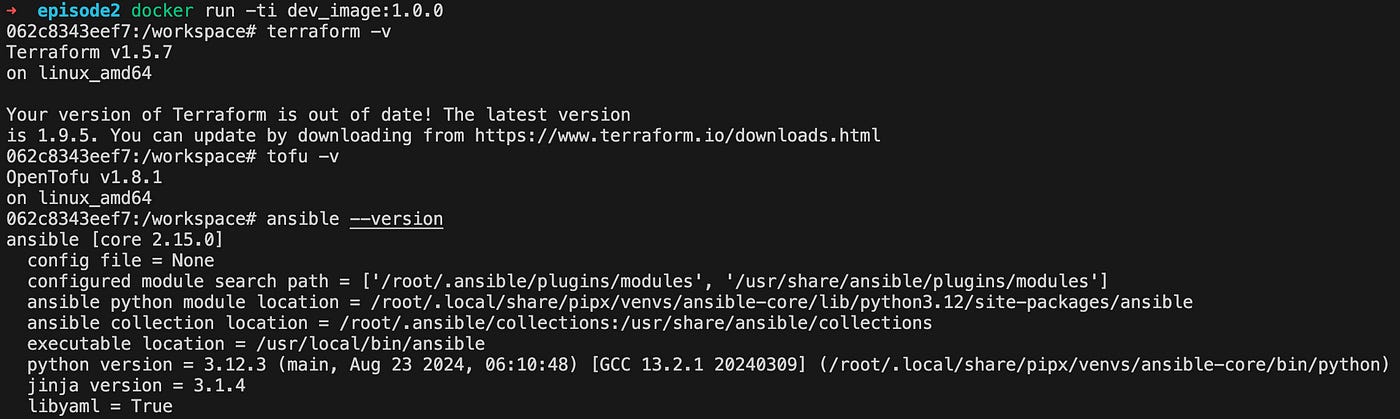
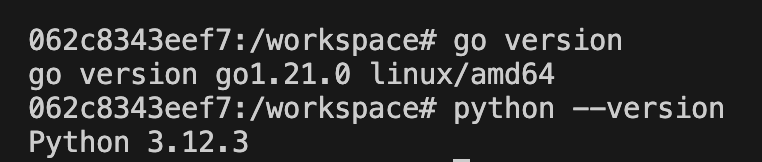
Now, we have met two out of three things related to our acceptance criteria, and I guess that the documentation can be easily written from all the details provided above, so we can say that this ticket can be moved into review 😁
In the real world, you will most likely want to take advantage of an editor to edit your code and run it from the Docker container. You would also want to give a name to your container, so let’s do that. The easiest way to do this is when you are creating it like so:
docker run -ti --name dev_container2 -v ~/Workspace:/workspace dev_image:1.0.0This command will bind the host directory Workspace from the home of my user to /workspace. If I create a container in this way, I will be redirected to my workspace where I have all my code. Pretty neat, right?
You may ask yourself, why I deleted the archives from the image when I was creating it. The reason is pretty simple, I wanted to make the image as small as possible to keep it portable.
Everything seems simple, right? Well, it’s not. Until I got all the dependencies right, I messed it up a million times, so don’t worry if you will also mess it up, it’s just part of the process.
Managing Docker containers
Listing containers
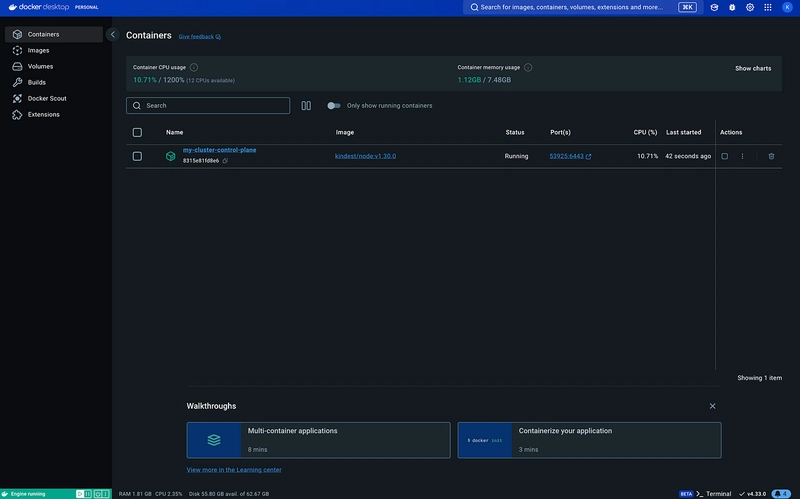
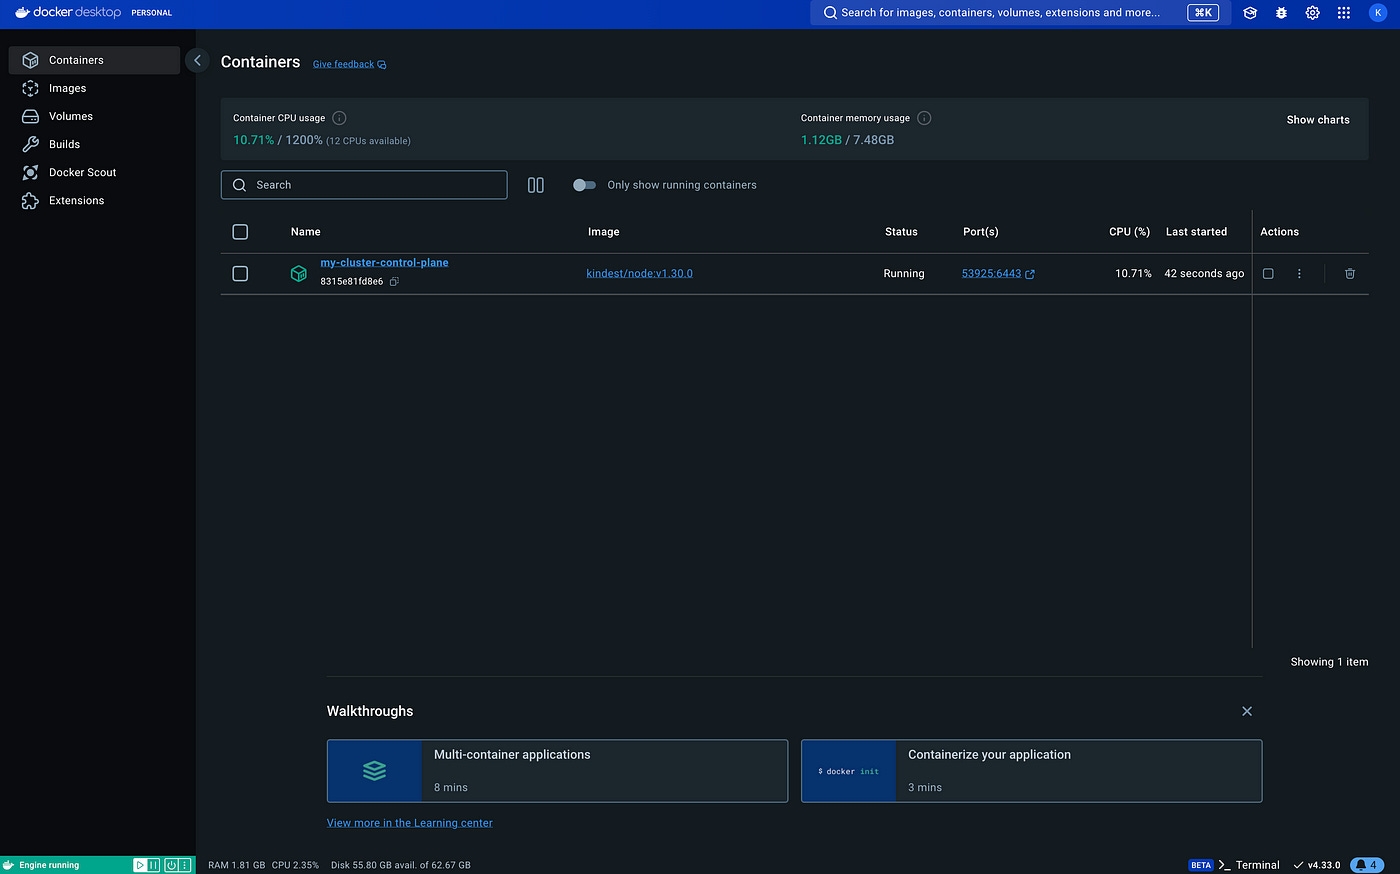
We can list containers with the docker ps command, but this alone will only show the containers that are running:
docker ps
CONTAINER ID   IMAGE                  COMMAND                  CREATED       STATUS       PORTS                       NAMES
8315e81fd8e6   kindest/node:v1.30.0   "/usr/local/bin/entr…"   2 weeks ago   Up 9 hours   127.0.0.1:53925->6443/tcp   my-cluster-control-plane
If you want to see all your existing containers, you can run docker ps -a
docker ps -a
CONTAINER ID   IMAGE                  COMMAND                  CREATED          STATUS                     PORTS                       NAMES
d6ae4b01f9de   dev_image:1.0.0        "bash"                   5 minutes ago    Exited (0) 5 minutes ago                               dev_container2
ad38f4f944e8   dev_image:1.0.0        "bash"                   5 minutes ago    Exited (0) 5 minutes ago                               dev_container
062c8343eef7   dev_image:1.0.0        "bash"                   16 minutes ago   Exited (0) 7 minutes ago                               mystifying_bhaskara
8315e81fd8e6   kindest/node:v1.30.0   "/usr/local/bin/entr…"   2 weeks ago      Up 9 hours                 127.0.0.1:53925->6443/tcp   my-cluster-control-plane
Starting a container
This is a very simple process, you can simply run docker start container_name or docker start first_few_letters_of_id
episode2 docker start d6
d6
➜  episode2 docker ps
CONTAINER ID   IMAGE                  COMMAND                  CREATED         STATUS         PORTS                       NAMES
d6ae4b01f9de   dev_image:1.0.0        "bash"                   7 minutes ago   Up 2 seconds                               dev_container2
8315e81fd8e6   kindest/node:v1.30.0   "/usr/local/bin/entr…"   2 weeks ago     Up 9 hours     127.0.0.1:53925->6443/tcp   my-cluster-control-plane
Attaching to a container
You’ve started your dev container, but how can you use it? Well, you need to attach to it. The command is docker attach container_name or docker attach first_few_letters_of_id
episode2 docker attach d6
d6ae4b01f9de:/workspace#
Stopping a container
Similar to starting, this is a very simple process, you can simply run docker stop container_name or docker stop first_few_letters_of_id
episode2 docker start d6
d6
➜  episode2 docker ps
CONTAINER ID   IMAGE                  COMMAND                  CREATED          STATUS         PORTS                       NAMES
d6ae4b01f9de   dev_image:1.0.0        "bash"                   11 minutes ago   Up 5 seconds                               dev_container2
8315e81fd8e6   kindest/node:v1.30.0   "/usr/local/bin/entr…"   2 weeks ago      Up 9 hours     127.0.0.1:53925->6443/tcp   my-cluster-control-plane
➜  episode2 docker stop d6
d6
➜  episode2 docker ps
CONTAINER ID   IMAGE                  COMMAND                  CREATED       STATUS       PORTS                       NAMES
8315e81fd8e6   kindest/node:v1.30.0   "/usr/local/bin/entr…"   2 weeks ago   Up 9 hours   127.0.0.1:53925->6443/tcp   my-cluster-control-plane
Removing containers
To remove a container, you will simply run docker rm container_name or docker rm first_few_letters_of_id
docker rm d6
d6
➜  episode2 docker ps -a
CONTAINER ID   IMAGE                  COMMAND                  CREATED          STATUS                      PORTS                       NAMES
ad38f4f944e8   dev_image:1.0.0        "bash"                   14 minutes ago   Exited (0) 14 minutes ago                               dev_container
062c8343eef7   dev_image:1.0.0        "bash"                   25 minutes ago   Exited (0) 16 minutes ago                               mystifying_bhaskara
8315e81fd8e6   kindest/node:v1.30.0   "/usr/local/bin/entr…"   2 weeks ago      Up 9 hours                  127.0.0.1:53925->6443/tcp   my-cluster-control-plane
This was originally posted on Medium.
3. Docker Network and Volumes
Docker networks types
Docker offers several network types, each serving different purposes:
1. Bridge Network
The bridge network is the default network type in Docker. When you start a container without specifying a network, it’s automatically attached to the bridge network.
Key features :
Containers on the same bridge can communicate with each other
Uses Network Address Translation (NAT) for external communication
2. Host Network
The host network removes network isolation between the container and the Docker host.
Key features :
Container uses the host’s network stack directly
Useful for optimizing performance in specific scenarios
3. Overlay Network
Overlay networks are used in Docker Swarm mode to enable communication between containers across multiple Docker hosts.
Key features :
Enables multi-host networking
Essential for deploying swarm services
4. Macvlan Network
Macvlan networks allow you to assign a MAC address to a container, making it appear as a physical device on your network.
5. Ipvlan Network
Ipvlan is similar to Macvlan but works at the network layer instead of the data link layer.
6. None Network
The none network disables networking for a container. It’s useful when you want to completely isolate a container from the network
To be completely honest, I haven’t had a need in my use cases for #4 or #5, but I have worked in some of my use cases with the rest of them. Of course, bridge is the one I’ve used the most.
Docker network examples
Let’s list the existing networks:
docker network list
NETWORK ID     NAME      DRIVER    SCOPE
9a571665758c   bridge    bridge    local
ff5a515b4fd3   host      host      local
cdf9ca0775b3   kind      bridge    local
a62f6451cad1   none      null      local
Bridge network example
Now, let’s create a new bridge network:
docker network create --driver bridge my_new_bridgeYou will see an output similar to this, which will actually show you the entire id of the network bridge that you have created.
06ca1c432576d5e865da9a0bf4d...If we list the existing networks again, we will see something similar:
docker network list
NETWORK ID     NAME            DRIVER    SCOPE
9a571665758c   bridge          bridge    local
ff5a515b4fd3   host            host      local
cdf9ca0775b3   kind            bridge    local
06ca1c432576   my_new_bridge   bridge    local
a62f6451cad1   none            null      local
Now, let’s create two alpine containers in this bridge, and ping one from the other:
docker run -dit --name alpine1 --network my_new_bridge alpine
docker run -dit --name alpine2 --network my_new_bridge alpine
We are using the -doption, because we don’t want to be attached to the containers.
If we run docker ps we can see that both containers are up and running:
docker ps
CONTAINER ID   IMAGE                  COMMAND                  CREATED          STATUS          PORTS                       NAMES
a51f7134e7ea   alpine                 "/bin/sh"                28 seconds ago   Up 28 seconds                               alpine2
cacfa2c11cf1   alpine                 "/bin/sh"                34 seconds ago   Up 33 seconds                               alpine1
Now, let’s ping one from the other:
docker exec -it alpine1 ping -c 2 alpine2

PING alpine2 (172.19.0.3): 56 data bytes
64 bytes from 172.19.0.3: seq=0 ttl=64 time=0.079 ms
64 bytes from 172.19.0.3: seq=1 ttl=64 time=0.136 ms

--- alpine2 ping statistics ---
2 packets transmitted, 2 packets received, 0% packet loss
round-trip min/avg/max = 0.079/0.107/0.136 ms


docker exec -it alpine2 ping -c 2 alpine1

PING alpine1 (172.19.0.2): 56 data bytes
64 bytes from 172.19.0.2: seq=0 ttl=64 time=0.063 ms
64 bytes from 172.19.0.2: seq=1 ttl=64 time=0.141 ms

--- alpine1 ping statistics ---
2 packets transmitted, 2 packets received, 0% packet loss
round-trip min/avg/max = 0.063/0.102/0.141 ms
As you can see, ping works just fine between the two containers.
Bonus: If you want to find the ip address of a container you can use the docker inspect command:
docker inspect alpine1 | grep -i IPAddress
            "SecondaryIPAddresses": null,
            "IPAddress": "",
                    "IPAddress": "172.19.0.2",
And of course, ping will work on the ip address as well, not only on the hostname:
docker exec -it alpine2 ping -c 2 172.19.0.2

PING 172.19.0.2 (172.19.0.2): 56 data bytes
64 bytes from 172.19.0.2: seq=0 ttl=64 time=0.104 ms
64 bytes from 172.19.0.2: seq=1 ttl=64 time=0.159 ms

--- 172.19.0.2 ping statistics ---
2 packets transmitted, 2 packets received, 0% packet loss
round-trip min/avg/max = 0.104/0.131/0.159 ms
Host network example
A good candidate for a host network example would be a network monitoring tool that needs direct access to the host system.
Note: This example only works on Linux.
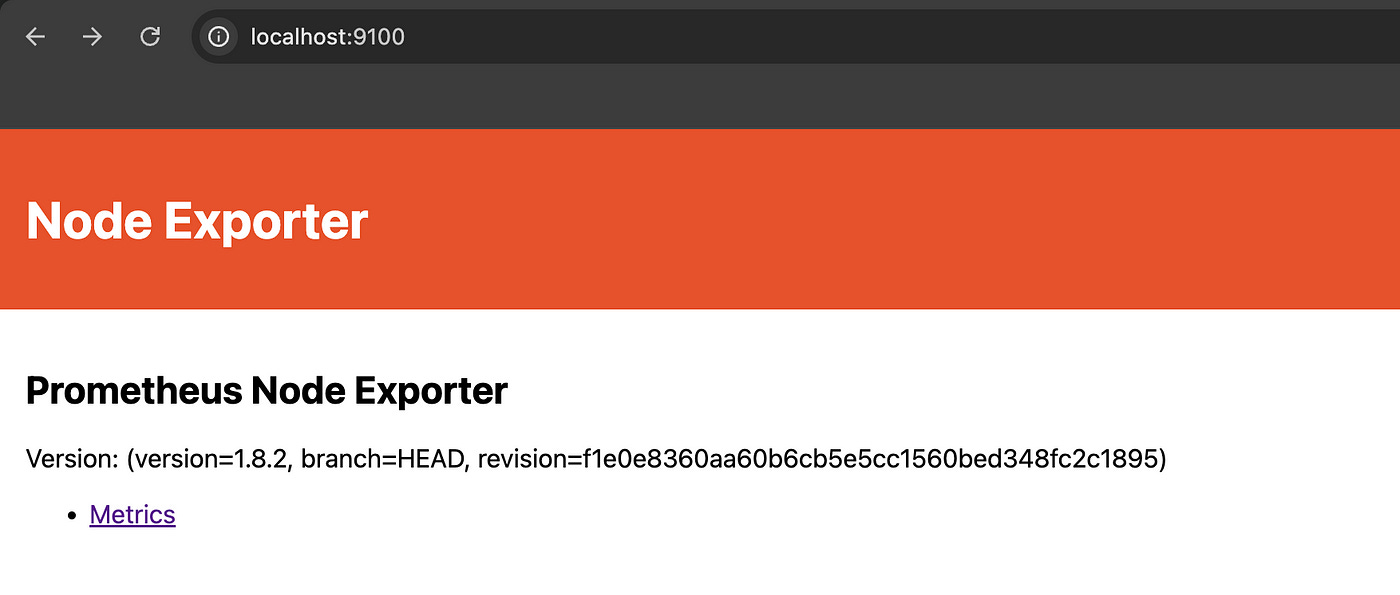
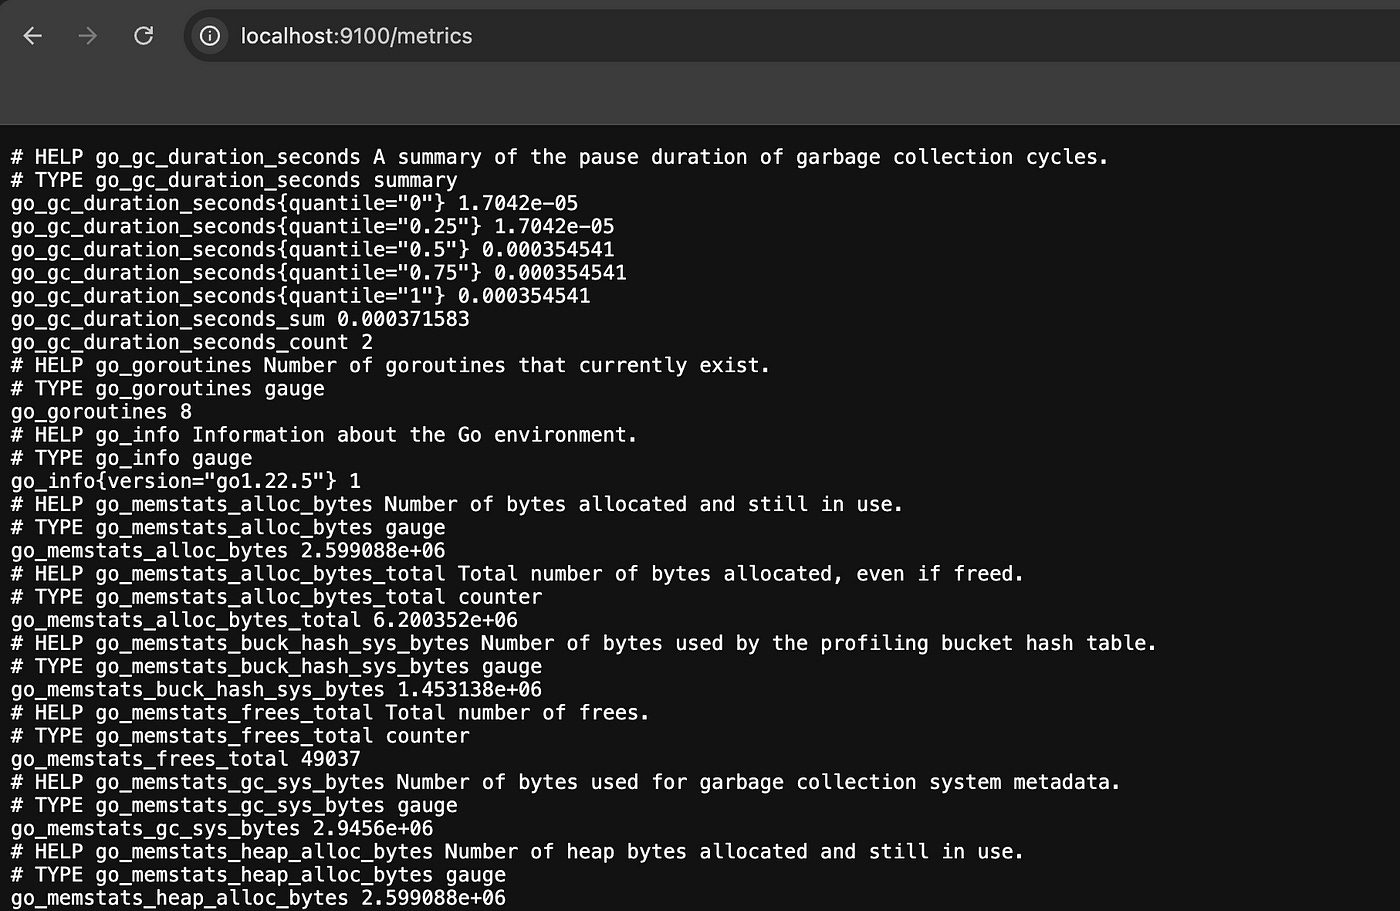
For this example, I will use the Prometheus node exporter, which is a tool that exposes hardware and OS metrics to Prometheus:
docker run -d --name node_exporter --network host prom/node-exporterLet’s see the container port:
docker inspect --format='{{.Config.ExposedPorts}}' node_exporter

map[9100/tcp:{}]
Tip : docker inspect returns a json, so you can leverage the --format option to get the relevant information about your containers. In the above case, I’m checking the values under Config, and because one of the values is ExposedPorts, I can easily check the value under it as well.
Note: Docker Desktop for Windows and MacOS uses a lightweight virtual machine to run containers. This means the --network host option doesn't work as it does on Linux systems. If you want to use this example on your operating system, you should leverage port mapping like this:
docker run -d --name node_exporter -p 9100:9100 prom/node-exporter
Docker volumes
Docker volumes allow you to persist data generated by containers. Whatever data is inside a Docker container is ephemeral (everything is deleted after the container is deleted), and Docker volumes are the ones that save data if your workloads require it.
Why use Docker volumes?
There are a couple of reasons for which you would use Docker volumes:
Data Persistence — ensures that data isn’t lost when a container stops or it is deleted
Data Sharing — you can share data between containers
Isolation — data is kept outside the container’s writable layer, meaning that there is a better separation of concerns
Docker volume types
There are three types of Docker volumes:
Named volumes — volumes managed by Docker and stored in Docker’s default location on the host.
Anonymous volumes — similar to named volumes but they are assigned a random name when they are created. This name is unique across the Docker host. Just like named volumes, anonymous volumes persist even if you remove the container that uses them, except if you use the
--rmflag when creating the container, in which case the anonymous volume is destroyed.Bind mounts — while bind mounts are not exactly volumes, I like to think of them as volumes. You’ve already seen this in the last part when I mounted an existing directory from the host system to a Docker container. In that example, I was passing my workspace directory (which had my source code), to a container to ensure that I ran my code with the specific versions I used in my developer environment image.
There are also some docker volume classes, but I’ll let you discover them yourselves if you are interested.
Named volume example
Let’s create a named volume:
docker volume create nginx
nginx
Now, let’s create a nginx container that uses this volume:
docker run -d --name nginx_named -v nginx:/usr/share/nginx/html -p 8080:80 nginx:latest
d96aea6e5cd85ca238150606b0555ead92274a8561c69c6364f45322276ad063
I’ve mapped the volume I’ve created in the /usr/share/nginx/html and also mapped the 8080 port to access nginx from my local machine.
Now, let’s modify the content of the index.html file from our volume:
docker exec nginx_named sh -c "echo 'Hello from the named volume!' > /usr/share/nginx/html/index.html"
curl http://localhost:8080
Hello from the named volume!
Ok, so now let’s delete the container, and recreate a new one to easily see if the content is still there:
docker stop nginx_named
nginx_named

docker rm nginx_named
nginx_named

docker run -d --name nginx_named -v nginx:/usr/share/nginx/html -p 8080:80 nginx:latest
e1204ca5dd9aec68bbefb97e8b39c5acbca284f569edf44420e79a2b6b8b6cf7

curl http://localhost:8080
Hello from the named volume!
As you can see, the content is still there because our data persisted.
Let’s clean up before going to the next example:
docker stop nginx_named
nginx_named

docker rm nginx_named
nginx_named

docker volume rm nginx
nginx
Anonymous volume example
An anonymous volume doesn’t have to be created before the container. It can be used directly with the -v option, when you are doing the actual creation of the volume:
docker run -d --name nginx_anonymous_volume -v /usr/share/nginx/html -p 8081:80 nginx:latest
e739ee4fe20f8cd7f253105b45aa46a311979f56aa6cfce5c858617fddaec800

docker exec nginx_anonymous_volume sh -c "echo 'Hello from Anonymous Volume!' > /usr/share/nginx/html/index.html"

curl http://localhost:8081
Hello from Anonymous Volume!
Now, let’s mount this volume to another nginx container. To do that, we will first need to get the unique identifier associated with it. We can do that
docker inspect --format='{{.Mounts}}' nginx_anonymous_volume

[{volume 6895fe7f79404ec8a2b337f3e74de6291d03c869c89d18bc866a11ae64b66e18
Based on that long unique identifier we can mount this volume to another container like so:
docker run -d --name nginx_anonymous_volume2 -v 6895fe7f79404ec8a2b337f3e74de6291d03c869c89d18bc866a11ae64b66e18:/usr/share/nginx/html -p 8082:80 nginx:latest
c55a85c4dca0fa34d00b9d4010b44f02d17e303f7602c5618d32fd5c6b8f62ca
Let’s check if this container will return the same result when we access it:
curl http://localhost:8082
Hello from Anonymous Volume!
This part was originally posted on Medium.
4. Docker registries
Publishing an image to a Docker registry
For this example, we will use Docker Hub, as it is Docker’s own container registry. Head out to https://hub.docker.com/, and create an account.
After you create your account you should see something similar to this:
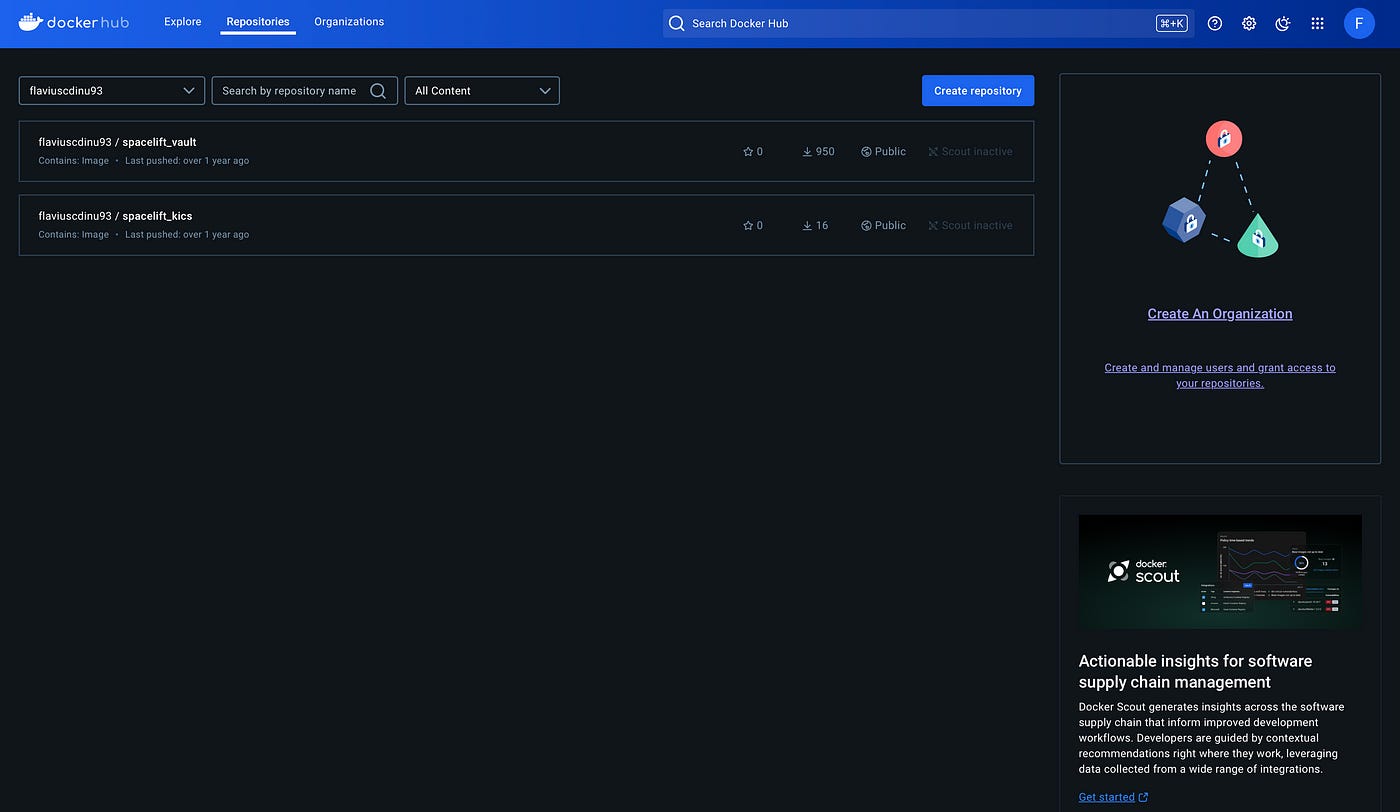
I already have two images in this account, but given the fact that you’ve just created an account from scratch, you shouldn’t have anything. Now, let’s create a repository:
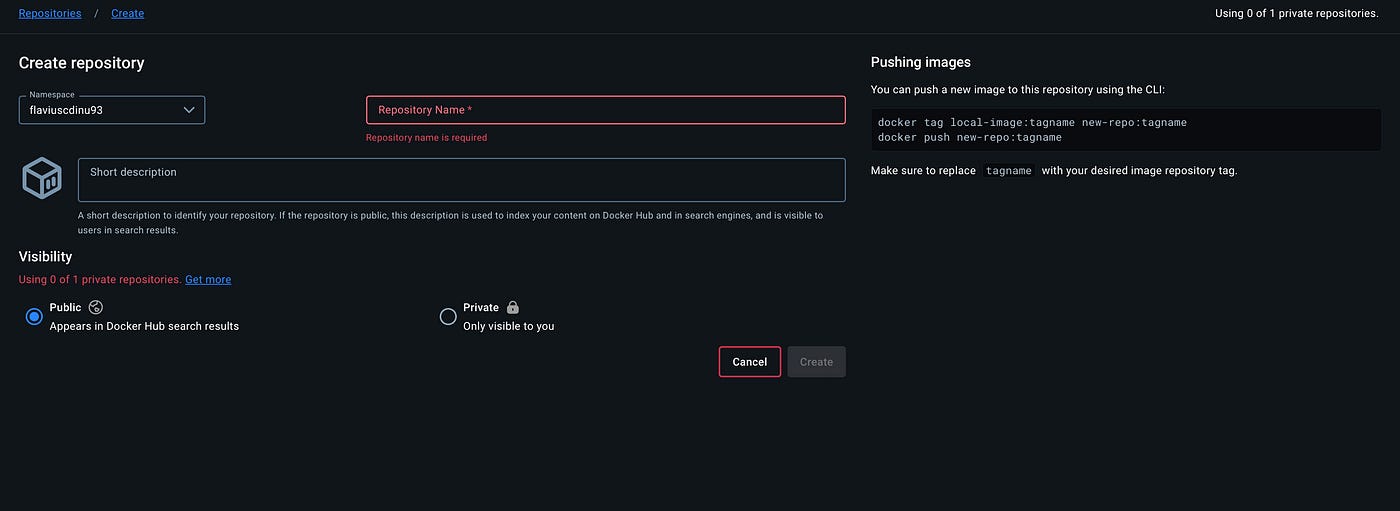
You will need to provide a name to your image and a short description, and you can also choose if your image is public or private. Keep in mind that you can only have one private image on a free account. Take also a note on the suggested commands to push an image:
docker tag local-image:tagname new-repo:tagname


docker push new-repo:tagname
For this example, I will use the development environment image that I’ve built in the second part. Don’t worry if this is the first part you see, as I’ll show you the image again, we will also build it and then tag and push it.
Before showing the Dockerfile and going through the process, this is the info I’ll use.
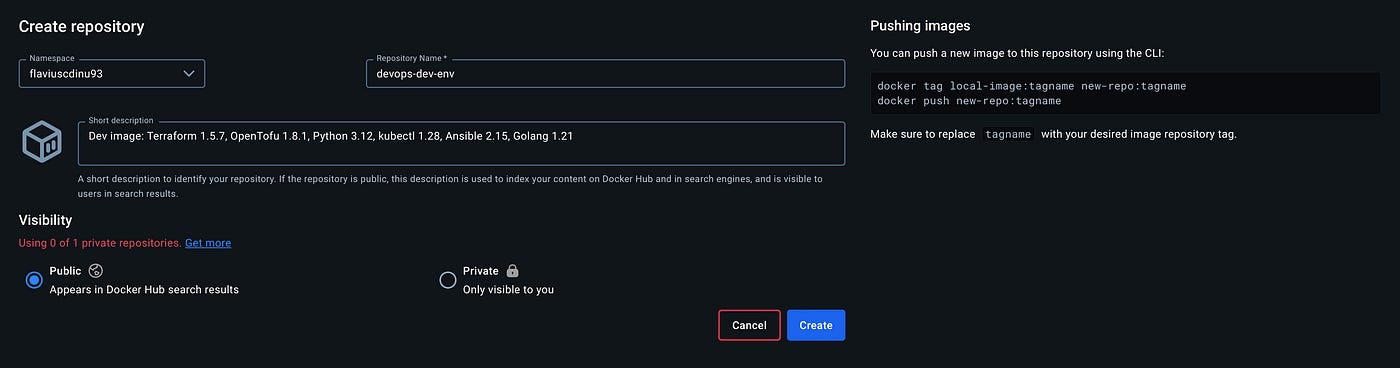
I clicked on create and this is the result:
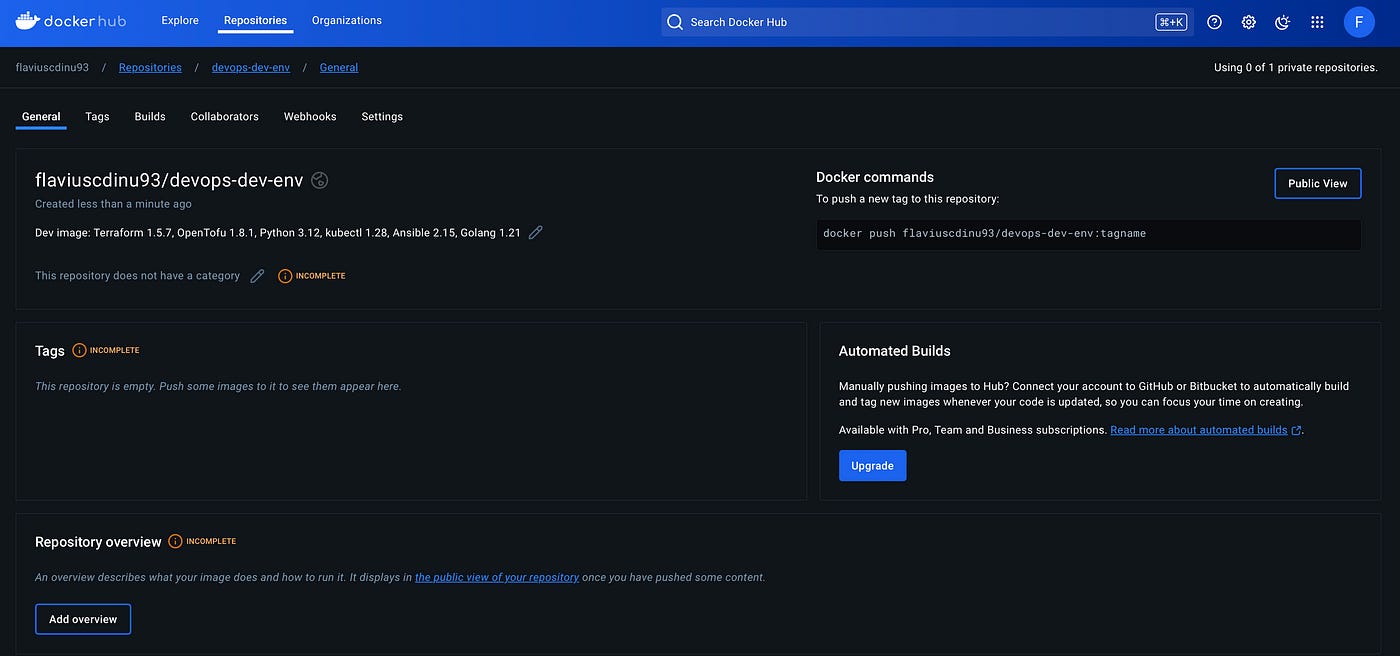
Now, let’s go through the process and push an image.
This is the Dockerfile I will use:
FROM alpine:3.20

ENV TERRAFORM_VERSION=1.5.7 \
    OPENTOFU_VERSION=1.8.1 \
    PYTHON_VERSION=3.12.0 \
    KUBECTL_VERSION=1.28.0 \
    ANSIBLE_VERSION=2.15.0 \
    GOLANG_VERSION=1.21.0 \
    PIPX_BIN_DIR=/usr/local/bin

RUN apk add --no-cache \
    curl \
    bash \
    git \
    wget \
    unzip \
    make \
    build-base \
    py3-pip \
    pipx \
    openssh-client \
    gnupg \
    libc6-compat

RUN wget -O terraform.zip https://releases.hashicorp.com/terraform/${TERRAFORM_VERSION}/terraform_${TERRAFORM_VERSION}_linux_amd64.zip && \
    unzip terraform.zip && \
    mv terraform /usr/local/bin/ && \
    rm terraform.zip

RUN wget -O tofu.zip https://github.com/opentofu/opentofu/releases/download/v${OPENTOFU_VERSION}/tofu_${OPENTOFU_VERSION}_linux_amd64.zip && \
    unzip tofu.zip && \
    mv tofu /usr/local/bin/ && \
    rm tofu.zip

RUN curl -LO "https://dl.k8s.io/release/v$KUBECTL_VERSION/bin/linux/amd64/kubectl" && \
    chmod +x kubectl && \
    mv kubectl /usr/local/bin/

RUN pipx install ansible-core==${ANSIBLE_VERSION}

RUN wget https://golang.org/dl/go$GOLANG_VERSION.linux-amd64.tar.gz && \
    tar -C /usr/local -xzf go$GOLANG_VERSION.linux-amd64.tar.gz && \
    rm go$GOLANG_VERSION.linux-amd64.tar.gz && \
    ln -s /usr/local/go/bin/go /usr/local/bin/go && \
    ln -s /usr/local/go/bin/gofmt /usr/local/bin/gofmt

WORKDIR /workspace

CMD ["bash"]
Now let’s build it:
docker build -t devops-dev-env:1.0.0 .Let’s check if it’s available locally:
docker images
REPOSITORY           TAG       IMAGE ID       CREATED        SIZE
devops-dev-env       1.0.0     c3069a674574   2 days ago     351MB
We are now ready to tag it with our repository name (I could’ve done this from the build phase, but I wanted to show you that you don’t need to worry about it). Your repository name will be different than mine, so ensure you make the changes accordingly.
docker tag devops-dev-env:1.0.0 flaviuscdinu93/devops-dev-env:1.0.0
docker images
REPOSITORY TAG IMAGE ID CREATED SIZE
flaviuscdinu93/devops-dev-env 1.0.0 c3069a674574 2 days ago 351MB
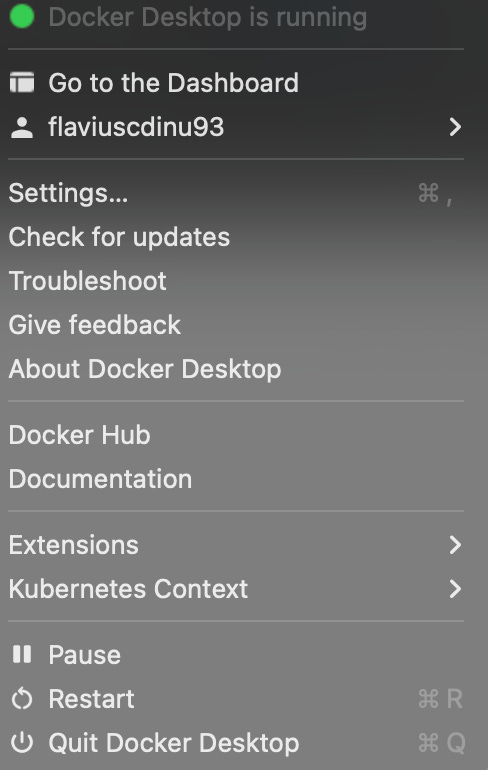
devops-dev-env 1.0.0 c3069a674574 2 days ago 351MBBefore pushing the image, ensure you are signed in with your user in Docker Desktop.
Let’s push the image:
docker push flaviuscdinu93/devops-dev-env:1.0.0
The push refers to repository [docker.io/flaviuscdinu93/devops-dev-env]
e46b168236e7: Pushed
9b08b92b54a9: Pushed
f3e42b4e3f66: Pushed
4b49e924d63f: Pushed
190aeee88612: Pushed
8fc9c443438f: Pushed
9110f7b5208f: Pushed
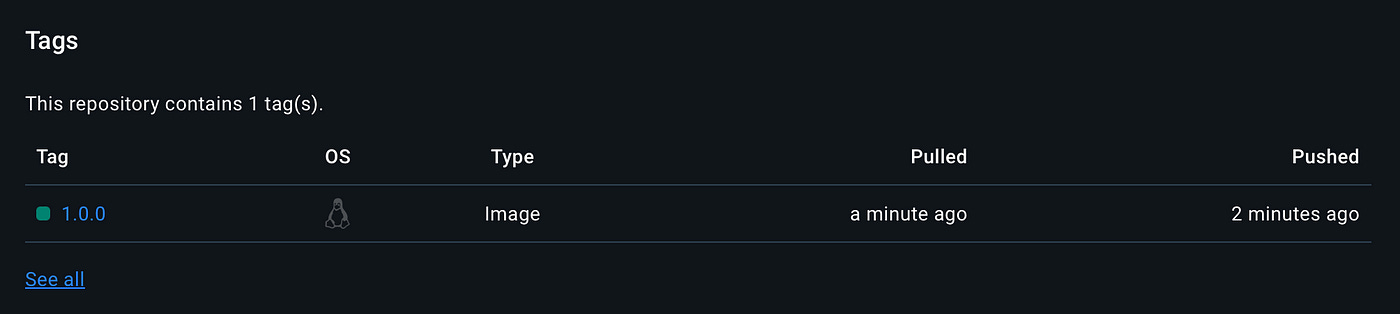
1.0.0: digest: sha256:ffa6b.... size: 1794Now, if we head back to Docker Hub, we will see our image there:
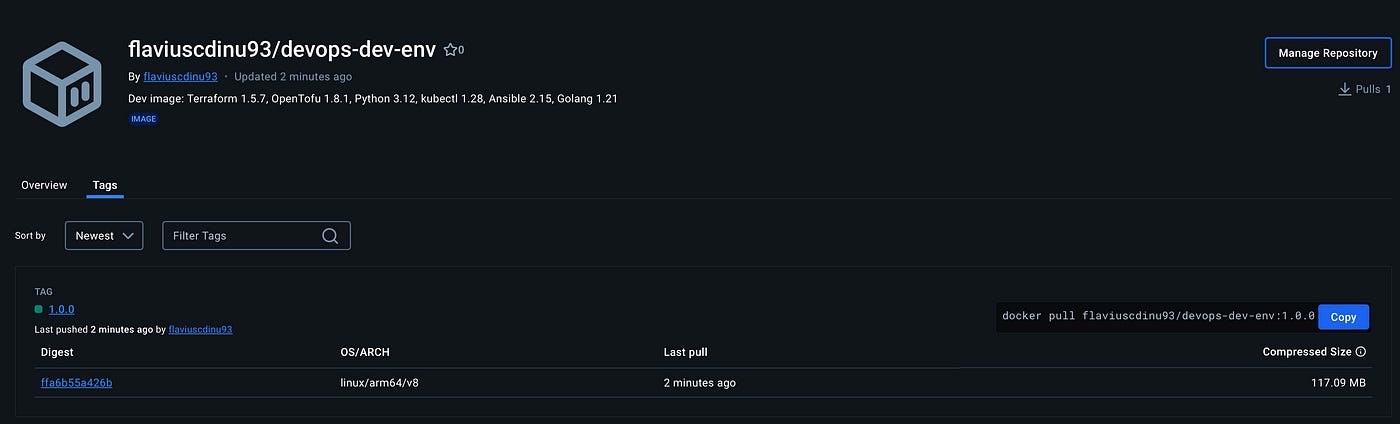
We can click on public view, and see what others will see when they find our image:
If we want to pull our image from the registry, we can simply run:
docker pull flaviuscdinu93/devops-dev-env:1.0.0Top 10 Docker Registries
In this section, I will present some of the most popular registries in my view, but I won’t show you how to push an image to all of them. Nevertheless, the process is pretty similar to the one I’ve presented above.
Without further ado, these are the most popular registries:
Docker Hub
GitHub Container Registry
AWS Elastic Container Registry (ECR)
Azure Container Registry (ACR)
Google Artifact Registry (GCR)
GitLab Container Registry
Oracle Container Registry
JFrog Artifactory
Harbor
RedHat Quay
1. Docker Hub
We’ve already seen how Docker Hub works and how it looks so I don’t think it needs much presentation.
It offers a massive repository of publicly available images, including official images for popular open-source projects, databases, and programming languages.
Key features:
Free tier with access to public images
Automated builds from your VCS
Integrates easily with Docker Desktop
Offers private repositories (1 for free, but there are paid plans available)
2. GitHub Container Registry
If you are already using GitHub for version control, the GitHub Container Registry seems like a very viable choice for storing and managing your Docker or even OCI images.
The GitHub Container registry is part of the GitHub Packages offering that has other popular registries as well such as npm, RubyGems, Apache or Gradle.
Key Features:
Integrated with GitHub Actions for CI/CD
Free tier available with public repositories
Private repositories included in GitHub Pro and GitHub Teams plans
Fine-grained permissions
3. AWS Elastic Container Registry (ECR)
Amazon ECR is a Docker container registry provided by AWS. It integrates seamlessly with other AWS services, making it an excellent choice for users already in the AWS ecosystem.

Key Features:
Integrates seamlessly with Amazon ECS, EKS, Fargate
It is highly scalable and secure
Supports both private and public repositories
It has a Pay-as-you-go pricing model
4. Azure Container Registry (ACR)
Azure’s Container Registry is a Docker container registry provided by Microsoft. If you are already in the Microsoft ecosystem and are heavily dependent inside your workflows on a container registry, this seems like a no-brainer.
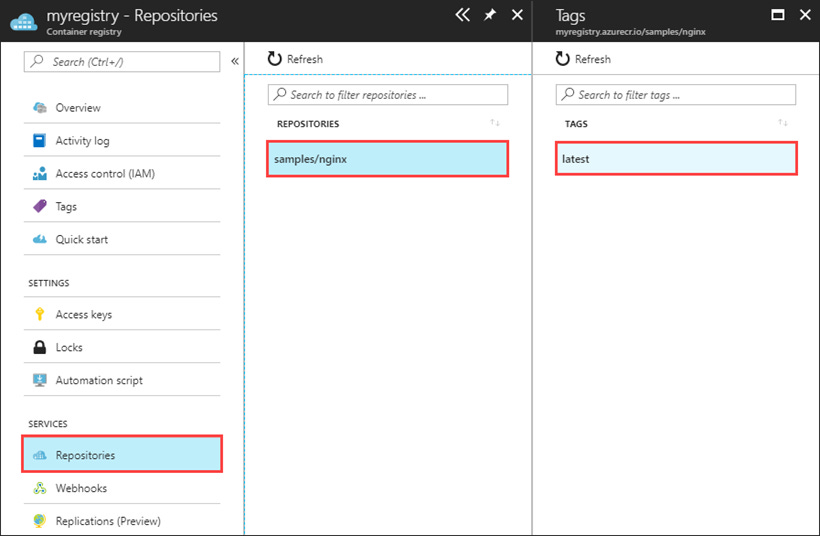
Key Features:
Integrated with Azure Kubernetes Service (AKS)
Geo-replication for high availability
Supports Helm charts and OCI artifacts
Built-in tasks for image building and patching
5. Google Artifact Registry (GAR)
Google Artifact Registry is Google’s answer to Docker image management., It’s pretty similar to the GitHub Packages offering and has a strong integration with Google Cloud services. Of course, if you are using Google Cloud, using Google’s registry makes a lot of sense.
Key Features:
Integrated with Google Kubernetes Engine (GKE)
Global availability and high security
Integrated with Cloud IAM for fine-grained access control
Automatic vulnerability scanning
6. GitLab Container Registry
GitLab Container Registry is a part of the GitLab CI/CD platform. It allows users to build, test, and deploy Docker images directly from their GitLab repositories, and if you keep your code on GitLab, you can easily use it for hosting your Docker images.
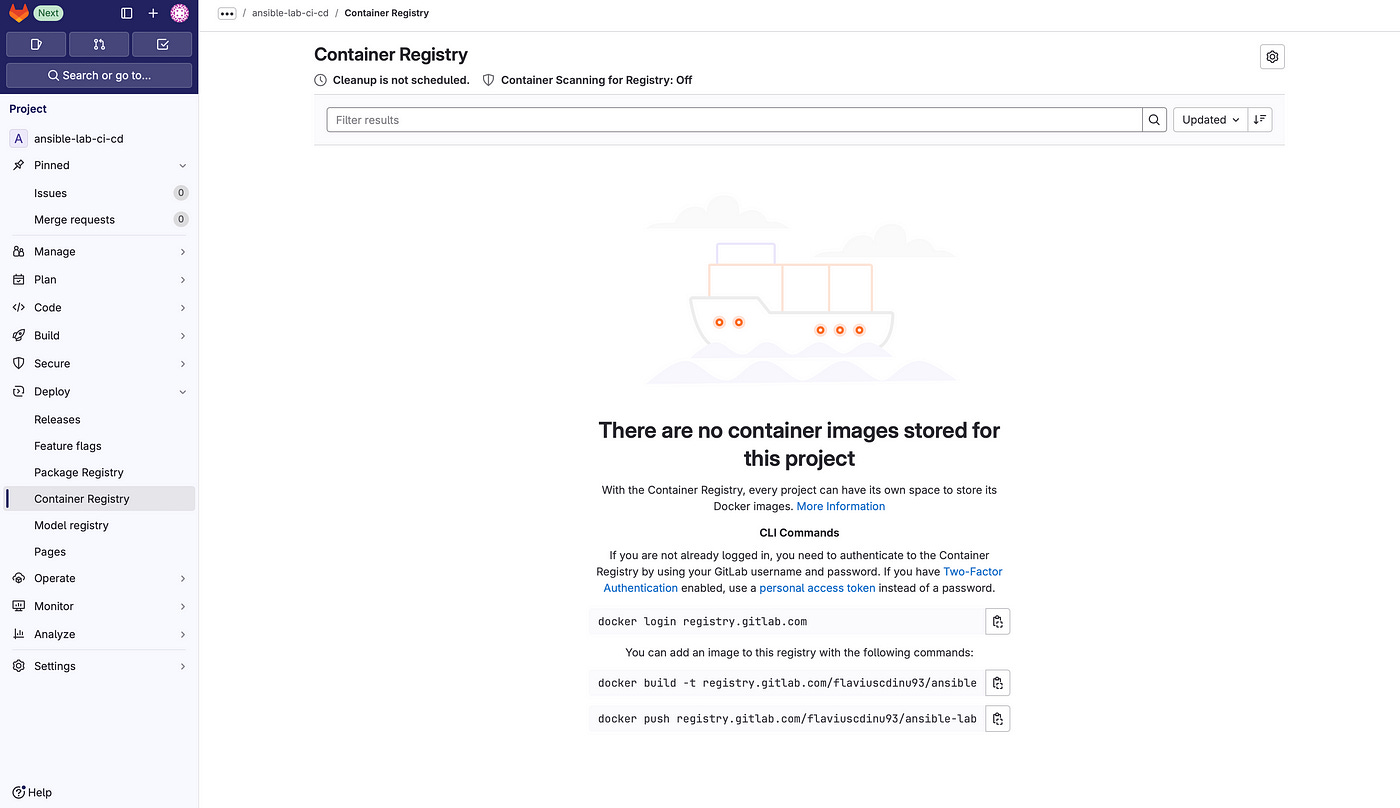
Key Features:
Integrated with GitLab CI/CD for seamless workflows
Free for both public and private repositories
Fine-grained access control
Built-in monitoring and logging
7. Oracle Container Registry
Oracle Container Registry is Oracle Cloud Infrastructure’s offering for managing your Docker images. It is tailored for Oracle products and services, making it ideal for organizations using Oracle Cloud Infrastructure.
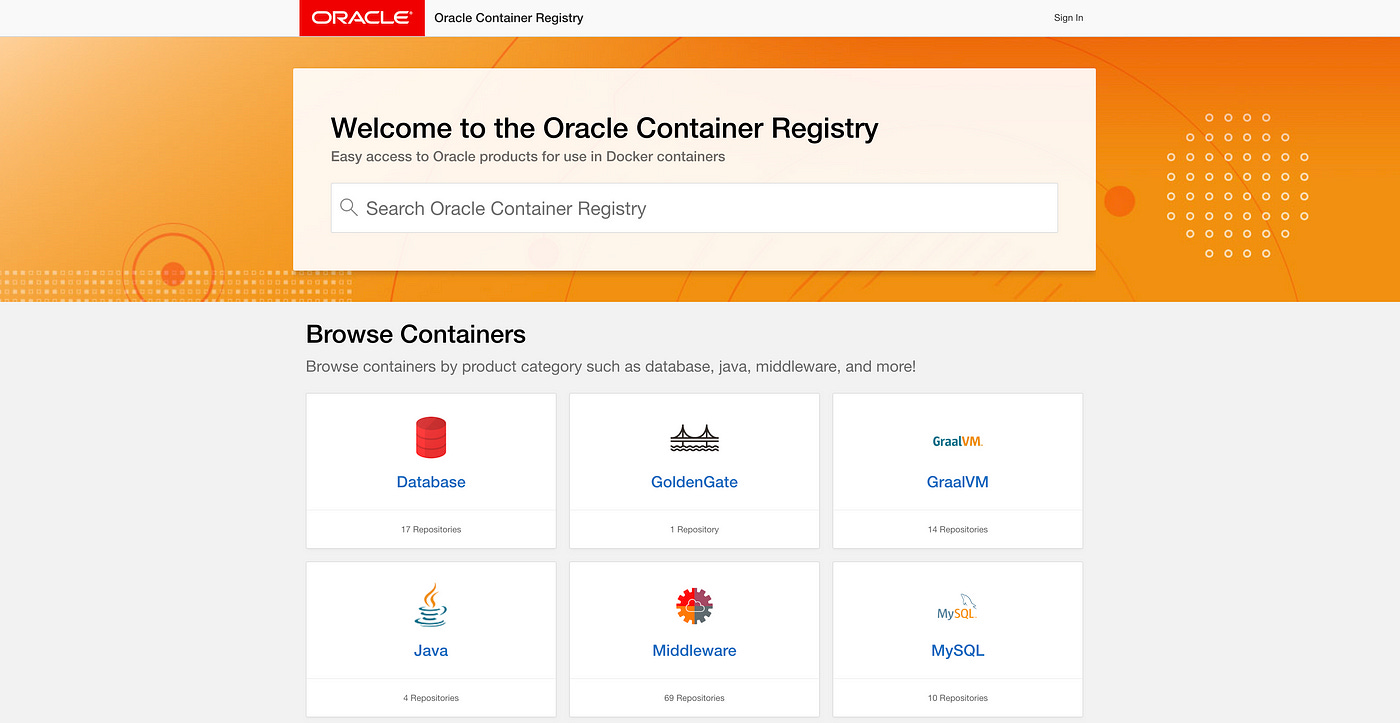
Key Features:
Offers pre-built images for Oracle products
Integrated with Oracle Cloud Infrastructure
Secure and compliant with Oracle standards
Supports both public and private repositories
8. JFrog Artifactory
JFrog Artifactory is a universal artifact repository manager that supports Docker images along with other build artifacts. Artifactory is known for its robust security features and extensive integration options.
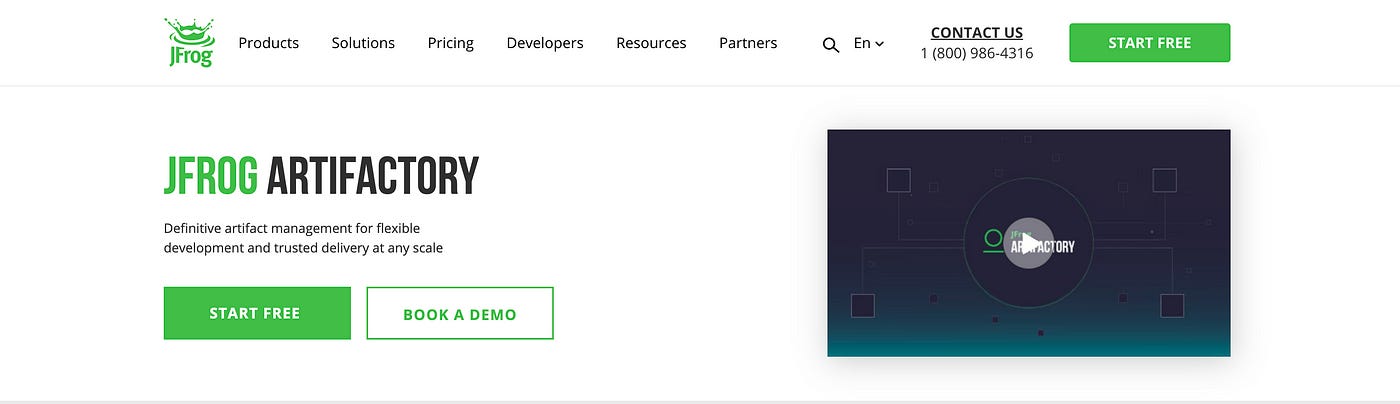
Key Features:
Supports Docker, Helm, and other package formats
Advanced security features such as Xray for vulnerability scanning
High availability and scalability
Integration with various CI/CD tools
9. Harbor
Harbor is a CNCF-graduated open-source container registry that emphasizes security and compliance. It has a range of features to manage Docker images, including RBAC, vulnerability scanning, and image signing.
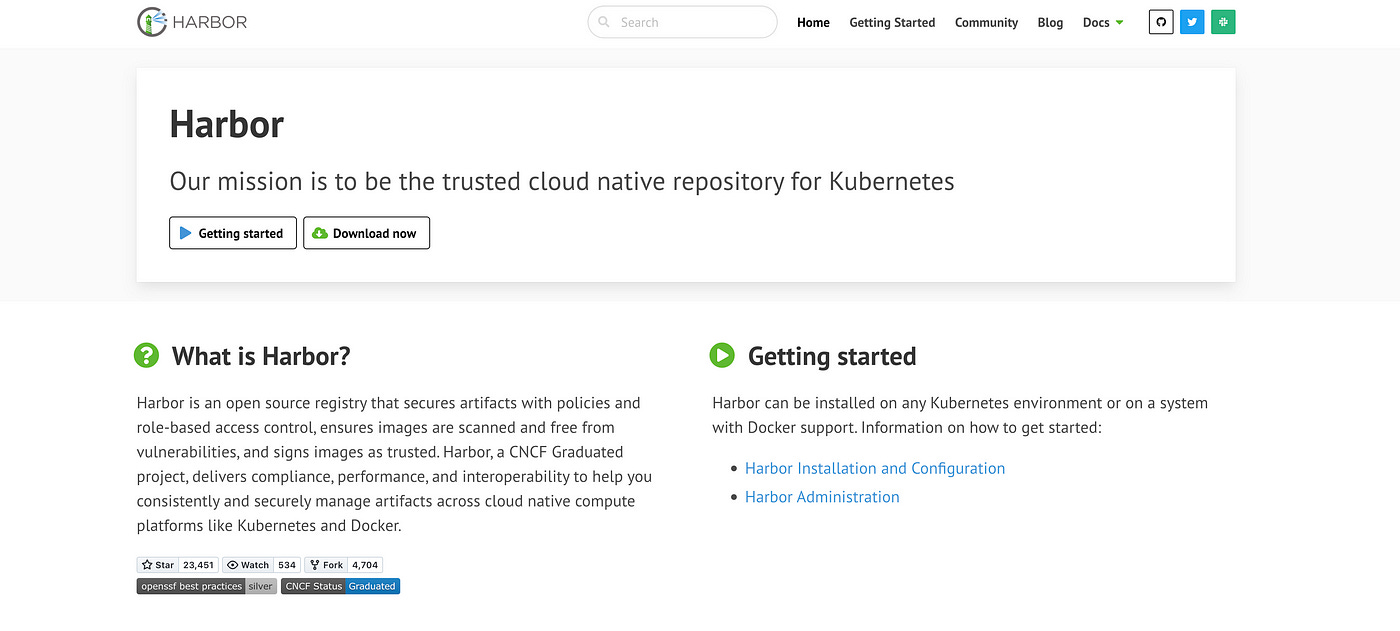
Key Features:
Role-based access control (RBAC)
Integrated with Clair for vulnerability scanning
Image replication across multiple registries
Content trust and image signing
10. RedHat Quay
If you are in the RedHat ecosystem, Quay is a viable choice for hosting your Docker images. It offers both a public and private image repository, along with automated security scanning.
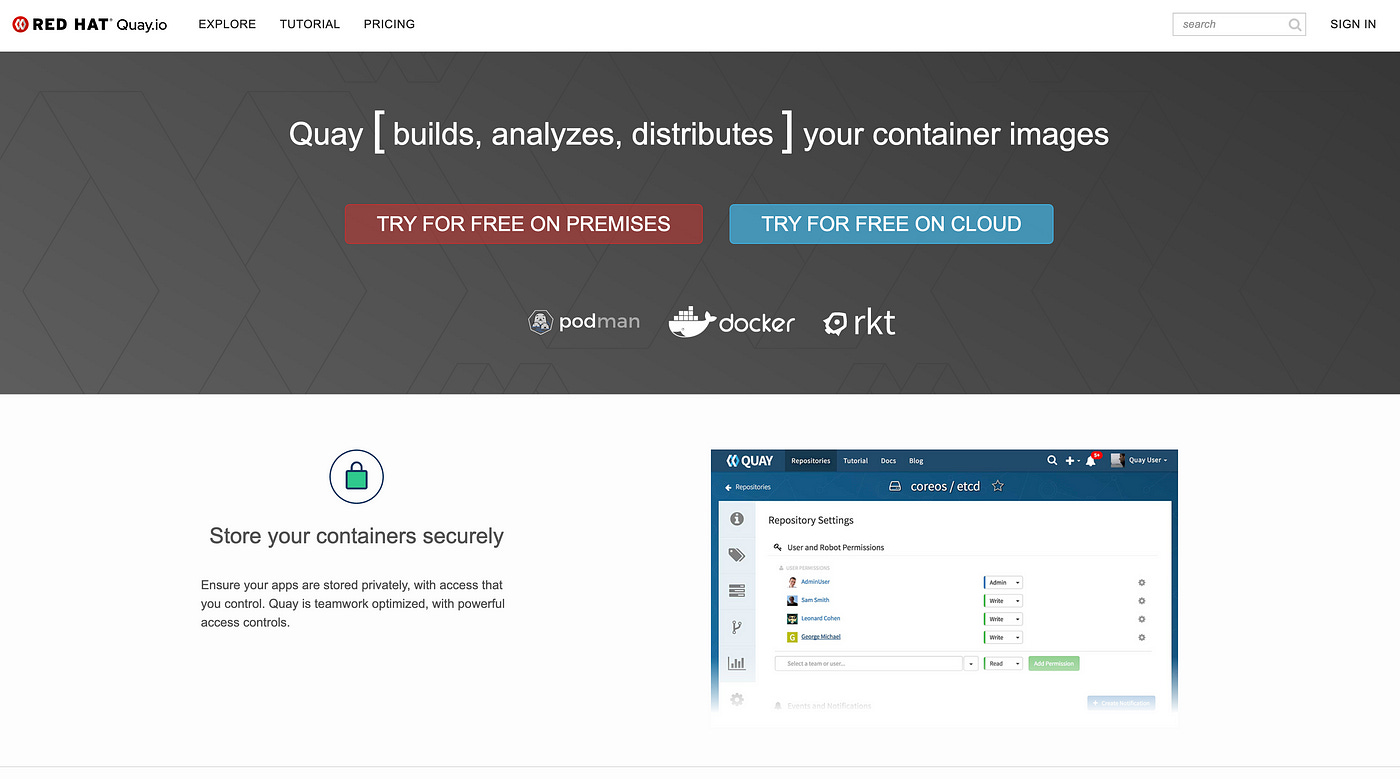
Key Features:
Continuous security monitoring
Integrated with OpenShift for seamless Kubernetes deployment
Supports multiple image storage backends
Customizable notifications and webhooks
This part was originally posted on Medium.
5. Docker Compose
What is Docker Compose?
Docker Compose is a Docker native tool that helps you manage multi-container applications by defining their configuration into a yaml file.
You can add all details related to your containers in this file and also define their networks and volumes.
It offers the following benefits:
Keeps it simple — you can define your entire application in a single
yamlfileReusability — you can easily share and leverage version control for your configurations
Consistency — ensures your environments are the same, regardless of the operating system you are using
Scalability — you can easily scale up or down with simple Docker-Compose commands
Docker Compose commands
Here are some of the most important arguments that can be used with the docker-compose command:
up— creates and starts containersdown— stops and removes containersstart— starts existing containers for a servicestop— stops running containers without removing themrestart— restarts all stopped and running servicesps— lists containers and their statuseslogs— displays the log outputs of the servicesrun— runs a one-time command on a servicecp— copies files or folders between a container and the machine that runs Docker Composepull— pulls images for services defined in the compose filebuild— builds or rebuilds services defined in the compose fileexec— executes a command in a running container
There are many other commands as well that you can use, but these are the most used ones. You can check what other commands are available by running docker-compose --help.
Docker Compose example
Before jumping into an example, let’s clarify some things first. If you write your Docker Compose code into a docker-compose.yml file, you won’t need to do anything special when you are running a command.
However, you don’t need to name it like, and you could choose any name you want. The only difference is, that you will need to specify the compose file with a -f option.
Ok, now we are ready to build an example. For this example, I will combine multiple technologies to demonstrate the power of Docker Compose:
Redis — in-memory data store to persist the API hits of our application
Flask — processes requests, and interacts with our Redis DB
NodeJS — will present the Flask application, making API requests to it
Nginx — reverse proxy routing incoming requests to the Node.js fronted and managing traffic between the frontend and backend
First things, first, I will create a docker-compose.yml file in which I will define a network:
networks:
  my_bridge_network:
    driver: bridge
I will use this bridge network for all of the containers I will define. Next, I will define a volume that Redis will use, as I want to have this data saved, regardless of running docker-compose down.
volumes:
  redis_data:
Now, let’s start defining our services:
services:
  redis:
    image: redis:6.2.6
    container_name: redis_server
    networks:
      - my_bridge_network
    volumes:
      - redis_data:/data
In the above example, I’m using the redis:6.2.6 image, and I’ve named my container redis-server. I am connecting to the existing network, and also leveraging my named volume in the /data directory.
Next, let’s define the flask application:
backend:
    image: python:3.9.7-slim
    container_name: flask_backend
    working_dir: /app
    volumes:
      - ./backend:/app
    command: >
      sh -c "pip install --no-cache-dir -r requirements.txt &&
        python app.py"
    networks:
      - my_bridge_network
    depends_on:
      - redis
As you can see, in this case, I’ve defined a working directory called /app and I’m mounting an existing directory on my local machine called backend in this mount point.
Next, I’m running two commands, one that installs the prerequisites in requirements.txt and the other that runs my application. At this point, I’m selecting the network, and I’ve also defined the depends_on redis, to wait for redis to be available, before running my application.
By now, you are wondering, what I have in the backend directory, so let me show you:
-
app.py — this connects to Redis using the container name and saves the number of API hits in Redis
from flask import Flask, jsonify
import redisapp = Flask(name)
r = redis.Redis(host='redis_server', port=6379, decode_responses=True)@app.route('/')
def hello():
count = r.incr('hits')
return jsonify(message="Hello from Flask!", hits=count)if name == "main":
app.run(host='0.0.0.0', port=5000) -
requirements.txt — this will contain the requirements of our application
Flask
redis
Next, let’s define the frontend service:
frontend:
    image: node:14.17.6-alpine
    container_name: node_frontend
    working_dir: /app
    volumes:
      - ./frontend:/app
    command: npm start
    ports:
      - "3000:3000"
    networks:
      - my_bridge_network
I’m using a node:14 image, and I’m also mapping an existing directory called frontend to /app, which is set as the working directory. I’m also specifying a command that starts the frontend application, the port mapping, and the same network.
In the frontend directory, there are multiple folders and files, but I’ve created only one manually:
-
index.js — I’m connecting here to my backend using the container name and Flask’s default port which is 5000, and I’m using a get to find out how many hits I have in my backend
const express = require('express');
const axios = require('axios');
const app = express();
const port = 3000;app.get('/', async (req, res) => {
try {
const response = await axios.get('http://flask_backend:5000/');
res.send(${response.data.message}
API hits: ${response.data.hits}
} catch (error) {
res.send(Error connecting to the backend
}
});app.listen(port, () => {
console.log(Frontend listening at http://localhost:${port});
});
To generate the other files, we need to go to our frontend directory and run the following:
npm init -y
npm install axios
npm install express
This will generate a node_modules folder, a package.json file and a package-lock.json file. Go to the package.json file and add a start command to the scripts. In the end, it should look similar to this:
{
  "name": "frontend",
  "version": "1.0.0",
  "main": "index.js",
  "scripts": {
    "test": "echo \"Error: no test specified\" && exit 1",
    "start": "node index.js"
  },
  "keywords": [],
  "author": "",
  "license": "ISC",
  "description": "",
  "dependencies": {
    "axios": "^1.7.7",
    "express": "^4.19.2"
  }
}
Now, we are ready to add the last container in our docker-compose configuration: nginx.
nginx:
    image: nginx:1.21.3
    container_name: nginx_proxy
    volumes:
      - ./nginx.conf:/etc/nginx/nginx.conf
    ports:
      - "80:80"
    networks:
      - my_bridge_network
    depends_on:
      - frontend
Its setup is pretty similar to what we’ve seen before, and we are mounting an nginx.conf file to the default configuration path in nginx.
This is the content of nginx.conf:
events { }

http {
    server {
        listen 80;

        location / {
            proxy_pass http://node_frontend:3000;
            proxy_set_header Host $host;
            proxy_set_header X-Real-IP $remote_addr;
            proxy_set_header X-Forwarded-For $proxy_add_x_forwarded_for;
            proxy_set_header X-Forwarded-Proto $scheme;
        }
    }
}
As you can see, we’ve set the proxy_pass to our frontend.
This is how our docker-compose.yaml file will look like in the end:
networks:
  my_bridge_network:
    driver: bridge

volumes:
  redis_data:

services:
  redis:
    image: redis:6.2.6
    container_name: redis_server
    networks:
      - my_bridge_network
    volumes:
      - redis_data:/data

  backend:
    image: python:3.9.7-slim
    container_name: flask_backend
    working_dir: /app
    volumes:
      - ./backend:/app
    command: >
      sh -c "pip install --no-cache-dir -r requirements.txt &&
        python app.py"
    networks:
      - my_bridge_network
    depends_on:
      - redis

  frontend:
    image: node:14.17.6-alpine
    container_name: node_frontend
    working_dir: /app
    volumes:
      - ./frontend:/app
    command: npm start
    ports:
      - "3000:3000"
    networks:
      - my_bridge_network

  nginx:
    image: nginx:1.21.3
    container_name: nginx_proxy
    volumes:
      - ./nginx.conf:/etc/nginx/nginx.conf
    ports:
      - "80:80"
    networks:
      - my_bridge_network
    depends_on:
      - frontend
And this is our directory structure:
.
├── backend
│   ├── app.py
│   └── requirements.txt
├── docker-compose.yml
├── frontend
│   ├── index.js
│   ├── package-lock.json
│   └── package.json
│   └── node_modules (a lot of files and folders here, omitted)
└── nginx.conf
Now, if we run docker-compose up this is what we’ll see:
And if you run docker-compose down and then docker-compose up again, you will see the count remains the same, because we saved the volume, but keep in mind that if you want to delete the volume you can do that by running docker-compose down -v.
I know this was a fairly complicate example, but these are the examples you will face in real-life.
As a DevOps engineer, you don’t need to know how to build these applications, as your developers will build them, but you should be able to follow their Python, Javascript, Golang, Java code, and help them if there are issues with making these containers communicate.
At the same time, as a developer, you don’t need to know Docker Compose and all the instructions you have to build, but you need to know how to containerize your application in a way it makes sense. In this example, we could’ve built custom images that had, for example, the requirements already installed.
This part was originally posted on Medium.
6. Securing your Docker Environment
What are the most common Docker security risks?
Before understanding how to improve security-related issues, we must first understand what are the most common ones:
Vulnerable base images — if you are using outdated base images they might contain known vulnerabilities. To solve these issues you need to constantly scan for vulnerabilities and update them as soon as you are facing these kinds of issues
Excessive privileges — you might find it easier to run containers as root, but in reality, even though your job might be easier initially, by running a container with root privileges you will increase the risk of your host machine if the container is compromised.
Container breakout — if an attacker gets access to one of your containers, they be able to gain control over the host system as well. This usually happens because of vulnerable images, misconfigurations, and excessive privilege.
Permissive networks — as you already know, by default, Docker uses a bridge network that allows containers to communicate with each other and external networks. If you need to ensure better isolation and reduce the chances of having breaches, you need to ensure that you do not expose services that should be kept internal.
Insecure image registries — there are many registries that are available online from which you can pull your container images. If you are using untrusted registries, this can lead to pulling compromised images that may contain malware or other malicious software
Secrets management — if you are not handling your secrets well, they could be easily exploited in case of attacks
Vulnerabilities in orchestrators (K8s, Swarm) — you need to ensure proper RBAC and network policies for your orchestrators to avoid the issues described above
Finding vulnerabilities in your Docker images
There are many tools you can use to find vulnerabilities in the Docker images you are using, and you will get information about each vulnerability, severity levels, descriptions, and also references to CVE databases.
Here are my top three:
I will not compare them in this post, but I will show you how to use Trivy to scan your docker images.
Using Trivy to scan Docker images
Go to Trivy’s GitHub repository and follow the instructions on how to install it on your operating system.
Now, let’s run the image scanner and see what are the vulnerabilities that we have in the image we’ve built in the second part:
trivy image flaviuscdinu93/devops-dev-env:1.0.0

2024-09-08T15:43:58+03:00 INFO [vuln] Vulnerability scanning is enabled
2024-09-08T15:43:58+03:00 INFO [secret] Secret scanning is enabled
2024-09-08T15:43:58+03:00 INFO [secret] If your scanning is slow, please try '--scanners vuln' to disable secret scanning
2024-09-08T15:43:58+03:00 INFO [secret] Please see also https://aquasecurity.github.io/trivy/v0.55/docs/scanner/secret#recommendation for faster secret detection
2024-09-08T15:43:58+03:00 INFO Detected OS family="alpine" version="3.20.2"
2024-09-08T15:43:58+03:00 INFO [alpine] Detecting vulnerabilities... os_version="3.20" repository="3.20" pkg_num=71
2024-09-08T15:43:58+03:00 INFO Number of language-specific files num=4
2024-09-08T15:43:58+03:00 INFO [gobinary] Detecting vulnerabilities...
2024-09-08T15:43:58+03:00 INFO [python-pkg] Detecting vulnerabilities...
2024-09-08T15:43:58+03:00 WARN Using severities from other vendors for some vulnerabilities. Read https://aquasecurity.github.io/trivy/v0.55/docs/scanner/vulnerability#severity-selection for details.
The output will be a breakdown based on the different components you have installed in the image:
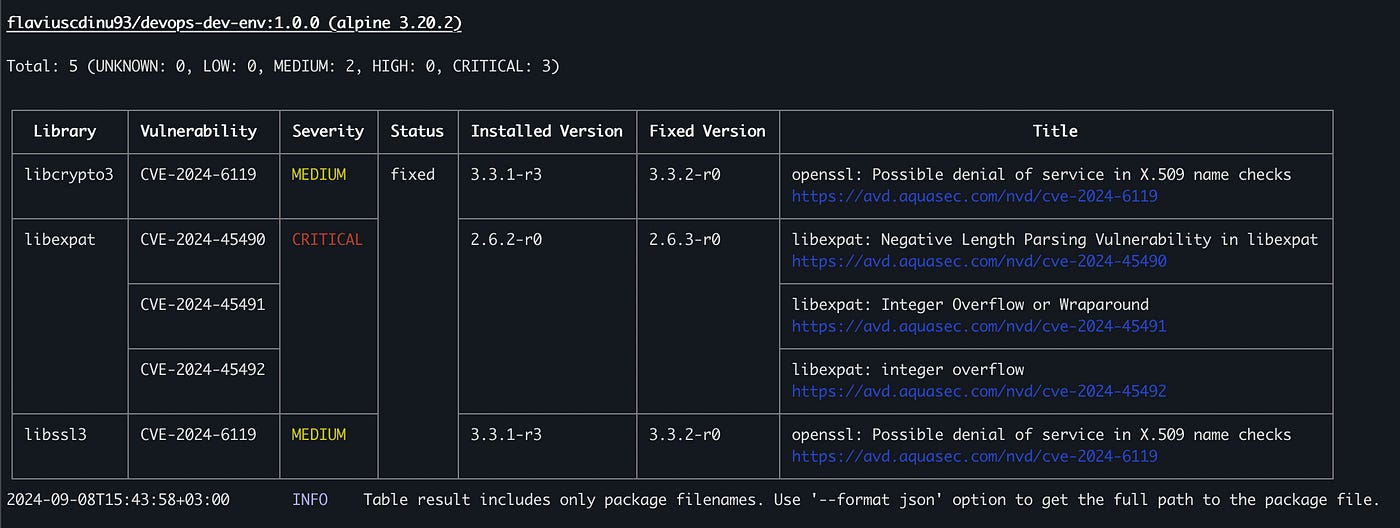
Because in my image, I’m starting from alpine:3.20, I have a couple of issues with my image as you can see above. Every vulnerability has a code, and if you want to learn more about it, you can just copy and paste it into Google or whatever other search engine you are using and search for it.
Check out this link if you want to learn more about CVE-2024–45490.
Now, those are just the vulnerabilities related to Alpine, but in my image, I have vulnerabilities related to other tools as well:

I won’t show you all the vulnerabilities because I have a ton. But as you can see, in Trivy’s output, if you want to solve these issues, you need to upgrade to a version in which these problems are not present anymore.
You can also run Trivy and return a json with all of the data related to a scan like so:
trivy image -f json -o results.json flaviuscdinu93/devops-dev-env:1.0.0My scan has over 4k lines, so I won’t be able to add it here, but you get the point, I have some work to do to fix these issues.
Building a GitHub Actions pipeline that scans for vulnerabilities
We will build a very simple repository that contains a Dockerfile (the same one that builds the development environment for your DevOps engineers, used above) and a GitHub Actions workflow that builds the image and checks for vulnerabilities using Trivy.
This workflow will run only when there are changes to the Dockerfile, because it doesn’t make too much sense to run it otherwise.
name: Docker Image Scan with Trivy

on:
  push:
    paths:
      - 'Dockerfile'
  pull_request:
    paths:
      - 'Dockerfile'
Above we’ve added a rule for this workflow to run only when there is a push, or a pull request made that changes the Dockerfile.
Next, we can start defining our job, and checking out the code:
jobs:
  scan:
    name: Scan Docker Image
    runs-on: ubuntu-latest
    steps:
      - name: Checkout code
        uses: actions/checkout@v3
Before being able to check the image for vulnerabilities, we need to first install Docker and build the image:
- name: Set up Docker Buildx
        uses: docker/setup-buildx-action@v2

- name: Build image
  run: |
    docker build -t devimage:latest .
Next, we need to install Trivy:
- name: Install Trivy
run: |
sudo apt-get install wget apt-transport-https gnupg lsb-release
wget -qO - https://aquasecurity.github.io/trivy-repo/deb/public.key | sudo apt-key add -
echo deb https://aquasecurity.github.io/trivy-repo/deb $(lsb_release -sc) main | sudo tee -a /etc/apt/sources.list.d/trivy.list
sudo apt-get update
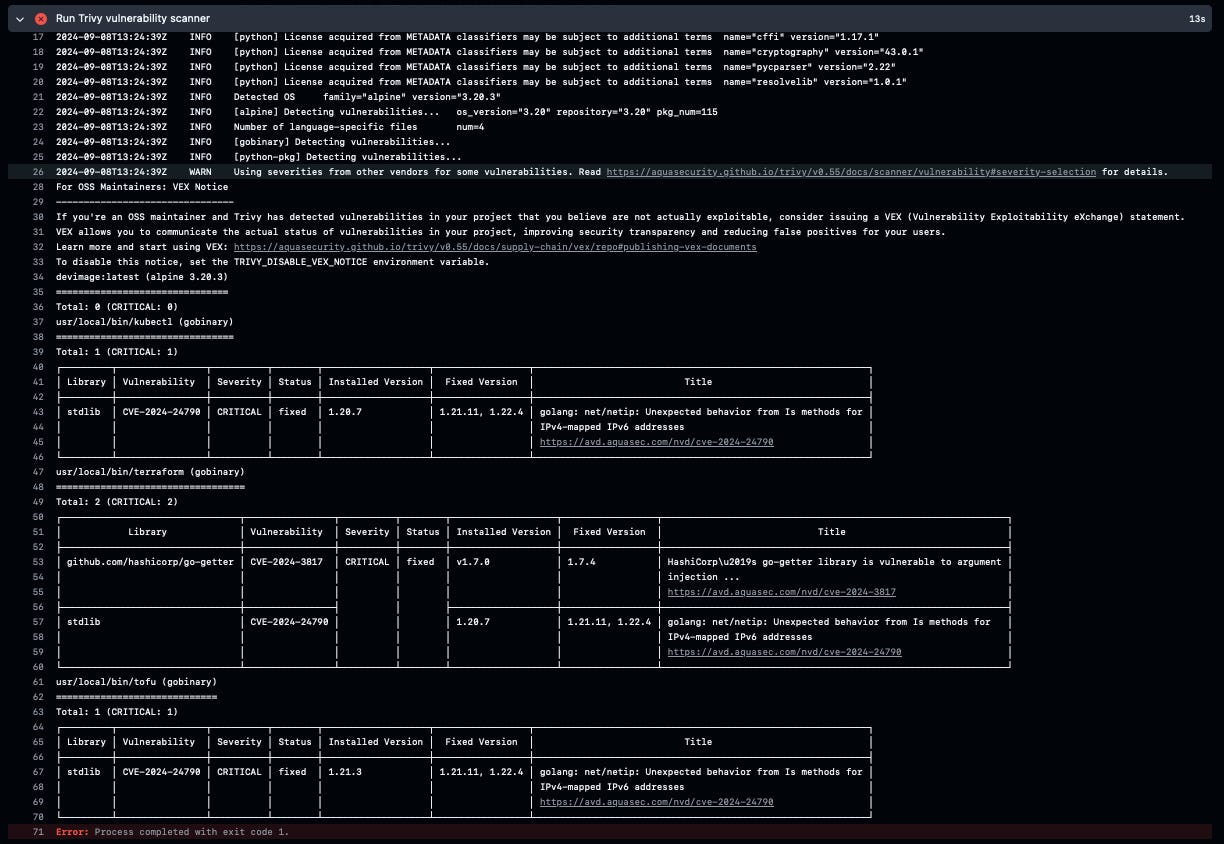
sudo apt-get install trivyNow we are ready to do the scan. In this example, I will force Trivy to exit with an error when the severity is critical, otherwise, the exit code will be 0:
- name: Run Trivy vulnerability scanner
  run: |
    echo "Scanning docker-image"
    trivy image --exit-code 1 --severity CRITICAL devimage:latest
    trivy image --exit-code 0 --severity HIGH,MEDIUM devimage:latest
We already know that our image has some critical vulnerabilities, so our pipeline will exit with an error:
Let’s change this behavior to make it return a 0 exit code for all cases, just to see if it is working properly:
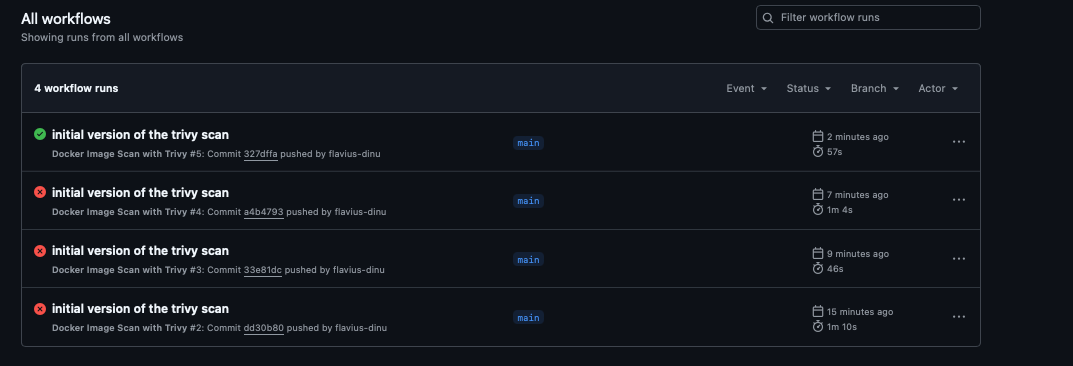
By making this change, we can see that our pipeline finishes successfully, and if we check the logs, we can see all of our scan results.
If you want to leverage the code directly you can get it from here.
Docker security best practices
To keep all of your Docker environment secure, you will need to implement at least the following best practices:
Improve your image security
Constantly scan for vulnerabilities, and use minimal base images such as Alpline or distroless to reduce the attack surface. In addition to this, implement multi-stage builds (we will talk about this in detail in the next parts) to minimize the final image size and reduce vulnerabilities. Leverage CI/CDs to constantly check for issues related to your images.
Implement least privilege access
Whenever you can, run your images as a different user than root. This will ensure that if your container is compromised, your host machine won’t be affected as much.
Set resource limits
Ensure your enforce resource limits for CPU and memory, as this will prevent denial of service attacks to resource exhaustion.
Use read-only filesystems
In some cases, your Docker container won’t need to write anything to the filesystem, so in these cases, it will make much more sense to leverage read-only filesystems. In this way, attackers will have a hard time to install malware on your containers.
Create and use different networks
By creating and using different network, you ensure that isolation is kept as much as possible and only the services that really need to be exposed, will be exposed.
Enable logging and monitoring
Monitor your container logs to detect any anomalies or even malicious activity. This will help in identifying strange behavior in real time.
This part was originally posted on Medium.
7. Docker Swarm vs Kubernetes
What is Docker Swarm?
Docker Swarm is Docker’s native orchestrating tool. It is working seamlessly with Docker, offering a straightforward approach to container orchestration.
Key Features:
Easy Setup : Swarm mode is built into the Docker engine, making it simple to set up and use.
Familiar Docker CLI : If you’re already using Docker, the learning curve for Swarm is minimal.
Service Discovery : Automatic service discovery and load balancing.
Rolling Updates : Built-in support for rolling updates and rollbacks.
Scaling : Easy horizontal scaling of services.
Let’s deploy the same application we’ve built in part 5, using Docker compose, the repository is here.
For Swarm, I’ve created a folder in the repository called swarm, that contains a slightly changed docker-compose file.
You will see that the first difference is the fact that I’m using an overlay network:
networks:
  my_overlay_network:
    driver: overlay
As mentioned in previous parts, overlay networks are distributed across multiple Docker hosts and combined with Swarm, creates a real orchestration platform.
Also, now you can easily place your services accross multiple nodes:
deploy:
    replicas: 1
    placement:
      constraints:
        - node.role == manager
Before deploying the configuration, we need to first initialize or join a swarm. In my case, I will initialize a new swarm:
docker swarm initTo deploy the configuration from the swarm directory you should navigate to it and run:
docker stack deploy -c docker-compose.yml my_stackIf you want to see the services deployed from inside the stack if you’ve created, you can easily run:
docker service ls

ID             NAME                    MODE         REPLICAS   IMAGE                 PORTS
xp3djy1t0d21   my_stack_backend        replicated   1/1        python:3.9.7-slim
kyrr4hlsk8bq   my_stack_frontend       replicated   1/1        node:14.17.6-alpine   *:3000->3000/tcp
xkr5we3ht4bl   my_stack_nginx          replicated   1/1        nginx:1.21.3          *:80->80/tcp
xeofhdsz7fn1   my_stack_redis-server   replicated   1/1        redis:6.2.6
If everything is working well you can access the application at localhost:80:

Otherwise, to view logs, you can easily run:
docker service logs my_stack_serviceNameE.G:
docker service logs my_stack_backend

my_stack_backend.1.t8h4m4pllk2h@docker-desktop    | WARNING: This is a development server. Do not use it in a production deployment. Use a production WSGI server instead.
my_stack_backend.1.t8h4m4pllk2h@docker-desktop    |  * Running on all addresses (0.0.0.0)
my_stack_backend.1.t8h4m4pllk2h@docker-desktop    |  * Running on http://127.0.0.1:5000
my_stack_backend.1.t8h4m4pllk2h@docker-desktop    |  * Running on http://172.21.0.3:5000
my_stack_backend.1.t8h4m4pllk2h@docker-desktop    | Press CTRL+C to quit
my_stack_backend.1.t8h4m4pllk2h@docker-desktop    | 10.0.1.4 - - [10/Sep/2024 10:50:05] "GET / HTTP/1.1" 200 -
my_stack_backend.1.t8h4m4pllk2h@docker-desktop    | 10.0.1.4 - - [10/Sep/2024 10:50:06] "GET / HTTP/1.1" 200 -
my_stack_backend.1.t8h4m4pllk2h@docker-desktop    | 10.0.1.4 - - [10/Sep/2024 10:50:06] "GET / HTTP/1.1" 200 -
my_stack_backend.1.t8h4m4pllk2h@docker-desktop    | 10.0.1.4 - - [10/Sep/2024 10:50:07] "GET / HTTP/1.1" 200 -
my_stack_backend.1.t8h4m4pllk2h@docker-desktop    | 10.0.1.4 - - [10/Sep/2024 10:50:07] "GET / HTTP/1.1" 200 -
my_stack_backend.1.t8h4m4pllk2h@docker-desktop    | 10.0.1.4 - - [10/Sep/2024 10:50:07] "GET / HTTP/1.1" 200 -
my_stack_backend.1.t8h4m4pllk2h@docker-desktop    | 10.0.1.4 - - [10/Sep/2024 10:50:07] "GET / HTTP/1.1" 200 -
my_stack_backend.1.t8h4m4pllk2h@docker-desktop    | 10.0.1.4 - - [10/Sep/2024 10:50:07] "GET / HTTP/1.1" 200 -
my_stack_backend.1.t8h4m4pllk2h@docker-desktop    | 10.0.1.4 - - [10/Sep/2024 10:50:07] "GET / HTTP/1.1" 200 -
my_stack_backend.1.t8h4m4pllk2h@docker-desktop    | 10.0.1.4 - - [10/Sep/2024 10:50:07] "GET / HTTP/1.1" 200 -
my_stack_backend.1.t8h4m4pllk2h@docker-desktop    | 10.0.1.4 - - [10/Sep/2024 10:50:07] "GET / HTTP/1.1" 200 -
my_stack_backend.1.t8h4m4pllk2h@docker-desktop    | 10.0.1.4 - - [10/Sep/2024 10:50:07] "GET / HTTP/1.1" 200 -
Pros of using Swarm:
Simple to learn and use
Tight integration with Docker
Lightweight and fast
Cons of using Swarm:
Limited advanced features compared to Kubernetes
Not as widely adopted in enterprise environments
What is Kubernetes?
Kubernetes, often abbreviated as K8s, is an open-source container orchestration platform originally developed by Google, and now under the CNCF umbrella. It offers a more comprehensive set of features for complex, large-scale deployments.
Key Features:
Auto-scaling : Horizontal pod autoscaling based on CPU utilization or custom metrics.
Self-healing : Automatic replacement of failed containers.
Advanced Networking : Powerful networking capabilities with support for various plugins.
Storage Orchestration : Dynamic provisioning of storage.
Declarative Configuration : Define the desired state of your system using YAML files.
Let’s reuse the above example, but now define the Kubernetes configuration for it. Again, the repository is here.
For K8s, I have defined two Docker images, one for the backend and the other one for the frontend:
# Dockerfile-BE
FROM python:3.9.7-slim

WORKDIR /app

COPY backend/* ./
RUN pip install --no-cache-dir -r requirements.txt

CMD ["python", "app.py"]


# Dockerfile-FE
FROM node:14.17.6-alpine

WORKDIR /app

COPY frontend/* .

RUN npm install

CMD ["node", "index.js"]
The first step I’ve done is I’ve built the images, tagged them appropiately and pushed them to the Docker registry. If you want to build your images and host them in your own registries, make sure you are in the root of the repository and then run:
docker build -t image_name:image_tag -f kubernetes/docker_images/Dockerfile_BE .
docker build -t image_name:image_tag -f kubernetes/docker_images/Dockerfile_FE .
Then, you can easily push the images to the registry of your choice using the docker push commands.
Now, if you want to use my public images they are available here:
flaviuscdinu93/be:1.0.3flaviuscdinu93/fe:1.0.1
Ok, so for every service that I’m using I will build at least a deployment and a service, with the exception of Redis (which needs a volume), and Nginx (which a need a configmap to hold the configuration).
All the files are defined in the repository under the kubernetes folder, but let’s walk through a couple of them:
---
apiVersion: v1
kind: Namespace
metadata:
  name: dev
I’ve defined a namespace for all the different component I will be deploying into K8s to better isolate my resources.
For the backend, I’ve defined the following deployment file:
---
apiVersion: apps/v1
kind: Deployment
metadata:
  name: backend
  namespace: dev
spec:
  selector:
    matchLabels:
      app: backend
  template:
    metadata:
      labels:
        app: backend
    spec:
      containers:
      - name: backend
        image: flaviuscdinu93/be:1.0.3
        ports:
        - containerPort: 5000
This will create a container in a pod based on the backend image I previosly defined, and open the 5000 port.
Next, I’ve defined a service to the backend to expose this container:
---
apiVersion: v1
kind: Service
metadata:
  name: backend
  namespace: dev
spec:
  selector:
    app: backend
  ports:
    - port: 5000
This happens because the selector is set to get the backend app.
The same things are happening for the others as well, the only difference is that redis will mount a volume, and nginx will use some data from a configmap:
# nginx configmap
apiVersion: v1
kind: ConfigMap
metadata:
  name: nginx-config
  namespace: dev
data:
  nginx.conf: |
    events { }

    http {
      upstream frontend {
          server frontend:3000;
      }

      server {
          listen 80;

          location / {
              proxy_pass http://frontend;
              proxy_set_header Host $host;
              proxy_set_header X-Real-IP $remote_addr;
              proxy_set_header X-Forwarded-For $proxy_add_x_forwarded_for;
              proxy_set_header X-Forwarded-Proto $scheme;
          }
      }
    }


# redis deployment using the volume
spec:
    containers:
    - name: redis
      image: redis:6.2.6
      volumeMounts:
      - name: redis-data
        mountPath: /data
    volumes:
    - name: redis-data
      persistentVolumeClaim:
        claimName: redis-data
Ok, now that everything is defined we can apply the code. To do that go to the kubernetes directory and run:
kubectl apply -f .

# To see everything that was created you can easily run:

kubectl get all -n dev
NAME                            READY   STATUS    RESTARTS      AGE
pod/backend-5459857cff-w2z8f    1/1     Running   0             37m
pod/frontend-679cdc8dc7-ts6lz   1/1     Running   0             37m
pod/nginx-6d6b99d9ff-pvzr4      1/1     Running   3 (37m ago)   37m
pod/redis-8545d5dbbf-dfmwz      1/1     Running   0             37m

NAME                   TYPE        CLUSTER-IP      EXTERNAL-IP   PORT(S)        AGE
service/backend        ClusterIP   10.96.185.238           5000/TCP       37m
service/frontend       ClusterIP   10.96.234.210           3000/TCP       37m
service/nginx          NodePort    10.96.254.83            80:30542/TCP   37m
service/redis-server   ClusterIP   10.96.169.17            6379/TCP       37m

NAME                       READY   UP-TO-DATE   AVAILABLE   AGE
deployment.apps/backend    1/1     1            1           37m
deployment.apps/frontend   1/1     1            1           37m
deployment.apps/nginx      1/1     1            1           37m
deployment.apps/redis      1/1     1            1           37m

NAME                                  DESIRED   CURRENT   READY   AGE
replicaset.apps/backend-5459857cff    1         1         1       37m
replicaset.apps/frontend-679cdc8dc7   1         1         1       37m
replicaset.apps/nginx-6d6b99d9ff      1         1         1       37m
replicaset.apps/redis-8545d5dbbf      1         1         1       37m
To access the application from our nginx reverse proxy we can port-forward it for now, as we haven’t defined any loadbalancers:
kubectl port-forward svc/nginx 8080:80 --namespace dev

Forwarding from 127.0.0.1:8080 -> 80
Forwarding from [::1]:8080 -> 80
Now go to localhost:8080 and see if you can access the application:

You can see that the application is working properly.
Pros of using K8s:
Highly scalable and flexible
Large ecosystem and community support
Backed by major cloud providers — AWS, Azure, Google Cloud
Cons of using K8s:
Steeper learning curve
More complex setup and management
Head to Head
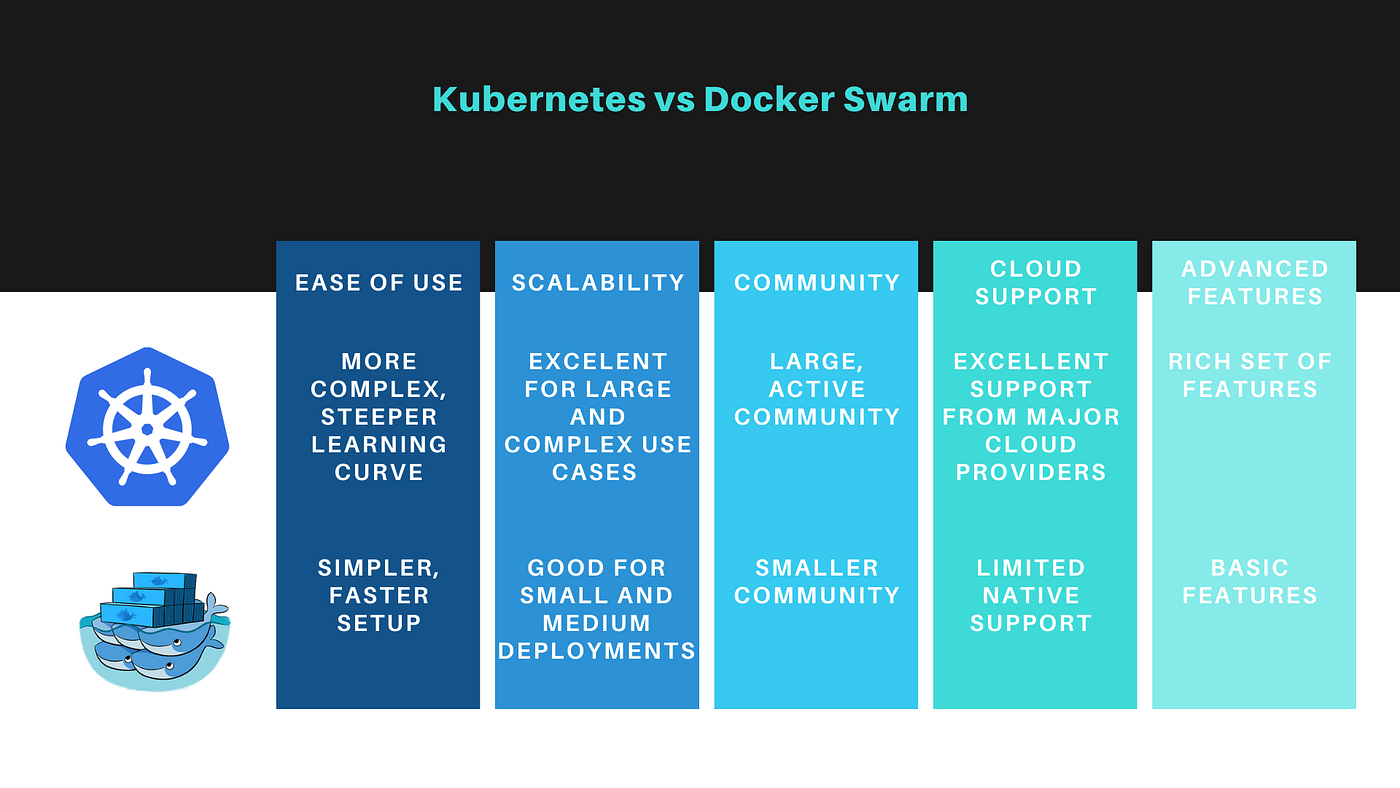
If you are heavily invested in the Docker ecosystem and your team is more familiar with Docker and doesn’t want a steep learning curve, Docker Swarm will be a better choice, especially for a small to mid-sized deployment.
On the other hand, if you working on complex applications, and you need a solution that’s widely adopted in enterprise environments and has dedicated services in major cloud providers, Kubernetes will be the way to go.
Even though Kubernetes is more complex, it offers unparalleled power and flexibility for large-scale deployments.
This part was originally posted on Medium.
8. CICD Pipeline for your Docker images
Repository structure
You can find the repository here.
This is what the repository structure looks like:
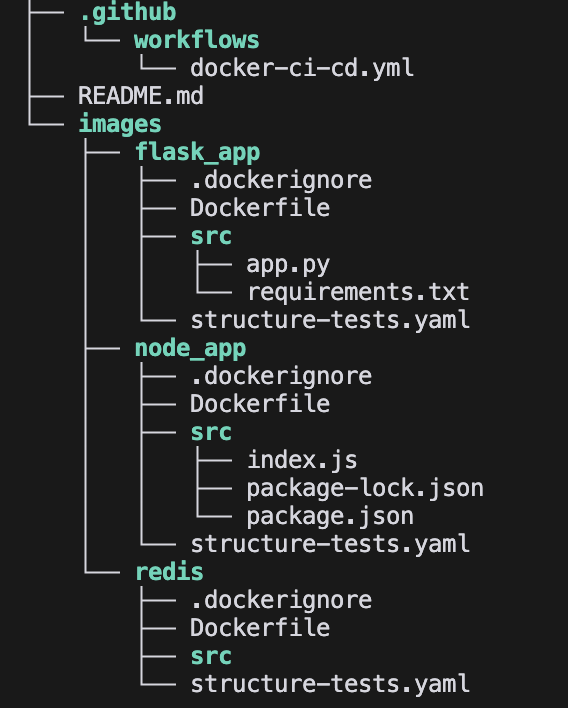
We have a GitHub Actions pipeline called docker-ci-cd.yml, and three images (yes the ones that I’ve started to play around since part 5), each of them with their own Dockerfiles.
Pipeline walkthrough
The worfklow will run only when there are changes to the images, on both pull-requests and merges to the main branch. We have set an environment variable called REGISTRY, in which we specify the GitHub Actions registry.
name: Docker CI/CD Pipeline example

on:
  push:
    branches: ["main"]
    paths:
      - 'images/**'
  pull_request:
    branches: ["main"]
    paths:
      - 'images/**'
env:
  REGISTRY: ghcr.io
In the pipeline, we have three jobs (the last one is just a placeholder that you can build however you’d like):
Detect Changes — This will detect if there are any changes to the images, their code, or even their tests
Build and Push — Builds the image, tests it, runs vulnerability scans, and pushes the images if the branch is main
Deploy — You can modify this job to deploy the containers using whatever orchestrator you want
Let’s start with the Detect Changes job:
detect-changes:
    runs-on: ubuntu-latest
    outputs:
      matrix: ${{ steps.set-matrix.outputs.matrix }}
This job will run on a ubuntu machine, and will declare an output that other jobs will use. This output will be built inside this job in a step called set-matrix.
steps:
    - uses: actions/checkout@v3
      with:
        fetch-depth: 0
First things first, we are checking out the repository, with a fetch-depth of 0, which means all git history is fetched, which is helpful for comparing multiple changes across commits and branches.
- id: set-matrix
  run: |
    if [ "${{ github.event_name }}" == "pull_request" ]; then
      # For pull requests, compare against the base branch
      BASE_SHA=$(git merge-base ${{ github.event.pull_request.base.sha }} ${{ github.sha }})
      CHANGED_DIRS=$(git diff --name-only $BASE_SHA ${{ github.sha }} | grep '^images/' | cut -d/ -f2 | sort -u | jq -R -s -c 'split("\n")[:-1]')
    elif [ "${{ github.event_name }}" == "push" ]; then
      # For pushes, compare against the previous commit
      CHANGED_DIRS=$(git diff --name-only ${{ github.event.before }} ${{ github.sha }} | grep '^images/' | cut -d/ -f2 | sort -u | jq -R -s -c 'split("\n")[:-1]')
    fi
We are checking if the event is either a pull_request or a push, and we will do different things based on the event type.
If the event is a pull_request, we are finding the common ancestor of the pull request’s base branch and the current commit. Based on it, we are running git diff to see all the files and folders that have changed, and we are filtering the results to find only the folders inside the images that have changed. Then with the cut command, we are extracting the subdirectory names within the images folder, and in the end, we are using jq to format the result as JSON.
If the event is a push, we compare the previous commit with the current one, and everything else stays pretty much the same.
If there are no changes, we skip the build with an exit 0 code. Also, at the end, we add our changed directory in the matrix variable and send it to the $GITHUB_OUTPUT variable. This ensures that all the other jobs can access the matrix.
if [ "$CHANGED_DIRS" == "[]" ] || [ -z "$CHANGED_DIRS" ]; then
  echo "No changes detected, skipping build."
  exit 0  # Exit without setting the matrix
fi

echo "matrix=${CHANGED_DIRS}" >> $GITHUB_OUTPUT
The Build and Push job only executes if the detect-changes job detects changes (the matrix output is not empty).
build-and-push:
    needs: detect-changes
    runs-on: ubuntu-latest
    if: ${{ needs.detect-changes.outputs.matrix != '[]' && needs.detect-changes.outputs.matrix != '' }}
    strategy:
      matrix:
        image: ${{fromJson(needs.detect-changes.outputs.matrix)}}
    permissions:
      contents: read
      packages: write
      security-events: write
In the first two steps, we are checking out the repository, and setting up Docker buildx which provides advanced features for building Docker images.
steps:
  - name: Checkout repository
    uses: actions/checkout@v3

  - name: Set up Docker Buildx
    uses: docker/setup-buildx-action@v2
In the next step, we log into the container registry, but only for push events. It uses the GitHub actor as the username and the GitHub token for authentication:
- name: Log in to the Container registry
  if: github.event_name == 'push'
  uses: docker/login-action@v2
  with:
    registry: ${{ env.REGISTRY }}
    username: ${{ github.actor }}
    password: ${{ secrets.GITHUB_TOKEN }}
Now we extract the metadata for the Docker image, including tags and labels — we are generating a tag based on the Git SHA and branch name.
- name: Extract metadata (tags, labels) for Docker
  id: meta
  uses: docker/metadata-action@v4
  with:
    images: ${{ env.REGISTRY }}/${{ github.repository }}/${{ matrix.image }}
    tags: |
      type=sha,prefix={{branch}}-
In the next step, we build the Docker image using the context from the specific image directory. It doesn’t push the image yet but loads it into the Docker daemon:
- name: Build Docker image
  uses: docker/build-push-action@v4
  with:
    context: ./images/${{ matrix.image }}
    push: false
    tags: ${{ steps.meta.outputs.tags }}
    labels: ${{ steps.meta.outputs.labels }}
    cache-from: type=gha
    cache-to: type=gha,mode=max
    load: true
We’ve also included a security vulnerability scanning process based on Trivy, and we are also uploading the security scan result to Security tab.
- name: Run Trivy vulnerability scanner
  uses: aquasecurity/trivy-action@master
  with:
    image-ref: ${{ steps.meta.outputs.tags }}
    format: 'sarif'
    output: 'trivy-results.sarif'
    ignore-unfixed: true
  continue-on-error: true


 - name: Upload Trivy scan results to GitHub Security tab
   uses: github/codeql-action/upload-sarif@v2
   if: always()
   with:
     sarif_file: 'trivy-results.sarif'
As we’ve created a couple of tests for our images, we want to run them before pushing the images, so we are using Google’s container structure tests for that:
- name: Run container structure tests
  run: |
    # Install container-structure-test
    curl -LO https://storage.googleapis.com/container-structure-test/latest/container-structure-test-linux-amd64
    chmod +x container-structure-test-linux-amd64
    sudo mv container-structure-test-linux-amd64 /usr/local/bin/container-structure-test

    # Set the image reference
    IMAGE_REF="${{ steps.meta.outputs.tags }}"

    # Run the tests
    container-structure-test test --image "$IMAGE_REF" --config ./images/${{ matrix.image }}/structure-tests.yaml

  shell: bash

- name: Push Docker image
  if: github.event_name == 'push'
  run: |
    echo "${{ secrets.GITHUB_TOKEN }}" | docker login ghcr.io -u $ --password-stdin
    docker push ${{ steps.meta.outputs.tags }}
In case we have a push event, we are pushing the image to the registry.
The last job, as mentioned before, doesn’t do anything at this moment, but it’s a placeholder for your orchestrator deployment:
deploy:
    needs: build-and-push
    runs-on: ubuntu-latest
    if: github.event_name == 'push' && github.ref == 'refs/heads/main'

    steps:
      - name: Deploy to production
        run: |
          echo "Deploying to production..."
Example Pipeline Run:
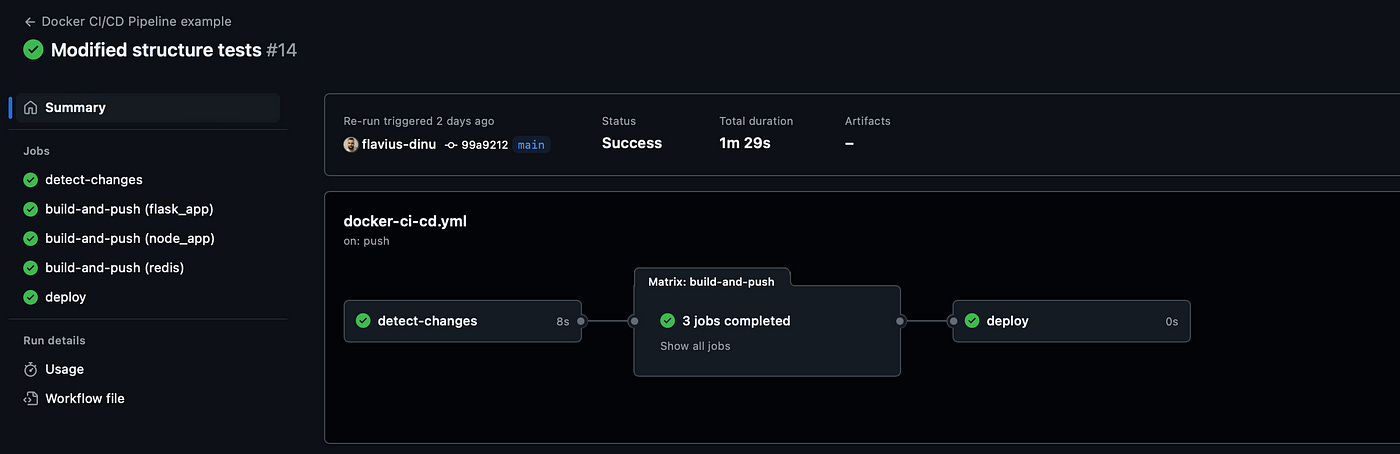
Here are the images pushed to the registry:
Also, you can see all the vulnerabilities pushed under the security tab:
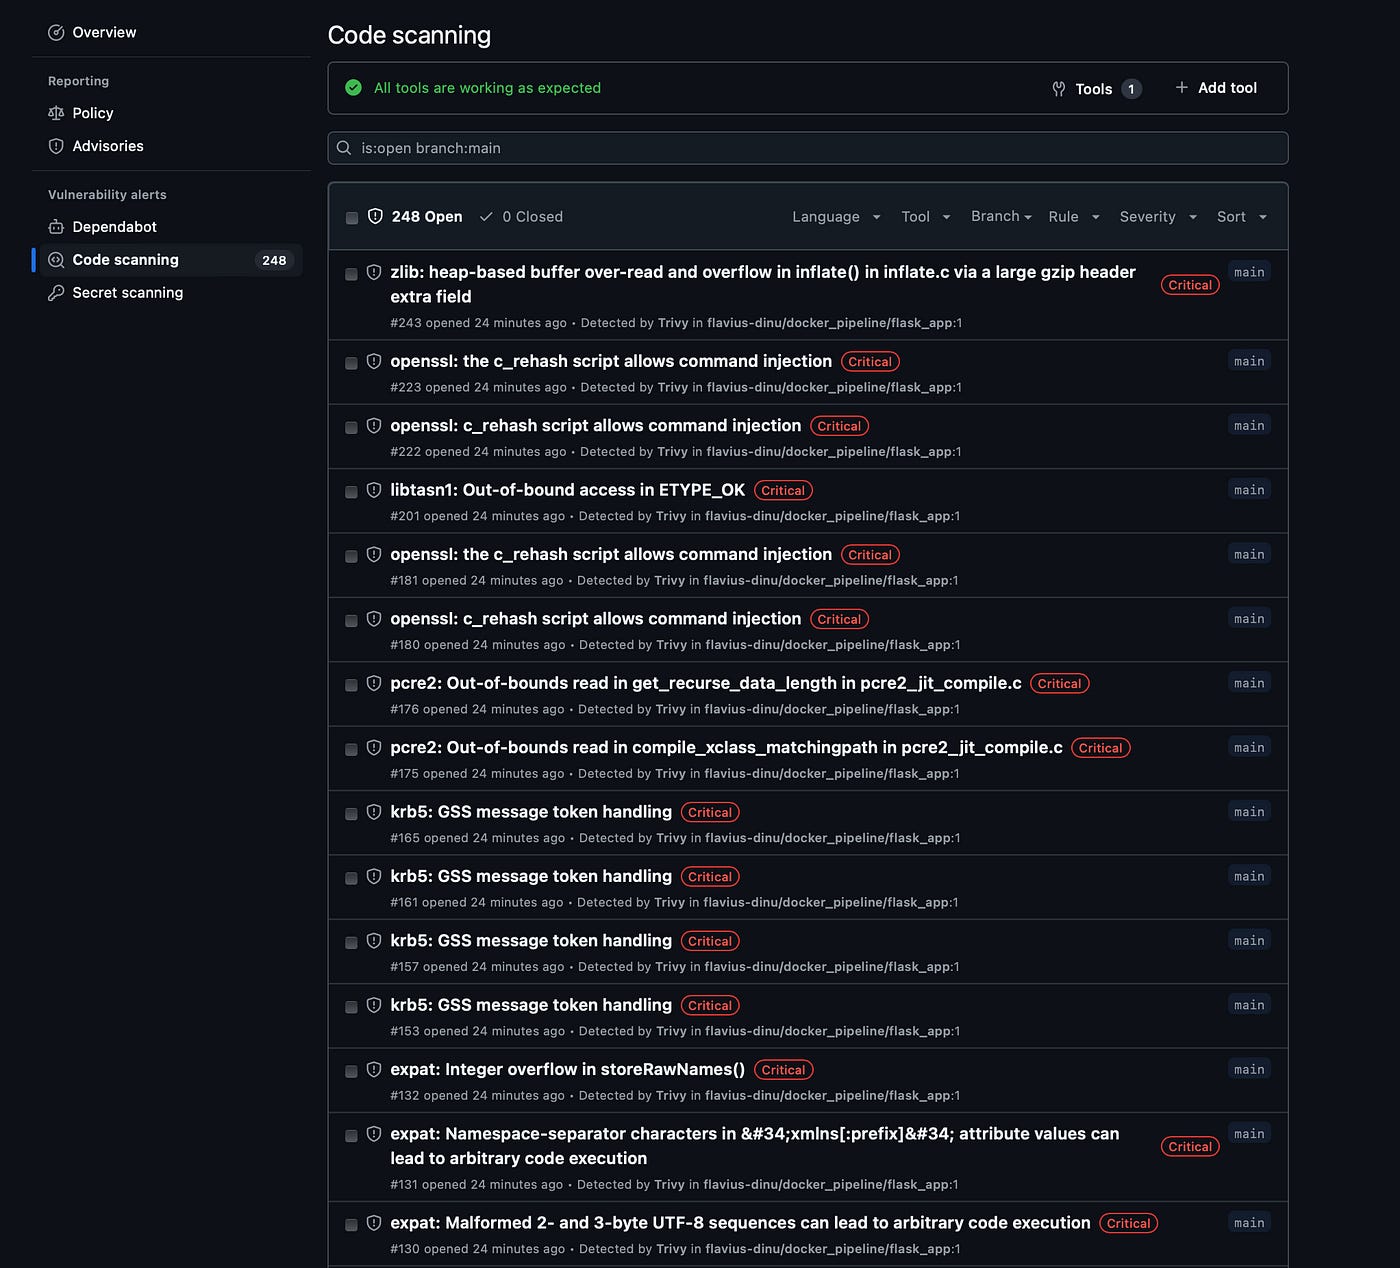
There are many vulnerabilities in these images, and I will solve a couple of them for the Python one, just to show you the number decreases:
This is how the Python image looked before:
FROM python:3.9.7-slim
WORKDIR /app
COPY src/* ./
RUN pip install --no-cache-dir -r requirements.txt
CMD ["python", "app.py"]
This is how it looks now:
FROM python:3.11-slim-bullseye
RUN useradd -m -s /bin/bash appuser
WORKDIR /app
COPY src/* ./
RUN pip install --no-cache-dir -r requirements.txt
USER appuser
CMD ["python", "app.py"]
As you can see, I’ve updated the image to use a newer python version, and made it use a non-root user:
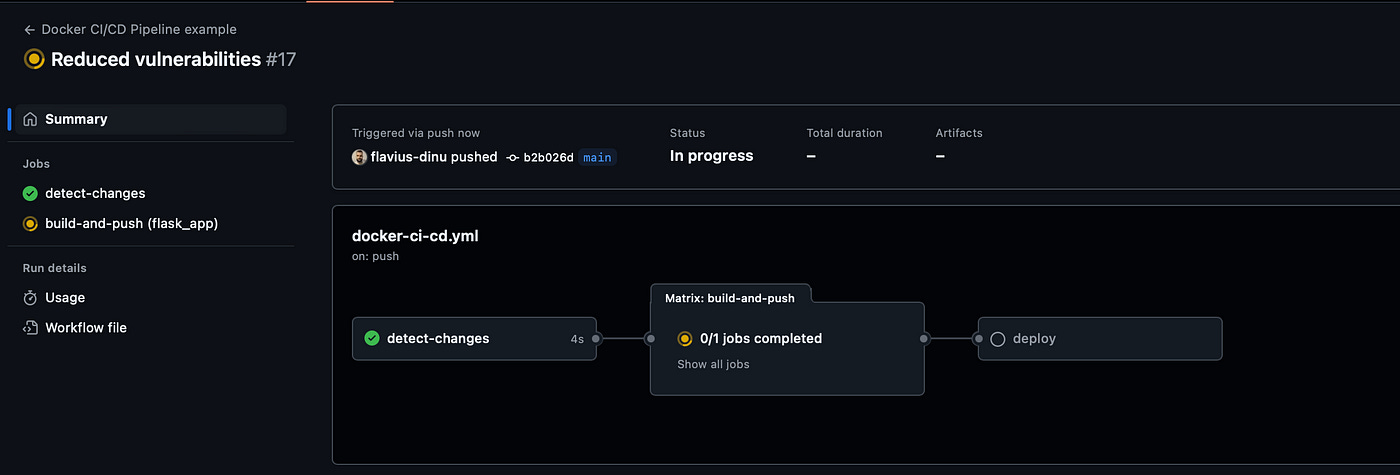
The pipeline is running for it, and at the end, we will see that the number of vulnerabilities has decreased considerably:
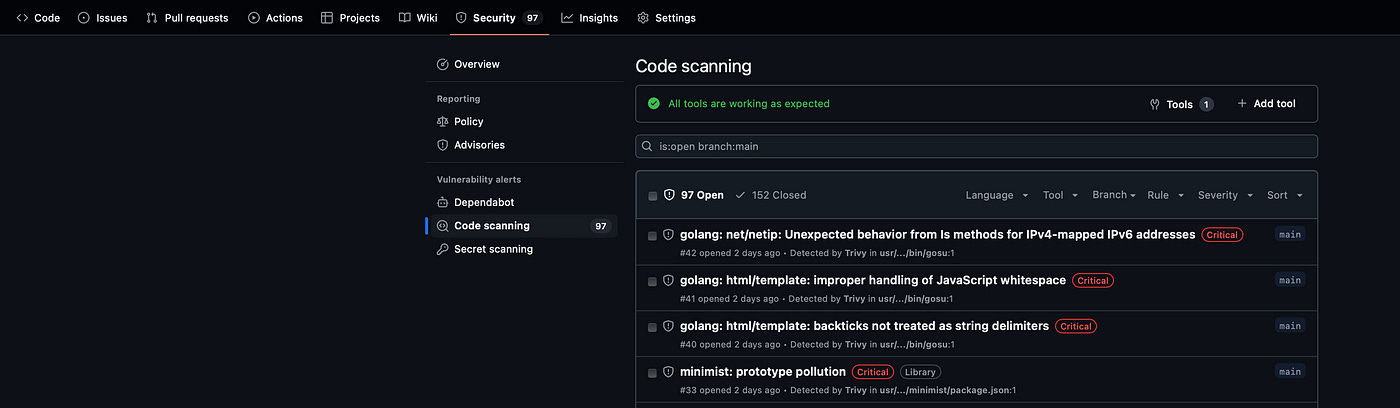
This part was originally posted on Medium.
9. Docker Optimization and Beyond Docker
Dockerfile Optimization
To create lightweight containers there are a few strategies that you should know:
Use multi-stage builds — Separate build and runtime environments, and only copy necessary artifacts to the final image
Choose lightweight base images — Alpine Linux or Distroless images for even smaller sizes
Minimize the number of layers — Combine RUN commands using & &, and use .dockerignore to exclude unnecessary files
Cleanup step in your layer — Remove package manager caches and temporary files
Leverage build-cache — Order layers from least to most frequently changing
Use specific tags for base images — Avoid the latest tag when you are building containers
Let’s see this in action for two images:
- The DevOps development environment image that we’ve built in the second part
flaviuscdinu93/devops-dev-env 1.0.0 c3069a674574 3 weeks ago 351MB
2. A Python image that runs an application:
flaviuscdinu93/python_app 1.0.0 7306a8fe9c7c 50 seconds ago 399MB
This is how the first image looks initially:
FROM alpine:3.20

ENV TERRAFORM_VERSION=1.5.7 \
    OPENTOFU_VERSION=1.8.1 \
    PYTHON_VERSION=3.12.0 \
    KUBECTL_VERSION=1.28.0 \
    ANSIBLE_VERSION=2.15.0 \
    GOLANG_VERSION=1.21.0 \
    PIPX_BIN_DIR=/usr/local/bin

RUN apk add --no-cache \
    curl \
    bash \
    git \
    wget \
    unzip \
    make \
    build-base \
    py3-pip \
    pipx \
    openssh-client \
    gnupg \
    libc6-compat

RUN wget -O terraform.zip https://releases.hashicorp.com/terraform/${TERRAFORM_VERSION}/terraform_${TERRAFORM_VERSION}_linux_amd64.zip && \
    unzip terraform.zip && \
    mv terraform /usr/local/bin/ && \
    rm terraform.zip

RUN wget -O tofu.zip https://github.com/opentofu/opentofu/releases/download/v${OPENTOFU_VERSION}/tofu_${OPENTOFU_VERSION}_linux_amd64.zip && \
    unzip tofu.zip && \
    mv tofu /usr/local/bin/ && \
    rm tofu.zip

RUN curl -LO "https://dl.k8s.io/release/v$KUBECTL_VERSION/bin/linux/amd64/kubectl" && \
    chmod +x kubectl && \
    mv kubectl /usr/local/bin/

RUN pipx install ansible-core==${ANSIBLE_VERSION}

WORKDIR /workspace

CMD ["bash"]
For this example, I won’t use multi-stage builds, as I’ll leverage them for the next image. Now, let’s combine all RUN instructions in a single RUN instruction, remove wget (use only curl), and remove the root cache.
FROM alpine:3.20

ENV TERRAFORM_VERSION=1.5.7 \
    OPENTOFU_VERSION=1.8.1 \
    KUBECTL_VERSION=1.28.0 \
    ANSIBLE_VERSION=2.15.0 \
    PIPX_BIN_DIR=/usr/local/bin

WORKDIR /workspace

RUN apk add --no-cache \
    bash \
    curl \
    git \
    unzip \
    openssh-client \
    py3-pip \
    pipx && \
    curl -L -o terraform.zip https://releases.hashicorp.com/terraform/${TERRAFORM_VERSION}/terraform_${TERRAFORM_VERSION}_linux_amd64.zip && \
    unzip terraform.zip && \
    mv terraform /usr/local/bin/ && \
    rm terraform.zip && \
    curl -L -o opentofu.zip https://github.com/opentofu/opentofu/releases/download/v${OPENTOFU_VERSION}/tofu_${OPENTOFU_VERSION}_linux_amd64.zip && \
    unzip opentofu.zip && \
    mv tofu /usr/local/bin/ && \
    rm opentofu.zip && \
    curl -LO "https://dl.k8s.io/release/v${KUBECTL_VERSION}/bin/linux/amd64/kubectl" && \
    chmod +x kubectl && \
    mv kubectl /usr/local/bin/ && \
    pipx install ansible-core==${ANSIBLE_VERSION} && \
    rm -rf /root/.cache && \

CMD ["bash"]
I’ve built the image and used a 1.0.1 tag:
flaviuscdinu93/devops-dev-env 1.0.1 8d1344dd324c 5 seconds ago 340MB
As you can see, the optimization isn’t that big, we’ve reduced just 11MB.
Now, let’s leverage a multi-stage build for the second image. The image initially looks like this:
FROM ubuntu:20.04

RUN apt-get update && \
    apt-get install -y python3 python3-pip

WORKDIR /app

COPY backend/ /app

RUN pip3 install -r requirements.txt

EXPOSE 5000

CMD ["python3", "app.py"]
I will switch the image from ubuntu to alpine and leverage a multi stage build:
FROM python:3.9-alpine as builder

WORKDIR /app

RUN apk add --no-cache build-base

COPY backend/requirements.txt .

RUN pip install --no-cache-dir --user -r requirements.txt

COPY backend/app.py .

FROM python:3.9-alpine

WORKDIR /app

COPY --from=builder /app/app.py .
COPY --from=builder /root/.local /root/.local

ENV PATH=/root/.local/bin:$PATH

EXPOSE 5000

CMD ["python", "app.py"]
After building the image, this is the result:
flaviuscdinu93/python_app 1.0.0-alpine 41243d14a523 1 second ago 59.6MB
We’ve reduced the initial image from almost 400MB to 60MB.
Docker deployment strategies
There are multiple deployment strategies that can be used to deploy your containers, and it all depends on what other tools you are using in your ecosystem.
1. Single-container deployment
In some special cases, deploying a single Docker container might be enough. What you’ll need to do is package your application and its dependencies into a Docker image and run it as a container on a machine.
Best Practices:
Use official base images — Start with minimal and secure base images from trusted sources
Optimize the Dockerfile — You should minimize the number of layers and remove unnecessary files to reduce the image size
Environment variables — Leverage environment variables for configuration to maintain portability across environments.
2. Multi-Container deployment with Docker Compose
Docker Compose can be easily used for defining and running multi-container Docker applications. As you already know, you can easily manage multiple services using a single docker-compose.yml file. If you haven’t seen the docker-compose article, take a look here.
Best Practices:
Service isolation — You should define each service in its own container to improve modularity
Networking — Use Docker network features to enable communication between containers (create the networks to fit your needs). Don’t rembember how? Take a look here.
Volumes — Remember the Nginx + NodeJS + Flask + Redis example built here? We’ve used volumes for data persistence to prevent data loss when recreating containers
3. Container orchestration with Kubernetes or Docker Swarm
For complex applications requiring scalability and high availability, leverage Kubernetes or Docker Swarm.
If you don’t remember what you can do with Kubernetes or Docker Swarm take a look at the K8s and Swarm part.
4. Use CI/CD pipeline
Integrating Docker into your CI/CD pipeline automates the building, testing, and deployment of applications. They will make your life easier. Check out an example of a GitHub Actions CI/CD pipeline here.
Best Practices:
Automated builds — Use CI/CD tools like Jenkins, GitLab CI/CD, or GitHub Actions to automate Docker image builds
Testing — Implement automated testing at each stage to catch issues early
Versioning and tagging — Tag Docker images with meaningful version numbers or commit hashes for traceability
5. Blue-Green Deployments
Blue-green deployment involves running two identical production environments. One of them (blue) is live and serves all production traffic, while the other one (green) is idle. When deploying a new version, you switch the traffic from blue to green after ensuring that everything works as planned. Then you can decide what you want to do with the blue environment (decommission or repurpose)
Advantages:
Zero downtime — Users experience no downtime during deployment
Easy rollbacks — You can revert traffic to the previous version quickly if there are any issues with your deployments
6. Canary Deployments
Canary deployment is a strategy to roll out the new version to a small subset of users before a full release. This minimizes risk by limiting exposure to potential issues.
Best Practices:
Monitoring — Closely monitor the performance and errors in the canary deployment
Gradual rollout — Increase the percentage of traffic to the new version incrementally
7. Rolling Updates
Rolling updates replace instances of your application one at a time with the new version. This ensures that a few cases are always serving requests, providing continuous availability.
Depending on what tools you are using in your ecosystem to deploy your Docker containers, you will most likely have to check out the best practices on how to implement the best deployment strategies.
Beyond Docker
Podman

Podman is a daemon-less container engine developed by Red Hat that allows you to run and manage containers without the need for a central daemon (unlike the Docker engine). It adheres to the Open Container Initiative (OCI) standards, ensuring compatibility with Docker images and container registries.
Key Features
Daemon-less architecture — You won’t need root-running daemon, enhancing security
Rootless containers — Enables running containers without root privileges
Docker-compatible CLI — Supports many Docker commands, making it easy to transition
Building Images with Podman
Building images with Podman is nearly identical to Docker, using the same Dockerfile syntax.
podman build -t myimage:latest -f Dockerfile .LXC

LXC is an operating-system-level virtualization method for running multiple isolated Linux systems (containers) on a single host. It provides a lightweight alternative to full-machine virtualization.
Key Features
System containers — Offers containers that behave like complete Linux systems
Low overhead — Utilizes kernel features for isolation, ensuring minimal performance overhead
customization : You can easily customize the container environment
Building Images with LXC
LXC doesn’t use images in the same way Docker does, and it relies on templates to create containers.
Creating an LXC Container
sudo lxc-create -n mycontainer -t ubuntuCRI-O

CRI-O is an open-source container runtime for Kubernetes that implements the Kubernetes Container Runtime Interface (CRI) using OCI-compliant runtimes. It aims to provide a lightweight alternative to Docker for Kubernetes environments.
Key Features
Kubernetes integration — It is specifically designed for K8s
Lightweight runtime — Reduces overhead by removing unnecessary components.
Security enhancements — Supports advanced security features like SELinux.
Building Images with CRI-O
CRI-O focuses solely on running containers and does not include image-building capabilities. To build images, you can use Buildah , another tool from the same ecosystem.
Building Images with Buildah
buildah bud -t myimage:latest .

buildah push myimage:latest docker://registry.example.com/myimage:latest
This part was originally posted on Medium.
Hope it helps!
Keep up building!


