"Every developer should try to self host at least once" - anonymous
I recall seeing a similar sentiment pop up on Reddit months ago, and it genuinely sparked a feeling of FOMO – a worry that I was missing out on something important. Despite working in this industry for a considerable time, I haven’t yet explored setting up my own home server.
Currently, I rely on services like Google Drive, Dropbox, and iCloud for file backups, which are convenient, but I recognize that we’re essentially entrusting our data to these companies and I'm now considering the potential benefits of taking control of my data by exploring home server options.
Then the journey begins...
I bought a barebone Mini PC since I have spare laptop RAM and NVME SSD lying around my house. I then downloaded Ubuntu Server and use Balena Etcher to flash the ISO image into my flash drive.
The setup begins by connecting a monitor, keyboard and ethernet cable for internet access in the PC and installing the operating system. There are many tutorials online on how to perform this tasks but I am pretty sure you already know how to do these things. After installation and logging in, I ran the following command:
sudo ufw allow sshThis command will help you remotely access your machine so that you can remove the keyboard and the monitor connected into it (In my case, I am using those things for my work laptop 😂). You can also enable http and https in order to access your server in your preferred browser of choice.
I chose Casa OS to run my home server dashboard and applications. It is a community based open source software that is also very beginner friendly, which is ideal for users like me. In order to install it, just run the following command:
curl -fsSL https://get.casaos.io | sudo bashCasa OS by default runs on port 80, but you can always change the port using the following command:
sudo bash -c "$(wget -qLO - https://raw.githubusercontent.com/bigbeartechworld/big-bear-scripts/master/change-casaos-web-ui-port/run.sh)"After installing Casa OS, access your dashboard in your preferred browser using the link pattern

I have the following apps installed currently:
- Transmission: A torrent client.
- Immich: Similar to Google Photos, backups my photos and videos.
- AdGuard Home: A personal DNS that I used to block unnecessary ads.
- Jellyfin: Similar to Netflix, but the media content are at your control 😉.
- Vaultwarden: A password manager.
- Open WebUI: I use it for user interface of my running Ollama models.
As of the moment, the following applications will suffice for my personal use case. Having this kind of machine helps me become more in control of my data.
Here comes the challenge...
Even though my setup runs smoothly and within expectations, I still cannot access it outside my home network. Yeah, I touch some grass also 🤣. I need to access my home server outside of my home network but without the risk of exposing my data into public web.
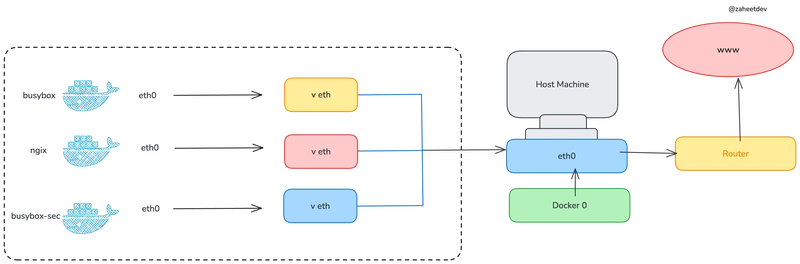
Here then comes VPN (Virtual Private Network) which is basically establishes a protected network connection when using public networks. I already have relevant experiences with this one as some of my previous projects involves private repositories that can only be accessed by connecting into the client's VPN. There are many solutions for this specific use case like WireGuard, but in this particular blog, I chose Tailscale.
Tailscale has a very generous free tier, which contains the following:
- Up to 3 users
- Up to 100 devices
- Access to nearly all Tailscale features
You can start your Tailscale account here.
In order to use Tailscale in your home server. You need to install it first by running the following command in your terminal:
curl -fsSL https://tailscale.com/install.sh | shAfter installing Tailscale, your device must be visible now in your Tailscale machine dashboard. They also have comprehensive documentation for other functionalities and guides.
I installed their mobile application in my device, activated the VPN and I was able to view the IP designated to my home server.
But Michael, I don't want to input IP address when accessing my home server every time!
I gotchu fam! Here's where DNS (Domain Name System) comes into action. DNS acts like a phonebook of the internet which translates human readable domain names like facebook.com into their appropriate IP addresses like the ones Tailscale VPN assigned to our corresponding machines.
You can always buy some domain names online like in Google Domains, Namecheap and GoDaddy. In this particular scenario, I will be using Duck DNS which is a free dynamic public DNS.
First, you must obtain your API key from Duck DNS by signing in. In my case, I use X to sign in and get my own API key. Then, register a subdomain you want to have and add the corresponding IP designated by Tailscale for your home server. Finally, your Duck DNS dashboard should look like this:
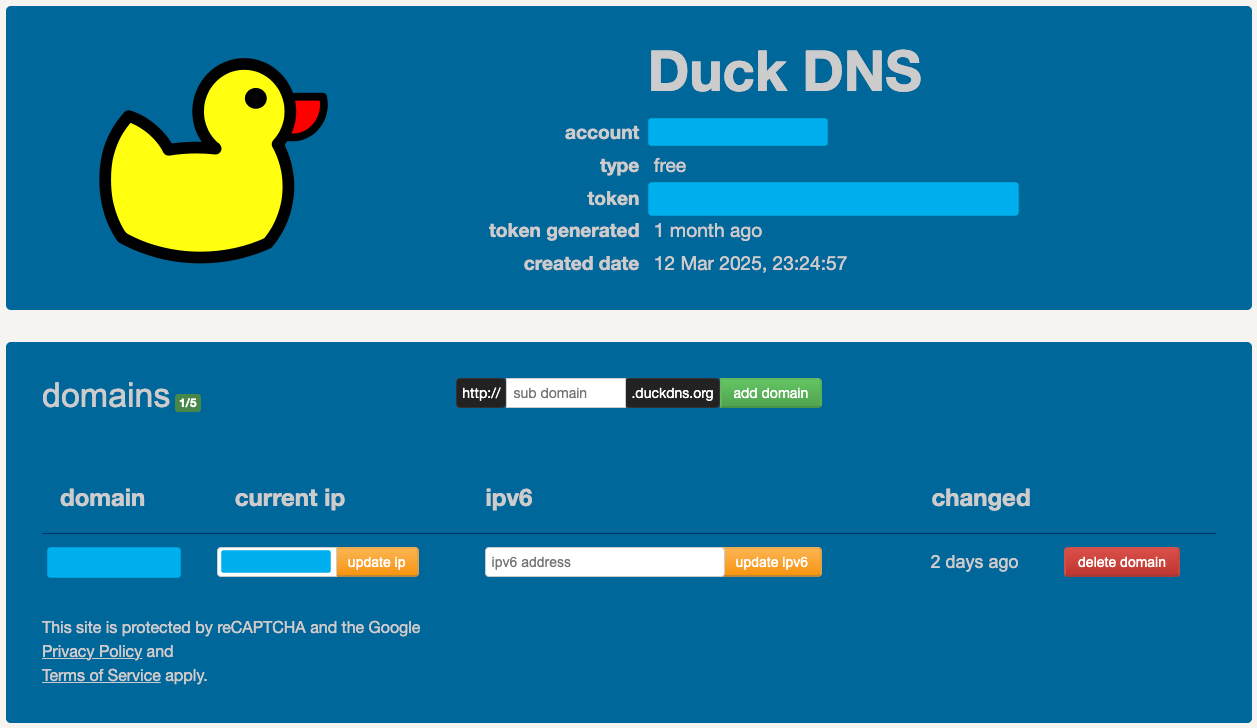
This single record will suffice as we will be using a reverse proxy to map each of our application. For the reverse proxy solution, we will be using Caddy, particularly xcaddy.
To install xcaddy, log into your home server and run the following commands:
sudo apt install -y debian-keyring debian-archive-keyring apt-transport-https
curl -1sLf 'https://dl.cloudsmith.io/public/caddy/xcaddy/gpg.key' | sudo gpg --dearmor -o /usr/share/keyrings/caddy-xcaddy-archive-keyring.gpg
curl -1sLf 'https://dl.cloudsmith.io/public/caddy/xcaddy/debian.deb.txt' | sudo tee /etc/apt/sources.list.d/caddy-xcaddy.list
sudo apt update
sudo apt install xcaddy
After installing xcaddy, run the following command to install Caddy with Duck DNS module included:
xcaddy build --with github.com/caddy-dns/duckdnsThe executable caddy file will be added in your current working directory and for the next steps, we will be setting up Caddy to run as a service. This Caddy documentation will help you to make it happen.
After setting the Caddy as a service, it's time for editing the Caddyfile. This file will hold your domain name/s to home server application/s mapping. Here's my configuration:
# This configuration holds your API key configuration and enables you to use wildcard (*) for your Duck DNS domain
(duckdns) {
    tls {
        dns duckdns  {
            override_domain .duckdns.org
        }
    }
}

# This will be the root mapping of your Duck DNS domain to Casa OS dashboard
.duckdns.org {
    import duckdns
    reverse_proxy localhost:
}

# This will map wildcard domains to your home server applications. For this example, I use jellyfin
*..duckdns.org {
    import duckdns

    @jellyfin host jellyfin..duckdns.org
    handle @jellyfin {
        reverse_proxy localhost:
    }
}
Finally, save the Caddyfile and restart the service using the following command:
sudo systemctl restart caddyYou must now be able to access your home server dashboard everywhere using Tailscale VPN and your Duck DNS name from your preferred web browser.
Just in case you're curious about the background image of my Casa OS dashboard, that was made by @artbymerisu. She's a great artist and creates beautiful anime wallpapers.