In this post, I’ll walk you through launching a Red Hat Enterprise Linux 9 (RHEL9) virtual machine using Amazon EC2. This setup is beginner-friendly, using free-tier eligible services. This setup allows you to practice Linux and cloud skills; this may also be an option when a physical test machine is not available.

📑 Table of Contents
- What You’ll Need
- Step 1: Launch an EC2 Instance
- Step 2: Configure Instance Details
- Step 3: Set Inbound Security Group Rules
- Step 4: Connect to Your Instance via SSH
- Step 5: Verify OS and Update the System
🧾 What You’ll Need
- An AWS Free Tier account
- Terminal access (CloudShell)
- A basic understanding of SSH
🪟 Step 1: Launch an EC2 Instance
- Log into the AWS Management Console
- Navigate to the EC2 Dashboard and click Launch Instance
- Enter a name (e.g.,
rhel9-vm) - Under Amazon Machine Image (AMI), select:
- Red Hat Enterprise Linux 9 (HVM), SSD Volume Type
- Found under the Quick Start AMIs
- ✅ Marked as Free Tier eligible
⚙️ Step 2: Configure Instance Details
-
Instance type:
t2.micro(Free Tier) -
Key pair:
- Create a new one or use an existing
.pemfile - Make sure to download and save it securely
- Create a new one or use an existing
- Storage: 10 GiB is the default and works fine for this setup
- Network settings: Use the default VPC or your preferred subnet
🔐 Step 3: Set Inbound Security Group Rules
Make sure the instance allows SSH access:
This should be default, but here are edit steps if needed:
- Under Security Group Settings, click Edit inbound rules
- Add a rule with the following:
- Type: SSH
- Protocol: TCP
- Port Range: 22
- Source: My IP (recommended)
This is required to access your VM via SSH.
🌐 Step 4: Connect to Your Instance via SSH
Once your instance state is running, do the following:
- Locate the Public IPv4 address in the EC2 dashboard
- In your terminal, navigate to the folder with your
.pemfile -
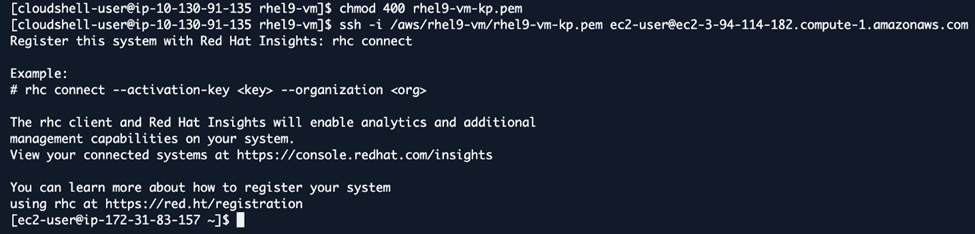
Change the permissions to secure the key:
chmod 400 your-key.pem -
Connect to your instance:
ssh -i your-key.pem ec2-user@your-public-ip
⚠️ Without the correct permissions on the
.pemfile, SSH will throw a warning and refuse to connect. Usechmod 400to fix this.
Snippet:
🖥️ Step 5: Verify OS and Update the System
Once logged in, verify the RHEL version:
cat /etc/redhat-releaseYou should see:
Red Hat Enterprise Linux release 9.x (Plow)Snippet:

Update installed packages:
sudo dnf update -y📌 Key Reminders
- ✅ RHEL 9 is available in Quick Start AMIs and is Free Tier eligible
- 🔐 Inbound security group rules must allow SSH (TCP on port 22)
- 🔑 Set file permissions with chmod 400 before connecting via SSH
- 👤 Use the default EC2 username: ec2-user
🧠 What I Learned
- Launching a Linux instance on AWS is straightforward and quick
- Red Hat Enterprise Linux 9 is a stable and powerful system
- Understanding security group settings is key for successful connections
🔧 Next Steps
I’ll be using RHEL9 to:
- Practice Linux terminal commands
- Explore system-level configurations and services
💬 Let’s Connect
https://www.linkedin.com/in/ltwilliams-tech/
If you’re exploring AWS, Linux, or cloud computing, feel free to connect or drop your thoughts.