Project Overview
Imagine a world where infrastructure provisions itself, deployments happen at the speed of light, and applications run seamlessly in containers. Sounds like DevOps heaven, right? Well, that’s exactly what we’ve built! This project is a Flask API running on AWS EC2, with a PostgreSQL database, fully automated using Terraform, Docker, and GitHub Actions. No more manual configurations—just pure DevOps wizardry! 🧙♂️✨
Why This Project?
We set out to create a fully automated deployment pipeline with a few key objectives:
✅ Automate Deployments – Because clicking buttons is overrated.
✅ Infrastructure as Code (IaC) – Terraform makes provisioning as easy as writing poetry.
✅ Containerization – So our app runs smoothly, anywhere, anytime.
✅ AWS Deployment – Because cloud is king, and EC2 is our throne.
🛠 Tech Stack & Tools Used
Infrastructure & Deployment
🔹 AWS EC2 → Our app’s luxurious penthouse in the cloud.
🔹 Terraform → Automates infrastructure like a charm.
🔹 GitHub Actions → Our deployment butler, making CI/CD effortless.
🔹 Docker & Docker Compose → Containers keep our app lightweight and portable.
🔹 SSH (appleboy/ssh-action) → Because deploying securely is non-negotiable.
Backend & Database
🔹 Flask → Python’s sleek and simple web framework.
🔹 PostgreSQL → The brain storing all our precious data.
Version Control & Registry
🔹 Git & GitHub → Our code’s happy place.
🔹 Docker Hub → The treasure chest for our container images.
Security & Networking
🔹 IAM Roles & Policies → Guarding AWS like a bouncer at an exclusive club.
🔹 Security Groups → Keeping unwanted traffic out like a medieval fortress.
📌 Project Setup & Installation Guide
This guide will walk you through setting up the project from scratch. No magic wands required, just follow these steps! 🧙♂️
🛠 Prerequisites
Before you dive in, ensure you have these installed:
🔹 On Your Local Machine:
✅ Git → Version control is life.
✅ Docker & Docker Compose → Containerization makes life easier.
✅ Python 3.x & pip → Flask won’t run without it.
✅ Terraform → Because writing YAML files is old school.
✅ AWS CLI → Talking to AWS like a pro.
🔹 On AWS EC2 Instance:
✅ Ubuntu 22.04 (or latest stable version).
✅ Docker & Docker Compose installed.
✅ PostgreSQL installed manually or via Docker.
📂 Cloning the Repositories
Now let’s grab the code and start the fun!
# Clone the main project repo
git clone https://github.com/DestinyObs/ictg_task.git
cd ictg_task

# Clone the Terraform automation repo
git clone https://github.com/DestinyObs/ictg_automate_v2.git
cd ictg_automate_v2
⚙️ Setting Up Infrastructure on AWS with Terraform
Terraform is our infrastructure wizard, automating EC2 provisioning and security configurations so we don’t have to click around AWS like it’s 2010.
🏗️ Provisioning an EC2 Instance with Terraform
🔹 Steps to Deploy:
1️⃣ Navigate to the Terraform automation repository:
cd ictg_automate_v22️⃣ Initialize Terraform:
terraform init3️⃣ Validate the configuration:
terraform validate4️⃣ Preview what Terraform is about to create:
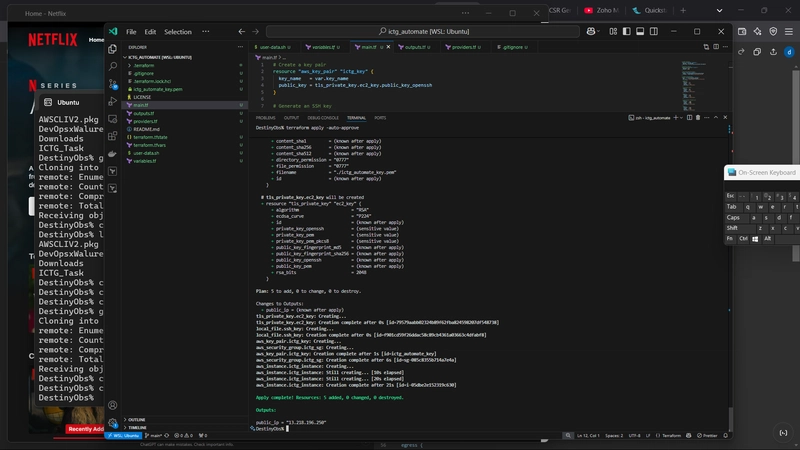
terraform plan5️⃣ Apply and deploy the infrastructure:
terraform apply -auto-approve💡 After execution, Terraform will provide the EC2 instance details like IP address and security settings.
🛠️ 1. Infrastructure Setup (Terraform)
🔑 1.1 Generating an SSH Key Pair
Before launching the EC2 instance, we need an SSH key to securely connect to it.
resource "tls_private_key" "ec2_key" {
  algorithm = "RSA"
  rsa_bits  = 2048
}
📌 Explanation:
✅ Generates an RSA 2048-bit private key for SSH authentication. No more passwords—only secure keys!
🔑 1.2 Creating a Key Pair in AWS
To allow SSH access, we need to register the public key with AWS.
resource "aws_key_pair" "ictg_key" {
  key_name   = var.key_name
  public_key = tls_private_key.ec2_key.public_key_openssh
}
📌 Explanation:
✅ This creates an AWS Key Pair using our generated SSH key.
✅ The private key remains local for secure SSH connections.
📂 1.3 Storing the Private Key Locally
Terraform saves the private key to a file for authentication.
resource "local_file" "ssh_key" {
  content  = tls_private_key.ec2_key.private_key_pem
  filename = "${path.module}/ictg_automate_key.pem"
}
📌 Important: Keep this key safe—losing it is like losing your house keys, but worse.
🔒 1.4 Security Group Configuration
A Security Group defines what network traffic is allowed.
resource "aws_security_group" "ictg_automate_sg" {
  name        = var.security_group_name
  description = "Allow SSH, HTTP, and necessary ports"

  ingress {
    from_port   = 22
    to_port     = 22
    protocol    = "tcp"
    cidr_blocks = ["0.0.0.0/0"] # Open for SSH (Restrict in production)
  }

  ingress {
    from_port   = 8000
    to_port     = 8000
    protocol    = "tcp"
    cidr_blocks = ["0.0.0.0/0"] # Backend API access
  }

  ingress {
    from_port   = 5173
    to_port     = 5173
    protocol    = "tcp"
    cidr_blocks = ["0.0.0.0/0"] # Frontend access
  }

  ingress {
    from_port   = 5432
    to_port     = 5432
    protocol    = "tcp"
    cidr_blocks = ["0.0.0.0/0"] # PostgreSQL database access
  }

  egress {
    from_port   = 0
    to_port     = 0
    protocol    = "-1"
    cidr_blocks = ["0.0.0.0/0"] # Allow all outbound traffic
  }
}
📌 Explanation:
✅ SSH (22) → Remote access.
✅ Backend (8000) → API communication.
✅ Frontend (5173) → Web app access.
✅ Database (5432) → PostgreSQL connectivity.
✅ Outbound rule → Allows all outgoing traffic for smooth operations.
💻 1.5 Creating the EC2 Instance
Finally, let’s provision our EC2 instance with Terraform.
resource "aws_instance" "app_server" {
  ami           = var.ami_id
  instance_type = var.instance_type
  key_name      = aws_key_pair.ictg_key.key_name
  security_groups = [aws_security_group.ictg_automate_sg.name]

  user_data = file("${path.module}/app-setup.sh")

  provisioner "file" {
    source      = "app-setup.sh"
    destination = "/home/ubuntu/app-setup.sh"
  }

  provisioner "remote-exec" {
    inline = [
      "chmod +x /home/ubuntu/app-setup.sh",
      "sudo /home/ubuntu/app-setup.sh"
    ]
  }

  connection {
    type        = "ssh"
    user        = "ubuntu"
    private_key = tls_private_key.ec2_key.private_key_pem
    host        = self.public_ip
  }

  tags = {
    Name = "ICTG App Server"
  }
}
📌 Explanation:
✅ Uses an Ubuntu AMI (adjust as needed).
✅ Attaches the Security Group.
✅ Uploads and executes a setup script (app-setup.sh).
✅ Establishes an SSH connection.
📍 1.6 Outputting Important Details
Terraform outputs key details so you don’t have to dig around AWS.
output "instance_public_ip" {
  description = "Public IP of the EC2 instance"
  value       = aws_instance.app_server.public_ip
}

output "private_key_file" {
  description = "Path to the private key file"
  value       = local_file.ssh_key.filename
}

output "security_group_id" {
  description = "ID of the created security group"
  value       = aws_security_group.ictg_automate_sg.id
}
📌 Explanation:
✅ Public IP → Needed to access the server.
✅ Private Key File → Used for SSH login.
✅ Security Group ID → For managing network rules.

🚀 Next Steps: Now that our infrastructure is live, let’s move on to containerizing the application with Docker! 🐳
🐳 2. Containerizing the Application (Docker Setup)
The application is containerized using Docker for consistency and portability.
🔹 Steps to Build and Run Locally:
1️⃣ Navigate to the project directory:
cd ictg_task2️⃣ Build and start the containers using Docker Compose:
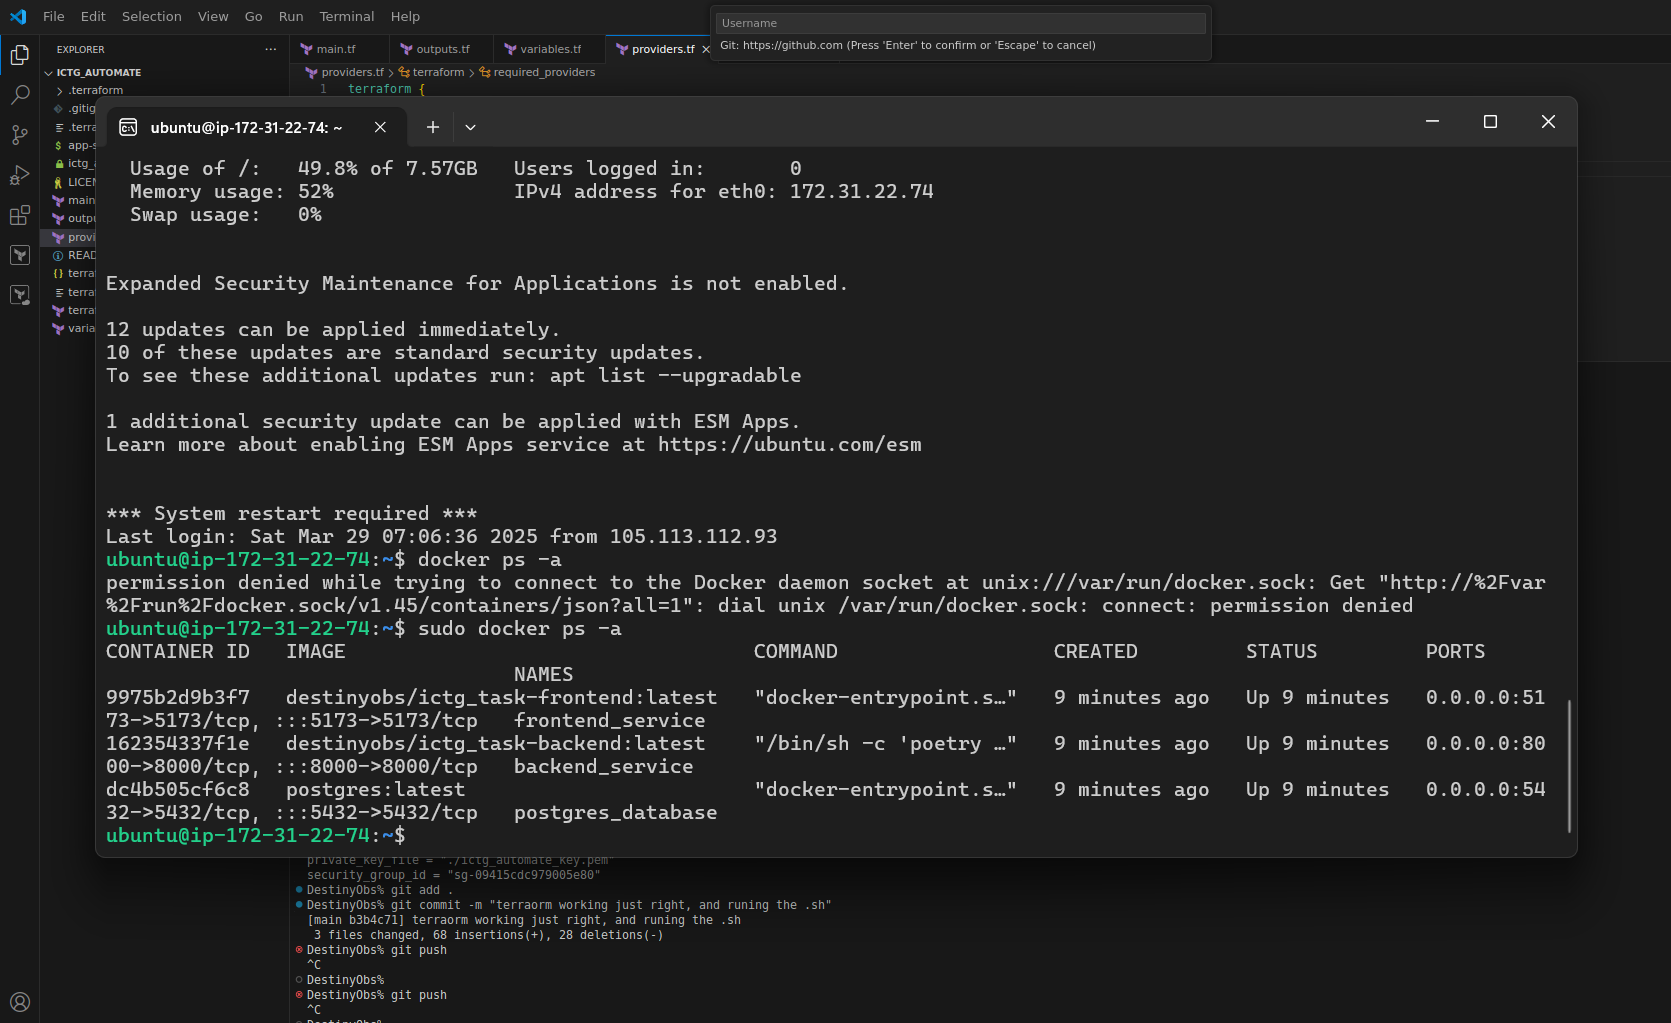
docker-compose up --build -d3️⃣ Verify that the containers are running:
docker ps🔹 Docker Compose Configuration
version: "3.8"
services:
  backend:
    build:
      context: ./backend
    container_name: backend_service
    ports:
      - "8000:8000"
    depends_on:
      - database
    env_file:
      - ./backend/.env
    networks:
      - devops-network
    restart: unless-stopped

  frontend:
    build:
      context: ./frontend
    container_name: frontend_service
    ports:
      - "5173:5173"
    env_file:
      - ./frontend/.env
    networks:
      - devops-network
    restart: unless-stopped

  database:
    image: postgres:latest
    container_name: postgres_database
    ports:
      - "5432:5432"
    volumes:
      - ./postgres_data:/var/lib/postgresql/data
    env_file:
      - ./backend/.env
    networks:
      - devops-network
    restart: unless-stopped

networks:
  devops-network:
    driver: bridge
📌 Explanation:
✅ Backend (Flask API) → Runs on port 8000.
✅ Frontend (React/Vue) → Runs on port 5173.
✅ Database (PostgreSQL) → Runs on port 5432.
✅ Uses Environment Variables from .env files.
✅ Ensures services restart if they fail (restart: unless-stopped).
🚀 3. Deploying the Application to EC2
Once Terraform provisions the EC2 instance, GitHub Actions will handle automatic deployment.
🔹 Manual Deployment via SSH (Optional Alternative to CI/CD)
If needed, you can manually deploy using SSH:
1️⃣ SSH into the EC2 instance:
ssh -i your-key.pem ubuntu@2️⃣ Pull the latest Docker images from Docker Hub:
docker pull destinyobs/ictg_task-backend:latest
docker pull destinyobs/ictg_task-frontend:latest
3️⃣ Run the application using Docker:
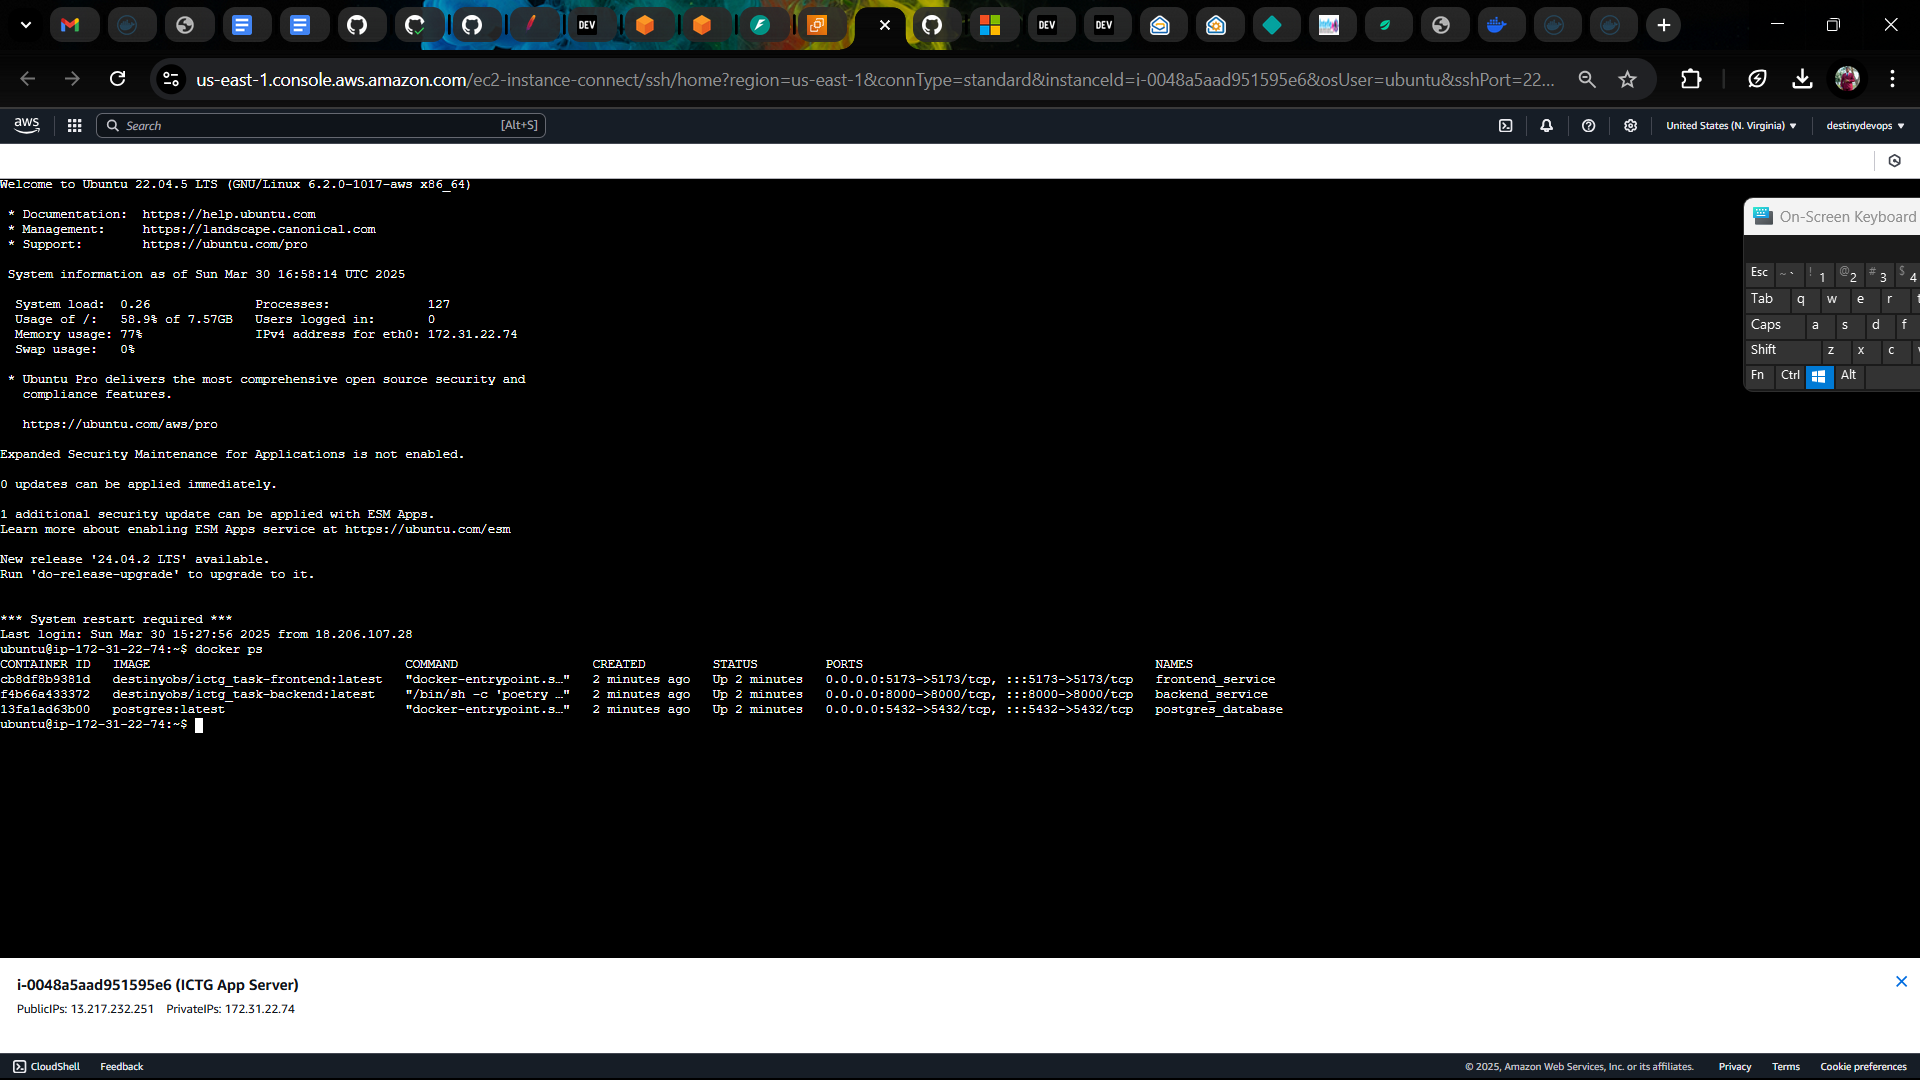
docker-compose up -d🎯 4. Verifying the Deployment
Once deployed, test the setup:
✅ Backend:
curl -X GET http://:8000/healthExpected Response: { "status": "ok" }
✅ Frontend: Open http://:5173 in a browser.
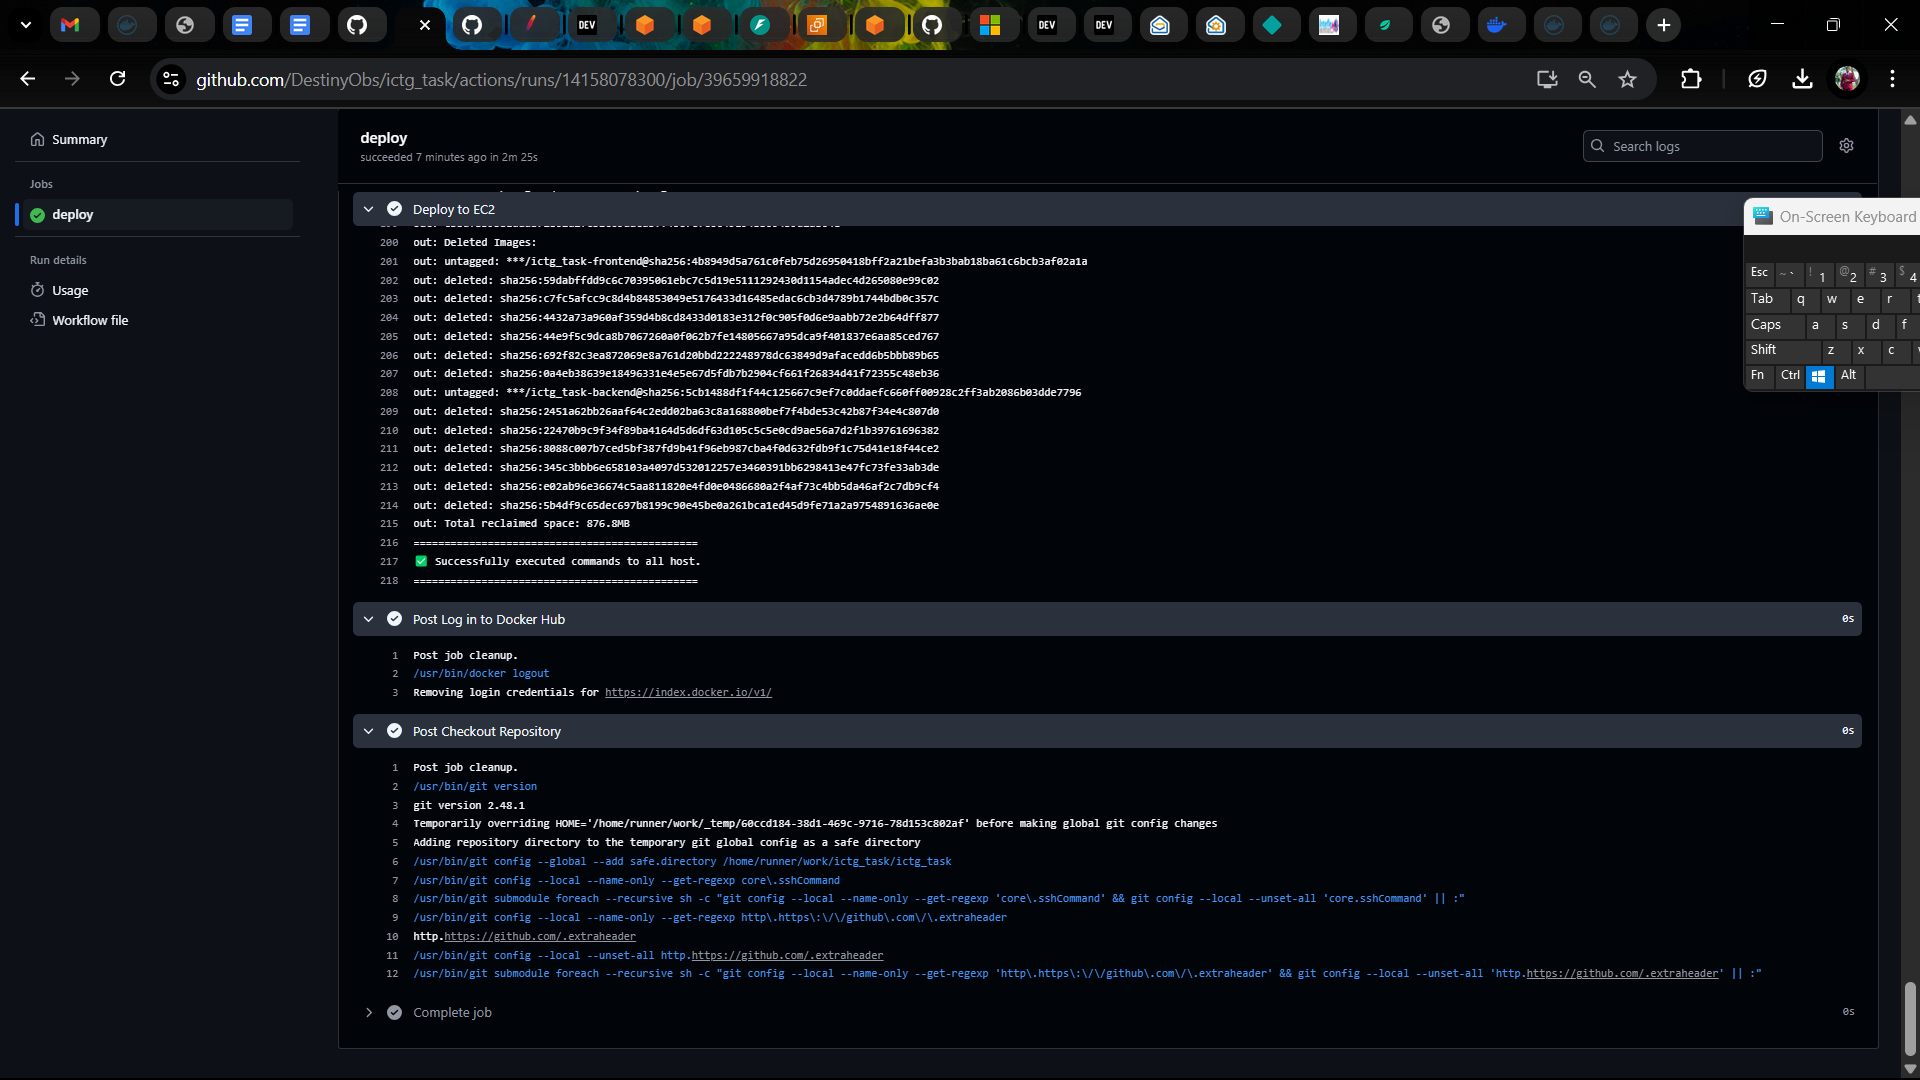
🪔 3. CI/CD Pipeline Setup for EC2 Deployment Using GitHub Actions
To streamline the deployment process of our application to an AWS EC2 instance, we leverage GitHub Actions. This setup ensures that every push to the main branch triggers an automated build and deployment of our backend and frontend applications.
Workflow Overview
This GitHub Actions workflow:
✅ Triggers on every push to the main branch.
✅ Builds Docker images for the frontend and backend.
✅ Pushes the images to Docker Hub.
✅ Connects to the EC2 instance via SSH.
✅ Deploys the updated containers automatically.
Workflow Breakdown
1. Define the Workflow
name: Deploy to EC2

on:
  push:
    branches:
      - main
This triggers the workflow when a push occurs on the main branch.
2. Define the Deployment Job
jobs:
  deploy:
    runs-on: ubuntu-latest
Defines a job called deploy that runs on an Ubuntu-based GitHub Actions runner.
3. Checkout the Repository
steps:
  - name: Checkout Repository
    uses: actions/checkout@v3
Fetches the repository code for further processing.
4. Authenticate with Docker Hub
- name: Log in to Docker Hub
    uses: docker/login-action@v2
    with:
      username: ${{ secrets.DOCKER_USERNAME }}
      password: ${{ secrets.DOCKER_PASSWORD }}
Logs into Docker Hub securely using GitHub Secrets.
5. Build and Push Docker Images
- name: Build and Push Backend Image
    run: |
      docker build -t ${{ secrets.DOCKER_USERNAME }}/ictg_task-backend:latest ./backend
      docker push ${{ secrets.DOCKER_USERNAME }}/ictg_task-backend:latest

  - name: Build and Push Frontend Image
    run: |
      docker build -t ${{ secrets.DOCKER_USERNAME }}/ictg_task-frontend:latest ./frontend
      docker push ${{ secrets.DOCKER_USERNAME }}/ictg_task-frontend:latest
Builds and pushes Docker images for both the backend and frontend.
6. Connect to EC2 and Deploy Containers
- name: Deploy to EC2
    uses: appleboy/[email protected]
    with:
      host: ${{ secrets.EC2_HOST }}
      username: ${{ secrets.EC2_USER }}
      key: ${{ secrets.EC2_PRIVATE_KEY }}
      script: |
Securely connects to the EC2 instance using SSH.
7. Remove Old Containers
docker stop backend_service frontend_service postgres_database || true
        docker rm backend_service frontend_service postgres_database || true
Stops and removes any existing containers to prevent conflicts.
8. Pull the Latest Docker Images
docker pull ${{ secrets.DOCKER_USERNAME }}/ictg_task-backend:latest
        docker pull ${{ secrets.DOCKER_USERNAME }}/ictg_task-frontend:latest
Retrieves the latest versions of the images from Docker Hub.
9. Ensure Docker Network Exists
docker network inspect devops-network >/dev/null 2>&1 || docker network create devops-networkChecks for the network and creates it if missing.
10. Run PostgreSQL Container
docker run -d \
          --name postgres_database \
          --network devops-network \
          -e POSTGRES_USER=app \
          -e POSTGRES_PASSWORD=${{ secrets.POSTGRES_PASSWORD }} \
          -e POSTGRES_DB=ictg_db \
          -p 5432:5432 \
          --restart unless-stopped \
          postgres:latest
Ensures the database container runs with the correct configurations.
11. Ensure PostgreSQL Readiness
retries=10
        until docker exec postgres_database pg_isready -U app || [ $retries -eq 0 ]; do
          echo "Waiting for PostgreSQL to be ready..."
          sleep 5
          retries=$((retries - 1))
        done
        if [ $retries -eq 0 ]; then
          echo "PostgreSQL failed to start." >&2
          exit 1
        fi
Waits for PostgreSQL to be fully initialized.
12. Run Backend and Frontend Services
docker run -d \
          --name backend_service \
          --network devops-network \
          -e DATABASE_URL="postgresql://app:${{ secrets.POSTGRES_PASSWORD }}@postgres_database:5432/ictg_db" \
          -p 8000:8000 \
          --restart unless-stopped \
          ${{ secrets.DOCKER_USERNAME }}/ictg_task-backend:latest

        docker run -d \
          --name frontend_service \
          --network devops-network \
          -p 5173:5173 \
          --restart unless-stopped \
          ${{ secrets.DOCKER_USERNAME }}/ictg_task-frontend:latest
Deploys the backend and frontend services.
13. Clean Up Unused Docker Resources
docker system prune -afFrees up disk space by removing unused containers and images.
Security Considerations
✅ Secrets Management: All sensitive credentials are stored securely in GitHub Secrets.
✅ Access Restrictions: The EC2 Security Group is configured to allow only necessary traffic.
✅ Database Security: PostgreSQL password is stored securely and not hardcoded.
Why This Setup?
✅ Fully Automated Deployment – Code push triggers deployment.
✅ Zero Downtime – Smooth updates without disruptions.
✅ Security First – No hardcoded credentials.
✅ Efficient Resource Management – Cleanup ensures optimal performance.
Conclusion & Next Steps
Summary of Achievements
We successfully automated the deployment of a full-stack application using Terraform, Docker, and GitHub Actions. The key milestones included:
🔹 Infrastructure Setup – Provisioned an AWS EC2 instance using Terraform.
🔹 Containerization – Dockerized backend, frontend, and database services.
🔹 CI/CD Pipeline – Automated build and deployment using GitHub Actions.
🔹 Automated Deployment – Utilized SSH actions to update containers smoothly.
Potential Improvements
🚀 Enhanced Security: Implement IAM roles, security best practices, and database access restrictions.
🚀 Automated Scaling: Leverage AWS Auto Scaling and Load Balancing.
🚀 Monitoring & Logging: Integrate Prometheus, Grafana, and centralized logging.
🚀 Infrastructure as Code Refinement: Use remote state management (S3) and modularized configurations.
🚀 Nginx Reverse Proxy & SSL: Implement Nginx for traffic management and SSL security.
This project provides a strong foundation for continuous deployment and scaling in a DevOps-oriented environment. 🚀
Note: This setup is a foundational approach as I continue expanding my expertise in this field. I hope this guide proves useful to fellow DevOps enthusiasts tackling similar challenges!